


A well-structured navigation menu is fundamental for directing visitors efficiently through your WordPress website, helping them locate information with ease. Whether you are establishing a new site or enhancing the user experience on an existing one, mastering the creation and customization of navigation menus is a crucial skill. WordPress offers an intuitive drag-and-drop menu interface, enabling effortless creation of header menus, dropdown options, and various other navigational structures. Through extensive experience in designing menu styles for diverse platforms, insights have been gained into effective menu types for different businesses, the optimal links and pages to include, and strategies for optimizing navigation to enhance user experience. This comprehensive, step-by-step guide will walk you through the process of adding and configuring a navigation menu in WordPress.
A navigation menu serves as a curated list of links, directing users to key sections of a website. Typically, these menus appear as a horizontal bar of links positioned at the top of every page on a WordPress site. They are instrumental in providing clear structure to your website, thereby assisting visitors in efficiently finding the content they seek. Below is an illustration of how a well-implemented navigation menu can appear on a website.

WordPress simplifies the process of adding both main menus and sub-menus. You have the flexibility to include links to your most crucial pages, specific categories or topics, individual blog posts, and even custom links like your social media profiles or external resources. This versatility ensures that your menu can effectively guide users to all relevant areas of your site.
The precise placement of your menu is largely determined by your chosen WordPress theme. Most themes offer multiple designated locations, allowing you to create various menus tailored for different display areas across your site. For example, a common feature in most WordPress themes is a primary menu, typically located at the top of the page. Additionally, themes might provide options for a secondary menu, a footer menu, or a specialized mobile navigation menu to cater to different devices and user needs. With this understanding, let's explore the steps to create a custom navigation menu within WordPress.
Table of Contents
- Creating Your First Custom Navigation Menu
- Creating Drop-Down Menus in WordPress
- Integrating Categories into WordPress Menus
- Adding Custom Links to Your Navigation Menus
- Editing or Removing Menu Items in WordPress
- Implementing Navigational Menus with the Full Site Editor (FSE)
- Displaying WordPress Menus in Sidebars and Footers
- Advanced Navigation Menu Techniques
- Frequently Asked Questions About WordPress Menus
Creating Your First Custom Navigation Menu
To begin creating a navigation menu, navigate to the Appearance » Menus page within your WordPress admin dashboard. It's important to note that if you only see ‘Appearance » Editor’ and not ‘Appearance » Menus’, your theme likely supports Full Site Editing (FSE). In such cases, you can refer to the dedicated section below on implementing navigational menus with the Full Site Editor.
Upon reaching the Menus page, you will be prompted to provide a name for your new menu, such as ‘Main Navigation’ or ‘Footer Menu’. After entering a descriptive name, click the ‘Create Menu’ button. This action will expand the menu configuration area, presenting you with options to populate your menu.
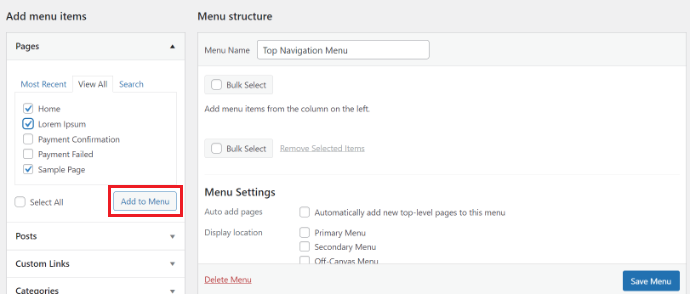
Subsequently, you can select the pages you wish to include in your menu. WordPress offers the flexibility to automatically add all new top-level pages or you can meticulously choose specific pages from the left-hand column. To view all available pages, first click the ‘View All’ tab. Then, check the box adjacent to each of the pages you intend to add to your menu, and finalize your selection by clicking the ‘Add to Menu’ button.
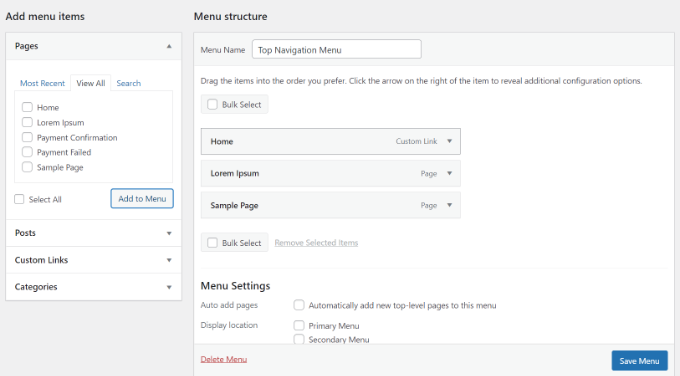
After your desired pages have been added, you gain full control over their arrangement within the ‘Menu Structure’ section. Simply drag and drop menu items to reposition them, allowing you to easily adjust their order and hierarchy to best suit your site’s navigation flow.
Important Note: While menu items are displayed in a vertical, top-to-bottom list within the menu editor, their live presentation on your website—whether vertical or horizontal, left-to-right—will depend entirely on the specific location you choose for the menu to be displayed, as determined by your theme’s design.
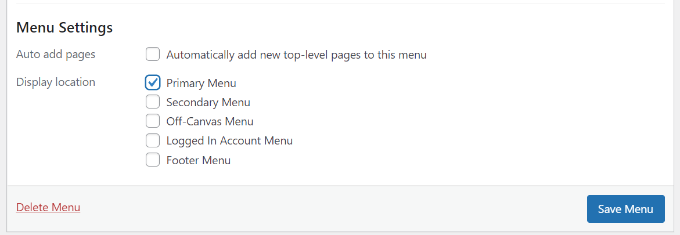
Most themes provide multiple distinct locations where you can assign your newly created menus. For instance, a popular theme might offer five different display locations. Once you have added and arranged your pages within the menu, the next step is to select the desired display location from the available options. After making your selection, click the ‘Save Menu’ button to apply your changes and make the menu live on your site.
Tip: If you are uncertain about where each menu location is positioned on your site, a practical approach is to save the menu in various locations one by one. After each save, visit your website to observe how the menu appears. While it’s unlikely you’ll utilize every available location, it’s common to use more than one to serve different navigational purposes across your site. For instance, you might consider creating a vertical navigation menu for specific sections.
Here is an example of a completed navigation menu displayed on a website:

Creating Drop-Down Menus in WordPress
Drop-down menus, also known as nested menus, are an effective way to organize your site’s navigation by including parent and child menu items. These menus enhance user experience by revealing related child items in a sub-menu when a user hovers their cursor over a parent item.
To establish a submenu, simply drag a desired menu item and place it directly beneath its intended parent item. Then, drag it slightly to the right. This indentation signifies its status as a child item. For example, you can easily create three sub-items under a main ‘Services’ menu entry using this method.
You can even implement multiple layers of dropdowns, allowing a sub-menu to contain its own sub-menu. However, caution is advised as this can sometimes lead to a cluttered appearance and may not be fully supported by all themes. For more comprehensive guidance, you can refer to resources on how to create effective dropdown menus in WordPress.
Below is an illustration of a functional sub-menu as it would appear on a live demonstration site:
Integrating Categories into WordPress Menus
For websites operating as a blog, incorporating your blog categories as a dropdown within your WordPress navigation menu is a highly recommended practice. This strategy, commonly employed by many content-rich sites, allows for clear organization of topics such as news, themes, tutorials, and other content types.
Adding categories to your menu is straightforward. Access the ‘Categories’ tab located on the left side of the menu screen. If not all categories are visible, ensure you click the ‘View All’ tab. Proceed by selecting the desired categories you wish to include, then click the ‘Add to Menu’ button. Initially, these categories will appear as standard menu items at the bottom of your current menu structure.
Once added, you can effortlessly reposition them by dragging and dropping them into their appropriate locations. A common arrangement involves nesting these categories under a primary ‘Blog’ or ‘Topics’ menu item, creating an organized and user-friendly hierarchy.
For more detailed guidance, resources are available on how to effectively add and manage topics within your WordPress navigation menus. The following image illustrates how various categories are presented within a navigational menu on a demonstration website:
Adding Custom Links to Your Navigation Menus
Beyond standard pages and categories, WordPress offers immense flexibility by allowing you to incorporate custom links into your navigation menu. This feature is particularly useful for linking to external resources such as your social media profiles, an online store, or other affiliated websites.
To implement a custom link, navigate to the ‘Custom Links’ tab on the Menu screen. Here, you will input the desired URL (the link) and the corresponding link text that will appear in your menu. After entering both pieces of information, click the ‘Add to Menu’ button. This functionality also opens up creative possibilities, such as adding visual social media icons or strategically placed call-to-action buttons to enhance user engagement and drive conversions.
Editing or Removing Menu Items in WordPress
By default, when you add pages or categories to your custom navigation menu, WordPress utilizes their respective titles or names as the displayed link text. However, you have the option to easily modify this text to better suit your navigational strategy or branding.
To edit any menu item, simply click on the downward arrow icon positioned next to it. This action will reveal options to change the menu item’s name or 'Navigation Label'. If you wish to entirely remove a link from your menu, you can click the ‘Remove’ button. For users who prefer an alternative to the drag-and-drop method, menu items can also be repositioned by clicking on the dedicated ‘Move’ links provided.
Implementing Navigational Menus with the Full Site Editor (FSE)
The innovative Full Site Editor (FSE) provides a modern approach to customizing WordPress themes directly through the block editor. Introduced with WordPress 5.9, this editor empowers users to integrate various blocks into their templates, facilitating the creation of truly unique designs.
To add a navigation menu using the Full Site Editor, begin by navigating to Appearance » Editor from your WordPress dashboard. For this demonstration, we will consider a default theme such as Twenty Twenty-Three. For further insights into suitable themes, resources on the best full site editing themes are available.
Once inside the editor interface, locate and click on the ‘Navigation’ tab to expand its options. This action will reveal new settings within the left-hand column. From there, proceed by clicking the ‘Edit’ icon situated at the top.
This will activate the full site editor on your screen, where you can then click the ‘+’ icon to introduce a new navigation menu item. A prompt will appear, offering a dropdown menu from which you can select an option. Should you wish to add a custom link, you can input a specific label and URL for the navigation menu item directly within the block panel. Additionally, the editor supports integrating functionalities like a search option directly into your menu.
After successfully adding an item, transition to the ‘Styles’ tab located in the right-hand column. Here, you gain control over a range of aesthetic properties for your menu items, including typography, overall appearance, height, spacing, letter case, and text decoration. The editor also facilitates the creation of submenus through a dedicated icon in the block toolbar.
Upon completing your modifications, it's advisable to preview the changes to observe the menu's appearance in real-time on your site. Finally, remember to click the ‘Save’ button at the top to secure all your updates.
Displaying WordPress Menus in Sidebars and Footers
Your menu placement options are not limited to the pre-defined display locations offered by your theme. WordPress allows you to integrate navigation menus into any widget-enabled area, such as your website's sidebar or footer.
To do this, navigate to Appearance » Widgets. From there, click the ‘Add Block’ (+) button at the top of the screen and search for and add the ‘Navigation Menu’ widget block to your desired widget area, such as the sidebar. Once the widget is in place, you can assign a title to it and select the appropriate menu from the ‘Select Menu’ dropdown list. After configuring these settings, simply click the ‘Update’ button to save your changes and display the menu in the chosen widget area.
For example, a custom footer menu can significantly enhance site navigation, providing easy access to important links from the bottom of every page.
Advanced Navigation Menu Techniques
For websites requiring extensive navigational structures, such as those with a multitude of pages and categories, advanced menu techniques can be highly beneficial. One such powerful method is the implementation of a mega menu.
Mega menus are sophisticated dropdowns capable of displaying a large number of items simultaneously, often organized into multiple columns and sometimes incorporating rich media like images. This approach is particularly well-suited for substantial websites, including large online stores, comprehensive news portals, or extensive corporate sites. Many prominent organizations and e-commerce platforms utilize mega menus to provide a highly organized and accessible navigation experience for their users.
Frequently Asked Questions About WordPress Menus
1. How do I add a homepage link to a WordPress menu?
To include your website's homepage in a navigation menu, first navigate to the ‘Pages’ section within the menu editor. Click on the ‘View All’ tab to display all available pages, where you should clearly see your homepage listed. Check the box located next to ‘Home’ and then click ‘Add to Menu’. Always remember to save your changes to ensure the homepage link is successfully integrated into your navigation.
2. How do I add multiple navigation menus in WordPress?
WordPress offers the flexibility to create an unlimited number of navigation menus. Once you have created your desired menus by following the steps outlined in this guide, the next step is to assign them to specific display locations on your website. To do this, click on the ‘Manage Locations’ tab within the menu interface.
From the ‘Manage Locations’ tab, you can easily select which menu you wish to display in each of the available menu locations provided by your active theme. If your current theme does not offer a sufficient number of menu locations, there are resources available that demonstrate how to add custom navigation menus to WordPress themes, further expanding your site's organizational capabilities.
