


Adding a contact form to your WordPress website is an essential step for effective communication. It provides a straightforward channel for customers to connect with you, while also serving as an invaluable tool for collecting email addresses and generating leads to expand your subscriber base.
This comprehensive tutorial will guide you through the process of effortlessly creating a WordPress contact form, completely code-free.
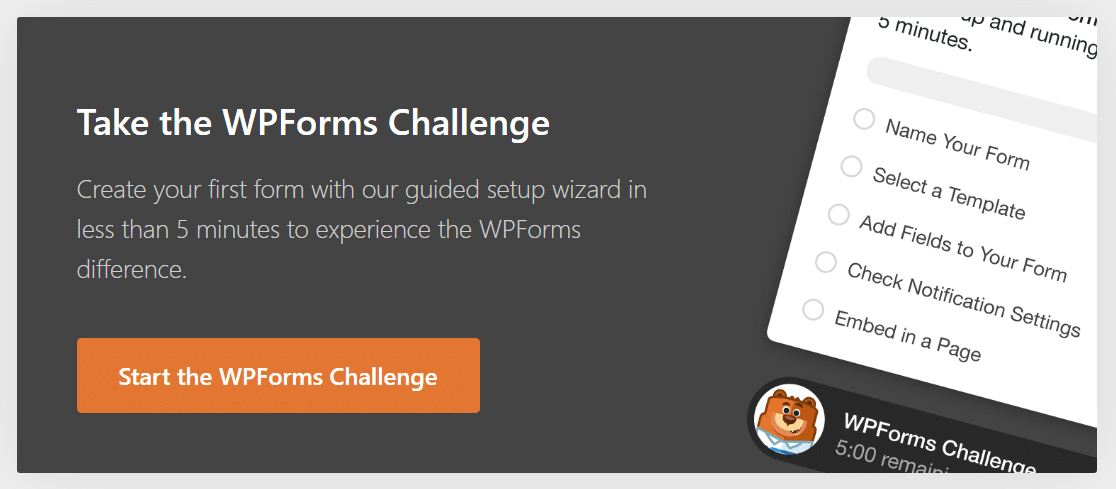
To demonstrate the simplicity of creating a contact form in WordPress, an intuitive setup wizard is often provided. This user-friendly wizard guides you through each step of creating your initial form, a process designed to be completed in just a few minutes, often even faster. This introductory experience is designed for new users and typically appears only during the first form creation, making the onboarding process engaging and efficient.
Ready to begin? Let's dive into the steps.
Step 1: Install a Form Builder Plugin
The first crucial step is to install and activate a robust form builder plugin. This type of plugin is recognized as a leading WordPress form solution and is ideal for constructing various forms, including contact forms.
For more details on this process, you can consult a step-by-step guide on how to install a plugin in WordPress.
Once activated, you will typically see a setup wizard or a guided tour offering to help you create your first form. By completing this guided process, you'll have your initial form ready and will be well on your way to creating a functional "Contact Us" page on your WordPress site.
Clicking "Start the Challenge" or a similar button will initiate the setup, guiding you through the process.
Step 2: Select the Simple Contact Form Template
After initiating the setup, you will be directed to the form configuration screen. Here, you can assign a name to your new form and choose from a wide array of pre-designed form templates to streamline your creation process. These templates cater to various needs, including customer service, marketing, and diverse business functions, as well as nonprofit organizations.
Clicking "Let's Go" or a similar button will allow you to proceed.
The initial phase of the setup involves naming your form. Provide a suitable name and confirm to advance to the next stage. A timer might even count down, adding an element of fun as you build your form.
Next, you’ll decide whether to select a pre-designed template or opt for a blank template if you prefer to build your form from scratch. For a contact form, selecting the Simple Contact Form template is the most efficient choice.
As soon as you choose the required template, the form builder will load a basic contact form template, making it ready for your customizations.
This is the environment where you can tailor your contact form by adding new fields, removing existing ones, or modifying their settings to suit your specific requirements.
Step 3: Customize Your Contact Form
Once you are within the form builder, an instructional message may appear, guiding you on the next steps. Customizing form fields in WordPress is remarkably simple using an intuitive drag-and-drop form builder.
You can effortlessly add new fields to your contact form by dragging them from a panel on one side and dropping them onto the form preview on the other. To make changes to an existing field, simply click on it. The order of fields on your form can also be easily rearranged by dragging and dropping them into a new position.
It is generally advisable to keep your contact form as straightforward as possible to encourage completion. However, you have the flexibility to include any additional fields as needed. For example, you can add an honorific field to your form, as well as more advanced options such as conditional logic, file upload capabilities, payment fields (for services like PayPal, Stripe, and others), checkboxes, and many other extra features available in the premium version of the plugin.
When you have completed customizing your form to your satisfaction, click "Done" or a similar button to save your changes.
Step 4: Configure Contact Form Notification Settings
The subsequent step in the form creation process involves configuring your form's notification settings.
Form notifications are typically enabled by default for each form you create. These are usually set up to be sent to the administrator's email address, providing full details of each submission as it occurs.
However, you might also want to send email notifications to the individual who submitted the form. This is easily managed; with a versatile form builder, you can create multiple form notifications and dispatch them to various members of your team, as well as to your customers, upon form submission.
Furthermore, if you aim to maintain consistent branding across all your emails, you can explore guides on adding a custom header to your email template.
Once your form's notifications are properly configured, click "Done" or a similar button to finalize these settings.
Step 5: Embed Your Simple Contact Form on a WordPress Page
You are now ready to integrate a "Contact Us" page into your WordPress website. The embedding functionality is designed to be very beginner-friendly, often not requiring direct use of shortcodes.
To begin, click on the "Embed" button, typically located at the top of the form builder.
You will then likely be presented with options such as "Select Existing Page" or "Create New Page." For this guide, let's proceed by creating a new page.
Next, you will need to input a name for your page. A common choice is "Contact" or "Contact Us."
The form builder will then place your form directly onto the newly created page. Within this interface, you can also style your form fields, labels, and submit buttons using simple color pickers and style settings. For more detailed instructions, refer to guides on styling contact forms.
Crucially, do not forget to click "Publish" or a similar button for your form to go live and be accessible on your website.
Upon completion, you may even see a display of the time it took to create your form, usually at the bottom-right of the screen.
You also have the option to embed your contact form in the sidebar of your site, offering another convenient location for visitors to reach out.
And there you have it! You now possess the knowledge to create a simple and effective WordPress contact form.
FAQs on Simple Contact Forms
Below are some frequently asked questions regarding simple contact forms in WordPress, providing additional information to enhance your understanding.
What are the benefits of using a contact form in WordPress?
A contact form on your website offers an accessible and secure channel for your visitors to submit inquiries, lodge complaints, share suggestions, or provide valuable feedback.
- Efficient communication — Contact forms streamline the communication process, allowing your audience to connect with you swiftly and directly.
- Enhanced security — They safeguard your email address from spammers. Since your contact form does not display your actual email address publicly, it prevents spambots from harvesting it and adding it to undesirable junk mail lists.
- Superior organization — A contact form can be integrated with your email marketing service for even greater simplicity, enabling the automation of marketing efforts or even connecting your form with platforms like Google Sheets to automatically save entries in a spreadsheet for easy management.
Is there a built-in contact form feature in WordPress?
No, the core WordPress.org platform does not come with a native, built-in contact form feature. To create your contact form, you will need to utilize a dedicated plugin. Installing such a plugin is typically a quick and straightforward process, and often, you can get started with a basic contact form using a free version without requiring a paid license.
What are the essential fields to include in a contact form?
A contact form should ideally be kept as simple as possible, comprising only the most essential fields such as Name, Email, and Message. Many form builder templates, like a "Simple Contact Form" template, will include these fundamental fields by default, meaning you often won't need to manually adjust anything to have a well-optimized and straightforward contact form.
Is it possible to track and manage contact form submissions?
Absolutely! Most WordPress form plugins incorporate a dedicated dashboard within your WordPress site where you can conveniently view, track, and manage all submissions received through your contact forms. In the free version of many plugins, you will typically receive email notifications for every new submission. For the ability to store all submissions directly on your website and access more advanced management features, upgrading to a premium version is usually required.
How can I backup and export contact form data for safekeeping?
One of the most effective methods for maintaining an external backup of your contact form data is by integrating your form with a spreadsheet service, such as Google Sheets. The premium versions of many form builders offer native integrations that allow you to connect any WordPress form to Google Sheets, ensuring that the data you collect is automatically appended to your spreadsheet. This integration also provides the significant advantage of being updated in real-time with every new submission.
Alternatively, you can manually export your contact form data using the plugin's features; however, this will only capture information up to the moment of the export. For continuous and automatic backup, integrating your form with Google Sheets or a similar service is highly recommended.
