


Regardless of your technical expertise or experience with WordPress, unforeseen issues can arise, ranging from user errors to security compromises through plugin vulnerabilities. When faced with such challenges, restoring your WordPress site from a backup often presents the quickest and most straightforward solution. This guide will walk you through various effective methods for restoring your WordPress site, enabling you to get your website back online in a timely manner. Understanding these restoration processes is crucial for maintaining the stability and availability of your online presence.
Understanding How WordPress Backups Work
Before delving into the restoration process, it's important to understand the fundamental components of a WordPress backup. A standard backup typically includes your website’s files and its MySQL database. However, the specifics of a WordPress backup can vary significantly depending on the method or tool used to create it.
WordPress Backup Plugins
When utilizing a WordPress backup plugin, you often have the flexibility to select which parts of your site to back up. Many plugins allow you to primarily retain your /wp-content/uploads/ directory and your database, and sometimes your themes and plugins folders, to conserve disk space. The database holds all your critical content and settings, while the uploads folder contains essential files like images from your media library that would otherwise be difficult to recover. Themes and plugins, though important, can usually be easily reinstalled if needed. Most advanced backup plugins offer comprehensive options, but also allow for more limited selections to optimize storage.
For optimal efficiency, it is highly recommended to use backup plugins that support incremental backups. This means that after an initial full site backup, the system only stores the changes made to your site since the last backup. This method dramatically reduces disk space consumption and minimizes the performance impact on your server, as it avoids repeatedly backing up unchanged files.
One-Click Restore Points with WordPress Hosts
If your hosting provider offers WordPress backups, these are frequently structured as site snapshots, akin to a system restore point on a computer. Many managed WordPress hosting services provide a convenient one-click restoration option, allowing you to revert your site to a previous state. This method is often the simplest and most efficient way to recover your website.
Hosting providers typically offer various types of backups, designed to provide comprehensive data protection:
- Automatic backups: These are regularly scheduled backups, often taken every 24 hours and retained for a specific duration.
- Manual backup restore points: Users can create these on demand at any time, providing flexibility for pre-update or pre-change safeguards.
- System-generated backups: These are automatically created when significant actions or tasks are performed within the hosting environment, ensuring critical operations are covered.
- Full downloadable backups: These are complete archive files (typically .zip) that encompass your entire WordPress site, including all website files and the SQL database.
- External backups: Some providers allow configuration for automatic backups to be stored on off-site cloud storage solutions, enhancing data redundancy and disaster recovery capabilities.
- Frequent backups (e.g., 6-hourly or hourly): For dynamic websites with frequent changes, such as e-commerce platforms or membership sites, more frequent backup options are often available to minimize data loss between intervals.
Beyond standard backups, many advanced hosting infrastructures incorporate persistent disk snapshots. These snapshots capture the state of the entire machine hosting your website at regular intervals. They are often stored redundantly across multiple physical locations, sometimes in different data centers from the original server. This distributed storage, coupled with automatic checksums, helps ensure the integrity and availability of your data, offering an additional layer of security against data loss. When choosing a hosting provider, prioritizing one that offers such robust backup and infrastructure features can provide significant peace of mind and proves invaluable compared to relying solely on third-party backup plugins or manual solutions. It is also beneficial when backup storage does not count towards your total disk space usage.
Restore WordPress from Backup via Your Hosting Dashboard
Many hosting providers offer a streamlined process to restore your WordPress site from various types of backups (automatic, manual, or system-generated) directly through their control panel or dashboard. Each backup typically represents a complete snapshot of your environment’s files, database, redirects, and server configurations at the moment it was created. Restoring a backup will revert all changes to these elements to that specific point in time.
Step 1
First, log in to your hosting provider's control panel or dashboard. Navigate to the section dedicated to your WordPress sites, and then select the specific site for which you need to restore a backup.

Selecting a WordPress site in your hosting dashboard.
Step 2
Locate the Backups tab within your site's management interface. Here, you will typically find a list of available backup options, which may include daily, hourly, manual, system-generated, external, and full downloadable backups. For this illustration, we will assume the use of automatic daily backups. To initiate a restore, simply click the "Restore to" button adjacent to the backup point you wish to use. Selecting the "Live" option will overwrite your production site with the chosen backup.

Restoring a WordPress backup to a live environment.
Step 3
You will then be prompted to confirm the backup restoration by entering your site name. Be aware that this action will overwrite your live environment. After confirming, click on "Restore backup."

Confirm WordPress backup restoration.
The restoration process may take a few minutes, depending on the size of your website. During this time, access to your WordPress site's admin dashboard may be temporarily unavailable. You can typically navigate away from the restoration screen within your hosting dashboard, as you will be notified once the process is complete.

WordPress backup restoration in progress.
Once the restoration is finished, you can access your WordPress site's admin dashboard. It's common practice for a new backup to be automatically generated immediately prior to a restoration, reflecting the state of your website just before the restore. This provides a convenient undo point if you need to revert the restoration.
Restore WordPress from Backup to a Staging Environment
Many hosting providers also offer the capability to restore a WordPress backup directly to a staging environment. This feature provides significant advantages for website management and development:
- It facilitates a smoother and more flexible development workflow, allowing for testing without affecting your live site.
- You can safely review a previous version of your website and assess its functionality without making any changes to your production site.
- It enables you to recover specific information or assets from an older backup without the risk of altering your live website's current state.
Step 1
The process for restoring a WordPress backup to a staging environment is largely similar to restoring it to live. Navigate to your backups section and click the "Restore to" button next to the backup you wish to use. This time, choose the "Staging" option, which will push your selected backup to the staging environment.

Restore WordPress from backup and push to staging environment.
Step 2
You will then be asked to confirm the backup restoration by entering your site name. This action will overwrite your current staging environment if one exists; otherwise, a new staging environment will be created. Proceed by clicking on "Restore backup."

Confirm WordPress backup restoration to staging environment.
The time required for this process will vary based on your site's size. Once complete, you can access your staging site, which now operates in its own dedicated environment, entirely separate from your live website. Staging sites, much like backups, typically do not count against your hosting plan’s disk space allocation.
Restore WordPress from Backup with a Plugin
Another effective method for restoring your WordPress site is by utilizing a dedicated backup plugin. It is highly recommended to choose plugins that support incremental backups. An incremental backup system is designed to only create backups when changes have been detected in your site’s files and database tables. This approach significantly enhances site performance and prevents the accumulation of numerous redundant backup files on your server. An ideal backup plugin will intelligently scan for recent changes, skipping new backups if no modifications have occurred. Examples of reliable backup plugins include WP Time Capsule, VaultPress, ManageWP, and BlogVault.
For the purpose of illustrating this method, we will refer to a common plugin-based restoration process. This type of plugin typically offers both incremental backups and restores, which means it optimizes performance by avoiding unnecessary file copying during backups and only selecting the specific files required for a restoration. Assuming you have already configured and performed a backup using such a plugin, the following steps outline a general restoration procedure. If you need guidance on initial setup, consult the plugin's documentation.

A typical WordPress backup plugin interface.
Step 1
Log in to your WordPress dashboard. Locate the section for your backup plugin (e.g., "WP Time Capsule" then "Backups") and select a desired restore point from the available calendar interface. In situations where your WordPress admin dashboard is inaccessible, many plugins provide alternative methods for restoring a downed site, usually involving direct file access.

Selecting a plugin restore point.
Step 2
Then, proceed to click on the option to "Restore site to this point." Many advanced plugins also offer the capability to restore to their own built-in staging solutions, providing an additional layer of flexibility and safety.

Restoring WordPress from backup using a plugin.
This streamlined process demonstrates how straightforward plugin-based restorations can be.
Restore WordPress Database Backup with phpMyAdmin
There may be instances where a manual database restoration is necessary. The following steps detail how to restore your MySQL database using phpMyAdmin. phpMyAdmin is a widely used, free, open-source web-based tool designed for administering MySQL or MariaDB databases. It facilitates various database operations, including migrations, table and index management, and the execution of SQL statements. This guide assumes you have an existing backup or an exported *.sql file ready for import. If not, you would first need to create a backup of your MySQL database using phpMyAdmin.
Step 1
First, you will need to access phpMyAdmin. Many hosting providers offer a direct link to phpMyAdmin within their control panel or dashboard, often found under a "Database Access" or similar section for your specific site. If you are using cPanel, phpMyAdmin is typically located under the Databases section.
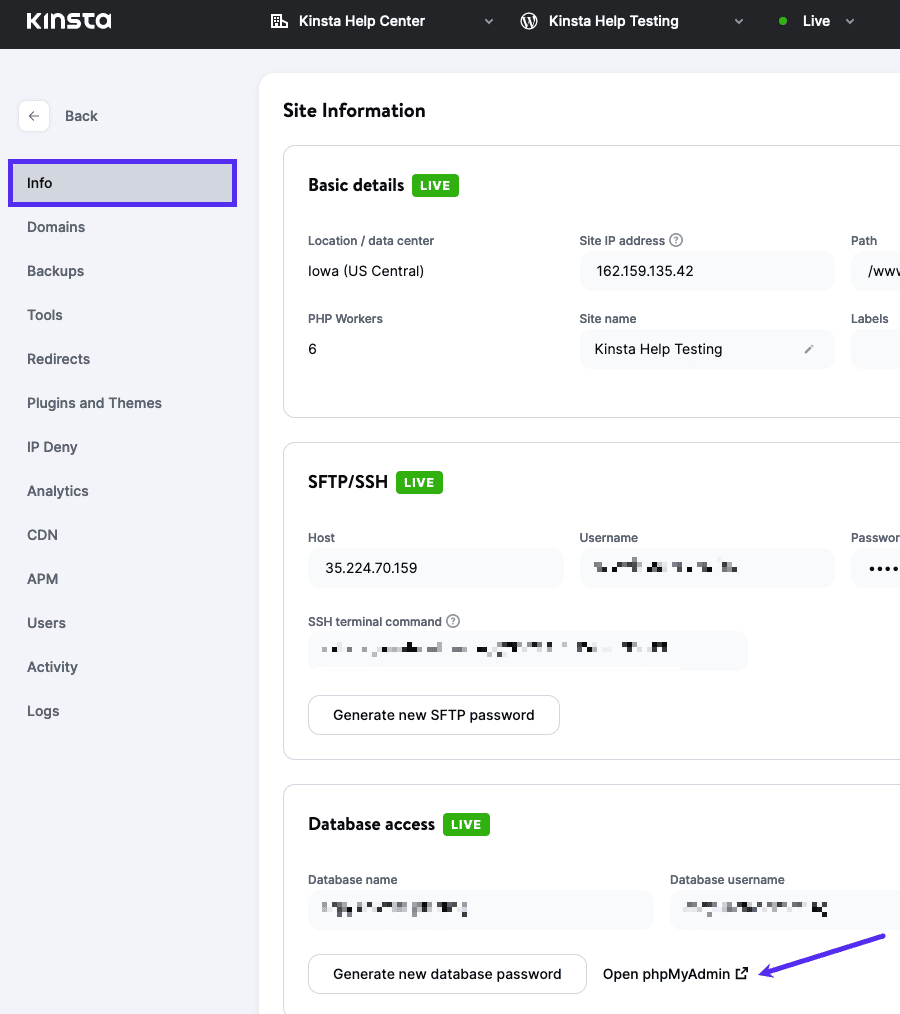
Opening phpMyAdmin from a hosting dashboard.
Note: The exact location of phpMyAdmin may vary with different hosting providers. Consult their documentation or support team if you cannot locate it.

cPanel phpMyAdmin interface.
Step 2
Click on your WordPress database. The database name will most likely correspond to the name of your site or be clearly identifiable.

Selecting the WordPress database in phpMyAdmin.
Step 3
Click on the Import tab, and then click on "Choose file." Select your *.sql backup/export file from your local system. After selecting the file, click on "Go" to begin the import process. Important: Importing your *.sql file will overwrite the existing contents of your database. Always ensure you have a current backup before proceeding. If you are uncertain, it is advisable to consult with a developer first.
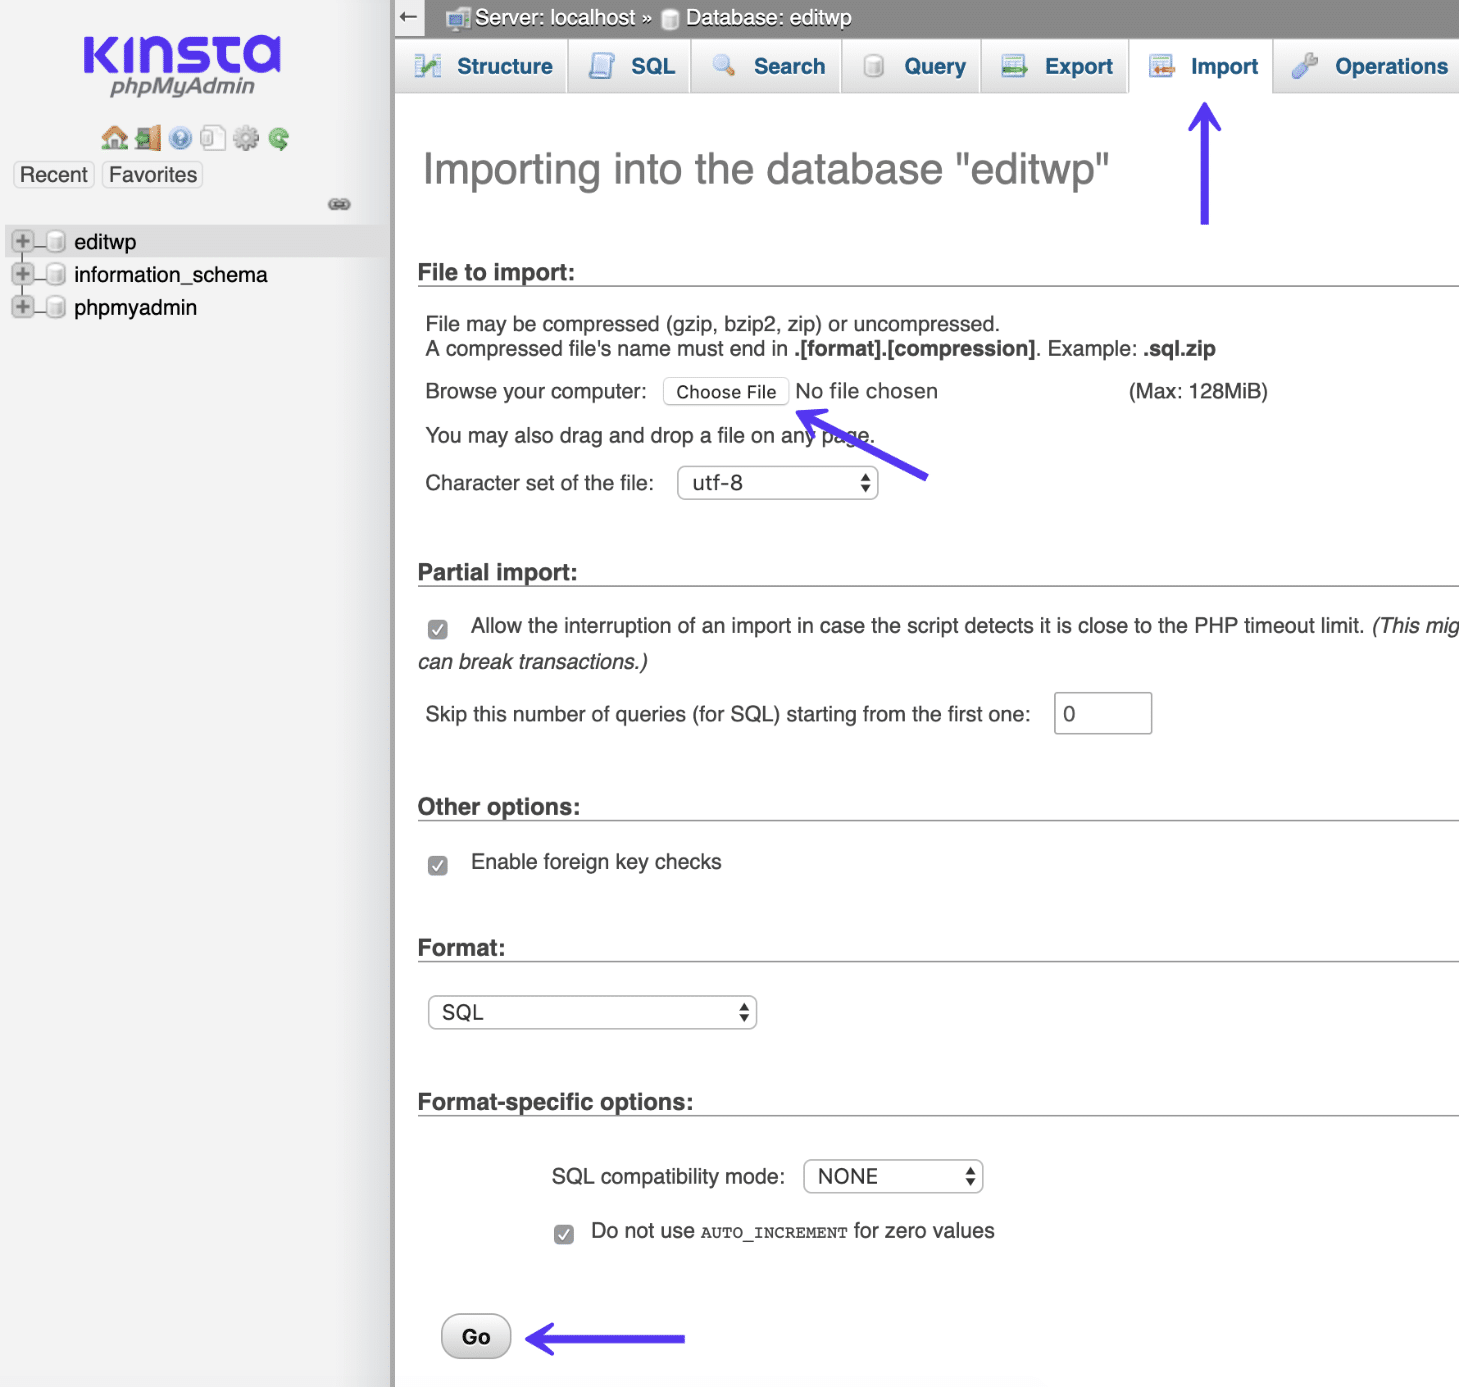
MySQL database import in phpMyAdmin.
Change Your Database Password
If your WordPress site has been compromised, it is highly advisable to reset your MySQL database password. Most hosting control panels provide an option to generate a new database password. When utilizing this feature, your wp-config.php file, if located in the default site root, is often automatically updated to reflect the new credentials. If your wp-config.php file is located elsewhere or not automatically updated, you will need to manually update it with the new password.

Generating a new database password.
Reinstall WordPress Core (Addressing Compromised Plugins/Themes)
Another recommended step, especially after a security incident, is to reinstall the WordPress core files. This process is crucial for ensuring the integrity of your installation and does not affect your content (which is stored in the database) or your specific customizations. The reinstallation can typically be performed in a few ways:
- From the WordPress dashboard, preserving existing content.
- Manually via SFTP, while ensuring existing content remains intact.
- Manually via WP-CLI, also preserving existing content.
If you suspect or confirm the use of compromised (nulled) WordPress plugins or themes, it is imperative to reinstall them using legitimate, official copies obtained directly from their developers. This helps in removing any malicious code that might have been embedded.
Restore WordPress Database Backup with cPanel
If you are utilizing a hosting provider that employs cPanel, you can restore your WordPress database through a similar process. Follow the steps below for cPanel-based database restoration.
Step 1
Log in to your cPanel account. Under the Files section, click on Backup.

cPanel backup interface.
Step 2
Scroll down to the Restore a MySQL database backup section. Click on "Choose File" and select your *.sql backup/export file. Then, click on "Upload" to initiate the restoration.
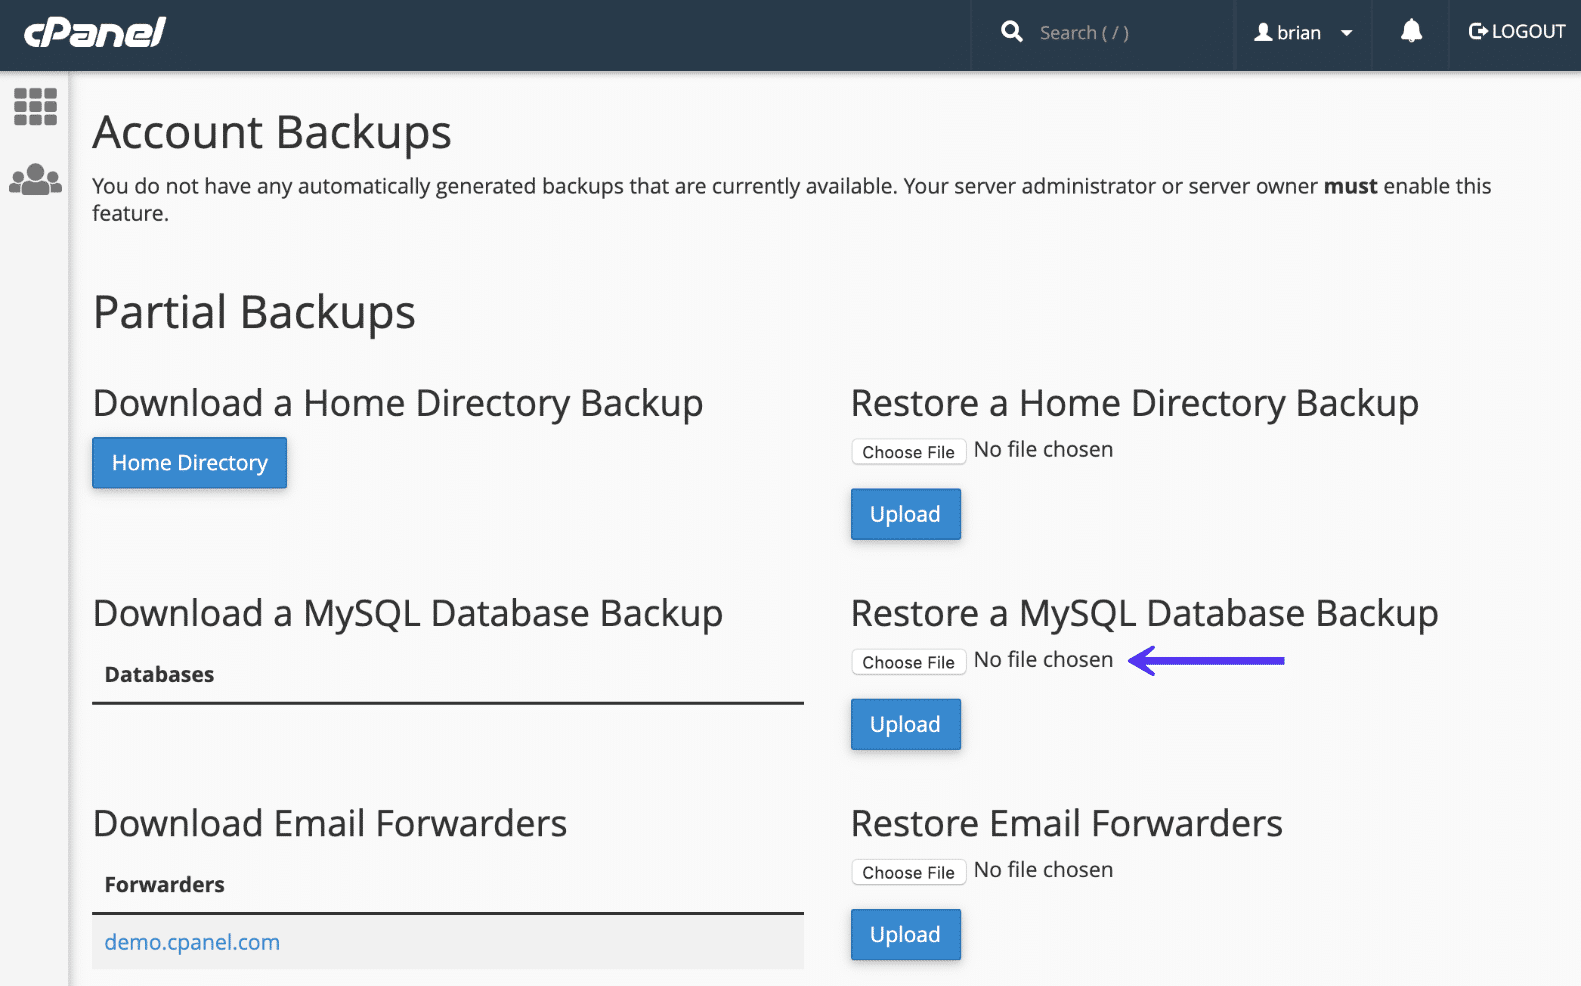
cPanel restore MySQL database backup.
Manually Restore WordPress Files from Dashboard or Using SFTP
Should you encounter an error that prevents access to your WordPress admin dashboard, or if you simply prefer working with SFTP, you can manually restore your WordPress files. This process essentially replicates the automatic reinstallation steps but is performed directly through file transfer protocols. Here’s a quick summary of the steps involved:
Restore WordPress Files from the Dashboard
If you still have access to your WordPress dashboard, this method is straightforward. In your WordPress dashboard, navigate to Dashboard > Updates in the sidebar. Then, click on the "Re-install Now" button.

WordPress dashboard re-install now option.
Upon clicking the button, WordPress will automatically download and reinstall the latest version of its core files. This action effectively re-runs the standard update process that WordPress performs, resulting in a fresh copy of the core installation. The process usually takes a few seconds.
Restore WordPress Files Using SFTP
If you are unable to access the WordPress admin area due to an error, or if you prefer to manage files via SFTP, you can perform a similar restoration process manually. This involves directly duplicating the actions WordPress would otherwise perform automatically. Here’s a quick summary of the steps:
- Download the latest version of WordPress.
- Extract the
.zipfile contents. - Upload everything except the
/wp-content/folder to your server.
Step 1
First, go to WordPress.org and download the most recent stable version of WordPress.
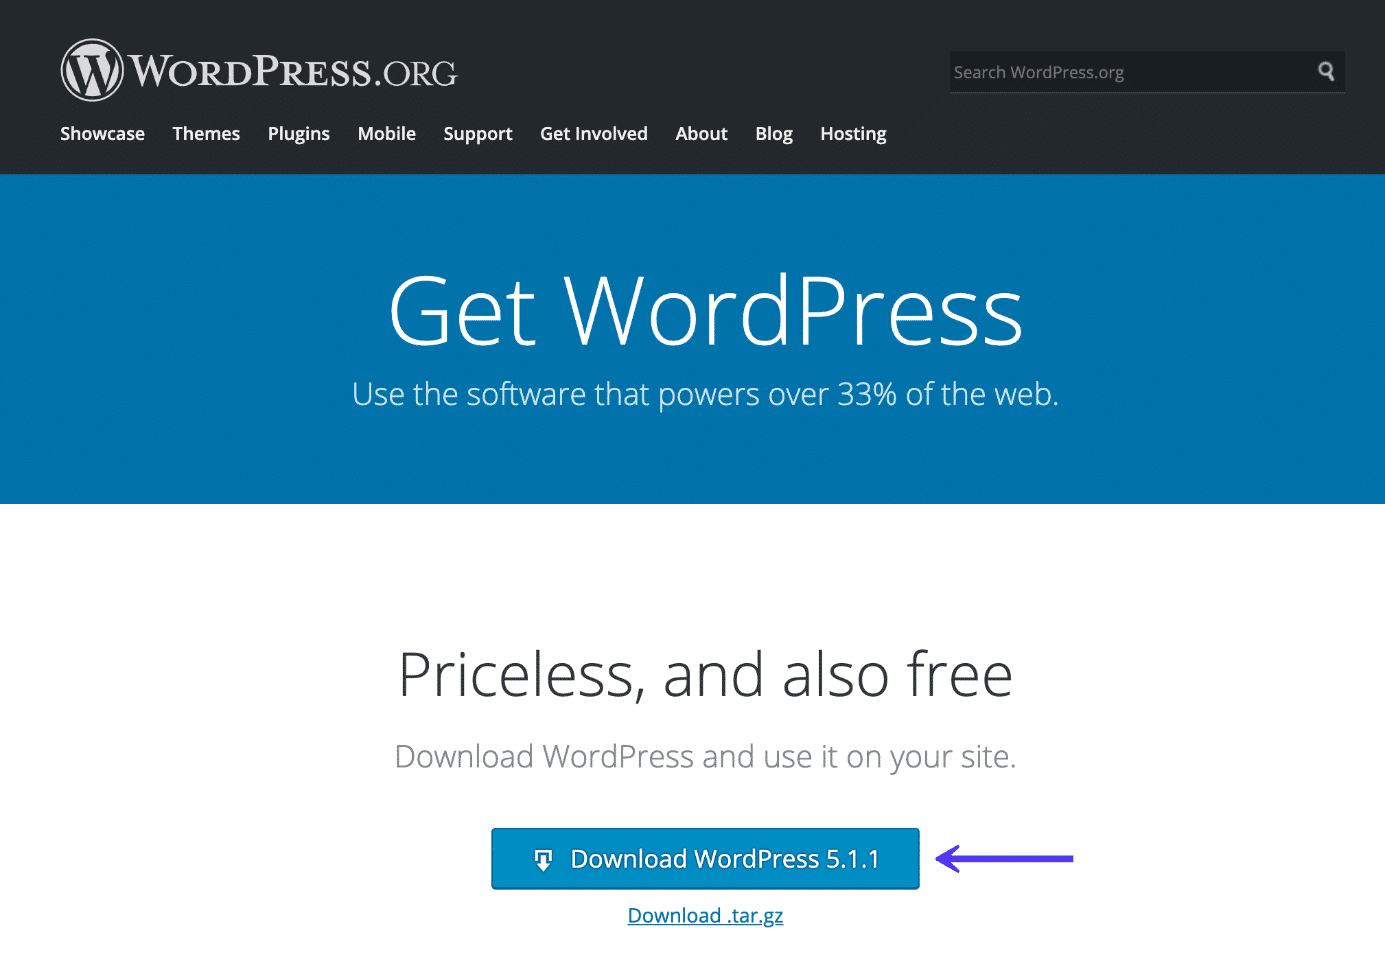
Downloading the most recent copy of WordPress.
Step 2
Once the download is complete, extract the entire contents of the .zip file to a folder on your computer. Crucially, then delete the wp-content folder from these extracted files.

Deleting the WordPress wp-content folder from the extracted files.
Step 3
After deleting the wp-content folder, connect to your hosting server via SFTP. Upload the remaining WordPress core files to the directory where your WordPress site is originally installed. This is commonly your root folder, often named public or public_html. When your SFTP program prompts you that "Target file already exists," ensure you select the Overwrite option and allow the transfer to continue.

Uploading remaining files via SFTP and overwriting existing ones.
By omitting the wp-content folder, this process effectively overwrites all core WordPress files without affecting your themes, plugins, or media library. Once the upload is complete, you should have a freshly installed copy of the WordPress core files, and your site should hopefully be functioning correctly.
Summary
While restoring WordPress from a backup or its core files is generally a direct process, users may occasionally encounter certain issues. Common problems include:
- Error establishing a database connection
- Internal server error (500)
- White screen of death
- ERR_CONNECTION_TIMED_OUT
- ERR_TOO_MANY_REDIRECTS
- Difficulties with importing or exporting users
Understanding these potential hurdles and the methods outlined in this guide can significantly aid in quick and effective site recovery. Regular backups are your most crucial defense against data loss and extended downtime, ensuring the longevity and reliability of your WordPress website.
