
How to Create a WordPress Staging Site: Step-by-Step Guide
- Wednesday, 17th September, 2025
- 00:02am
Establishing a WordPress staging site is a strategic decision that offers a robust safety net before implementing significant alterations to your live website. It acts as a protective barrier, identifying and resolving potential issues long before they could impact your site's visitors. If the thought of updates, new plugins, or theme modifications causing unexpected problems on your live site has ever concerned you, a staging environment will become an invaluable tool.
This comprehensive guide will provide you with clear, step-by-step instructions on how to effectively create and manage a WordPress staging site.

What is a WordPress Staging Site?
A WordPress staging website is essentially a duplicate, fully functional copy of your live website, hosted in a private environment where you can safely conduct tests and experiments. Consider it your dedicated development sandbox—a secure space to try out new ideas, debug issues, or troubleshoot problems without any risk to your public-facing site. Should anything unexpected occur during testing, your live site remains completely unaffected and fully operational, ensuring continuous availability for your audience.
By leveraging a staging environment, you gain the freedom to experiment confidently with various aspects of your website, including:
- WordPress Core Updates: Evaluate new versions of WordPress to confirm seamless compatibility with your site’s existing themes, plugins, and custom code.
- Theme and Plugin Modifications: Safely update or switch themes, and install or modify plugins, eliminating the risk of conflicts or errors on the live site.
- Custom Code Implementations: Develop, add, and thoroughly test custom code snippets and functions before integrating them into your production environment.
- Design Changes: Revamp layouts, styling elements, and overall aesthetics to enhance user experience and engagement without public visibility during development.
Utilizing a staging site is an indispensable practice for both WordPress website maintenance and advanced development. It functions as a critical testing ground, allowing you to proactively identify, diagnose, and rectify issues, thereby preventing any negative impact on your visitors and ensuring a stable, high-performing website.
Why a Staging Site is Essential
Making direct modifications to a live website can often feel precarious, akin to performing on a tightrope without a safety net. A single misstep could lead to significant disruptions, including downtime, broken features, or even a complete site crash. This is precisely why a staging website is a transformative tool for any WordPress site owner or developer:
- Mitigate Risks: A staging site serves as a secure proving ground where you can test updates, apply tweaks, and implement new functionalities without the inherent anxiety of potential live site issues. If an error surfaces, it can be addressed and resolved discreetly before it ever reaches your audience.
- Ensure Zero Downtime: One of the most significant advantages is the ability to conduct extensive testing, make significant changes, and thoroughly experiment, all while your live website continues to operate flawlessly and without interruption for your visitors.
- Prevent Critical Errors: Staging environments act as an early warning system. They are instrumental in detecting and resolving potential conflicts stemming from plugin compatibility, theme updates, or custom code modifications before these issues can destabilize your live production environment.
- Streamline Development Workflow: For developers and designers, a staging site provides an isolated space to work on new features, refine designs, and test innovative ideas without interfering with the live site’s performance or user experience. It creates an efficient, parallel workflow that fosters creativity and meticulous development.
Whether you're dealing with routine plugin updates, comprehensive theme overhauls, or major WordPress core upgrades, a staging site is your most reliable ally. It provides that essential layer of protection, instilling the confidence required to implement improvements and changes, secure in the knowledge that you maintain full control over your website’s integrity.
Prerequisites for Staging Site Creation
Before you embark on the journey of setting up your WordPress staging site, it's crucial to ensure you have all the necessary components and preparations in place for a smooth and successful process. Here’s a checklist of what you'll need:
- Backup Your WordPress Site: This is your ultimate safety measure. Always begin by creating a full backup of your live website. This ensures that in the unlikely event something doesn’t go as planned, you can effortlessly restore your site to its previous stable state.
- Access to Hosting Panel or FTP: If your chosen method involves creating the staging site manually or utilizing your host’s proprietary tools, you will need administrative access to your hosting control panel (such as cPanel) or an FTP client. These tools are essential for managing your website files and databases. Ensure your credentials are readily available.
- Check Server Resources: Be aware that staging sites, being full copies of your production site, will consume additional server resources, including storage space and bandwidth. Verify that your current hosting plan offers sufficient capacity to comfortably accommodate a staging environment without compromising the performance of your live site.
- Disable Caching Plugins: While caching plugins are excellent for enhancing your live site's speed and performance, they can sometimes interfere with the delicate process of creating a staging environment. It is advisable to temporarily deactivate any caching plugins before you commence the staging site creation.
With these foundational steps completed, you are well-prepared to proceed with creating your staging site efficiently and without unexpected complications.
Methods for Creating a WordPress Staging Site: 3 Approaches
Now that the significant advantages of a WordPress staging site are clear, let's explore the various methods available for setting one up. Each approach offers distinct benefits and levels of technical involvement. Here’s a concise overview of the most common ways to establish a staging environment:
- Using a WordPress Staging Plugin: This is widely considered the most straightforward and popular method, particularly beneficial for users who may not possess extensive technical expertise. A variety of plugins are specifically developed to facilitate the creation of staging sites, often with just a few intuitive clicks.
- Utilizing Your Web Host’s Staging Feature: Many reputable hosting providers now offer integrated staging features, allowing you to generate a staging site with a single click directly from your hosting dashboard. This method is exceptionally convenient and efficient if your current host provides this functionality.
- Creating a Staging Site Manually via cPanel: For those who are comfortable with more technical procedures and desire a higher degree of control over the setup process, a manual staging site can be configured through your hosting control panel (e.g., cPanel). This approach provides maximum customization but involves a greater number of individual steps.
Method 1: Using a WordPress Staging Plugin
Numerous WordPress plugins are expertly designed to assist you in cloning your live site and establishing a secure staging environment. These tools automate much of the complex process, making it accessible to users of all technical levels.
Here’s a detailed guide on how to set up a staging site using WP Staging, a highly regarded and reliable option in the WordPress ecosystem:
Step 1: Install and Activate the WP Staging Plugin
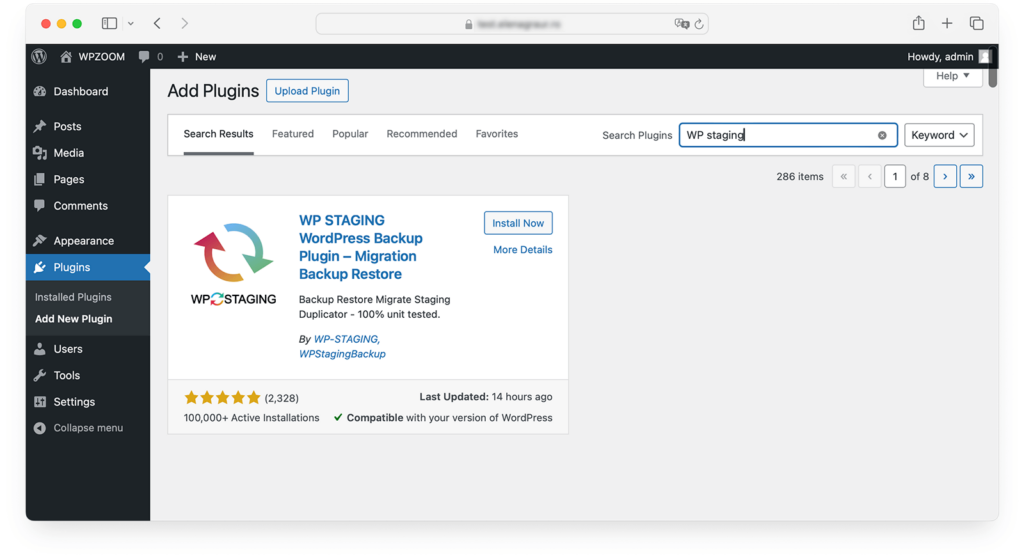
- Access your WordPress administration dashboard.
- Navigate to the Plugins section, then click on Add New.
- In the search bar provided, type WP Staging and press Enter.
- Once the plugin appears in the search results, click Install Now. After the installation is successfully completed, proceed to click Activate.
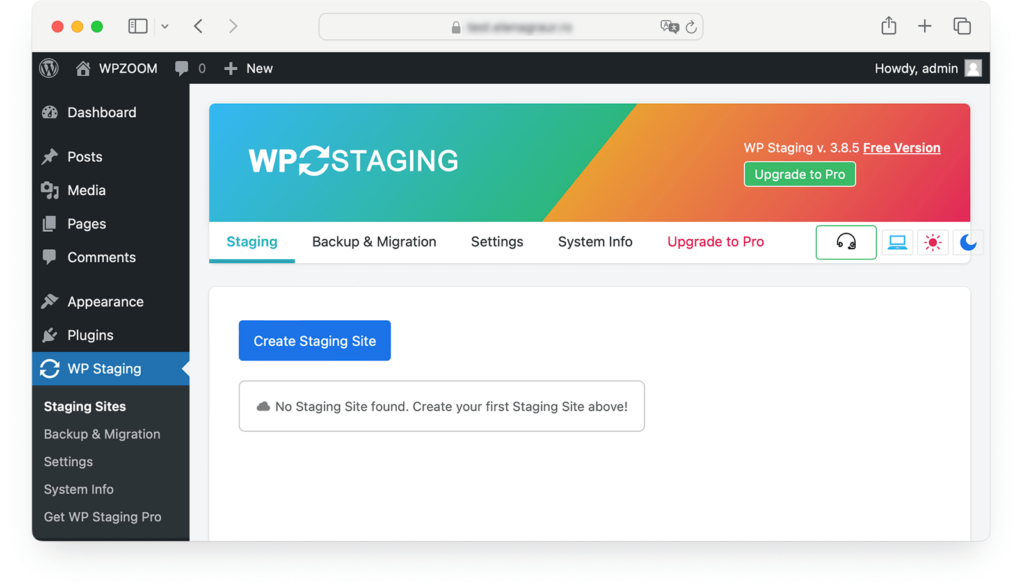
Upon activation, a new WP Staging menu option will be visible in your WordPress dashboard, providing convenient access to the plugin’s functionalities.
Step 2: Create Your Staging Site
- Click on the WP Staging option located in your WordPress dashboard menu.
- Locate and click the Create Staging Site button.
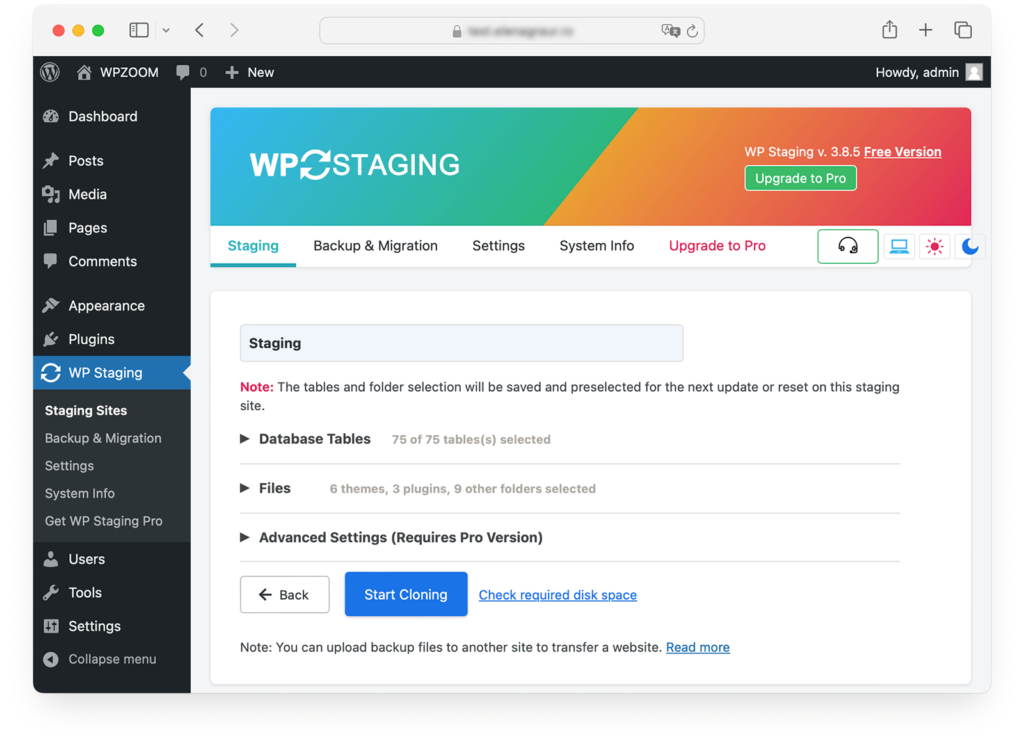
- You will be prompted to assign a name to your staging site; a simple and descriptive name like “staging” is typically sufficient.
- Finally, click Start Cloning to initiate the duplication process.
The plugin will now diligently clone your entire live website into a new, isolated staging environment. The duration of this process will vary depending on the size and complexity of your website. Allow a few moments for the plugin to complete its operation.
Step 3: Access and Use Your Staging Site
Once the cloning process has successfully concluded, WP Staging will present you with a direct link to access your newly created staging site. This link typically follows a structure similar to yoursite.com/staging/.
- Click on the provided link to navigate to your staging site.
- Log in using your existing WordPress administrative credentials.
You now have a fully functional replica of your live website, providing a secure space where you can make modifications, test updates, and experiment with new features without any potential repercussions. Remember, any changes implemented within this environment will not affect your live production site, offering a completely risk-free zone for all your development and testing needs.
Method 2: Utilizing Your Web Host’s Staging Feature
If your web hosting provider offers an integrated staging feature, this is arguably one of the most streamlined and user-friendly ways to create a WordPress staging site. Many managed WordPress hosts now provide convenient one-click staging options, making this method ideal for those seeking a rapid setup with minimal technical prerequisites.
- Access your hosting account’s primary dashboard or control panel.
- Locate the section dedicated to managing your websites. This area might be labeled as “My Sites,” “Website Management,” or something similar.
- Within your website management tools, search for an option explicitly titled Staging or Staging Environment and click on it.
- You will typically be prompted to select the specific website for which you wish to create a staging site, particularly if you manage multiple domains.
- Finally, click the Create button to initiate the process.
Your hosting platform will then proceed to generate a clone of your live site within a dedicated staging environment. This automated process is generally very quick, often completing within just a few minutes.
Upon completion, you will usually receive a notification, or a new link will become visible within your hosting dashboard. Click on this provided link to access your staging site.
As with other methods, your staging site will be a complete and fully operational duplicate of your live website. You can log in using your standard WordPress credentials and immediately begin making changes, testing updates, or developing new functionalities in a safe, isolated space.
Method 3: Creating a Staging Site Manually via cPanel
For users who prefer a more hands-on approach or require granular control over every aspect of the staging process, manually creating a staging site through your hosting control panel (such as cPanel) is an excellent choice. While this method demands a slightly higher degree of technical knowledge, it rewards you with extensive customization capabilities and a deeper understanding of your site’s architecture.
Step 1: Create a Subdomain
- Log in to your hosting cPanel.
- Navigate to the Domains section and click on Domains.
- Select the option to Create a New Domain.
- In the provided Domain field, enter the desired name for your subdomain (e.g., “staging.yourwebsite.com“).
- Click Submit to finalize the subdomain creation.
You have now established a subdomain, such as staging.yourwebsite.com, which will serve as the dedicated location for your new staging site.
Step 2: Copy Your Files to the Subdomain
- Within cPanel, access the File Manager.
- Navigate to the root directory of your live site, which is typically named public_html.
- Select all the files and folders within your live site’s root directory, then click the Copy option.
- Paste these copied files into the folder that corresponds to your newly created subdomain (e.g., public_html/staging/).
This critical step effectively duplicates all of your live site’s essential files and assets into the directory designated for your staging subdomain.
Step 3: Export and Import Your Database
- In cPanel, proceed to phpMyAdmin.
- Select the database associated with your live production site from the list.
- Navigate to the Export section, click the Export button, and save the generated SQL file to your local computer.
- Return to cPanel and create a completely new database for your staging site by going to MySQL Databases or MySQL Database Wizard.
- Finally, import the previously saved database file into this new, empty database via phpMyAdmin.
At this point, your staging site possesses a complete copy of your live site’s database, ensuring data consistency for testing.
Step 4: Update the Database Connection
- Within the File Manager, locate the wp-config.php file within your staging site’s directory.
- Edit this file to update the database name, database username, and database password. These credentials must now correspond to the new staging database you created in the previous step.
- Save the modifications to the wp-config.php file.
Your staging site is now correctly configured to connect to its own dedicated database, ensuring it remains entirely separate from your live site’s data.
Step 5: Update URLs
- Go back to phpMyAdmin and select the newly created staging site’s database.
- Locate the wp_options table within this database.
- Update both the siteurl and home fields to accurately reflect the URL of your new subdomain (e.g., https://staging.yourwebsite.com).
This final adjustment ensures that your staging site operates under its specific subdomain URL, preventing any potential conflicts or overlaps with your live production environment.
Testing and Deploying Changes from Staging to Live Site
Once you have successfully created your staging site and implemented all necessary modifications, the crucial next phase involves thoroughly testing these changes and then deploying them to your live website. This meticulous step is paramount to guarantee flawless functionality and a seamless transition before your updates go public.
Step 1: Thoroughly Test Your Staging Site
Before initiating any deployment, dedicate ample time to comprehensively test every aspect of your staging site. Use the following checklist to guide your evaluation:
- Check Plugin Compatibility: Verify that all installed plugins operate as expected and remain compatible after any updates or new installations.
- Test Core Functionality: Ensure that your site’s primary features, such as contact forms, e-commerce shopping carts, user login systems, and navigation, are fully functional.
- Review Design Elements: Scrutinize your site’s design to confirm that layouts are intact, no elements are broken or missing, and the visual aesthetics meet your standards.
- Cross-Browser and Device Testing: Test your site across various web browsers (e.g., Chrome, Firefox, Safari, Edge) and on different devices (desktop, tablet, mobile) to confirm it is fully responsive and displays optimally everywhere.
Step 2: Push Changes from Staging to Live
Once you are completely confident in the performance and stability of your staging site, it's time to transfer those approved changes to your live production environment. The specific method for deployment will depend on how you initially created your staging site:
- Using a Staging Plugin: If you utilized a dedicated plugin like WP Staging, the premium version typically offers a "push to live" or "deploy" feature. Navigate to the plugin’s dashboard, review a summary of the changes to be deployed, and then click the appropriate button (e.g., Push Changes).
- Manual Method via cPanel: For staging sites set up manually, you will need to meticulously copy the updated WordPress files and export/import the modified database from your staging environment back to your live site. This process is executed through your cPanel’s File Manager and phpMyAdmin tools.
- Hosting Provider’s Staging Tool: If you leveraged your web host’s integrated staging feature, return to the Staging section of your hosting dashboard. There, you will typically find an option such as Deploy to Live or Push to Production.
Step 3: Post-Deployment Checks
Immediately after successfully deploying your changes to the live site, it is crucial to perform a final series of verification checks:
- Clear Caches: Ensure that all caching mechanisms, including any caching plugins and server-level caches, are cleared. This guarantees that visitors will always see the most current version of your updated site.
- Recheck Key Functions: Quickly navigate through your site's main features once more to confirm that everything is operating smoothly and as intended.
- Monitor Performance: Pay close attention to your site’s overall performance, load times, and responsiveness, especially if your updates involved significant modifications or the addition of new features.
Best Practices for Managing Your WordPress Staging Site
While creating a WordPress staging site is a significant step, effectively managing it is key to maximizing its benefits and ensuring a consistently smooth development workflow. Adhering to these best practices will help you maintain a secure, current, and efficient staging environment:
- Regularly Synchronize Staging with Live Site: To ensure your staging site accurately reflects your live production environment, it's vital to regularly synchronize data and files from the live site to your staging copy. This practice ensures that any new content, user data, or updates made on the production site are mirrored in the staging environment, providing an up-to-date basis for your testing. Many staging tools and hosting features offer a one-click synchronization option.
- Maintain Staging Site Security: Just as with your live website, your staging environment requires robust security measures to protect its integrity and prevent unauthorized access.
- Password Protect the Staging Site: Implement password protection for your staging site using methods such as a .htaccess file or a dedicated security plugin. This restricts public access, keeping your development work private.
- Utilize SSL: Ensure your staging site is secured with an SSL certificate, particularly if you are testing e-commerce functionalities, user registrations, or any sensitive data transmission. This encrypts data and builds trust.
- Delete Outdated Staging Sites: Once you have successfully deployed changes to your live site and no longer require a specific staging instance for further testing, consider deleting it. Lingering, unused staging sites can consume valuable server resources, clutter your hosting environment, and, if not properly maintained, potentially introduce security vulnerabilities.
Creating and leveraging a WordPress staging site is an indispensable practice for any serious website owner or developer. It empowers you to innovate, test, and improve your website with confidence, ensuring that your live site remains stable, secure, and provides an optimal experience for all visitors. By integrating a staging workflow into your routine, you are investing in the long-term health and success of your online presence.
