


Ensuring your website is secure with an SSL certificate is paramount in today\'s digital landscape. SSL (Secure Sockets Layer) encrypts the connection between your website and its visitors, protecting sensitive data and building trust. For many website owners, cPanel\'s AutoSSL feature provides an invaluable, automated solution for obtaining and managing these essential certificates.
What is AutoSSL?
AutoSSL is a powerful utility integrated within cPanel that significantly simplifies the process of acquiring and installing SSL certificates, predominantly those issued by Let’s Encrypt. Essentially, it offers a free SSL certificate to website owners, enabling them to facilitate secure transactions, protect data, and enhance user interactions over the internet. This crucial tool not only substantially enhances website security and builds user confidence but also plays a vital role in boosting search engine rankings by automatically securing your web presence without manual intervention.
How To Enable AutoSSL?
Enabling AutoSSL for your domains is a straightforward process within the cPanel environment. Follow these steps to activate this essential security feature:
- Log into cPanel: To begin, access your cPanel account using the login credentials typically provided by your web hosting provider.
- Locate the Security Section: Once logged in, navigate to the "SECURITY" section within the cPanel interface. This dedicated section usually houses various security-related tools, settings, and features designed to protect your website.
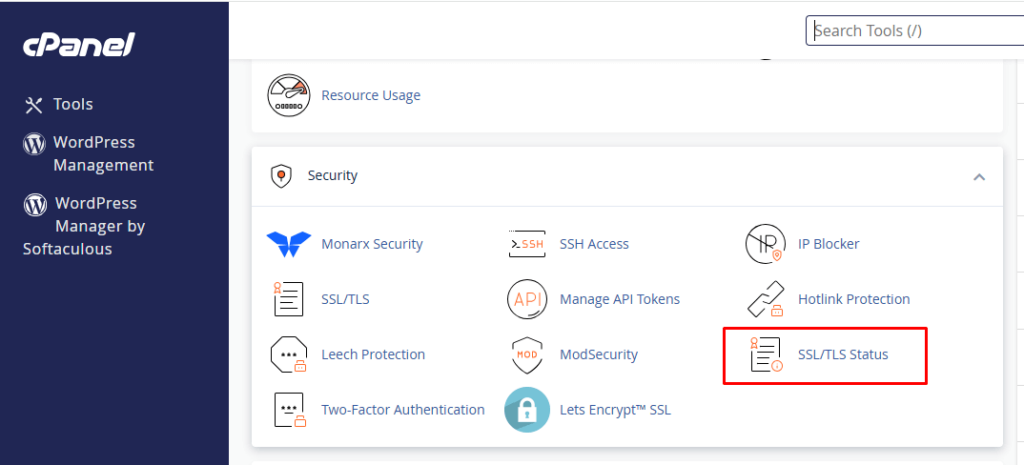
- Select SSL/TLS Status: Within the "SECURITY" section, locate and click on the "SSL/TLS Status" option. This interface will display the current status of SSL certificates for your websites and provide the necessary controls for managing these certificates.
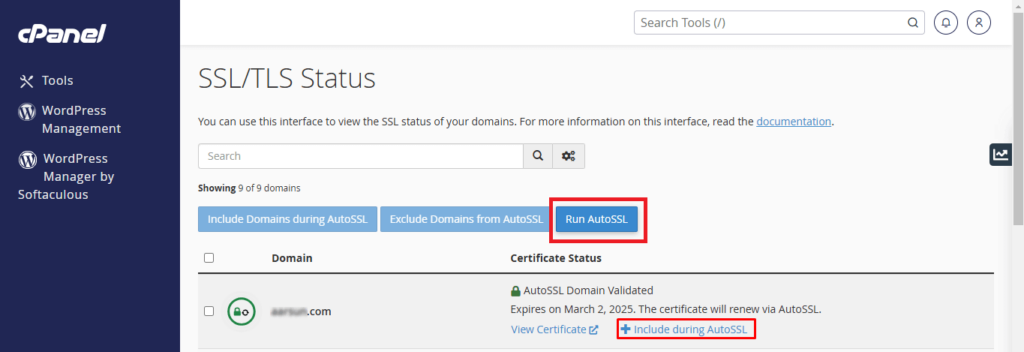
- Enable AutoSSL for Your Preferred Domains: In the "SSL/TLS Status" interface, you will be presented with a comprehensive list of all your domains and subdomains. Carefully select the checkboxes next to each domain or subdomain for which you wish to secure with an SSL certificate. It\'s generally recommended to secure all relevant domains.
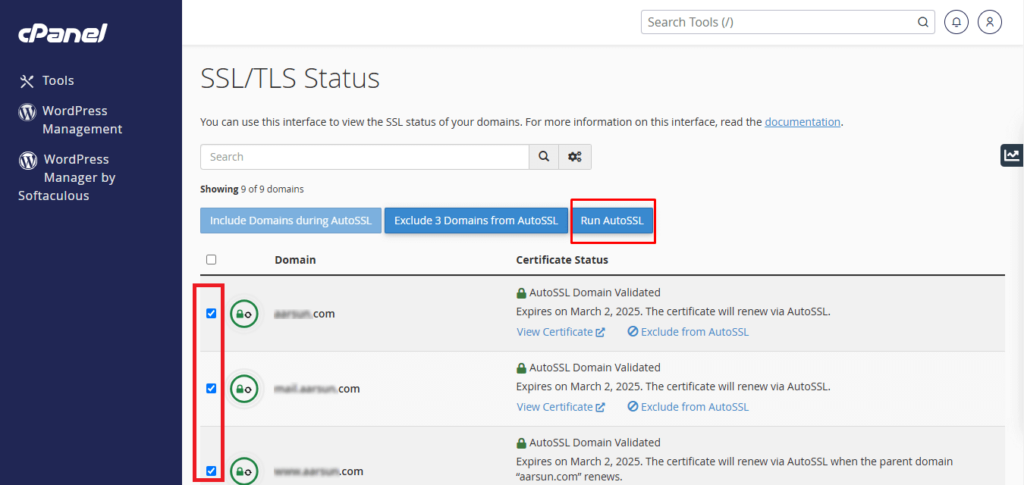
- Initiate AutoSSL: After meticulously selecting all the desired domains, proceed by clicking the "Run AutoSSL" button. This crucial action initiates the request and automated installation of SSL certificates for all the selected domains. The system will then communicate with Let\'s Encrypt to obtain and configure the certificates.
- Important Note: Please be aware that the process of requesting and applying SSL certificates might take some time for the changes to fully propagate and become active across your website. This waiting period can vary, potentially extending up to an hour, as the system completes all necessary configurations and updates. Patience during this phase is key to successful implementation.
Validating the SSL Certificate
After successfully enabling AutoSSL, it is always a good practice to verify that the SSL certificate has been correctly installed and is actively securing your domain. You can easily perform this check using various external online tools. For instance, a widely used tool like SSL Shopper allows you to input your domain name and quickly ascertain the installation status of your SSL certificate, confirming a secure connection and the presence of the padlock icon in browsers.
Troubleshooting AutoSSL Errors: Common Recommendations
While AutoSSL is designed for seamless operation, you might occasionally encounter issues where your website still displays a "Not Secure" warning or lacks the expected padlock icon in the browser address bar, even after enabling the feature. This can occur due to several common factors, which we will address below with practical solutions:
1. Mixed Content
One of the most frequent reasons for an insecure status on an SSL-enabled website is "mixed content." This phenomenon occurs when a secure HTTPS page attempts to load resources (such as images, scripts, stylesheets, or fonts) over an insecure HTTP connection. Such mixed content effectively compromises the secure connection established by the SSL certificate, preventing the browser from displaying the padlock icon and marking the site as fully secure. To resolve this, you must meticulously audit all resources on your website and ensure they are exclusively loaded via HTTPS. This might involve updating hardcoded URLs in your theme or plugins.
2. Multiple Certificates
The presence of older or conflicting SSL certificates, such as self-signed or expired ones, on your domain can actively prevent new Let’s Encrypt certificates from being successfully issued or recognized by AutoSSL. These older certificates can create conflicts that confuse the system.
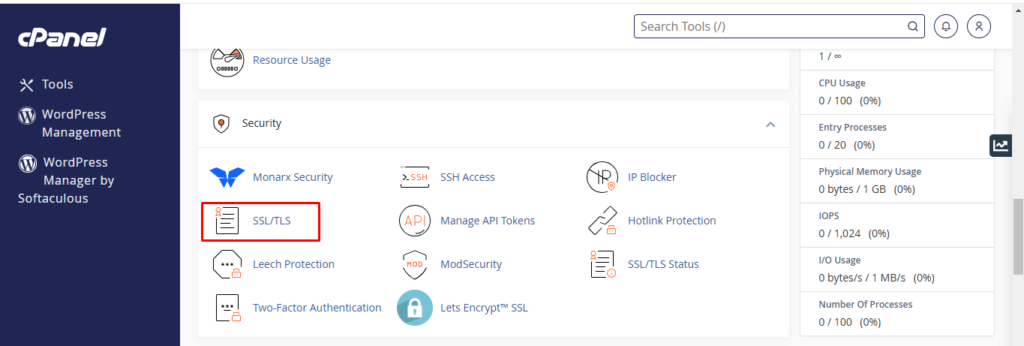
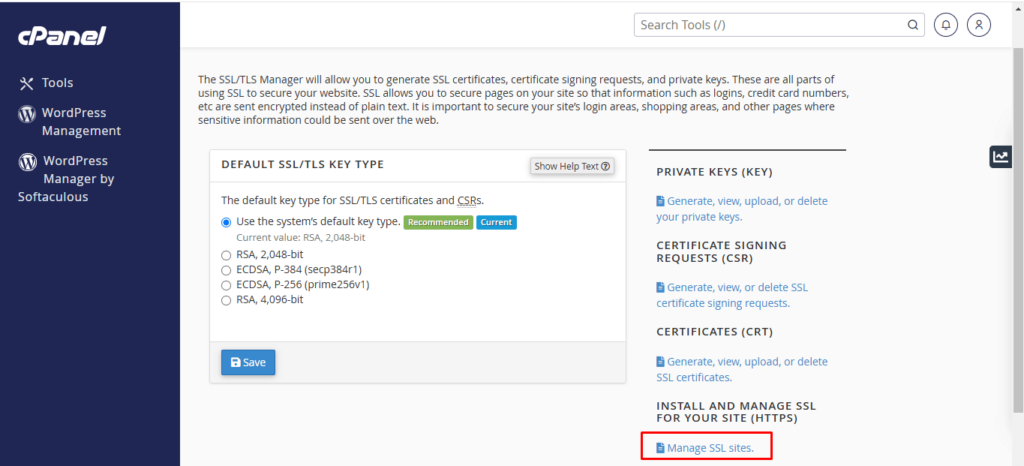
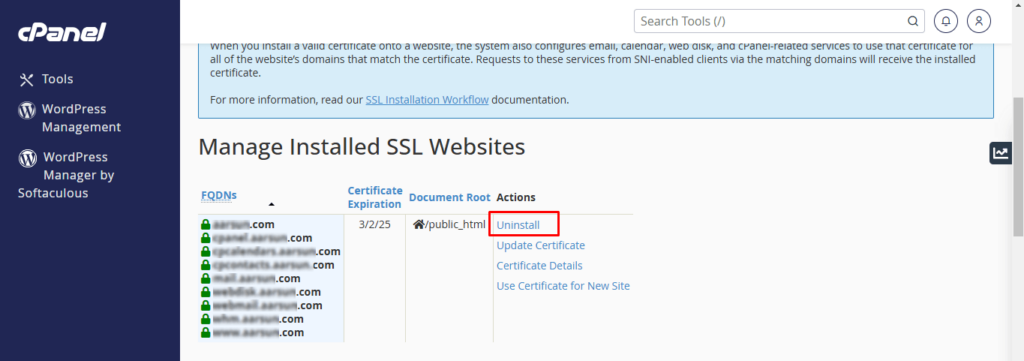
- To identify any previously installed certificates, navigate to the "SSL/TLS" section within your cPanel interface and click on "Manage SSL Sites." This area will provide a comprehensive list of all SSL certificates currently associated with your domains, allowing you to review their status.
- If you observe any outdated, invalid, or conflicting certificates listed, it is crucial to remove (uninstall) them from your server. After their removal, return to the "SSL/TLS Status" section and re-run AutoSSL for the affected domains to prompt the successful installation of new, valid certificates.
3. Domain Verification Problems
For Let’s Encrypt to issue an SSL certificate, it needs to verify that you are the legitimate owner of the domain in question. If this essential verification process fails, AutoSSL will be unable to obtain or install the certificate. Here’s how to troubleshoot common domain verification issues and ensure successful validation:
4. Domain Name Servers (DNS) Configuration
First and foremost, it's essential to confirm that your website’s domain is correctly resolving to the IP address of your web hosting server. You can utilize various online DNS lookup tools, such as "whatsmydns.net," to check the current "A" record for your domain. This "A" record should precisely match the server IP address provided by your hosting provider, which is typically found in your hosting account\'s welcome email or within your cPanel dashboard.
If the IP addresses do not correspond, it strongly indicates that your domain’s DNS is pointing to a different server than where your website is hosted. In such a scenario, AutoSSL will attempt to install the SSL certificate on an incorrect server or location, inevitably leading to validation failure. Ensure your domain’s nameservers are accurately configured to point to your current hosting provider to resolve this issue.
5. AAAA Records
Even if your "A" records (for IPv4) are correctly directed to your web host\'s IP address, issues can still arise if other DNS records, specifically "AAAA" records (for IPv6), are incorrectly configured or pointing elsewhere, particularly if your nameservers are managed by a third party. An "AAAA" record maps a domain name to an IPv6 address. Use online tools like "whatsmydns.net" to inspect your "AAAA" records. Often, unnecessary or misconfigured "AAAA" records can interfere with AutoSSL validation by introducing conflicting addresses. If you identify any "AAAA" records that are not essential or are incorrectly configured for your hosting environment, it is best practice to remove them to prevent these potential conflicts and ensure smooth AutoSSL operation.
6. Code Interference
Occasionally, specific code within a website’s .htaccess file or other configuration files can inadvertently delay or interfere with the AutoSSL initiation process. This is particularly relevant during the initial reconciliation phase, before the deployment check of any files or code. To prevent such interference and ensure AutoSSL\'s verification requests are processed without hindrance, you can add the following snippet at the very beginning of your website’s .htaccess file:
RewriteCond %{REQUEST_URI} !^/[0-9]+\..+\.cpaneldcv$
RewriteCond %{REQUEST_URI} !^/\.well-known/acme-challenge/.+$
RewriteCond %{REQUEST_URI} !^/\.well-known/acme-challenge/[0-9a-zA-Z_-]+ $
RewriteCond %{REQUEST_URI} !^/\.well-known/pki-validation/[A-F0-9]{32}\.txt(?:\ Comodo\ DCV)?$
7. AutoSSL Suspended or Disabled
If you find that the "Run AutoSSL" option is entirely missing from your cPanel interface, it typically indicates that the AutoSSL feature has been suspended or disabled at the server level for your account. This could be due to various reasons, including server-wide policies or specific account configurations. In such instances, you will need to contact your web hosting provider\'s support team, reseller, or system administrator. They will be able to verify the status of AutoSSL for your account and enable the feature if it has been inadvertently turned off or requires manual activation.
8. Excluding Domains (Optional)
In certain specific situations, you might encounter persistent problems with particular domain names that prevent AutoSSL from functioning correctly for them, or you may simply wish to exclude certain domains from SSL protection. If you need to exclude specific domains from the AutoSSL process, it is recommended to consult the dedicated guides and documentation provided by your web host. They typically offer precise instructions on how to manage domain exclusions within your control panel or through their support channels, ensuring you maintain control over your website\'s security configuration.
Implementing and managing SSL certificates through cPanel’s AutoSSL feature is a highly effective, user-friendly, and automated way to secure your website with free SSL certificates from Let’s Encrypt. This essential security measure not only significantly enhances user trust, protects sensitive data, and ensures a secure browsing experience, but also plays a vital role in improving your website\'s search engine optimization (SEO) performance by favoring secure sites.
In today\'s dynamic digital landscape, a secure website is no longer merely an option but an absolute necessity. By proactively ensuring your site is protected with a valid SSL certificate, you demonstrate a responsible and professional approach to online operations, which is indispensable for building and maintaining credibility, fostering user confidence, and establishing a strong, trustworthy online presence in the modern era.
