


Odoo 18 provides a powerful and integrated email management system, designed to significantly enhance business communication directly within the platform. By precisely configuring Outgoing Mail Servers, users gain the ability to send emails effortlessly, whether they are invoices, notifications, or marketing campaigns. Similarly, setting up Incoming Mail Servers allows Odoo to intelligently process received emails, automatically generating relevant records such as new leads in CRM or support tickets in the helpdesk module. This comprehensive guide outlines the essential steps to configure both outgoing and incoming mail servers in Odoo 18, ensuring a smooth, secure, and highly efficient email integration for your business.
Step 1: Enable Developer Mode
To access the advanced technical configurations required for mail server setup in Odoo, it is first necessary to activate Developer Mode. This mode unlocks the Technical menu, which is otherwise hidden from standard user interfaces.
How to Enable Developer Mode in Odoo 18
- Navigate to General Settings: Begin by logging into your Odoo instance. From the main dashboard, proceed to the Settings module.
- Activate Developer Mode: There are two primary ways to activate this mode:
- Scroll to the very bottom of the General Settings page. You will find and click the option labeled Activate the Developer Mode.
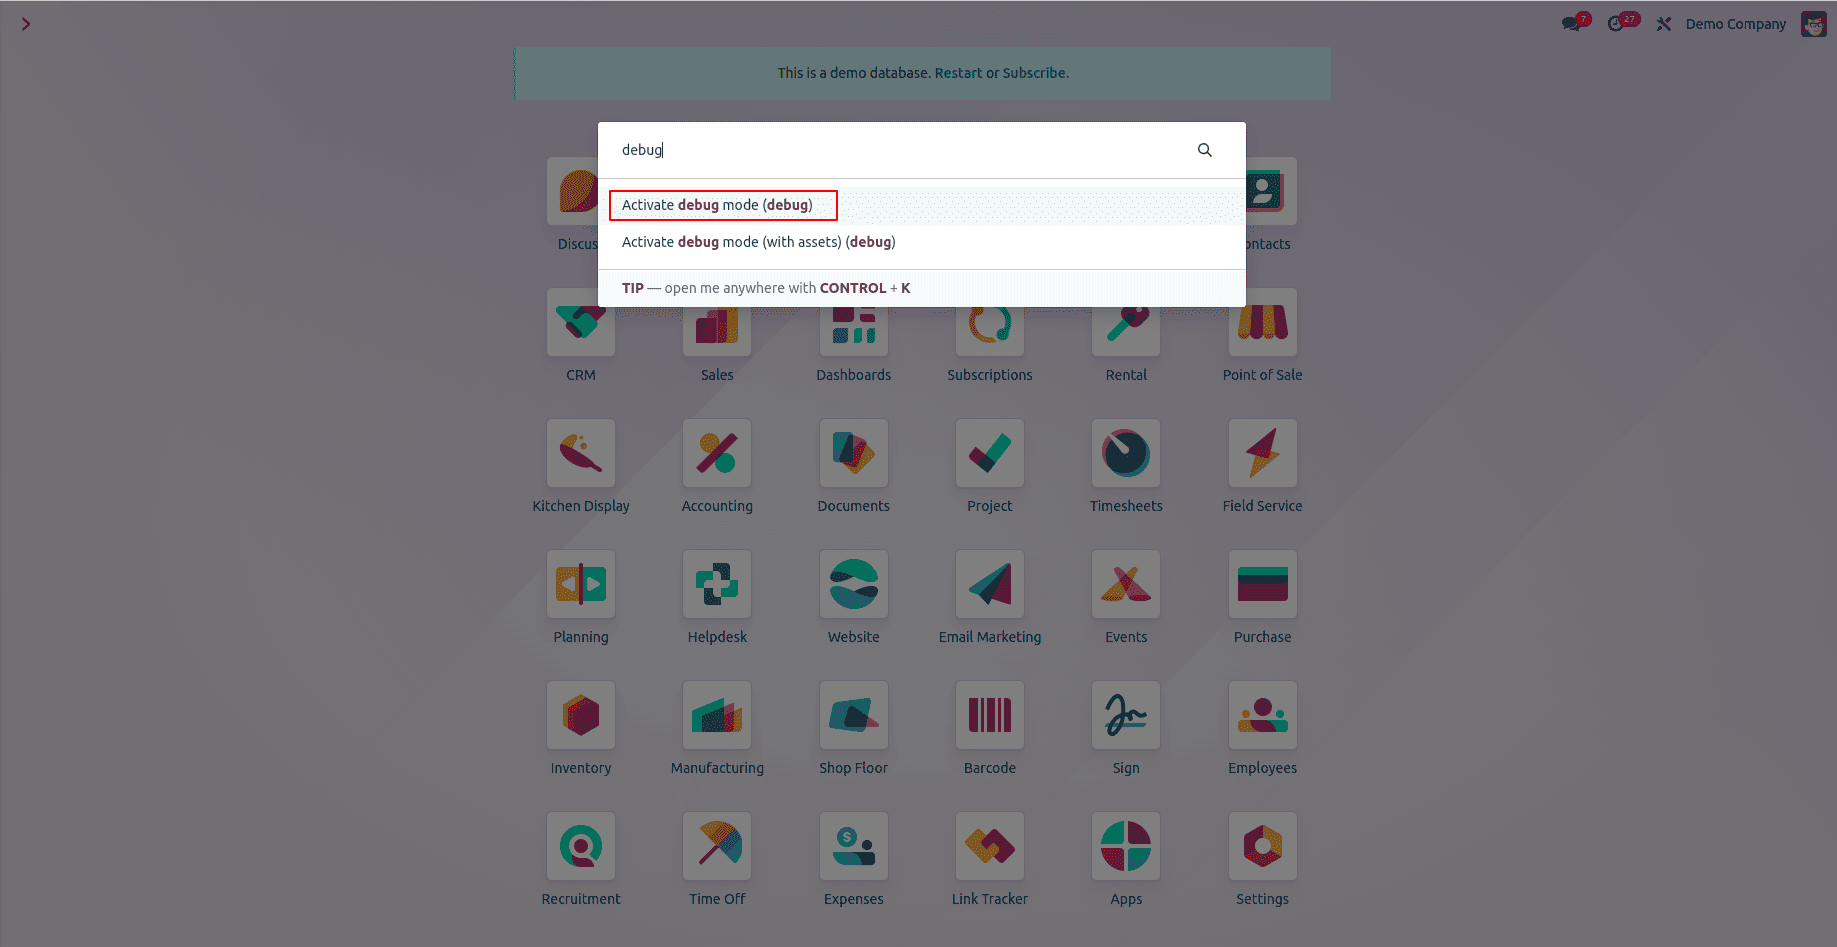
- Alternatively: For a quicker approach, you can search for "debug" directly from the Odoo homepage search bar. Selecting the relevant debug option will also activate Developer Mode.
Once Developer Mode is successfully enabled, a new Technical menu will become visible. This menu provides access to a wide array of advanced configuration options, including those for email servers.
Step 2: Configuring Outgoing Mail Servers
Outgoing mail servers are crucial for enabling Odoo to send emails directly from the platform. This functionality is essential for various business communications, including automated notifications, sending invoices, dispatching promotional campaigns, and more.
Accessing Outgoing Mail Server Settings
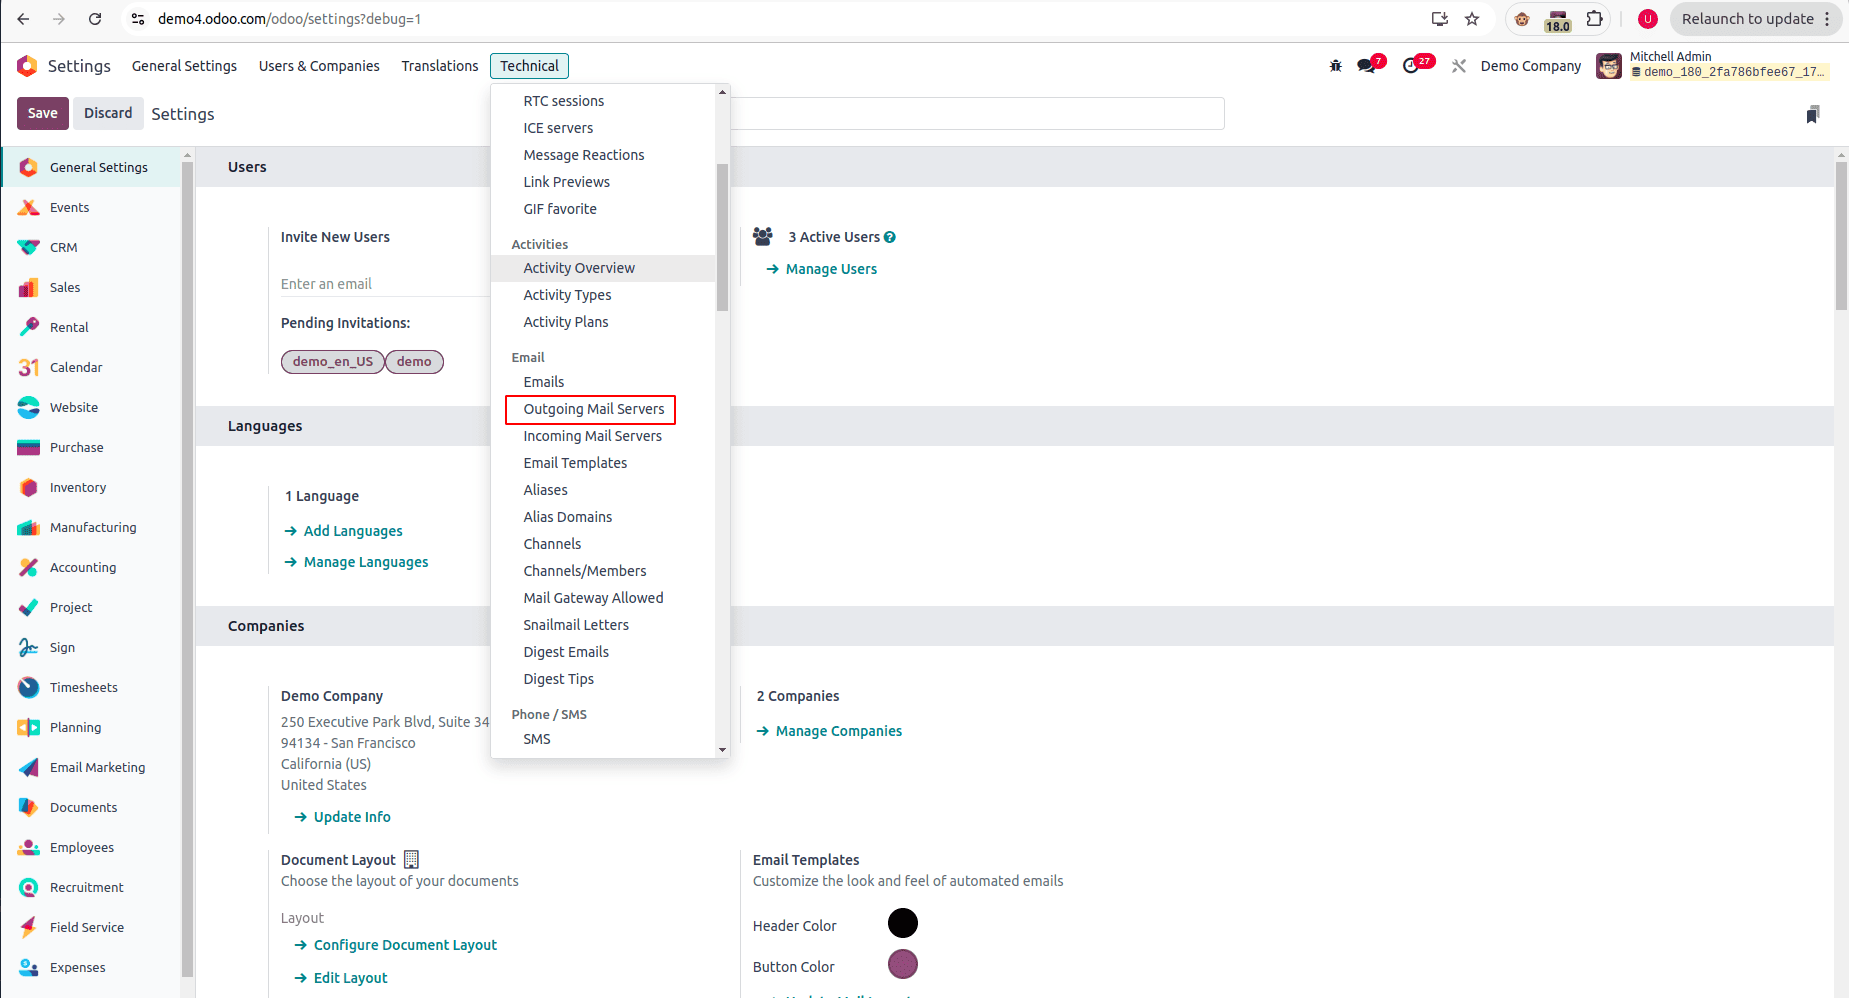
- Navigate to Settings > Technical > Email > Outgoing Mail Servers. This path will lead you to the dedicated configuration area for your outgoing email settings.
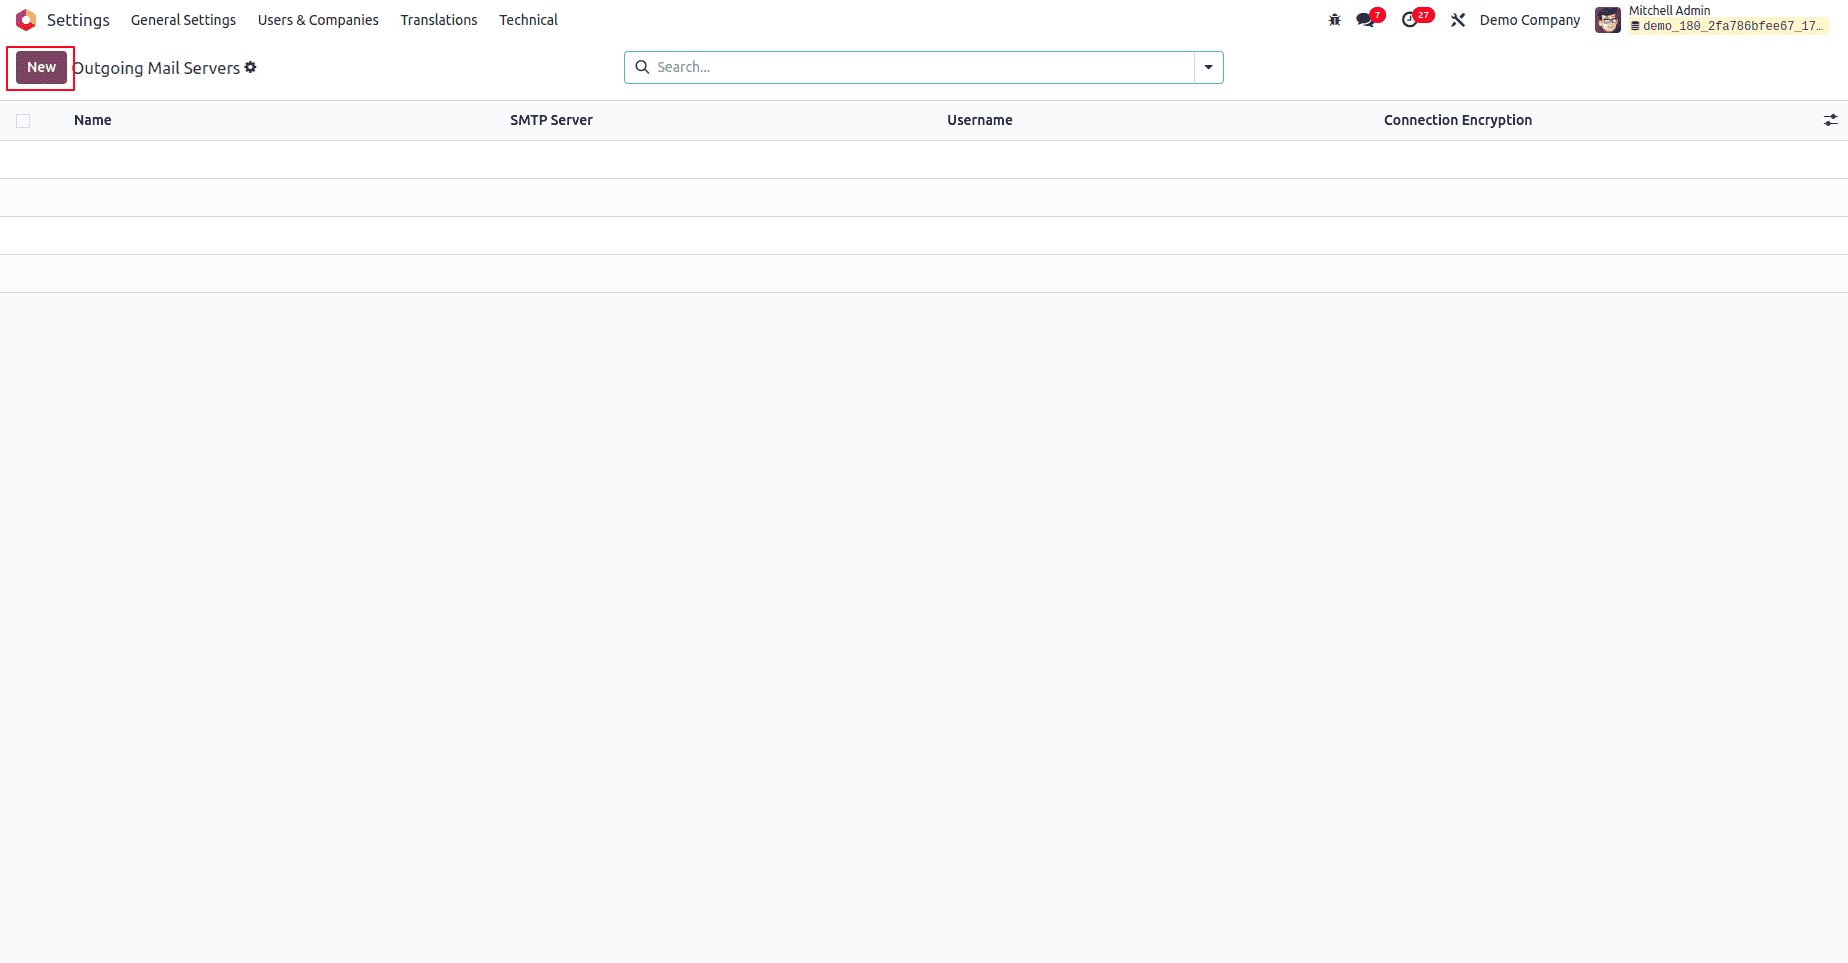
- To initiate a new server setup, click the New button. This action will open a form where you can input the details for your outgoing mail server configuration.
Entering Outgoing Mail Server Details
In the new form view, you will need to provide specific information about your email service provider to establish a connection:
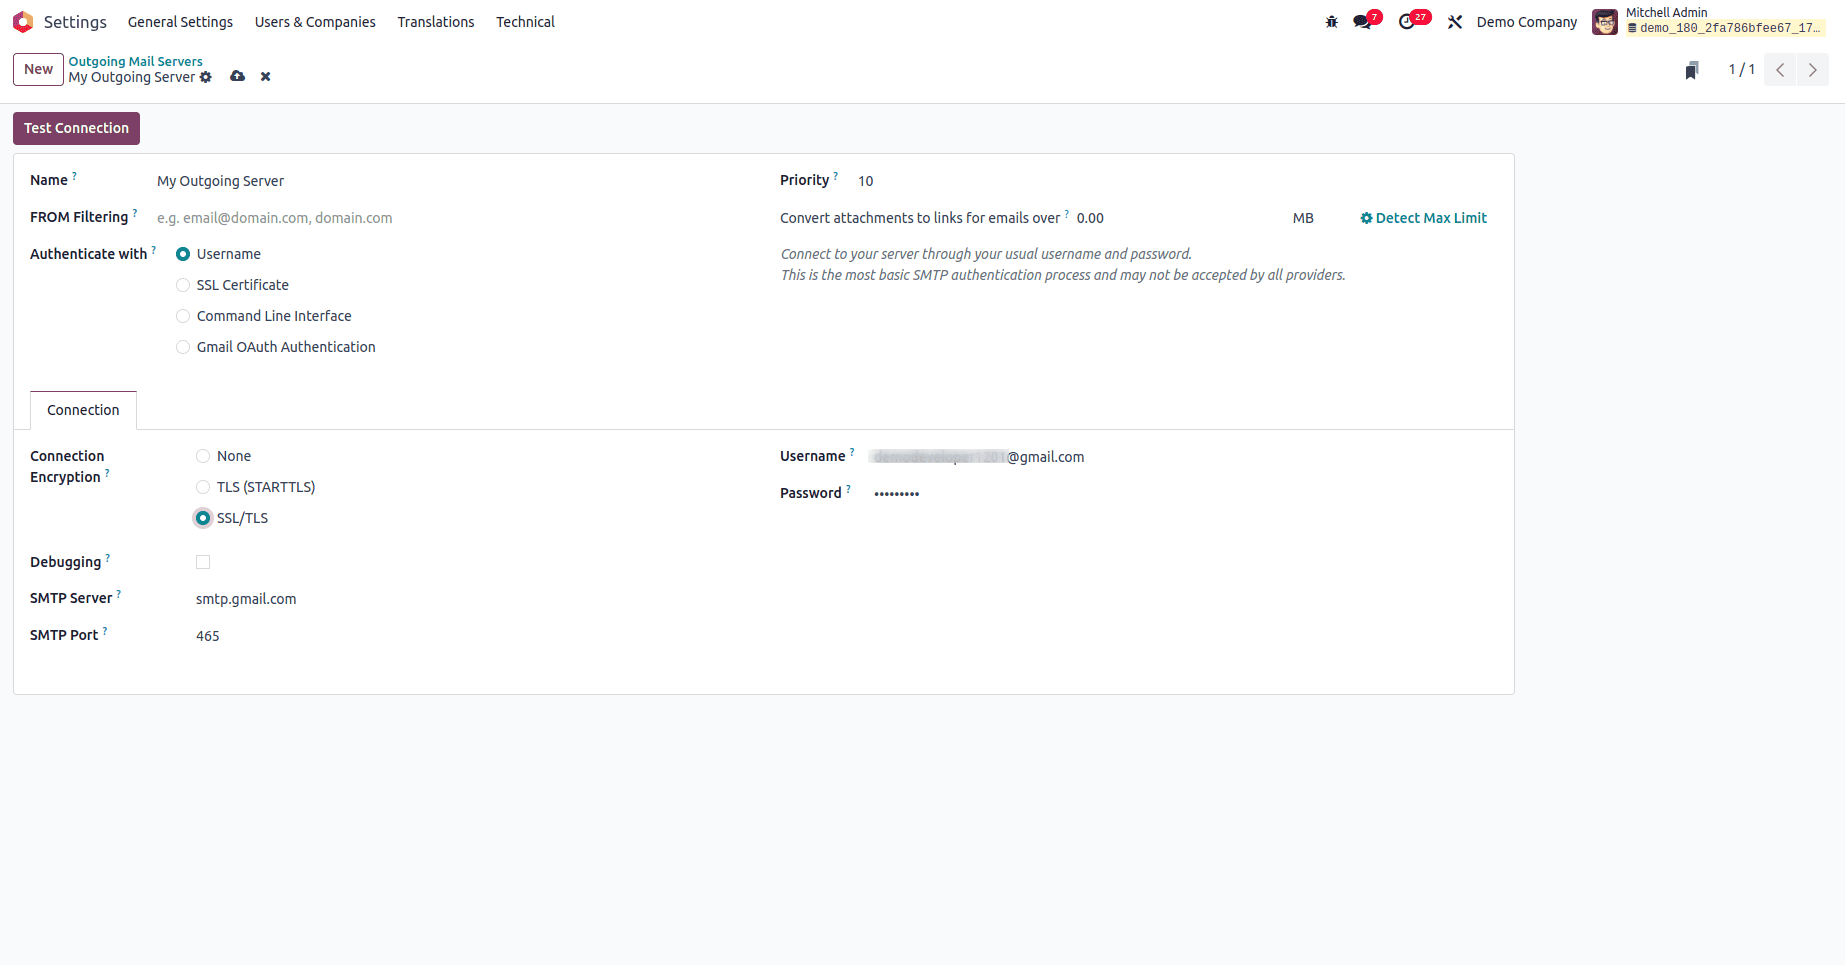
- Name: Assign a clear and descriptive name for this mail server configuration. This helps in easy identification, especially if you plan to configure multiple servers (e.g., "Gmail SMTP Server for Marketing" or "Office 365 SMTP").
- SMTP Server: Enter the SMTP server address provided by your email service provider.
- For Gmail, this is typically
smtp.gmail.com. - For Outlook/Office 365, use
smtp.office365.com. - For Yahoo Mail, it's usually
smtp.mail.yahoo.com.
- For Gmail, this is typically
- SMTP Port: Specify the port number that corresponds to your chosen encryption settings:
- Use
465for SSL/TLS connections, which is a secure and commonly recommended port. - Use
587for STARTTLS connections, another secure method.
- Use
- Connection Encryption: Choose the appropriate encryption type to ensure secure communication for your outgoing emails. SSL/TLS is generally the most recommended and widely used option for modern email configurations, offering robust security.
- Authenticate With: Select User Name as the authentication method. This is standard for most email providers.
- Username: Enter the full email address that will be used for authentication with your email provider (e.g.,
[email protected]). - Password: Provide the corresponding password for the email account. If your email provider utilizes two-factor authentication or enhanced security, you might need to generate and use an app-specific password instead of your main account password.
- Priority: Assign a priority level to this server. In scenarios where multiple outgoing mail server configurations exist, Odoo will process emails using the server with the lowest numerical priority value first.
Testing the Outgoing Connection
- After carefully filling in all the required details in the form, click the Test Connection button located at the top of the page.
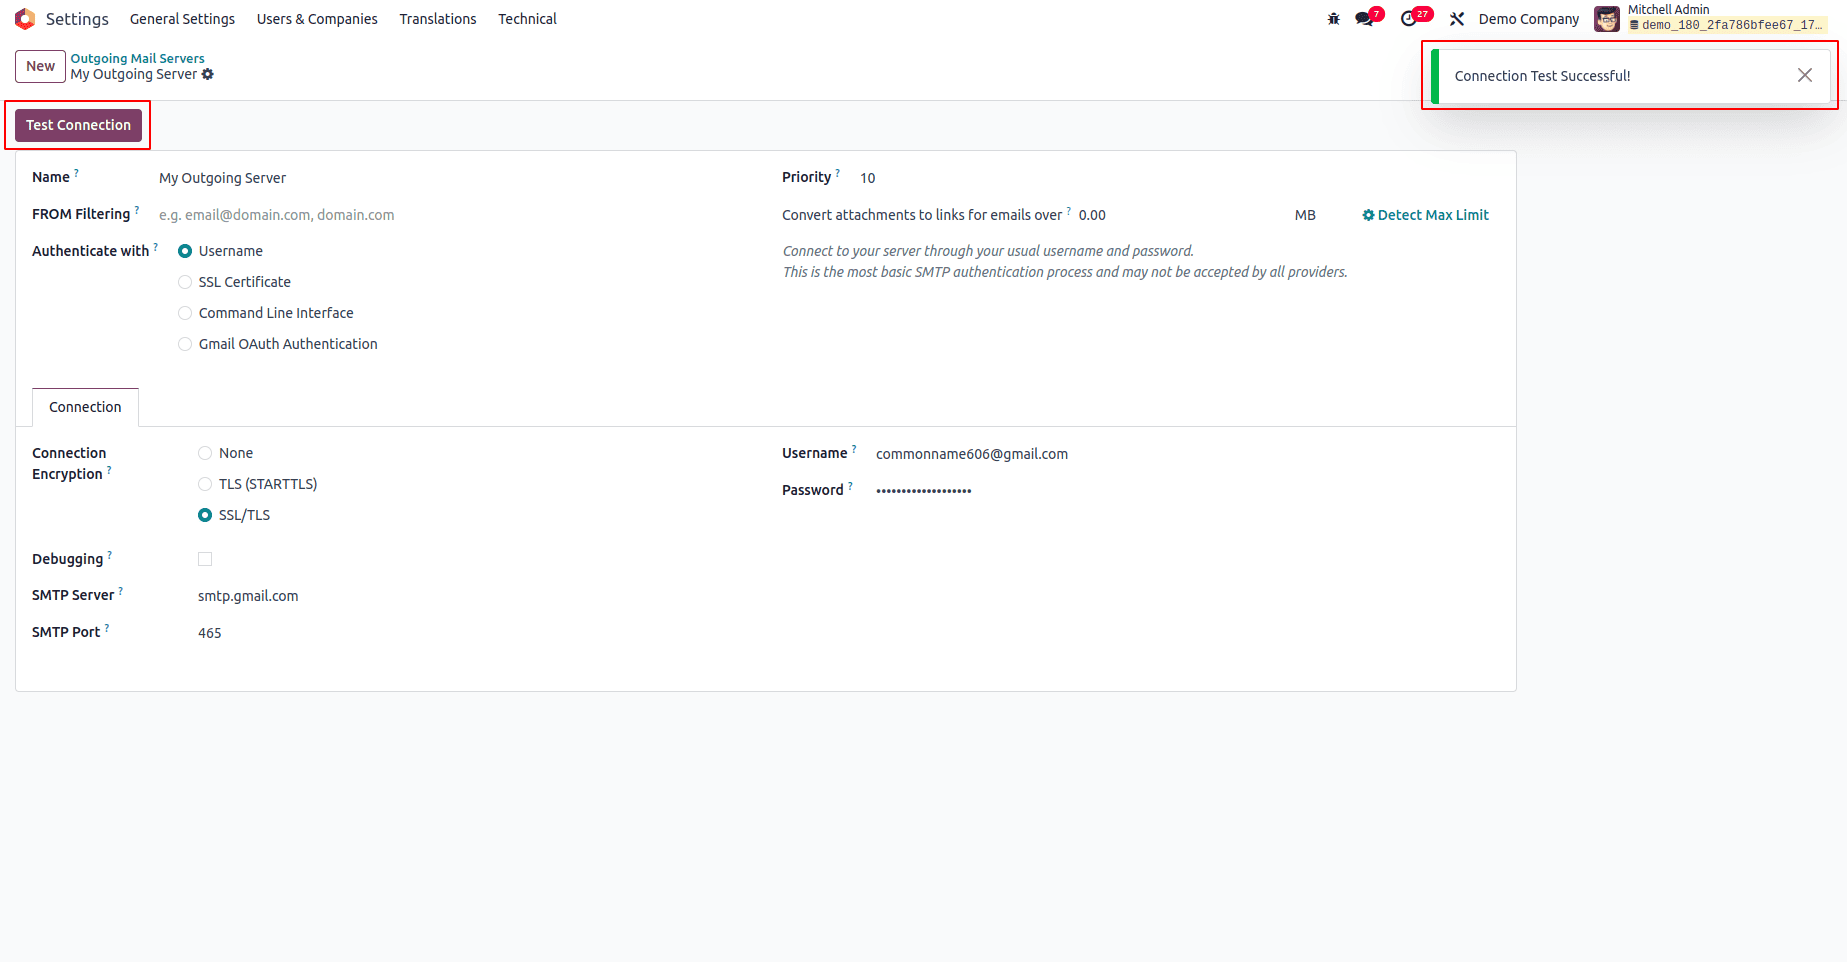
A successful connection will result in a confirmation message from Odoo. If the test fails, meticulously review all entered details, including the server address, port number, username, and password. Additionally, verify that your email provider's account settings, such as enabling "Allow less secure apps" (if applicable) or setting up "App passwords," are correctly configured to permit third-party access.
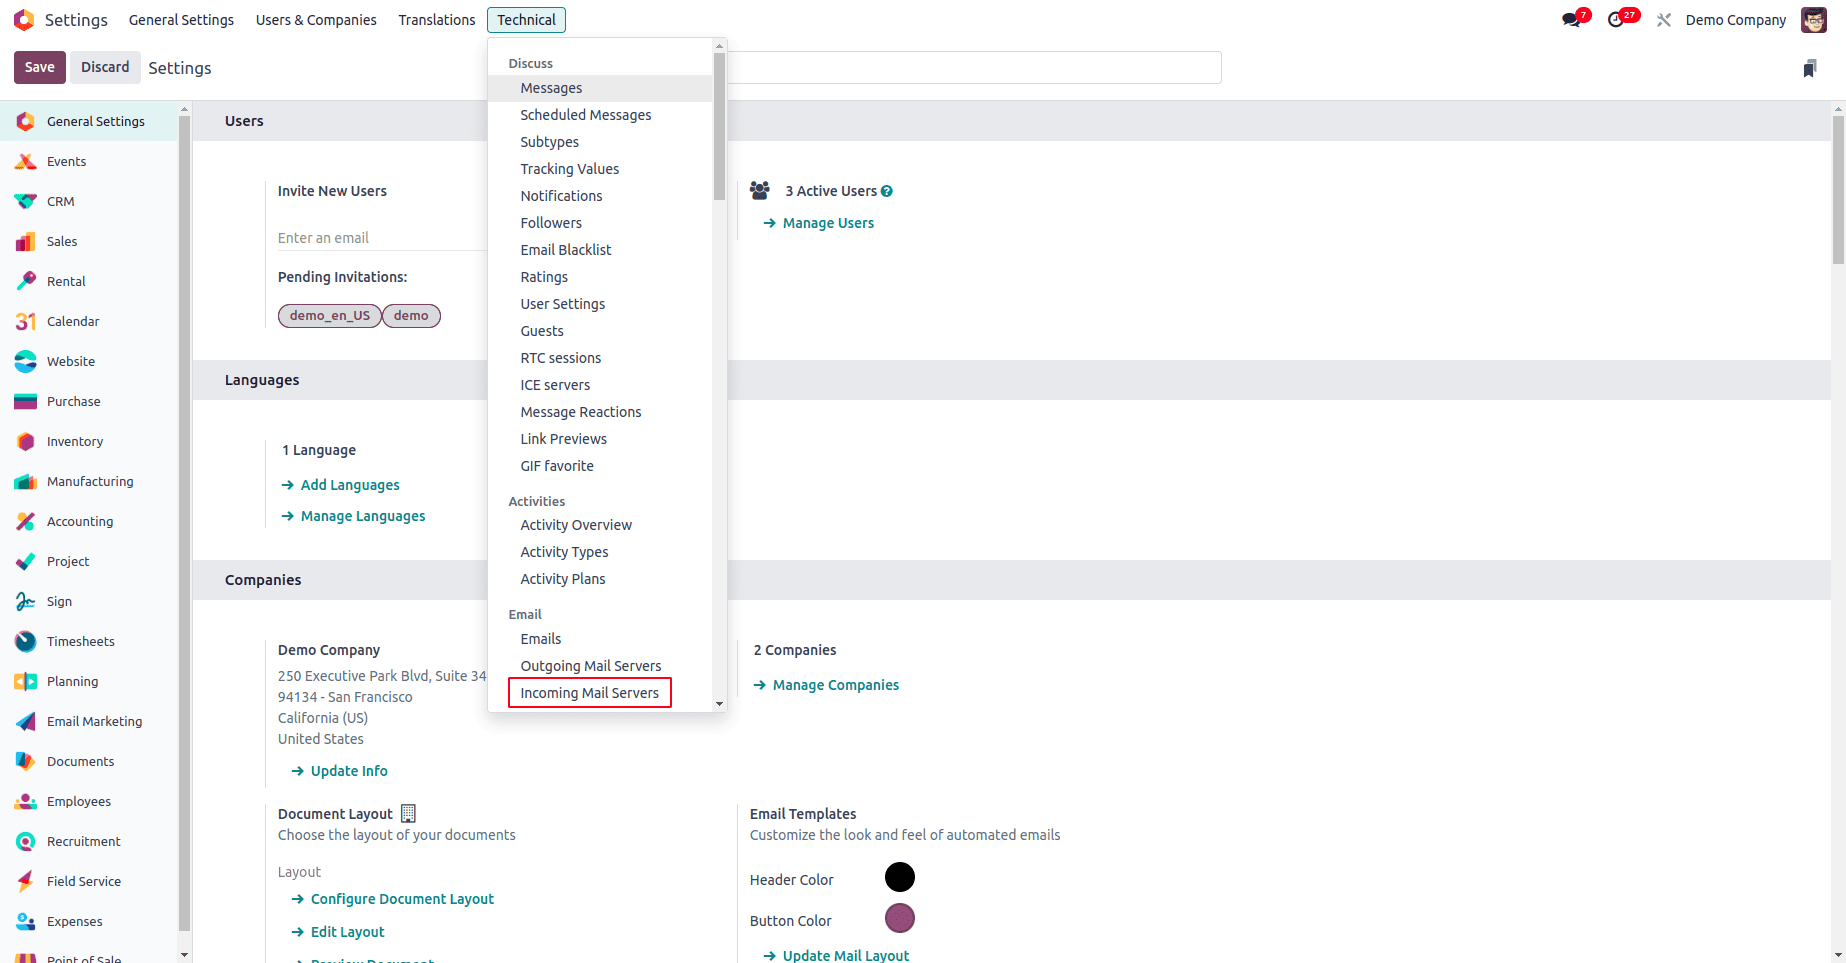
Step 3: Configuring Incoming Mail Servers
Incoming mail servers are integral for Odoo to receive and automatically process emails. This functionality allows for streamlined workflows, such as creating new records in specific modules like CRM (for leads) or Helpdesk (for support tickets) directly from incoming email communications.
Accessing Incoming Mail Server Settings
- Navigate to Settings > Technical > Email > Incoming Mail Servers. This is where you will manage and set up your incoming email configurations.
- To add a new incoming mail server, click the New button. This will open a form where you can enter the necessary server details.
Entering Incoming Mail Server Details
On the new form view, provide the following information to configure your incoming mail server:
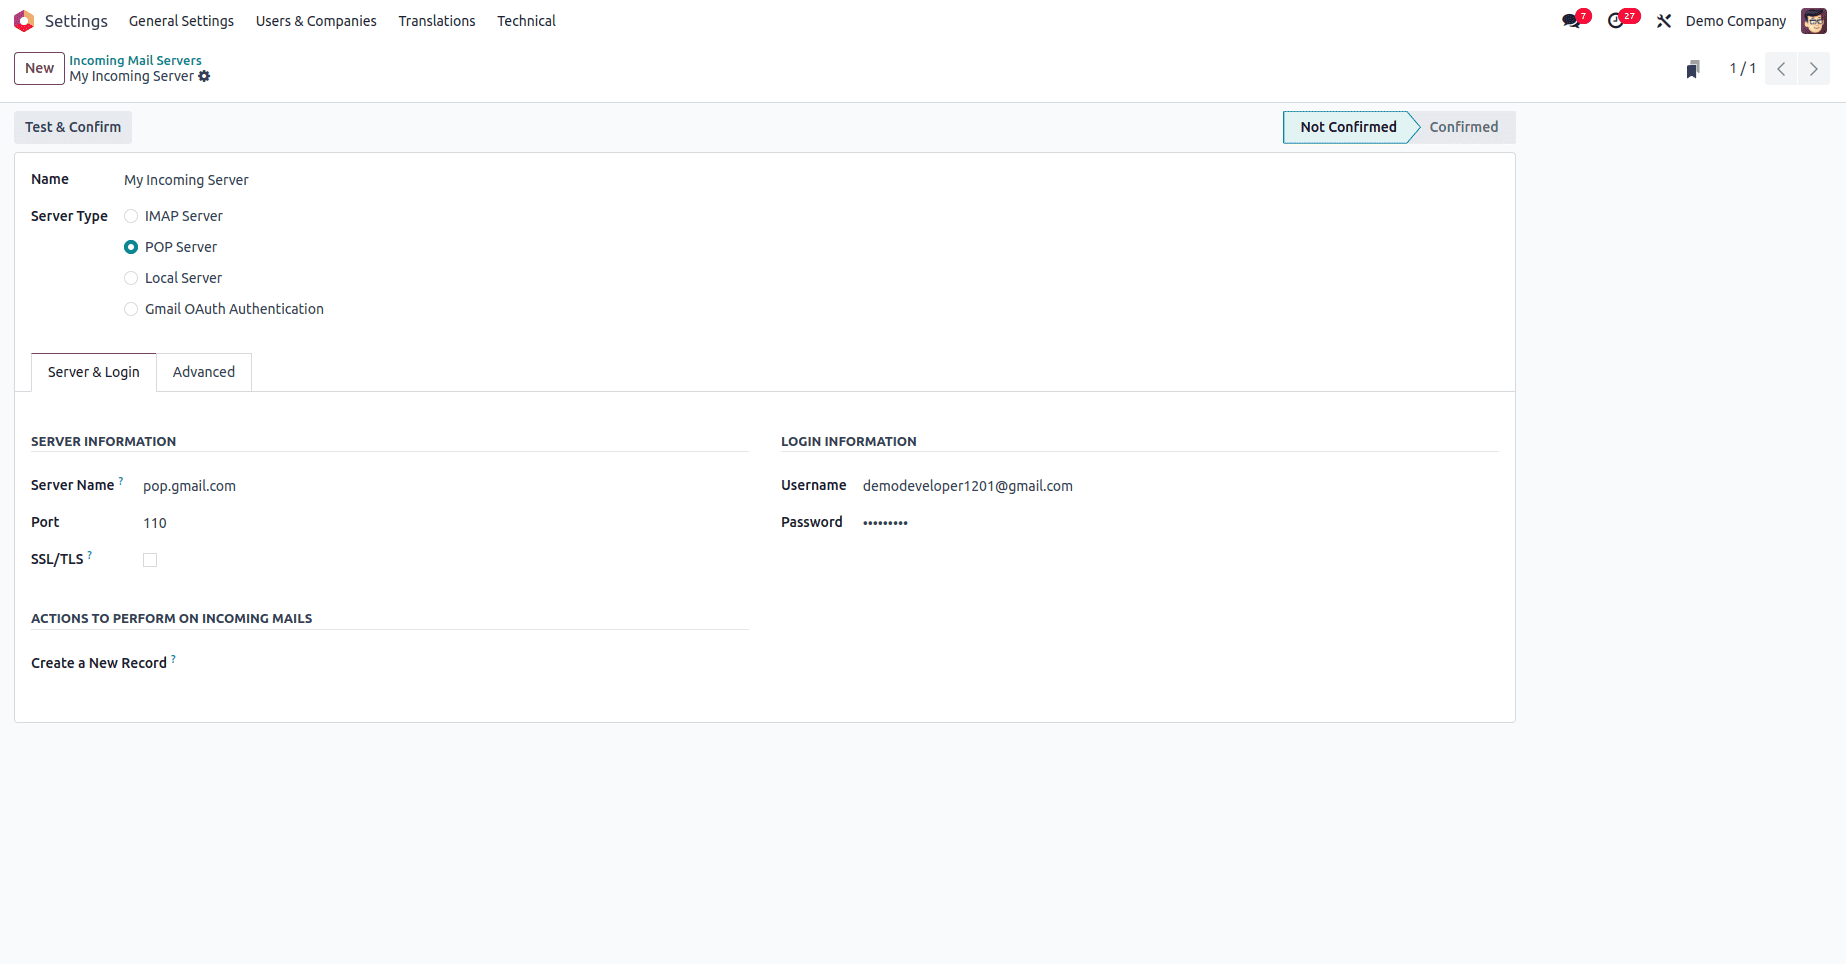
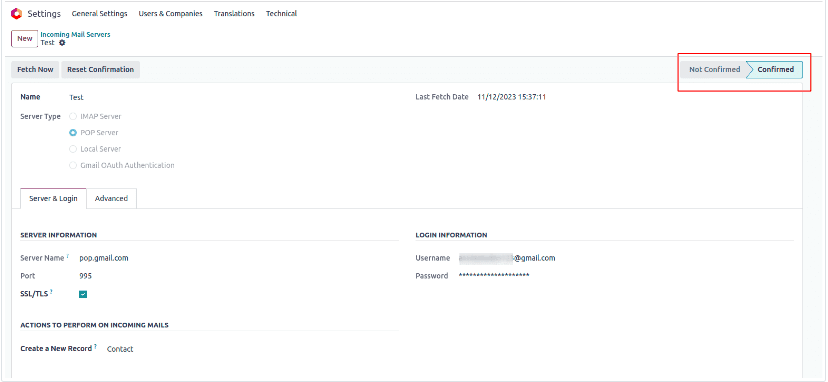
- Server Name: Input the email server address based on your provider and chosen protocol.
- For Gmail POP3, use
pop.gmail.com. - For Gmail IMAP, use
imap.gmail.com. - For Outlook/Office 365, use
outlook.office365.com.
- For Gmail POP3, use
- Port: Specify the appropriate port number for the selected email protocol (e.g., 995 for POP3 SSL/TLS, 993 for IMAP SSL/TLS).
- SSL/TLS: Ensure this option is enabled to establish a secure, encrypted connection for all incoming email communications.
- Username: Enter your full email address (e.g.,
[email protected]). - Password: Provide the corresponding password for the email account. As with outgoing servers, an app-specific password might be required by your email provider.
Defining Actions for Incoming Mails
Odoo offers advanced capabilities to automatically process incoming emails by creating records within specific modules. In the Actions to Perform on Incoming Mails section:
- Create a Record in a Model: Select the Odoo model where you want the incoming emails to be processed and converted into new records.
- For instance, selecting Leads will automatically generate new CRM leads from relevant incoming emails.
- Choosing Helpdesk Tickets will ensure that incoming support emails are converted into new helpdesk tickets, streamlining customer service.
Testing and Confirming the Incoming Configuration
- To verify your incoming mail server setup, click the Test & Confirm button located in the top-right corner of the form view.

- Upon a successful connection, Odoo will update the status of your incoming mail server from "NOT CONFIRMED" to "CONFIRMED," indicating that it is ready to process emails.
Step 4: Monitoring and Troubleshooting Email Communication
After successfully configuring both outgoing and incoming mail servers in Odoo 18, it is crucial to monitor their performance and be prepared to troubleshoot any issues that may arise. Regular monitoring ensures that your email integration remains robust and reliable, supporting continuous business operations.
Odoo provides various tools to help you keep track of email activities. You can typically find logs of sent and received emails within the system, often accessible through the "Technical" menu under "Email" or related modules. If emails are not being sent or received as expected, common troubleshooting steps include:
- Checking Server Credentials: Reconfirm that the SMTP/POP3/IMAP server addresses, port numbers, usernames, and passwords are all entered correctly. Even a minor typo can prevent connection.
- Verifying Email Provider Settings: Ensure that your email service provider allows access from external applications and that any necessary app-specific passwords or security settings are correctly configured.
- Reviewing Odoo Server Logs: Accessing your Odoo server logs can provide more detailed error messages that pinpoint the exact cause of a connection failure or processing issue.
- Testing Connection Again: Utilize the "Test Connection" and "Test & Confirm" buttons after making any changes to quickly verify if the adjustments have resolved the problem.
By diligently following this detailed guide, you can effectively configure both outgoing and incoming mail servers in Odoo 18. This setup unlocks powerful email integration features that are vital for streamlining communication, enhancing productivity, and ensuring secure and efficient business operations within your Odoo environment.
