


This comprehensive guide details the optimal configuration of LiteSpeed Cache.
When initiating your setup, it is recommended to begin with the “Advanced” preset within the LiteSpeed Cache settings. Even with this starting point, several crucial steps remain, including configuring object caching, integrating a Content Delivery Network (CDN) such as QUIC.cloud or Cloudflare, and meticulously testing CSS/JS configurations. Always monitor your website for any potential issues in an incognito browser window. Familiarity with the Tuning settings is essential, as it allows for the exclusion of problematic files that might cause site malfunctions. It is advisable to verify all settings and frequently test your website's performance using tools like PageSpeed Insights; however, Chrome Dev Tools offers a more granular and detailed analysis for troubleshooting.
For enhanced performance, consider implementing a dedicated performance optimization plugin in conjunction with LiteSpeed Cache. Such plugins often provide additional optimizations, including the ability to selectively disable plugins on specific pages to minimize CSS/JS overhead, preload Largest Contentful Paint (LCP) images and other critical resources, and host web analytics scripts locally. Some users may find that these plugins offer superior results for lazy loading, in which case it is important to ensure no duplicate settings are enabled between the caching plugin and the performance optimization plugin.
To further improve user experience, especially navigation speed, a navigation optimization plugin can be utilized. In such cases, it is advisable to disable the "Instant Click" feature within LiteSpeed Cache to prevent conflicts and redundant functionalities. The synergy of LiteSpeed Cache, a performance optimization plugin, and a navigation optimization plugin, coupled with a high-performance hosting environment, can dramatically enhance your website's speed and responsiveness.
- ON – enable (may still require testing).
- OFF – disable.
- TEST – commonly breaks sites (test in incognito window).
- DEPENDS – on/off depends on something else, like another setting.
- CONSUMES RESOURCES – can increase server resource usage.
When selecting a hosting provider optimized for LiteSpeed, consider services known for their robust performance. For shared hosting, reputable providers offer excellent value, featuring fast CPUs and NVMe SSDs, which are crucial factors influencing Time To First Byte (TTFB) and WordPress admin panel speed. For Virtual Private Servers (VPS), a range of providers specialize in high-frequency compute options, leveraging advanced hardware for superior performance. It is important to choose a hosting solution that aligns with high performance standards, as the quality of your hosting significantly impacts overall site speed and reliability.
Should you encounter any issues during configuration, it is highly recommended to consult LiteSpeed's official documentation, leverage the plugin's dedicated support channels, or seek assistance from the active user community.

1. Dashboard
The Dashboard provides an overview of various settings, displaying metrics such as CDN usage, available quota, and performance load times for your website.

2. General Settings
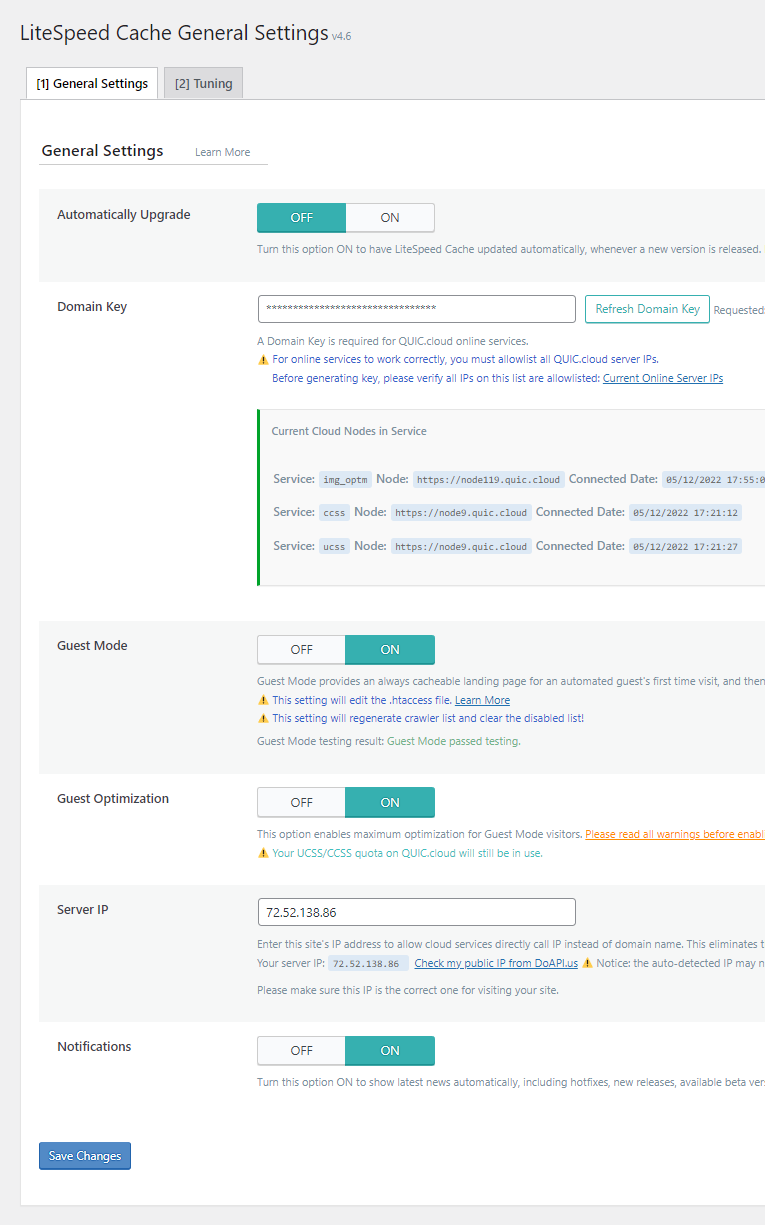
- Automatically Upgrade: Off – Manual plugin updates are generally recommended for better control and stability.
- Domain Key: Requesting a domain key is essential for seamless integration with CDN services.
- Guest Mode: On – Activating Guest Mode can substantially enhance load times for first-time visitors and improve PageSpeed scores. Note that this feature is not compatible with certain CDN acceleration platforms and may increase server resource consumption. Always test for potential issues in an incognito browser window and exclude any conflicting files via the Tuning settings.
- Guest Optimization: On – This setting should only be enabled in conjunction with Guest Mode. It applies aggressive page and image optimizations for new visitors, leading to further improvements in load times and performance scores.
- Server IP: Locate your server's IP address within your hosting control panel, typically under General Information or similar sections. Relying on external IP detection services may not always yield the accurate server IP.

- Notifications: On – Enable this to receive important updates and notifications from the plugin, or disable it if preferred.
3. Configuration Presets
Preset configurations allow for quick application of optimized settings, saving valuable time during initial setup.

If you opt for the recommended "Advanced" preset, the following checklist outlines essential steps and considerations for further fine-tuning:
- General → Request a domain key and add your server IP address.
- Cache → Disable cache logged-in users and cache commenters.
- Object → Configure object cache, or request assistance from your hosting provider.
- Advanced → Disable Instant Click and consider using a dedicated navigation optimization plugin for preloading.
- CDN → Establish your CDN integration and configure settings within its dashboard. Ensure key features like the QUIC backend, author scan blocking, browser XML-RPC blocking, and hotlink protection are enabled.
- Image Optimization Settings → Enable lossless optimization for images.
- Page Optimization → Tuning – CSS → Exclude common Unused CSS (UCSS) files. Enable CSS combine and generate UCSS. If this causes site breakage, exclude additional CSS files (using browser developer tools to identify them). Alternatively, consider whitelisting specific CSS selectors. If issues persist, disable UCSS and instead enable load CSS asynchronously and inline CSS async lib, then re-test your site.
- Page Optimization → JS Deferred / Delayed Excludes → Exclude common JavaScript files from delayed execution. Proceed to JS settings, set "load JS deferred" to Delayed, and test thoroughly. If site functionality is affected, exclude other problematic JavaScript files or revert to the "Deferred" option.
- HTML settings → Add prefetch/preconnect hints for relevant third-party domains that cannot be hosted locally. Define applicable classes or IDs for HTML lazy load selectors, and disable the option to remove noscript tags.
- Lazy Load → Disable all lazy load settings if utilizing a performance optimization plugin for this feature; otherwise, enable all.
- VPI → Disable all VPI settings if utilizing a performance optimization plugin for this feature; otherwise, enable all.
- Localization → Enable localize resources and specify applicable third-party domains. For local font hosting, a specialized plugin can be used to optimize and preload above-the-fold fonts. Monitor browser developer console for any errors or warnings.
- Tuning → This section is crucial for excluding additional files that may cause conflicts or breakage with enabled optimization settings.
- Database → DB Optimization Settings → Define the maximum number of post revisions (e.g., 10) and then proceed to clean your database via the Manage tab by selecting "clean all".
- Crawler → Configure the crawler to enhance performance by proactively caching pages. However, this feature is generally not recommended for shared hosting environments due to its significant resource consumption, unless very conservative settings are applied and server capacity allows.
- Toolbox → Heartbeat → Enable all three Heartbeat control settings and configure their respective TTL values to 0, 0, and 120 seconds.
- Performance Optimization Plugin → Refer to the dedicated section below for detailed configuration of a performance optimization plugin.
- Purge: Access Toolbox > Purge All. For CDN services, navigate to the CDN section and initiate a purge of all CDN cache.
- Test → Thoroughly test your website using Chrome Dev Tools, paying close attention to console warnings. Additionally, inspect for any layout discrepancies and monitor server resource usage (CPU/RAM) within your hosting control panel.
4. Cache Settings
Cache
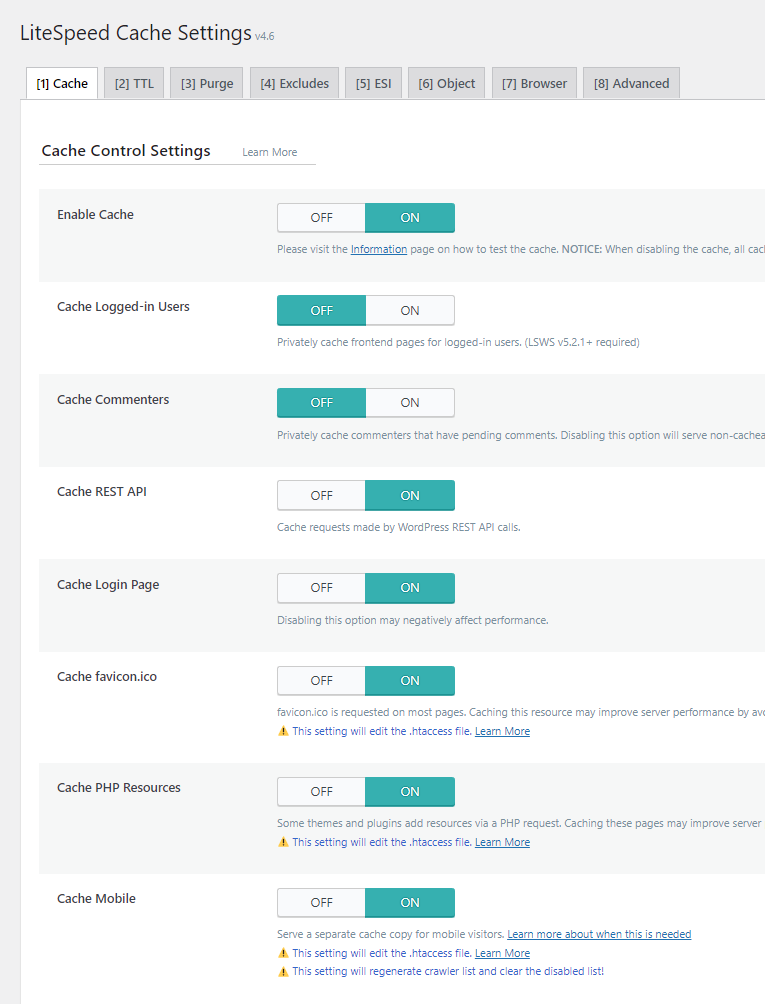
- Enable Cache: On – This fundamental setting activates the caching mechanism. Verify its functionality by checking for the "x-litespeed-cache hit" header in your website's HTTP response.
- Cache Logged-in Users: Off – Only activate this setting for websites with a membership model or similar setups where individual logged-in user sessions require separate caching. Otherwise, keeping it enabled will consume additional server resources unnecessarily.
- Cache Commenters: Off – This option generates a distinct cache for users who submit pending comments. For blogs with a high volume of comments, enabling this can consume significant server resources.
- Cache REST API: On – Essential for modern WordPress themes, various plugins, and the Block Editor, enabling this setting ensures efficient caching of REST API calls.
- Cache Login Page: On – Activating this helps conserve server resources, as the login page is a frequent access point. It is generally advisable to maintain the default login URL, as caching and CDN services are optimized to handle it efficiently.
- Cache favicon.ico: On – This setting ensures the favicon (the small icon displayed in the browser tab) is cached for faster loading.
- Cache PHP Resources: On – This caches static PHP-generated files, such as CSS and JavaScript, that are part of your theme. Disable only if your website explicitly loads dynamic CSS or JavaScript via PHP, which is uncommon for most setups.
- Cache Mobile: On – This setting is mandatory when utilizing Guest Mode, Guest Optimization, and other advanced optimizations like UCSS, CCSS, or AMP, or when serving mobile-specific content. Be aware that it consumes server resources.
- Cache URIs: For most websites, explicitly caching URIs is generally not required, as the “cache logged-in users” setting typically manages private cached URIs, and few pages necessitate forced caching.
- Drop Query String: Query strings, often found in marketing and tracking URLs, can prevent caching. The default exclusion list is usually sufficient, but additional query strings should be added if present on your site.
Time-To-Live (TTL) Settings
- Cache TTL – The default Time-To-Live (TTL) settings are typically adequate. Cache TTL defines the duration a cached file remains valid before it expires and a new version is generated. A shorter TTL ensures users always view the most recent content, ideal for frequently updated sites, but increases server resource consumption. Conversely, a longer TTL conserves resources but results in less frequent cache refreshes.

Purge Settings
- Purge All On Upgrade: On – This essential setting automatically purges the cache when WordPress core, themes, or plugins are updated, ensuring your website displays correctly. It is a recommended practice to keep this enabled.
- Auto Purge Rules For Publish/Update: The default auto-purge rules are generally sufficient. When publishing a new post or updating existing content, it often necessitates purging related elements such as the blogroll to reflect the changes across the site.
- Serve Stale: Off – If enabled, this feature serves the most recently purged (stale) version of a page while the new cached version is being generated. Activating it consumes additional server resources.
- Scheduled Purge URLs: This section is only necessary if specific pages require purging at predefined times, typically during periods of low website traffic. If utilized, the scheduled purge time must also be configured.
- Purge All Hooks: The default settings for purge hooks are generally adequate. These hooks trigger a complete cache purge when specific actions occur. For instance, adding comment\_post can ensure a site-wide purge upon a new comment submission.

Exclusion Rules
This section allows you to define exclusions. It is primarily used for dynamic websites, sites with frequent content changes, or those catering to logged-in users, where standard caching might inadvertently display outdated information. Relevant paths or patterns should be added here to prevent such occurrences.
Edge Side Includes (ESI)
- Enable ESI: Off – Edge Side Includes (ESI) provide granular control over how different components of dynamic pages are cached (publicly, privately, with custom TTLs). However, implementing ESI can introduce complexity, and for many server configurations, returning full page caches is simpler and often more efficient. If ESI is disabled, configurations for elements like the admin bar, comment form, Nonces, or Vary Group become unnecessary.
Object Cache
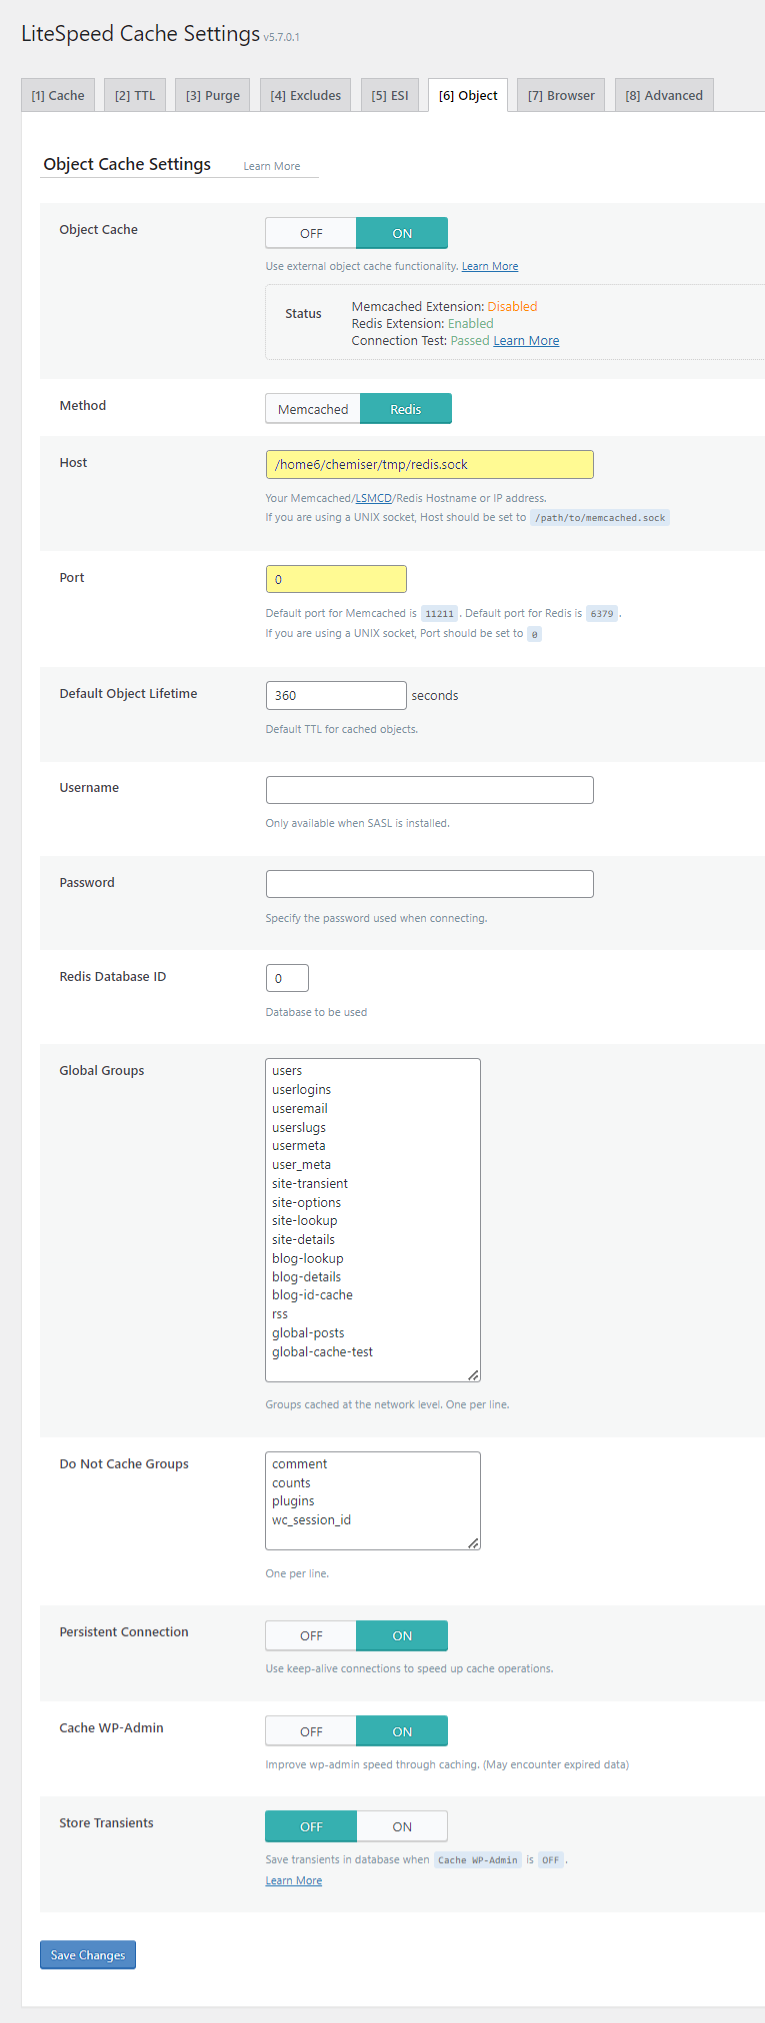
Object caching significantly improves the performance of the WordPress administration area and offers broader performance benefits. Solutions like Redis are often more robust than Memcached, particularly for complex, e-commerce, or highly dynamic websites. For such demanding environments, advanced object caching solutions may offer superior performance. Consult your hosting provider’s documentation for specific instructions on enabling Redis or Memcached, including details on supported versions, activation procedures, port numbers, and socket paths.


Check whether your hosting plan supports Redis.
- Step 1: Activate Redis or Memcached within your hosting control panel. This is typically found under sections like "Redis Object Cache," "LiteSpeed Redis Cache Manager," or by enabling the Redis extension within "Select PHP Version."

- Step 2: Record the designated port number and socket path provided by your hosting environment.

- Step 3: Within LiteSpeed Cache, enable Object Cache and select Redis as the method. Input the noted port number and socket path into the respective fields. After saving changes, a connection test should confirm successful integration. If you encounter difficulties or the feature is unavailable, contact your hosting support for assistance.
- Object Cache: On – This feature enables database caching, which accelerates the administrative backend and enhances overall site performance.
- Method: Redis – Redis is generally considered more powerful than Memcached, though its availability depends on your hosting provider. Activate it first within your hosting account, then configure it here.
- Host: Consult Hosting Account – The host information, typically referred to as the “socket path,” can be found within your hosting control panel.
- Port: Consult Hosting Account – The correct port number should be specified by your hosting provider; otherwise, common default ports are 11211 for Memcached and 6379 for Redis.
- Default Object Cache Lifetime: A value of 360 seconds is typically suitable for the default object cache lifetime.
- Username/Password: These fields can generally be left blank as they are not typically required for this setup.
- Redis Database ID: Use for Multiple Sites – When a single hosting account manages Redis for multiple websites, each site will require a unique Redis Database ID, typically ranging from 0 to 100.
- Global Groups: These fields should generally be left unchanged, as they define groups intended for network-level caching.
- Do Not Cache Groups: This setting can be left as default unless specific groups need to be explicitly excluded from object caching.
- Persistent Connection: On – Enabling this maintains an active connection, further accelerating object cache performance.
- Cache WP-Admin: On – This accelerates the WordPress administrative interface. Keep it enabled unless you observe outdated data, in which case it may need to be temporarily disabled for troubleshooting.
- Store Transients: Off – If "Cache WP-Admin" is disabled, enabling this ensures server status notices are preserved.
Browser Cache
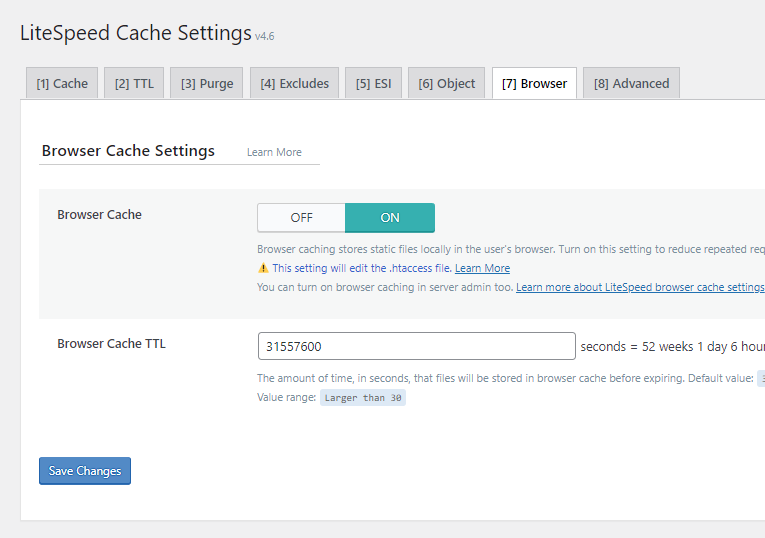
- Browser Cache: On – This setting is fundamental and should always be enabled for optimal performance.
- Browser Cache TTL: 31557600 – A duration of approximately one year (31,557,600 seconds) is recommended by major search engines for serving static assets with an efficient cache policy. This value instructs browsers on the duration to store cached resources. For e-commerce platforms or highly dynamic websites, a shorter TTL, such as 43,800 seconds (one month), might be more appropriate.
Advanced Settings
- Login Cookie: This setting can typically be left at its default. It is primarily relevant for environments with multiple independent WordPress installations where the caching system needs to differentiate between logged-in users across these distinct sites; it is not applicable to WordPress multisite setups.
- Improve HTTP/HTTPS Compatibility: Off – Only enable this if your website uses both HTTP and HTTPS protocols and you are encountering caching-related problems. Alternatively, enforcing SSL (Secure Sockets Layer) across your entire site can often resolve such compatibility issues.
- Instant Click: Off – This feature attempts to preload pages in the background when a user hovers over a link, aiming for instant page loads upon clicking. However, it consumes server resources. A dedicated navigation optimization plugin is often a more efficient alternative, as it not only offers similar preloading capabilities but can also preload pages within the viewport, significantly speeding up navigation while including mechanisms to minimize server load.

5. Content Delivery Network (CDN)
A specialized Content Delivery Network (CDN) designed for LiteSpeed, such as QUIC.cloud, offers exceptional performance as demonstrated by various CDN performance trackers. This type of CDN is integral for enabling certain advanced LiteSpeed Cache features, including image optimization and critical CSS generation. While a basic plan may be available, it often utilizes a limited number of Points of Presence (PoPs). For optimal performance and comprehensive protection, including DDoS mitigation, upgrading to a standard plan that leverages an extensive global network of PoPs is highly recommended.

CDN network (multiple points of presence)
How To Set Up a Specialized CDN

- Step 1: Ensure that a domain key has been requested and your server's IP address has been correctly entered in the General settings section.
- Step 2: Navigate to CDN → CDN Setup → Begin CDN Setup. After clicking “Refresh CDN Setup Status,” you will be provided with two nameservers. Utilizing the CDN's DNS typically results in improved performance when paired with LiteSpeed, owing to more precise geo-routing capabilities.

- Step 3: Access your domain registrar and update your domain's nameservers to those provided by the CDN. The process usually involves navigating to "Domains," "Manage Domain," "Nameservers," and selecting "Use Custom Nameservers."

- Step 4: Register for the CDN service, either through a link in your LiteSpeed Cache settings or directly on the CDN provider's website. Within your domain's CDN configuration, enable the following four critical settings. For most websites, default settings for other options are suitable; advanced users may customize further as needed.
- QUIC backend – Accelerates the WordPress admin panel by enabling the CDN to connect to your server using HTTP/3.
- Block Author Scan – Prevents the scanning of author profiles on your site, mitigating potential username enumeration attacks. This should not be blocked if your SEO strategy relies on author archives.
- Block Browser XML-RPC – Contributes to server resource conservation and enhanced security. However, this should not be blocked if you use certain WordPress plugins, mobile applications, or external services that depend on XML-RPC.
- Hotlink Protection – Safeguards your website by preventing unauthorized embedding of your images on other sites, thereby conserving your bandwidth.


- Step 5: Within the CDN tab, consider upgrading from a free tier to a standard plan and acquire sufficient credits to cover anticipated usage. Some hosting providers that utilize LiteSpeed Enterprise may offer complimentary monthly credits, which is not typically the case with OpenLiteSpeed installations.

Activate the standard plan and select your regions.
Alternative CDN Setup: Cloudflare with LiteSpeed Cache
If exploring alternative CDN solutions, Cloudflare offers robust acceleration platforms that can be integrated. Cloudflare's APO or a specialized caching plugin for Cloudflare, which utilizes dynamic caching, can be considered.
When implementing Cloudflare's APO, it is crucial to disable specific LiteSpeed Cache settings to avoid conflicts. These include Guest Mode, mobile cache, WebP replacement, JS/CSS minify, and JS/CSS combine. The Cloudflare plugin should then be used to configure APO, following its specific setup instructions.
Specialized Cloudflare Page Cache Instructions
- Step 1: Update your domain's DNS to use Cloudflare, a service renowned for its DNS performance. After adding your website to Cloudflare, their system will scan your existing DNS records and provide two new nameservers. These should be updated in your domain registrar's settings, typically found under "Domains," "Manage Domains," "Nameservers," and selecting "Use Custom Nameservers."

- Step 2: Install the specialized Cloudflare page cache plugin. Provide your Cloudflare account email, global API key, and domain, then enable page caching. The developer recommends the following steps. For further inquiries, consulting the plugin's support forum is advisable.
- Disable LiteSpeed Cache’s page caching, guest mode, and guest optimization.
- LiteSpeed Cache should then primarily be used for static file optimization. However, most other LiteSpeed Cache configurations, such as object cache, crawler, database optimization, Heartbeat, and image/page optimization settings, can still be utilized normally, excluding its caching and CDN features.
- Avoid entering your Cloudflare API details directly into LiteSpeed Cache, as this plugin manages that integration.
- Refrain from using the official Cloudflare plugin and confirm that APO (Automatic Platform Optimization) is disabled in your Cloudflare dashboard.
- Activate fallback cache within the specialized page cache plugin, and then disable page caching in LiteSpeed Cache.

- Step 3: Proceed to configure settings within your Cloudflare dashboard. The following recommendations are often beneficial:
- SSL/TLS Recommender (found under SSL/TLS → Overview).
- Always Use HTTPS (located under SSL/TLS → Edge Certificates).
- HTTP Strict Transport Security (configurable under SSL/TLS → Edge Certificates).
- WAF Rules (within the Security section) to effectively block undesirable requests.
- Brotli (found in Speed → Optimization → Content Optimization).
- Early Hints (accessible via Speed → Optimization → Content Optimization).
- Crawler Hints (under Caching → Configuration).
- Hotlink Protection (within Scrape Shield).
- Purge Cloudflare’s Cache (perform this action once all configurations are complete).
- Step 4: Utilize a robust TTFB (Time To First Byte) testing tool to measure performance across multiple geographical locations. It is recommended to test your website at least three times to confirm that resources are properly cached and that your CDN is effectively routing traffic through the nearest data center.

General CDN Settings
- CDN Integration – On – Enable this if you are actively using a specialized CDN service; otherwise, keep it off if using an alternative CDN.
- Use CDN Mapping – Off – Most modern CDN services do not require explicit CDN mapping, so this setting is generally disabled. It should only be enabled if your CDN utilizes a specific CDN URL, such as some third-party CDN providers. In such scenarios, you would input the CDN URL and specify the file types to be served.
- HTML Attribute To Replace – This setting can be left at its default, as it is only relevant when CDN mapping is enabled.
- Original URLs – This setting should remain at its default unless you are managing a multisite installation with varied domains and subdomains.
- Included Directories – Typically, specifying only the wp-content and wp-includes directories is sufficient for CDN integration.
- Exclude Path – This field can be left blank unless there are specific subdirectories within the included directories that you wish to exclude from CDN processing.
- Cloudflare API – This is only necessary if you are integrating with Cloudflare's CDN services, rather than a specialized LiteSpeed-compatible CDN.
6. Image Optimization Settings
Carefully configure the following settings to ensure optimal image delivery, then initiate an image optimization request.
- Auto Request Cron: On – Enables an automated cron job to request optimization for newly uploaded images.
- Auto Pull Cron: On – This setting should be enabled in conjunction with the "Auto Request Cron" for continuous optimization processing.
- Optimize Original Images: On – It is generally recommended to enable this feature to optimize your original image files.
- Remove Original Backups: Off – Retain original image backups unless you are fully satisfied with the quality of the optimized versions.
- Optimize Losslessly: On – Lossless compression is often preferred for maintaining image quality, but you can experiment with other compression methods to find the best balance for your site.
- Preserve EXIF/XMP Data: Off – Disabling this removes EXIF data from images, which contributes to smaller file sizes and faster loading.
- Create WebP Versions: On – This setting generates WebP versions of your images, which are known for their superior compression and smaller file sizes. After optimization, use browser developer tools to verify that WebP images are being served. Consult documentation or support forums for common WebP troubleshooting if issues arise.

- Image WebP Replacement: On – This feature should be enabled if the "Create WebP Versions" option is also active, ensuring WebP images are served when supported.
- WebP Attribute To Replace: Define the specific HTML element attributes that should be targeted for WebP image replacement.
- WebP For Extra srcset: On – Ensures that images referenced within custom code, particularly those using srcset, are also served in WebP format where possible.
- WordPress Image Quality Control: 85 – A quality setting of 85% is often aligned with performance assessment tools, providing a good balance between file size and visual fidelity.

7. Page Optimization Settings
Preventing Layout Breakage Through File Exclusions
To prevent layout issues, particularly when implementing Unused CSS (UCSS) removal and JavaScript delay, it is crucial to exclude specific files. This applies if you use popular page builders, themes, or other services. Refer to documentation for common UCSS exclusions and add any relevant files or services under Tuning – CSS → UCSS File Excludes and Inline. Similarly, identify common JavaScript delay exclusions and add them under Tuning → JS Delayed Includes. Performing these exclusions proactively will significantly improve compatibility and reduce the risk of site breakage. For instance, with a widely used theme, its core styles and mobile menu scripts should typically be excluded from UCSS processing.

Troubleshooting Persistent Layout Issues
Should layout issues persist despite minify/combine optimizations, the Tuning section provides a means to exclude problematic files. If Unused CSS (UCSS) is identified as the source of the problem, consult relevant documentation for guidance on whitelisting specific CSS selectors.
Addressing Flash of Unstyled Content (FOUC)
Certain CSS optimization settings can lead to Flash of Unstyled Content (FOUC) and unexpected layout shifts, both of which negatively affect Core Web Vitals. These issues are frequently associated with minify, combine, UCSS, and asynchronous CSS loading. It is imperative to test each of these settings individually and thoroughly monitor your website for any visual anomalies.

CSS Settings
- CSS Minify: On – This feature removes superfluous characters and whitespace from CSS files, resulting in smaller file sizes.
- CSS Combine: Test – While necessary for UCSS, this setting frequently causes site breakage. If issues arise, identify the conflicting CSS files and add them to the exclusion list under Tuning – CSS → CSS Excludes.
- Generate UCSS: Test – This feature aims to eliminate unused CSS but is a common cause of site breakage. Should this occur, additional files may need to be excluded from UCSS processing. If problems persist, consider disabling this setting and enabling "load CSS asynchronously" as an alternative. Note that a specialized CDN service is essential for both UCSS and Critical CSS (CCSS) functionalities.
- UCSS Inline: Depends – The decision to inline UCSS depends on your priorities. Enabling it can improve PageSpeed scores, but for actual user experience, loading UCSS in a separate file is often faster.
- CSS Combine External and Inline: Test – This setting should be enabled when "CSS Combine" is active, as it helps prevent potential errors.
- Load CSS Asynchronously: Depends – Only activate this if UCSS is not functioning correctly. This feature automatically generates critical CSS. If you encounter FOUC, allow time for Critical CSS (CCSS) rules to generate, then perform a full cache purge. Monitor your Cumulative Layout Shift (CLS) score in Core Web Vitals, and be aware that this setting may not be compatible with certain CDN acceleration platforms.
- CCSS Per URL: Off – Disable this setting if "Load CSS Asynchronously" is off, particularly when working with page builders.
- Inline CSS Async Lib: Depends – This should be enabled if "Load CSS Asynchronously" is active, as it aids in preventing FOUC.
- Font Display Optimization: Swap – This strategy displays a fallback font while custom web fonts are loading, effectively preventing Flash of Invisible Text (FOIT) and addressing the "ensure text remains visible during webfont load" recommendation in performance audits.

JavaScript Settings
- JS Minify: On – This feature removes unnecessary characters and whitespace from JavaScript files, leading to smaller file sizes.
- JS Combine: Off – It is generally recommended to disable this setting when operating on modern HTTP/2 or HTTP/3 servers.
- JS Combine External and Inline: Off – This should only be enabled if "JS Combine" is active, which is typically not recommended.
- Load JS Deferred: Delay + Test – Setting this to "Delay" often yields the best performance results, but it frequently causes site breakage. In such cases, it is necessary to add common JavaScript delay exclusions within your Tuning settings and, if needed, exclude other problematic JavaScript files. The "Deferred" option offers a good balance, while "Off" provides the safest approach.

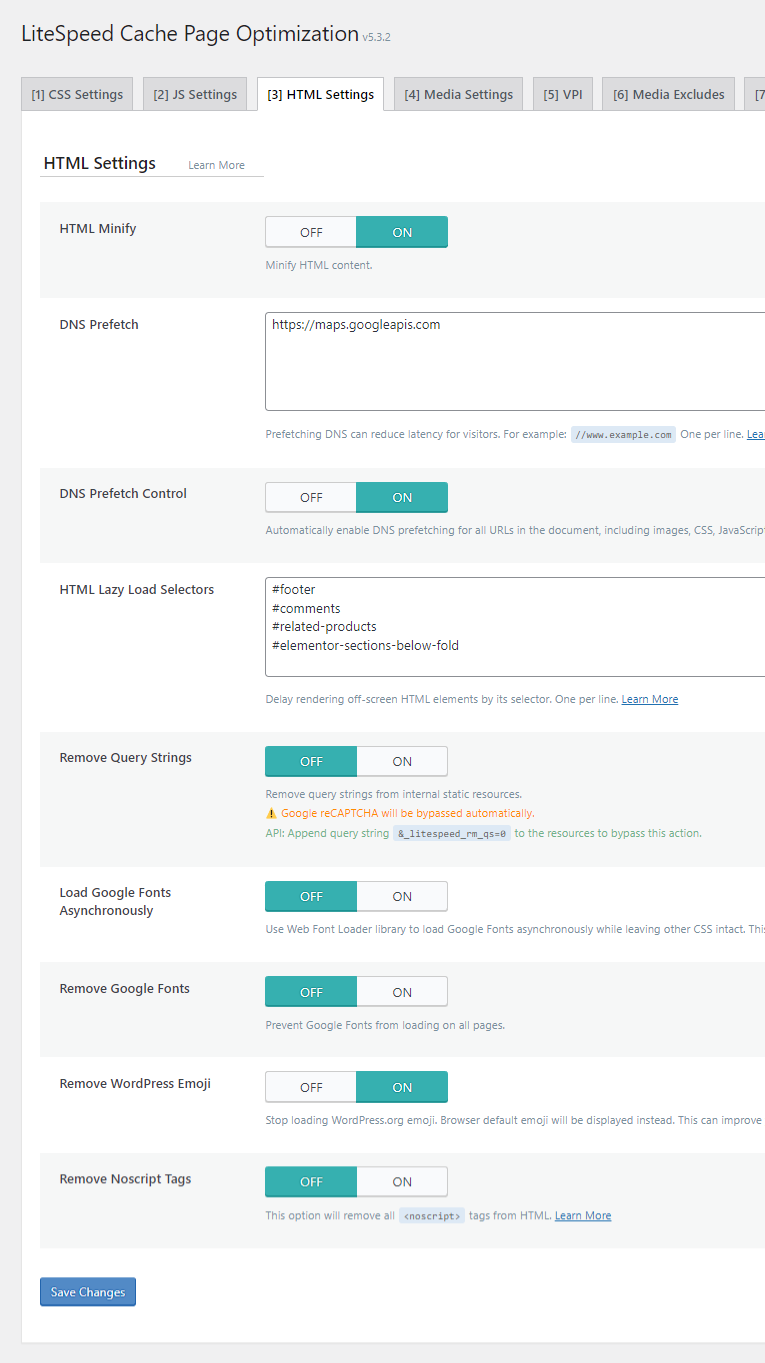
HTML Settings
- HTML Minify: On – This setting removes superfluous characters and whitespace from HTML markup, reducing file size.
- DNS Prefetch: This optimization is employed when a resource is anticipated soon but not immediately required. Analyze your website's third-party code report in performance tools to identify external domains loading on your site. While most third-party scripts should ideally be delayed or hosted locally via Localization settings, any persistent external domains that cannot be optimized otherwise should be added here.
- DNS Prefetch Control: On – This setting works in conjunction with the DNS Prefetch list; no further action is needed if you've already defined domains there.
- DNS Preconnect – This is utilized when a resource is critically needed immediately. In most optimized setups, this setting requires minimal intervention, as CDN URLs (which are typically not distinct for specialized CDNs) and third-party fonts (which are ideally hosted locally) are the primary candidates for preconnection.
- HTML Lazy Load Selectors: This feature extends lazy loading functionality to content located below the fold, beyond just images. Common applications include comment sections, footers, related product displays in e-commerce, and page builder sections. To implement, identify the desired element on your live site, inspect its code using browser developer tools, copy its CSS selector, and then paste it into the LiteSpeed Cache settings. While some performance optimization plugins offer integrated, user-friendly options for this, LiteSpeed Cache currently requires manual input of CSS selectors.
- HTML Keep Comments: Off – This setting is primarily used for debugging purposes, allowing HTML comments to remain in the source code. For production sites, it should typically be off.
- Remove Query Strings: On – Enabling this allows static resources that contain query strings to be effectively cached.
- Load Google Fonts Asynchronously: Off – Exercise caution and thorough testing with this setting. Analyze the "fonts" section of your waterfall chart in performance tools to observe the impact on font loading times. Often, keeping this off yields better results.
- Remove Google Fonts: Off – This should only be activated if you are locally hosting all fonts and wish to prevent any external Google Fonts from loading on your website.
- Remove WordPress Emoji: On – Emojis can contribute to increased page load times, so enabling this setting helps optimize performance.
- Remove Noscript Tags: Off – While enabling this might offer a minor performance improvement, it carries the risk of causing JavaScript-related issues with analytics tools and SEO. Therefore, it is generally recommended to leave it disabled.
Media Settings
- Lazy Load Images: Depends – This setting controls the lazy loading of images. Note that it may not effectively lazy load background images, a capability often offered by dedicated performance optimization plugins through CSS background image handling. If your site heavily relies on background images, using such a plugin for lazy loading might yield superior results.
- Basic Image Placeholder: This option allows you to display a low-fidelity image placeholder while the full-resolution images are loading.
- Responsive Placeholder: Depends – Enable this if you are using a basic image placeholder, as it helps reduce Cumulative Layout Shift (CLS) by reserving space for the image.
- Responsive Placeholder SVG: Define the SVG (Scalable Vector Graphics) to be used as the responsive image placeholder.
- Responsive Placeholder Color: The default gray color provided by LiteSpeed Cache is generally suitable for the responsive placeholder.
- LQIP Cloud Generator: On – When enabled, a Low-Quality Image Placeholder (LQIP), generated by a CDN service, is displayed as a temporary visual cue before the full-quality image loads. It is advisable to test this feature to ensure desired visual outcomes.
- LQIP Quality: If the LQIP Cloud Generator is active, this setting controls the quality level of the generated low-quality image placeholder.
- LQIP Minimum Dimensions: A dimension of 150x150 pixels is generally appropriate. This setting applies only when the LQIP cloud generator is enabled, and LQIP will only be used for images exceeding these specified dimensions.
- Generate LQIP In Background: On – Enabling this allows LQIP generation to occur in the background, as disabling it may adversely affect page load times.
- Lazy Load Iframes: On – Activating lazy loading for iframes, including videos and maps, significantly contributes to improved page loading speed.
- Add Missing Sizes: On – This feature automatically adds explicit width and height attributes to image tags that lack them, which helps prevent layout shifts.

Viewport Images (VPI)
- Viewport Images: On – When enabled, a CDN service intelligently identifies non-background images visible within the initial viewport and automatically excludes them from lazy loading. For this feature to function, "Lazy Load Images" must also be active.
- Viewport Images Cron: On – This ensures that viewport image detections are processed efficiently in the background through a cron-based queue.
Specialized performance optimization plugins often offer more sophisticated "preload critical images" settings that can more effectively exclude viewport images from lazy loading while simultaneously preloading them. If performance audit tools continue to flag LCP images as problematic, consider utilizing the corresponding setting in a dedicated performance optimization plugin.


Edit a page to ensure correct viewport image detection.
Media Exclusions
Although the Viewport Images setting aims to automatically exclude above-the-fold images from lazy loading, you retain the option to manually exclude specific images here. Exclusions can be defined by URL or, for bulk exclusions, by class name.

Localization Settings
- Gravatar Cache: On – This feature is highly beneficial for websites with numerous comments, as it caches Gravatar images for faster display.
- Gravatar Cache Cron: On – This setting should be enabled to ensure continuous Gravatar cache generation if Gravatar Cache is active.
- Gravatar Cache TTL: The default Time-To-Live (TTL) of 604,800 seconds (one week) for Gravatar cache is typically sufficient.
- Localize Resources: On – This valuable feature allows you to host external JavaScript files locally. Relevant URLs should be added in the section below.
- Localization Files: Review your website's third-party code report to identify external JavaScript files. Consider delaying the loading of non-essential scripts, such as web analytics, tag managers, or CAPTCHA services. A curated list of commonly localized scripts is provided below. For web fonts, prioritize local hosting over delaying. Be aware that delaying advertisement scripts may impact revenue. Consult documentation for common issues related to localization.
      https://ajax.aspnetcdn.com

      https://ajax.cloudflare.com/

      https://ajax.googleapis.com/ajax/

      https://cdn.jsdelivr.net/

      https://cdnjs.com/

      https://cdnjs.cloudflare.com/

      https://code.jquery.com/

      https://maxcdn.bootstrapcdn.com/

      https://netdna.bootstrapcdn.com/

      https://oss.maxcdn.com/

      https://stackpath.bootstrapcdn.com/


      https://maps.google.com/maps/api/js

      https://maps.googleapis.com/maps/api/js

      https://pagead2.googlesyndication.com/pagead/js

      https://platform.twitter.com/widgets.js

      https://platform-api.sharethis.com/js/

      https://s7.addthis.com/js/

      https://stats.wp.com/

      https://ws.sharethis.com/button/

      https://www.google.com/recaptcha/api.js

      https://www.google-analytics.com/analytics.js

      https://www.googletagmanager.com/gtag/js

      https://www.googletagmanager.com/gtm.js

      https://www.googletagservices.com/tag/js/gpt.js

      https://connect.facebook.net/en_US/fbevents.js

      https://connect.facebook.net/signals/config/
Tuning
If the activation of any prior optimization setting results in issues such as a broken website layout, it is highly probable that specific problematic files need to be identified and excluded within these Tuning settings. Consulting documentation on common exclusions for Unused CSS (UCSS) removal and JavaScript delay is recommended for effective troubleshooting.

8. Database Optimization
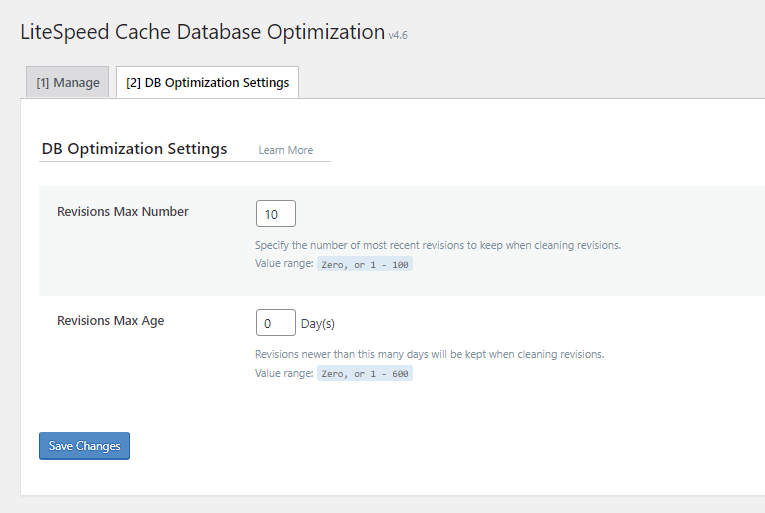
Within the Manage tab, it is generally advisable to clear all database entries except for post revisions and auto-drafts, as these serve as critical backups of your content. Additionally, you can perform table optimization for improved database efficiency.
Database Optimization Settings
- Revisions Max Number: 10 – Setting a maximum of 10 revisions provides a reasonable number of backups without excessively increasing database size. The ideal number can vary based on individual preferences and update frequency.
- Revisions Max Age: 0 – Setting this to 0 ensures that post revisions are never automatically deleted. This approach is beneficial for content that is infrequently updated, preserving long-term backup access.
9. Cache Crawler Configuration
The cache crawler actively preloads and refreshes cached pages, maintaining a "warm" cache to optimize performance. This feature, however, is arguably the most resource-intensive of all settings. It is imperative to closely monitor server resource usage (e.g., CPU, RAM) in your hosting control panel. If excessive resource consumption is observed, the crawler should be fully disabled.
It is important to note that the use of a cache crawler is generally not recommended for shared hosting environments unless the server possesses sufficient capacity. If enabled on shared hosting, ensure your plan includes adequate CPU cores and RAM, and always apply conservative crawler settings to prevent performance degradation.
The following recommendations are tailored for shared hosting environments, with guidance on adjusting values to manage resource usage (or to leverage more powerful server capabilities). For detailed explanations of each setting, consult the official crawler documentation.
- Crawler: On – Activates the cache crawler functionality.
- Delay: 300 – Consider increasing this value to alleviate server load during crawling.
- Run Duration: 200 – Decreasing this value can help reduce the overall server load.
- Interval Between Runs: 1000 – Lengthening this interval can contribute to a reduction in server load.
- Crawl Interval: 86400 – A higher value generally reduces server load. Ideally, observe the crawler's typical run duration and set this interval in seconds accordingly.
- Threads: 2 – Reducing the number of concurrent threads can help decrease server load.
- Timeout: 30 – For lightweight websites, a 10-second timeout might suffice, whereas more resource-intensive sites may benefit from a 60-second setting.
- Server Load Limit: 0.5 – Lowering this value helps reduce server load. This setting defines a threshold for CPU usage, beyond which the crawler will terminate (e.g., 0.5 for a single-core server, 1 for a dual-core server, and 2 for a quad-core server).

Role Simulation
This feature is exclusively for pre-crawling pages tailored to logged-in users, ensuring their personalized content is cached efficiently.
Sitemap Settings
- Custom Sitemap: Specify your website's sitemap URL here. This practice significantly reduces server load by directing the crawler to prioritize only the important pages listed within the sitemap. For instance, with a popular SEO plugin, your sitemap might be located at
https://yourdomain.com/sitemap_index.xml. - Drop Domain From Sitemap: On – This should be enabled by default. Disable it only if your sitemap contains multiple domains, as is common in multisite setups.
- Sitemap Timeout: 200 – This value defines the maximum number of seconds the crawler is permitted to spend scanning your sitemap.

10. Toolbox and Utilities
The majority of settings within the Toolbox are self-explanatory, encompassing functions such as cache purging, import/export options, .htaccess file editing, reports, debugging tools, logs, and beta testing. This section will specifically address Heartbeat settings, which are crucial for managing the WordPress Heartbeat API.
Heartbeat Settings
- Frontend Heartbeat Control: On – This setting enables control over the Heartbeat API's activity on the frontend of your website.
- Frontend Heartbeat TTL: 0 – Setting the Time-To-Live (TTL) to 0 typically disables the Heartbeat on the frontend, but thorough testing is recommended.
- Backend Heartbeat Control: On – This option provides control over the Heartbeat API's operations within the WordPress administrative backend.
- Backend Heartbeat TTL: 0 – Setting this TTL to 0 usually disables the Heartbeat in the backend, though verification through testing is advised.
- Editor Heartbeat: On – This setting specifically manages the Heartbeat API's function within the post editor.
- Editor Heartbeat TTL: 120 – While features like autosaves are desirable, increasing this Time-To-Live (TTL) value to 120 seconds helps optimize resource usage in the post editor.

11. Performance Optimization Plugin Integration
A dedicated performance optimization plugin offers unique optimizations not inherently present in LiteSpeed Cache. To prevent redundant functionalities and potential conflicts, it is recommended to utilize such a plugin exclusively for its distinct features.
General Settings – Features such as emoji removal and Heartbeat API control are already handled by LiteSpeed Cache, rendering their counterparts in the performance plugin redundant. Furthermore, a robust CDN service typically provides protection against brute-force attacks on the WordPress login page, making it unnecessary to relocate its URL. All other General settings within the performance plugin introduce new optimization opportunities, with detailed explanations available for each.

Preloading
Beyond images, various other file types can be preloaded to further enhance the Largest Contentful Paint (LCP) metric.
- Fonts – Identify your font files from a performance waterfall chart and experiment with preloading them. This optimization is effective only when fonts are hosted locally and should be applied primarily to fonts displayed above the fold or those embedded in CSS files. Proper font preloading can significantly reduce blocking time and improve LCP.

Test for font preloading warnings in browser developer tools.
- Preload Critical Images – If performance audit tools continue to recommend preloading LCP images or excluding them from lazy load, even after configuring LiteSpeed Cache's Viewport Images settings, consider disabling those and utilizing this feature instead. Define the approximate number of images typically loaded above the fold (e.g., 3 is often a suitable starting point). For background images not directly embedded in HTML, manually add a new preload hint, specifying the image's URL, page ID, and priority.

- Preload – For websites utilizing the WordPress block editor, preloading the wp-block-library can ensure it loads earlier. If the block editor is not in use, this file can be disabled via a script manager to achieve a minor reduction in CSS size.
- Fetch Priority – Inspect your website's source code or use browser developer tools to verify that your Largest Contentful Paint (LCP) images are properly utilizing the
fetchpriorityattribute. If WordPress is not automatically assigning fetch priority to the correct images based on its internal logic, this setting allows for manual fine-tuning, which can significantly improve LCP. To implement, add the class name, ID, or filename of the resource (supporting<img>,<link>, and<script>tags) for which you want to set fetch priority. In most scenarios, a "high" priority is appropriate. For targeting images within a parent container (e.g.,<div>,<figure>,<section>) that lack unique classes, enable the "Search by Parent Selector" option.

- Disable Core Fetch (Test) – If, after reviewing, you find that WordPress is incorrectly applying fetch priority to non-LCP elements (e.g., an image below the fold), consider disabling core fetch and any theme or plugin-specific image loading optimizations. In such cases, manually assign fetch priority using the previous setting.

Lazy Loading
Dedicated performance optimization plugins often provide more advanced lazy loading capabilities compared to LiteSpeed Cache. These typically include the ability to lazy load CSS background images and automatically exclude images with assigned fetch priority from lazy loading, streamlining LCP image optimization. If using such a plugin, it is recommended to disable all LiteSpeed Cache's lazy load settings and rely on the performance plugin's configurations instead.
Similar to defining HTML Lazy Load Selectors, you can add the class or ID of your background images to the “background selectors” field. As an alternative, a specific helper class can be applied to background images. Given that the “preload critical images” setting automatically handles LCP image exclusions from lazy loading, “excluding leading images” can be left off. And if you want to manually exclude URLs and parent selectors from lazy load, you can also do it here. Note that certain lazy loading features in performance plugins can overlap with LiteSpeed Cache's HTML lazy load selectors, making it crucial to choose one approach.


Local Web Fonts
Analyze your website's waterfall chart using performance tools to identify any fonts still loading from third-party domains. If these are web fonts, utilize the dedicated settings within your performance optimization plugin for local hosting. For fonts from other external sources, it is best to disable these plugin settings and consider a specialized local font hosting plugin.


Use a waterfall chart to verify local font hosting.
Script Manager
The Script Manager allows you to selectively disable plugins or individual CSS/JavaScript files on pages where they are not required, thereby reducing the overall CSS/JS footprint. Begin by enabling the script manager, then navigate to its settings to activate both "Test Mode" and "Display Dependencies." "Test Mode" facilitates safe experimentation by applying changes only to logged-in administra
