


In today's digital landscape, robust account security is paramount. Weak passwords are a significant vulnerability, susceptible to various attack methods, including brute-force attacks. While strong, complex passwords offer a greater level of protection, they are not entirely foolproof on their own.
To significantly bolster the security of your server management account, it is highly recommended to implement Multi-Factor Authentication (MFA). MFA introduces an essential second layer of security beyond traditional passwords. This additional security layer, at present, typically involves one-time passwords, also known as verification codes, generated by an MFA application on your smartphone. Throughout this guide, we will refer to these as verification codes.
Implementing MFA ensures that even if your password is compromised, an unauthorized individual cannot access your account without the second factor – the unique, time-sensitive verification code from your device.
How to Set Up Multi-Factor Authentication
Follow these steps to configure multi-factor authentication for logging into your account:
- Install an MFA Application: Begin by installing a reliable MFA app on your smartphone. Popular choices include Google Authenticator, Microsoft Authenticator, or any other compatible MFA application.
- Navigate to Your Profile: Log in to your control panel. Once logged in, go to the My Profile section. Scroll down until you find the “Multi-Factor Authentication (MFA)” section, then click on the provided link to proceed.
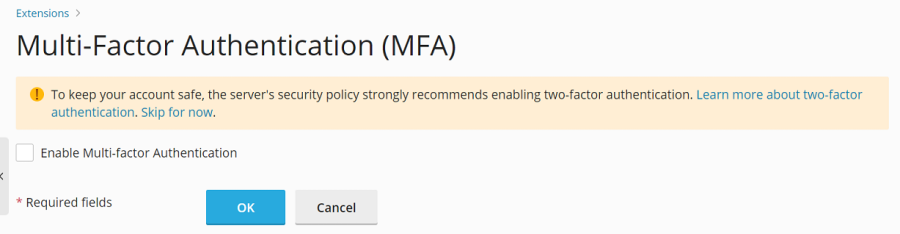
- Enable MFA: Locate and select the “Enable Multi-factor Authentication” checkbox to activate the feature.
- Scan the QR Code: A QR code will be displayed on your screen. Use your smartphone's MFA application to scan this QR code. Upon successful scanning, your authentication app will display the hostname of your server. For example, the Google Authenticator app will show a 6-digit verification code directly below the hostname. Other MFA applications may require you to tap the hostname to reveal the code.
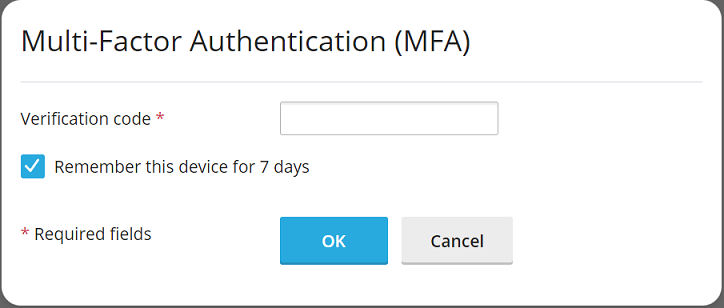
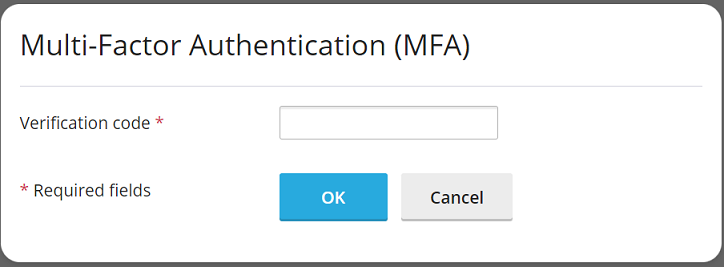
- Enter the Verification Code: Input the current verification code displayed in your MFA app into the designated field on your screen.
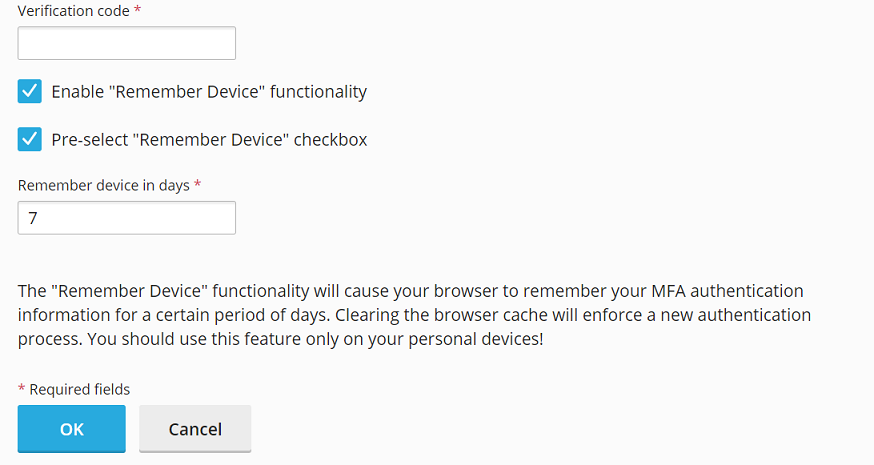
- Optional: Enable "Remember Device" Feature: If you prefer not to enter a verification code every time you log in from a trusted device, select the “Enable the “Remember Device” feature” checkbox.
Warning: For your security, this feature should only be enabled on your personal and trusted devices. Enabling it on a public or shared device could potentially allow unauthorized access to your account.
- Understanding "Remember Device": If the “Remember Device” feature is enabled, your browser will recall your device for a specified number of days. During this period, you will not be prompted for a verification code when logging in from that specific device. After this period expires, or if your browser's cache is cleared, you will be required to enter a verification code again.
- "Remember Device" on New Devices: Should you log in from a different device after enabling the “Remember Device” feature, you will be prompted for a verification code. You will also see a checkbox labeled “Remember this device for N days,” where N corresponds to the duration you previously specified.
To have this “Remember Device” checkbox automatically selected by default each time you access your account from a new device, check the “Preselect the “Remember Device” checkbox” option.
Congratulations! Multi-Factor Authentication has now been successfully configured for your account. From this point forward, you will be prompted to enter a verification code from your MFA app each time you log in, significantly enhancing your account’s security posture.
Implementing Mandatory Multi-Factor Authentication
For environments requiring a higher security standard, it is possible to enforce Multi-Factor Authentication usage across all user accounts. Multi-Factor Authentication is typically facilitated through a dedicated extension, which often comes pre-installed as part of standard configurations. If this extension is installed, any account owner can individually set up MFA.
However, for enhanced organizational security, you might want to make MFA mandatory for all user accounts, with the option to allow or disallow a bypass during setup. If bypassing is not permitted, users will be unable to access their accounts until MFA is properly configured.
Note: It is important to understand that enforcing MFA applies universally to all accounts. There is currently no mechanism to selectively enforce MFA for certain accounts or account types while exempting others. Following these instructions will enforce MFA for every account, including your administrator account.
Steps to Enforce MFA Usage:
- Set Up MFA for Your Administrator Account: Before enforcing MFA globally, ensure that you have already set up logging into your administrator account with verification codes, following the procedure outlined above in the "How to Set Up Multi-Factor Authentication" section.
- Edit the Configuration File: Access the
panel.iniconfiguration file for editing. You can find this file at the following locations:- For Linux systems:
/usr/local/psa/admin/conf/panel.ini - For Windows systems:
%plesk_dir%admin\conf\panel.ini
- For Linux systems:
- Add Configuration Lines: Based on your desired enforcement scenario, add the following lines to the
panel.inifile and then save your changes:- To enforce MFA without the possibility to bypass it:
[ext-mfa]
enforce = true
allowSkipEnforce = false
When a user attempts to log in to an account without MFA configured, they will encounter the following message. Access to the control panel will be restricted until MFA is successfully set up.

- To enforce MFA with the possibility to bypass it:
[ext-mfa]
enforce = true
allowSkipEnforce = true
In this scenario, if a user logs in to an account without MFA configured, they will see a similar message. However, unlike the strict enforcement, they will have the option to skip the MFA setup and proceed to use the control panel. This message will reappear with each subsequent login attempt until MFA is configured for their account.
- To enforce MFA without the possibility to bypass it:
- Optional: Customize "Learn More" Link: Once MFA enforcement is active, users will see the aforementioned messages, typically including a link to an article explaining MFA's importance and functionality. If you wish to direct users to an alternative informational resource about MFA, you can add lines similar to the following pattern to your
panel.inifile and save it:[ext-mfa] learnMoreUrl = https://example.com ; Replace with the URL of your preferred web page.This allows you to provide custom guidance or additional context regarding MFA implementation to your users.
