


Do you want to add a WordPress contact form to your website?
Incorporating a contact form on your site offers the most straightforward method for your customers to reach out to you. Furthermore, it provides an excellent opportunity to collect email addresses and generate leads, thereby helping you expand your email list and strengthen customer relationships.
In this comprehensive tutorial, we’ll guide you through the process of creating a WordPress contact form with remarkable ease, requiring no coding whatsoever.
To demonstrate the simplicity and efficiency of creating a contact form in WordPress using a reputable plugin, many tools incorporate a guided setup experience.
This fun and user-friendly Setup Wizard often walks you through every essential step needed to create your first form. While some guided challenges suggest a timeframe, you’ll likely have a fully functional form much sooner. This guided setup is designed to be user-friendly, typically appearing during your initial form creation process, making the start-up journey smooth and engaging.
Ready to enhance your website's communication capabilities? Let’s begin!
Step 1: Install a Form Builder Plugin
The first crucial step involves installing and activating a reputable form builder plugin for your WordPress site. These plugins are widely recognized as excellent solutions for building contact forms due to their comprehensive features, intuitive interfaces, and overall ease of use, making them ideal for both beginners and experienced users.
For more detailed instructions, you may consult a step-by-step guide on how to install a plugin in WordPress.
Upon activation, many form builders will present you with a setup wizard or a guided tour designed to help you get started quickly. Completing this initial setup typically prepares you to create your first functional contact form, ready to be integrated into a "Contact Us" page on your WordPress site.
Look for an option like "Start Setup" or "Begin Form Creation" to commence the process.
Step 2: Choose a Simple Contact Form Template
After initiating the setup process, you'll typically be directed to the form creation screen. Here, you will have the opportunity to assign a meaningful name to your form and explore a wide array of pre-built form templates to streamline your design. These diverse templates often cover various categories such as customer service inquiries, marketing sign-ups, and various other business and nonprofit functions, offering a great starting point for any need.
Once you’ve named your form, proceed to the next step.
Next, it’s time to either select a pre-designed template or opt for a blank template if you prefer to build your form entirely from scratch. Since our goal is to create a straightforward contact form, selecting a "Simple Contact Form" template is often the most efficient choice.
Selecting your desired template will immediately transition you to the intuitive form builder interface, where a basic contact form template will be pre-loaded and ready for your customization. This setup ensures you have a solid foundation to work from.
Step 3: Customize Your Contact Form
Once you’re within the form builder, you'll likely encounter helpful on-screen instructions guiding you through the next phase of customization:
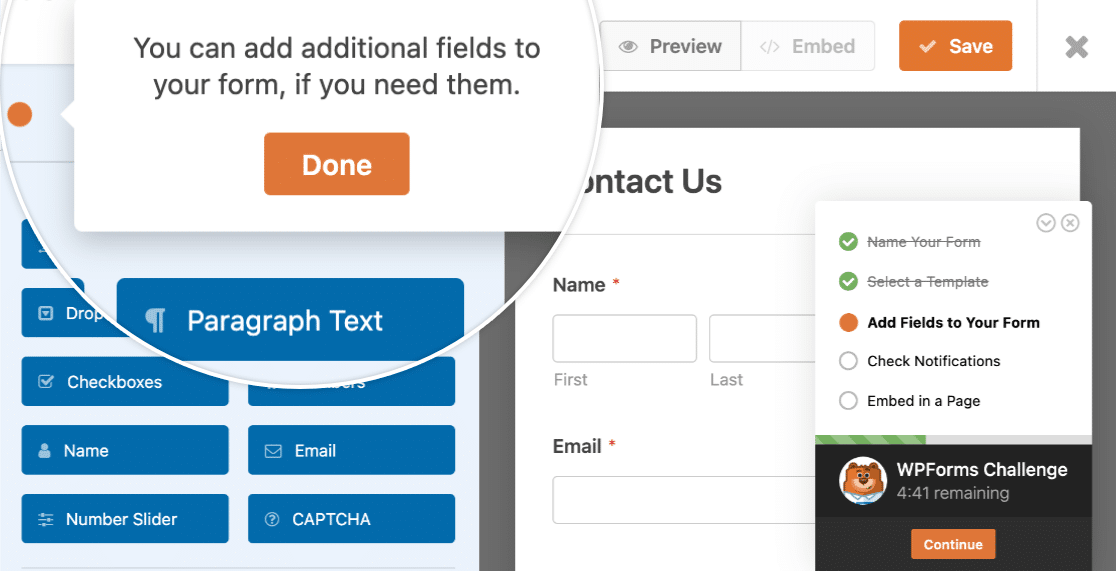
Customizing form fields in WordPress is remarkably straightforward, thanks to the intuitive drag-and-drop functionality available in most form builders. This visual approach makes adding and arranging elements exceptionally easy.
You can effortlessly add new fields to your contact form by dragging them from a left-hand panel directly onto the form preview on the right-hand side.
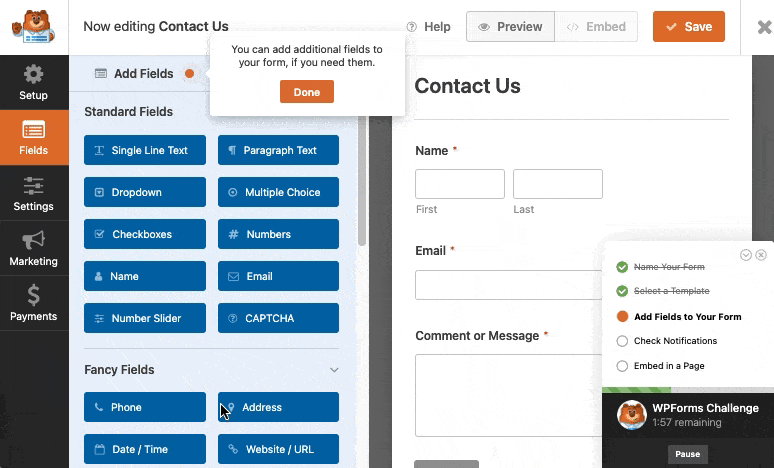
Subsequently, click on any field within your form to access its individual settings and make necessary modifications. You also have the flexibility to rearrange the order of fields on your form by simply dragging them to your preferred position.
Consider reviewing various contact us page examples to inspire your own custom form design, ensuring it meets your specific requirements and enhances user experience.
It is generally advisable to keep your contact form as simple and concise as possible to encourage completion. However, you are completely free to include any additional fields as needed to gather specific information. For instance, you might include an honorific field, or leverage more advanced functionalities such as conditional logic, file upload capabilities, or even integrate payment fields for services like PayPal or Stripe. Many form builders also offer a wide range of other sophisticated features in their premium versions, allowing for highly tailored solutions.
Once you have finished customizing your form to your satisfaction, remember to save your changes and proceed.
Step 4: Configure Contact Form Notification Settings
The next crucial step in setting up your form involves configuring its notification settings. This ensures you are promptly informed whenever a new submission occurs.
Form notifications are typically enabled by default in most modern form builders for every new form created. These are commonly set up to send an email to the site's administrative email address, containing full details of each entry as it is submitted. This default ensures you never miss a new lead or inquiry.
But what if you also wish to send email notifications to the person who submitted the form, confirming their submission or providing further information?
This is easily managed. Many form builders allow you to configure multiple form notifications, enabling you to send distinct alerts to various team members within your organization, as well as to your customers upon successful form submission. This flexibility ensures all relevant parties are kept in the loop.
Furthermore, to maintain consistent branding across all your email communications, you might explore options for adding a custom header image to your email templates. This helps reinforce your brand identity and provides a more professional appearance for all automated messages.
Once your form’s notifications are configured properly and tested, save your settings and continue to the final steps.
Step 5: Embed Your Simple Contact Form on a WordPress Page
You are now ready to seamlessly add your newly created contact form to a page on your WordPress website. The embedding functionality provided by most form builders is exceptionally beginner-friendly, often requiring no direct interaction with shortcodes, simplifying the process significantly.
To begin, look for an "Embed" button or similar option, typically located at the top of the form builder interface.
From here, you will usually have options such as "Select Existing Page" or "Create New Page." For a new form, it’s often easiest to go ahead and create a new page directly from this interface.
You’ll then be prompted to type in a name for your new page. For instance, you might simply call your page "Contact" or "Get In Touch":
Most form builders will then automatically place your form directly onto the newly created page. Within the page editor, you may also find options to further style your form fields, labels, and submit buttons using simple color pickers and visual settings. Consult guides on styling contact forms for more detailed instructions on how to achieve your desired aesthetic.
Just don’t forget a critical step: you’ll need to click "Publish" for your page and the embedded form to go live and be visible on your website. Without publishing, your form will remain a draft.
And with that, you’re done! Many form builders even display the time it took to create your form, highlighting the efficiency of the process.
Additionally, consider embedding your contact form in the sidebar of your website for increased visibility across your site, offering an accessible point of contact from multiple pages.
And there you have it! You now possess the knowledge and skills to create a simple, yet highly effective, WordPress contact form.
Frequently Asked Questions About Simple Contact Forms
Take a look at the frequently asked questions below for more information about simple contact forms in WordPress, addressing common queries and providing deeper insights.
What are the Benefits of Using a Contact Form in WordPress?
A contact form prominently displayed on your website provides an easy, secure, and professional channel for your visitors to submit queries, complaints, suggestions, or feedback. This structured approach to communication offers numerous advantages:
- Efficient Communication: Contact forms are an excellent way to enable your readers and customers to communicate with you quickly and directly, streamlining the process for both parties.
- Enhanced Security: By using a contact form, you effectively shield your direct email address from spammers. Since your contact form doesn’t publicly display your email address, malicious bots and spammers cannot easily harvest it and add it to junk mail lists, significantly reducing unwanted solicitations.
- Improved Organization: With a contact form, you can seamlessly connect to various third-party services, such as your email marketing platform, to make things even simpler by automating follow-up communications. You can also integrate your form with tools like Google Sheets to automatically save all entries in a centralized spreadsheet, aiding in data management and lead tracking.
Does WordPress Include a Built-in Contact Form Feature?
No, the core WordPress.org platform does not come with a built-in contact form feature. To create a functional contact form, you will need to install a dedicated form builder plugin. The installation of such plugins is generally quick and straightforward, offering a hassle-free process. Furthermore, many reputable form builders provide free versions that are perfectly suitable for getting started with a basic contact form, allowing you to establish communication without an initial investment.
What are the Essential Fields for a Contact Form?
A contact form should ideally be kept as simple and uncluttered as possible to minimize user friction and maximize completion rates. The most essential fields to include typically consist of: Name, Email, and Message. Many simple contact form templates include these fundamental fields by default, ensuring a well-optimized and ready-to-use form without requiring extensive manual adjustments. This streamlined approach focuses on gathering only the most critical information.
Can Contact Form Submissions Be Tracked and Managed?
Absolutely! Most WordPress form plugins provide a dedicated dashboard or section within your WordPress site's administration area where you can conveniently view, track, and manage all submissions received through your contact forms. In many free versions of these form builders, you'll receive email notifications every time a new submission occurs, ensuring you stay informed. For more advanced features, such as storing all submissions directly on your website dashboard for easy access and organization, upgrading to a premium version of the plugin is usually an available option.
How Can I Back Up and Export Contact Form Data?
One of the most effective ways to maintain an external backup of your valuable contact form data is by integrating your form with a cloud-based spreadsheet service like Google Sheets. Many premium form builder versions offer native integrations that enable you to connect any WordPress form to Google Sheets. This setup ensures that the data you collect is automatically added to your spreadsheet in real-time, providing a live and continuously updated backup that is always accessible.
You can also manually export your contact form data from most plugins, typically in a CSV format. However, it's important to note that this manual export will only include information up to the specific point in time when you perform the export. For continuous and automatic data preservation, we highly recommend setting up an integration with a service like Google Sheets.
Next Steps: Enhance Form Security and Functionality
Once your basic contact form is up and running, consider implementing advanced features to further secure and optimize it. Many form builders include a variety of robust spam protection tools designed to effectively mitigate unwanted submissions on your site. Even the free versions often provide excellent features, such as reCAPTCHA v2 and v3 options, to secure your forms against automated bots, significantly reducing the amount of junk mail you receive.
If you anticipate creating longer or more complex forms, think about implementing a multi-step design in WordPress. This approach can significantly reduce form fatigue by breaking down a lengthy process into manageable sections, thereby encouraging users to complete the entire submission process and improving overall conversion rates.
Additionally, explore clever web form techniques, such as utilizing hidden fields, to capture valuable background data without cluttering the user interface. These fields can silently collect information like referral sources or user IDs, providing deeper insights into your audience without impacting the user experience.
Ready to build your own custom form? Begin today with an intuitive WordPress form builder plugin. Many premium versions offer a wealth of powerful features, diverse templates, and often come with a satisfaction guarantee, ensuring you find the perfect solution for your website's needs.
If this article proved helpful in your journey to create a WordPress contact form, consider following reputable sources for more free WordPress tutorials and guides to continue expanding your knowledge and improving your website.
