Efficient user management and robust access control are absolutely vital for businesses of all sizes, regardless of their operational complexity. Within Odoo 16, organizations are equipped with powerful tools to streamline user administration and significantly enhance data security across their entire system. This comprehensive guide will meticulously walk you through the entire process of setting up user accounts and configuring granular access control in Odoo 16, thereby empowering you to confidently take full command of your system’s security framework and internal organization.
Managing User Accounts in Odoo 16
In this foundational section, we will delve into the essential steps required for creating and effectively managing user accounts within your Odoo 16 environment. Understanding these procedures is key to maintaining a secure and organized system.
User Creation
Creating individual user accounts is the first step, enabling individuals to securely access your Odoo 16 system, personalize their settings, and efficiently track their activities. This process ensures authenticated access and empowers users to perform their assigned tasks with appropriate permissions.
- Log in to your Odoo 16 instance using an administrator account or a user account possessing sufficient access rights.
- Navigate to the “Settings” module from the main dashboard, then proceed to click on the “Manage Users” option.
- Click on the “Create” button to initiate the creation of a brand new user account.
- Carefully enter the user’s primary details, including their username and email address. Under the “Allowed companies” field, precisely select which organizational entities or databases you wish to grant this user access to. You may also specify other optional yet important information, such as the user’s preferred language and time zone, located under the “Preferences” tab.
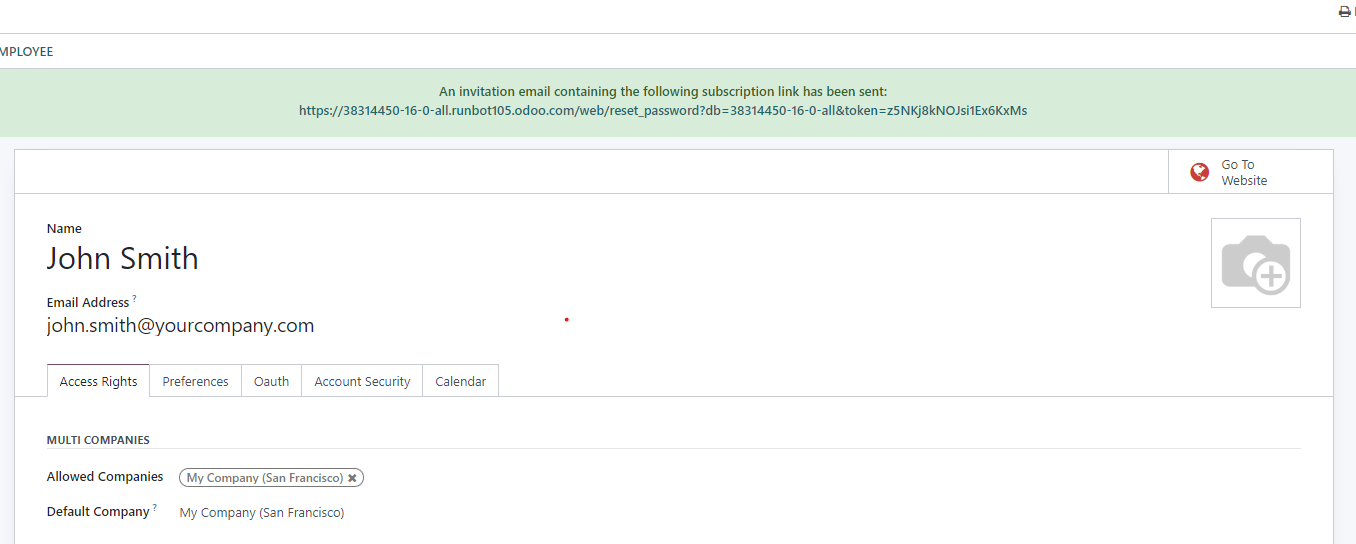
Once all details are accurately entered and the page is successfully saved, the newly created user will automatically receive an invitation email from Odoo. They must accept this invitation to complete their account setup and create their login credentials.
Assigning User Types
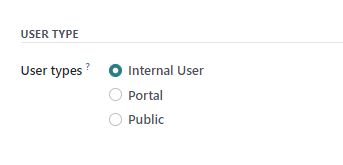
In Odoo 16, users are thoughtfully categorized into distinct types, each defined by specific roles and corresponding access levels. This categorization is crucial for effective permissions management:
- Internal Users: These are typically employees or internal staff members who require comprehensive access to various modules and features within the Odoo system to perform their daily operational tasks.
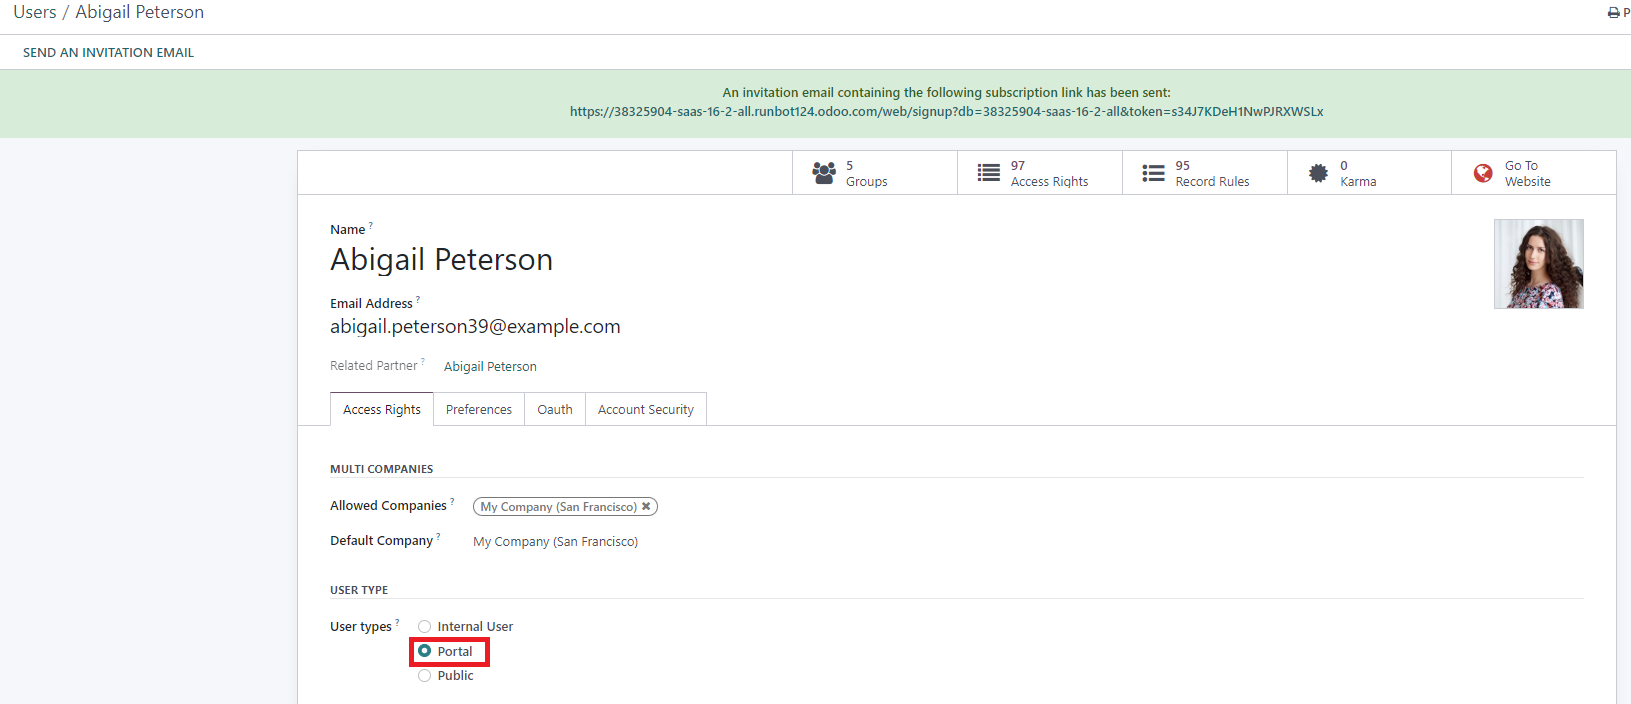
- Portal Users: Generally customers or suppliers, these users are granted limited, secure access to relevant documents and information exclusively through the Odoo Portal. This allows for controlled external interaction without full system access.
- Public Users: This category is reserved for individuals who only require website access to publicly available features. Examples include browsing product catalogs, reading blog posts, or submitting contact forms, without needing any backend system access.
By diligently assigning the most appropriate user type in Odoo 16, you can precisely ensure that each individual possesses the correct level of access and functionality, perfectly tailored to their specific roles and operational needs within your organization.
Related Partner Field: Streamlining Portal Access for External Collaborators
The “Related Partner” field offers a highly convenient way to associate a user account with a specific partner record, such as an existing customer or supplier. This strategic connection enables seamless integration and fosters enhanced collaboration across various Odoo modules, ensuring efficient communication and direct access to associated business records. This functionality is particularly useful for external stakeholders who require limited interaction with your system.
For instance, if you establish a new contact within Odoo’s contact application for a new customer to whom you wish to grant access to your dedicated customer portal, you can accomplish this with a simple click. Navigate to the Contact form, select “Action”, and then choose “Grant portal access”.
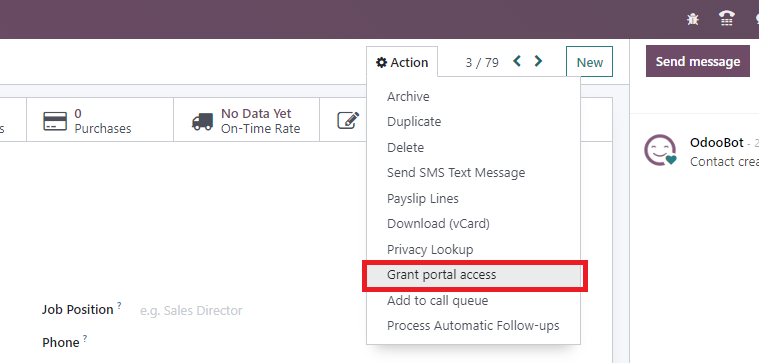
In the subsequent pop-up window, click “Grant Access” and then “Close”. Now, if you return to “Settings” > “Companies & Users” > “Users”, you will observe that a new Portal User has been automatically generated, and an email invitation for login creation has already been dispatched to them.
Assigning User Roles and Permissions
Odoo provides extensive capabilities to define user access rights with exceptional precision. Within the “Access Rights” tab of each user’s form, you are able to conveniently select the exact role and specific access permissions for every installed application within your Odoo instance. This granular control ensures that users only have access to the functionalities relevant to their job functions.

Managing Passwords
Effective password management is a critical component of user security. Odoo 16 offers flexible options for users to manage their passwords, as well as for administrators to assist when needed.
Enabling Password Resets from the Login Page
To empower your users to reset their passwords directly from the Odoo login page, enhancing user autonomy and reducing administrative overhead, follow these straightforward steps:
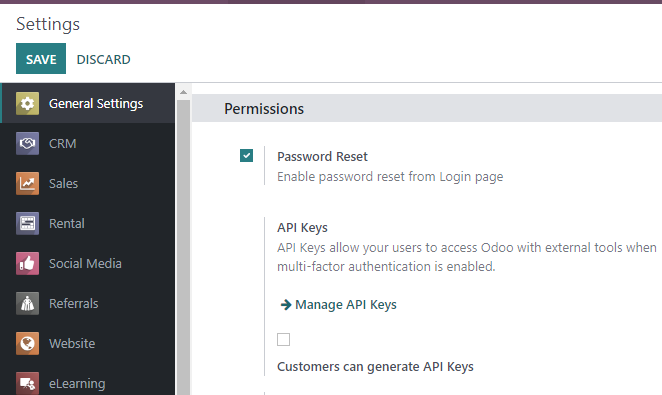
- Navigate to the global “Settings” within your Odoo environment and carefully select “Permissions”.
- Locate and activate the “Password Reset” option to enable this feature for all users.
- Ensure you save the changes to apply the new setting.
Sending Password Reset Instructions to Users
As an administrator, you can easily send password reset instructions to individual users in Odoo by following these simple steps:
- Access “Settings” > “Users & Companies” > “Users”.
- Carefully locate the specific user from the displayed list and open their detailed user form.
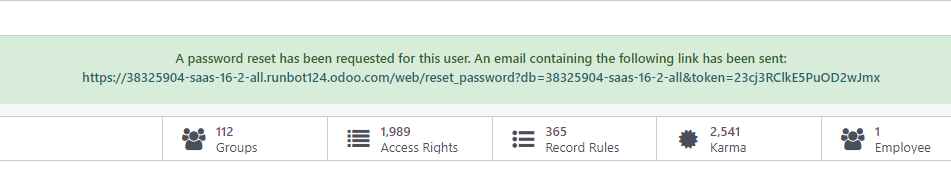
- Within the user form, click on the “Send Password Reset Instructions” option.

An automatic email will be promptly dispatched to the user, containing comprehensive instructions on how they can securely reset their password. This email will also include a convenient, direct link that redirects the user to an Odoo login page specifically designed for the password resetting process, ensuring a smooth experience.
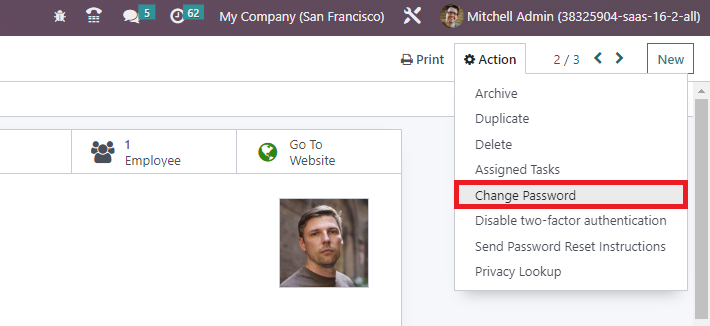
Changing a User’s Password Directly
To directly change a user’s password within Odoo as an administrator, use these straightforward steps:
- Go to “Settings” > “Users & Companies” > “Users”.
- Choose the particular user for whom you wish to modify the password to access their detailed user form.
- Click on the “Action” button, typically found at the top of the form, and then select “Change Password”.
- Enter the desired new password and confirm the change by clicking on the “Change Password” button.
Please note: This method exclusively modifies the user’s local password within your specific Odoo system database. It does not affect their primary odoo.com account credentials. If a password change for their odoo.com account is required, it is strongly recommended to utilize the "send password reset instructions" functionality instead, as this will guide them through the official odoo.com password recovery process.
After successfully clicking on “Change Password”, you will typically be redirected to an Odoo login page, from where you can reaccess your database using the newly updated password for the chosen user.
Managing Multi-Company Access in Odoo 16
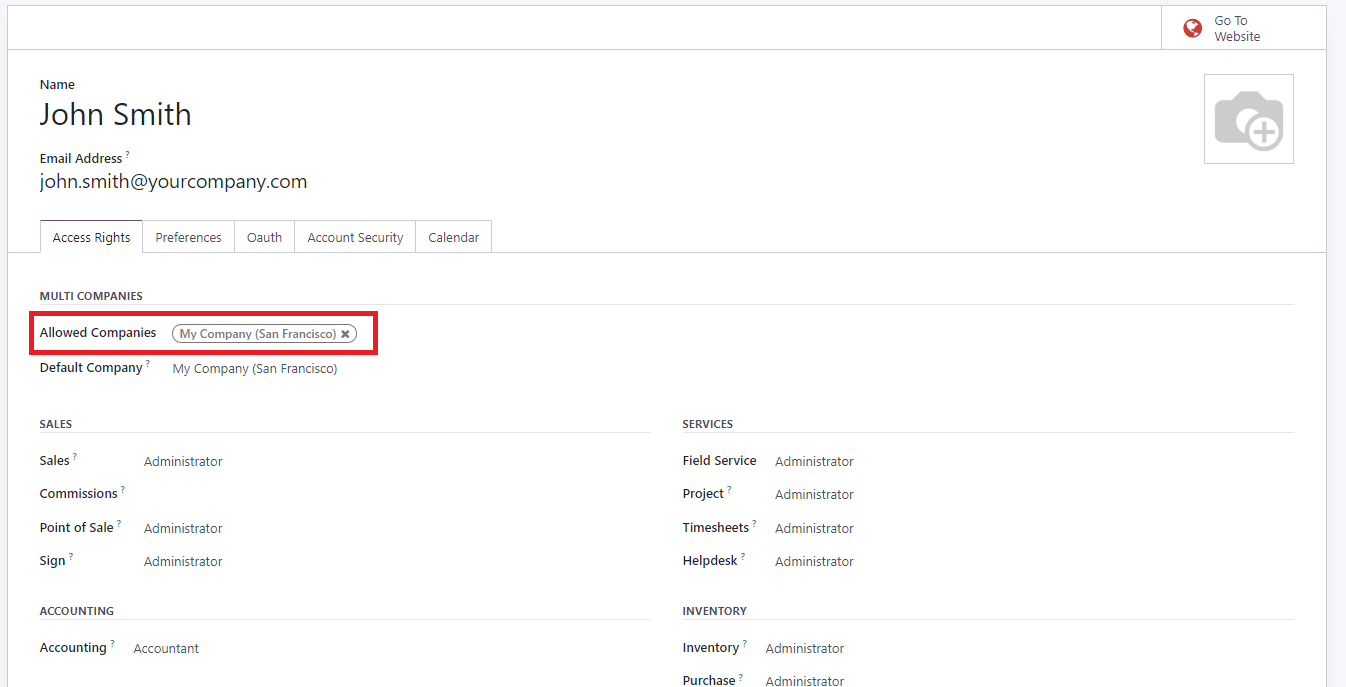
The multi-company access feature in Odoo 16 is exceptionally valuable, particularly for organizations that operate with multiple distinct entities, all of which need to be efficiently managed from a single, centralized system. Within the “Access Right” tab of your user forms, you will find the “Allowed Companies” field. This crucial field enables you to precisely define which of your various company databases a particular user can access. You have the flexibility to select access to a single company or to multiple companies as required by their role.

Managing User Groups in Odoo 16
User groups in Odoo 16 are instrumental in significantly simplifying access control and permissions management. They provide an organized framework allowing you to group users logically based on their roles, departments, or specific responsibilities. This approach offers highly efficient control over access to various modules, features, and critical data throughout your Odoo system. By strategically assigning users to relevant groups, you can effortlessly manage permissions for multiple individuals simultaneously, ensuring appropriate access levels and substantially enhancing data security within your Odoo 16 environment.
Configuring User Groups
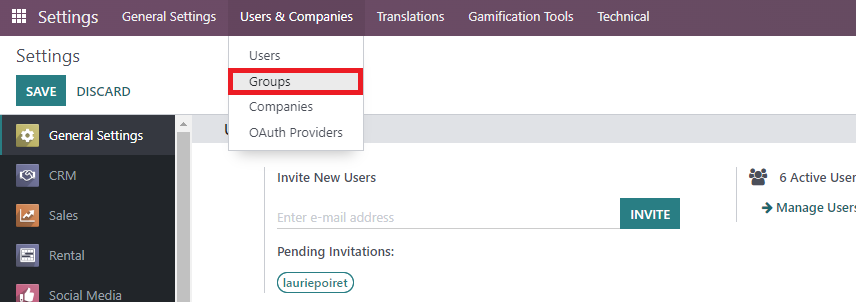
To gain access to and effectively configure user groups within your Odoo 16 user interface, you must first activate developer mode. Once developer mode is enabled, navigate to “Settings” > “Users & Companies” > “Groups”.
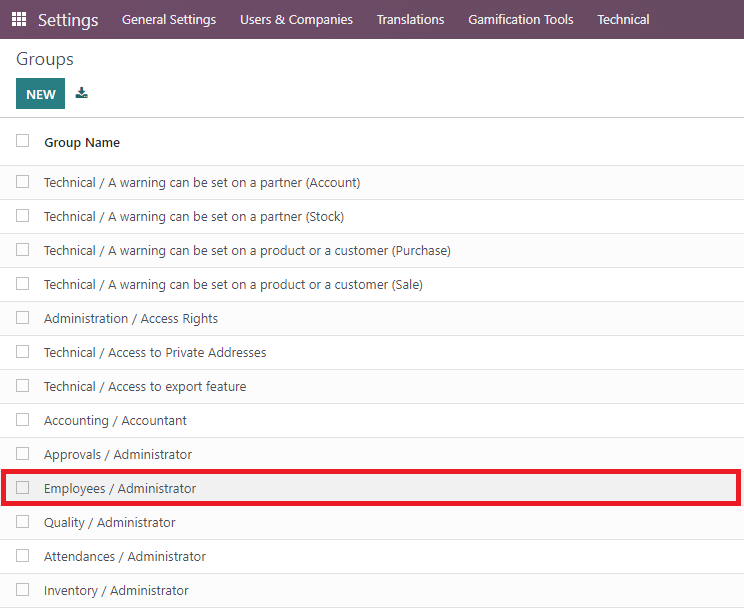
Here, you are presented with a comprehensive overview of all your different user groups and their respective types. From this interface, you can effortlessly create new groups or meticulously configure existing ones to perfectly align with your organizational structure and security requirements. To configure an existing group, simply select it from the list and click to open its detailed settings.
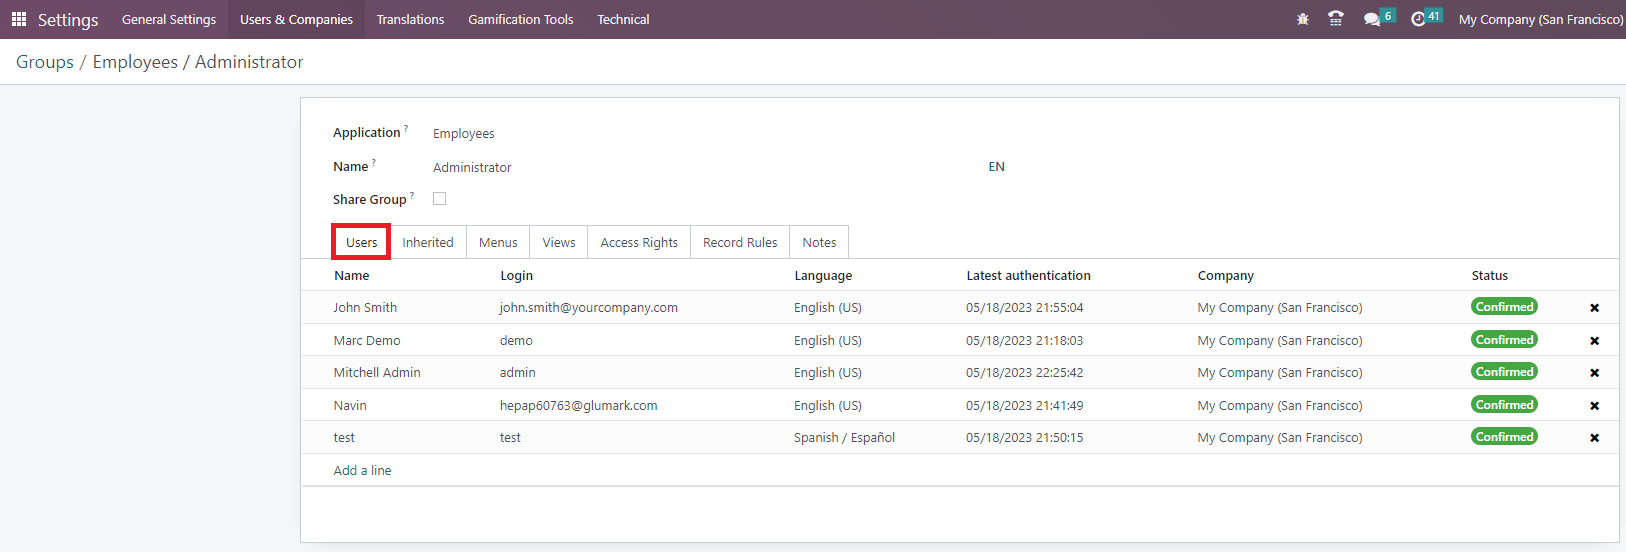
User Tab
Each Access Group within Odoo 16 can be precisely configured through a multitude of dedicated tabs, enabling you to define exact rules pertaining to models within each of your installed Odoo applications. To begin, under the “Users” tab, you will find a clear and comprehensive list of all individuals currently assigned to this particular group.
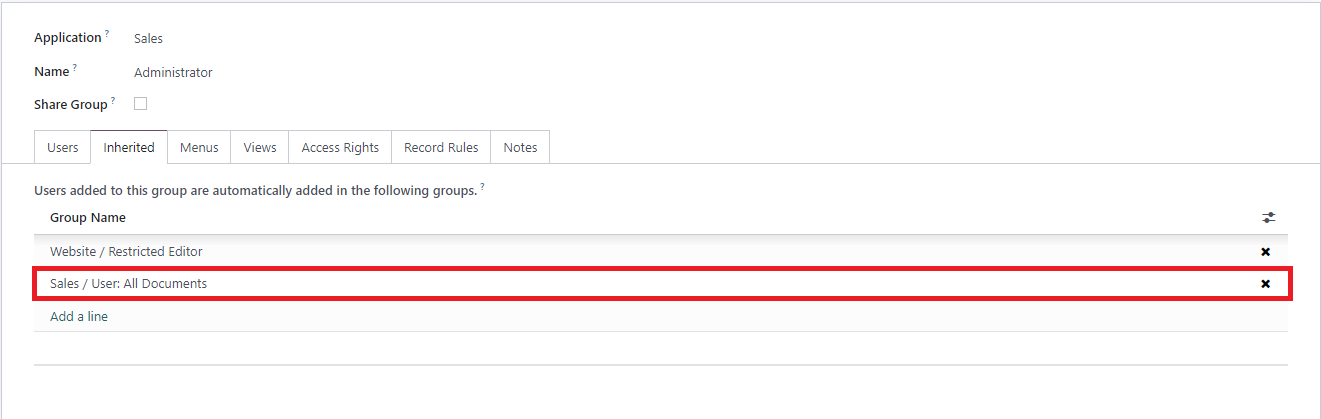
Inherited Tab
When a user is added to an application access group configured with “inherited” settings in Odoo, it signifies that they will be automatically granted membership in other related groups as well. For example, if a user is granted access to the “Employees / Administrator” group, they will consequently also inherit access to groups such as “Fleet / Administrator” and “Employees / Officer: Manage all employees”. This powerful feature significantly simplifies user management by ensuring that predefined permissions and access rights cascade efficiently down through related groups, thereby providing seamless and consistent access control across multiple functionalities without requiring manual assignment for each linked group.
Menus Tab
The Menus tab in Odoo is specifically designed to allow administrators to precisely specify which menus or models a particular user group can access. By carefully configuring this tab, you gain direct control over which sections and features of the entire Odoo system are visible and available to the users within that group. This serves as a vital method to customize the user’s interface experience and accurately determine their permitted level of access to different functionalities and data within Odoo, ensuring a streamlined and secure environment.
Access Rights Rules Tab
Access Rights rules in Odoo function as the primary layer for controlling user permissions at a fundamental level. Each individual rule within this tab directly corresponds to a specific object or data model present within the Odoo system. By carefully enabling the appropriate options for each rule, you can precisely define the user’s access level for that particular object:
- Read: This permission grants the user the ability to view the values and information associated with the object, but explicitly prevents them from making any modifications.
- Write: This permission grants the user the authority to edit and modify the existing values of the object.
- Create: This permission allows the user to generate new values or records for that specific object, effectively adding new data to the system.
- Delete: This permission enables the user to completely remove or delete values and records associated with the object.
These distinct options collectively provide administrators with significant flexibility and granular control when defining each user’s specific level of access and their permissible actions on individual objects or models throughout the Odoo system, ensuring robust security and data integrity.
Records Rules Tab
Record Rules in Odoo serve as a crucial, additional layer for defining more intricate editing and visibility rules, allowing administrators to either overwrite or further refine the broader Access Rights settings. These rules exercise precise control over access to specific records within a given model, determining exactly which records can be accessed by which users. When you configure a record rule, you can meticulously choose from a range of options, including Read, Write, Create, and Delete, to specify the precise permissions for values associated with that particular rule. This advanced functionality provides administrators with a highly granular level of control over user access and their permitted actions on specific data records throughout the Odoo system.
To illustrate the practical application of record rules, let’s consider a common example:
In the User Group designated as “Sales / Own documents”, you will observe a variety of carefully set Records Rules. The “Personal” rules within this group are specifically designed to restrict users to accessing only their own sales orders and any sales orders that are currently unassigned. Concurrently, users within this group are granted complete and unrestricted access to all records belonging to other models that are not covered by these specific sales order restrictions.
In stark contrast, a user group such as the “all documents” group is granted universal access to every record by employing the domain [(1,'=',1)], a condition that is always evaluated as true. This effectively bypasses granular restrictions for this specific group.
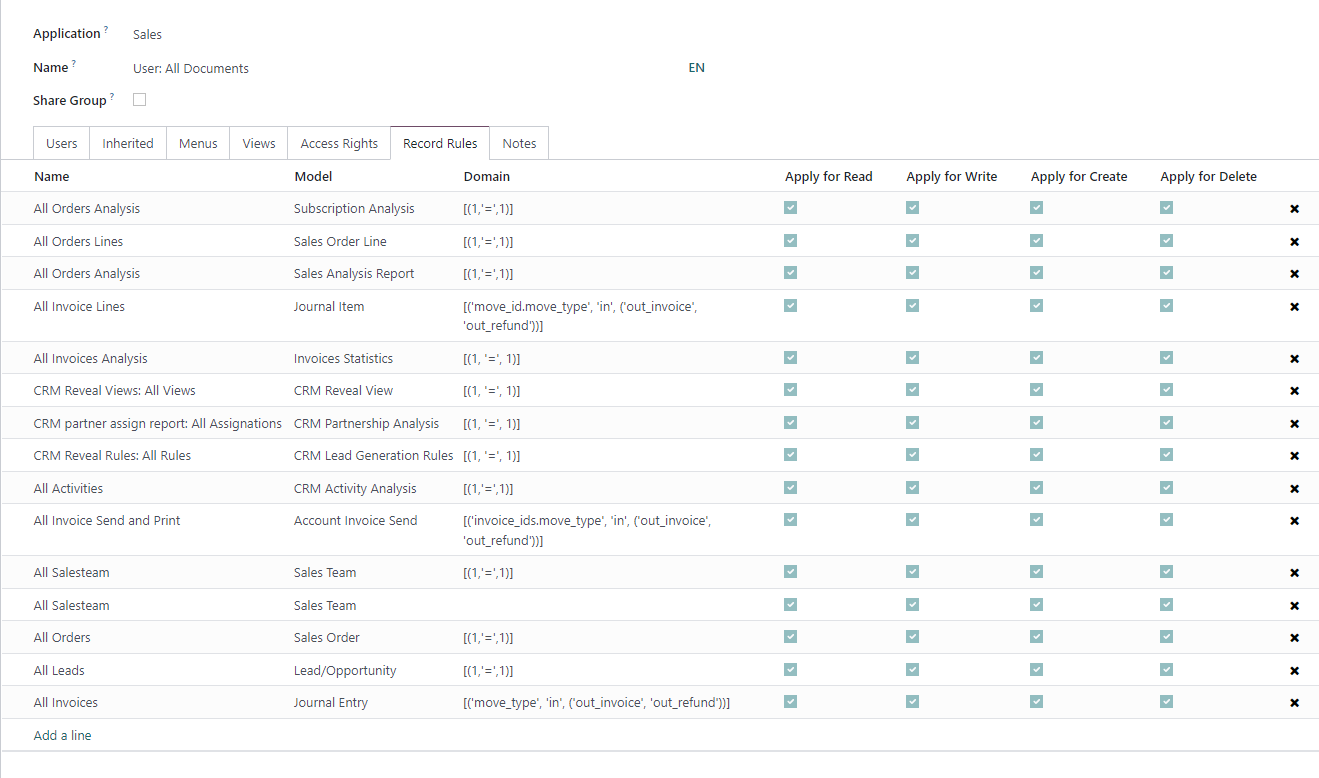
As a direct consequence of this structure, the “Sales > Administrator” group typically does not require any additional, explicit access privileges. This is because it inherently inherits full access permissions from the broader “All Documents” group, simplifying the overall permission management for high-level roles.