


Enhancing Account Security with Multi-Factor Authentication
Weak passwords pose a significant security risk, as they are highly susceptible to brute-force attacks. While strong passwords offer a better defense, they are not entirely impervious to compromise, highlighting the need for additional security measures.
To significantly enhance the security of your control panel account, it is highly recommended to implement multi-factor authentication (MFA) for logging in. While passwords serve as the initial layer of defense, MFA introduces a crucial second layer to your authentication process. Currently, this additional security layer typically involves one-time passwords, often referred to as verification codes, which are generated by a dedicated MFA application on your smartphone. Throughout this guide, we will use the term 'verification codes' to refer to these one-time passwords.
Setting Up Multi-Factor Authentication
To configure your account for logging in with verification codes, follow these detailed steps:
- Begin by installing a multi-factor authentication application on your smartphone. Popular choices include Google Authenticator, Microsoft Authenticator, or any other compatible MFA app you prefer.
- Navigate to your 'My Profile' section within the control panel interface. Locate the 'Multi-Factor Authentication (MFA)' section, then proceed by clicking the designated link to initiate the setup process.
- Activate the feature by selecting the 'Enable Multi-factor Authentication' checkbox.
- Using your smartphone, scan the QR code displayed on your screen with your chosen authentication app. Upon successful scanning, your authentication app will display the hostname of your server. For instance, the Google Authenticator app will typically show a 6-digit verification code directly beneath the hostname. Other MFA applications may require you to tap on the hostname entry to reveal the verification code.
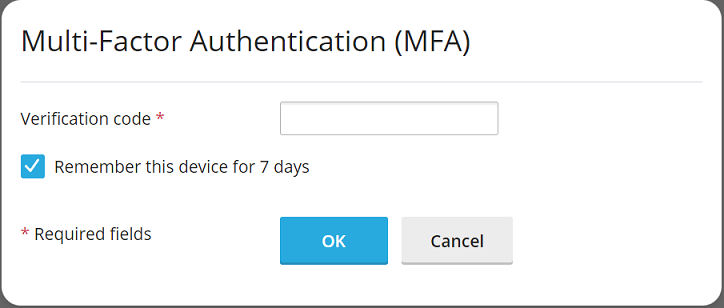
- Carefully enter the verification code provided by your MFA app into the required field on the setup page.
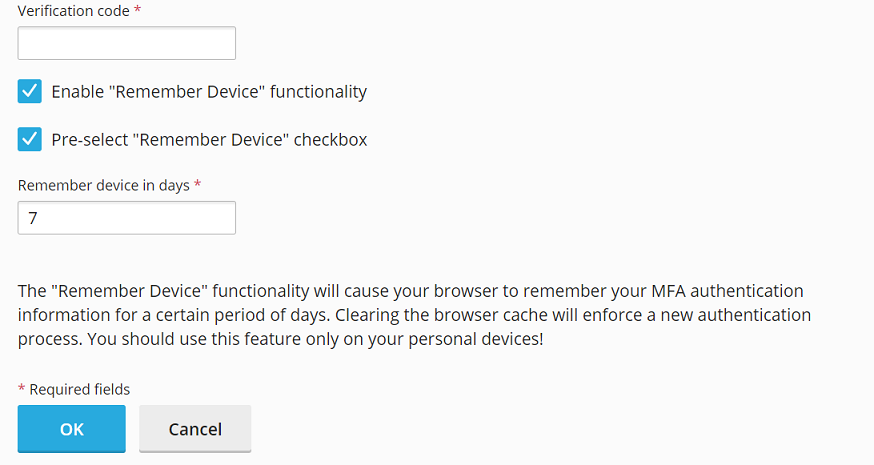
- For convenience, if you prefer not to enter a verification code every time you log in, you can select the 'Enable the 'Remember Device' feature' checkbox. Important Security Notice: This feature should only be enabled on devices that are exclusively yours and are securely managed. Enabling it on a shared or public device could potentially grant unauthorized third parties access to your account.
- When the 'Remember Device' feature is active, you will not be prompted for a verification code when accessing your account from the current device for a pre-defined number of days. After this period expires, or if your browser's cache is cleared, you will then be required to re-enter a verification code.
- Should the 'Remember Device' feature be active, your browser will retain your device's recognition for the duration you have specified. Nevertheless, if you attempt to log in from a different device, you will still be prompted to provide a verification code. On such occasions, you will also notice a checkbox labeled 'Remember this device for N days,' where N corresponds to the number of days you previously configured.
 To ensure this 'Remember this device' checkbox is automatically selected by default whenever you log in from a new device, select the 'Preselect the 'Remember Device' checkbox' option.
- Finalize the setup by clicking 'OK'.
Congratulations, you have successfully configured Multi-Factor Authentication for your account. From this point forward, each login attempt will require you to enter a verification code generated by your MFA application, significantly bolstering your account's security.
Enforcing Multi-Factor Authentication Across All Accounts
Multi-Factor Authentication functionality is typically integrated through a dedicated extension, which is often included as a standard component of recommended setups. When this extension is installed, any account owner gains the ability to configure MFA for their individual account.
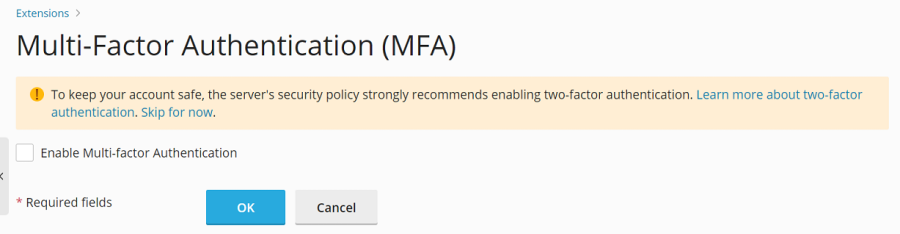
For a heightened security posture, administrators might consider enforcing MFA usage across all user accounts. This can be configured either with or without the option for users to bypass the setup. If bypassing is disallowed, users will be unable to log in until MFA is properly configured.
Important Note: It is crucial to understand that there is currently no granular option to enforce MFA for specific accounts or account types while excluding others. The procedures outlined below will apply MFA enforcement universally to all accounts, including your primary administrator account.
To implement mandatory MFA usage for all accounts, please follow these instructions:
- First, ensure that logging in with verification codes is set up for your administrator account, following the configuration steps detailed earlier in this guide.
- Locate and open the
panel.iniconfiguration file for editing. Its typical locations are:- For Linux:
/usr/local/psa/admin/conf/panel.ini - For Windows:
%plesk_dir%admin\conf\panel.ini
- For Linux:
- Based on your desired enforcement scenario, append the following specific lines to the
panel.inifile, and then save your changes:- To enforce MFA without any bypass option:
[ext-mfa]
enforce = true
allowSkipEnforce = false
In this configuration, any user attempting to log in without MFA already configured for their account will encounter a mandatory message, preventing them from proceeding until they successfully set up MFA.

- To enforce MFA with the option to bypass setup:
[ext-mfa]
enforce = true
allowSkipEnforce = true
With this setting, users without MFA configured will still see a prompt; however, unlike the previous scenario, they will have the option to skip the MFA setup and continue accessing their account. It is important to note that this reminder message will reappear with every subsequent login attempt until MFA is eventually configured.
- To enforce MFA without any bypass option:
- (Optional) After enforcing MFA, users will be presented with one of the messages (as illustrated in the screenshots above), which typically includes a link to an article explaining the principles and security benefits of MFA. If you prefer to direct users to an alternative information source about MFA, you can customize this link. To achieve this, add the following line pattern to your
panel.inifile and save it:[ext-mfa] learnMoreUrl = https://example.com ; Replace with the desired URLThis allows you to feature a specific webpage that aligns with your educational content about MFA.
