


While WordPress offers an intuitive user interface for content creation and management, developers often encounter scenarios where a programmatic approach becomes invaluable. This method allows for the efficient creation of posts, pages, users, and navigation menus, proving especially useful for development, testing, and streamlined site setup.
This comprehensive guide will explore the process of programmatically creating various WordPress elements, providing practical insights and code examples. We will cover:
- Essential prerequisites for programmatic development within WordPress.
- How to create custom pages using code.
- Steps to programmatically generate new posts.
- Methods for setting up navigation menus.
- Techniques for adding new users through code.
Why Programmatically Create WordPress Content? Real-World Applications
At first glance, using code to create pages, posts, menus, or users might seem redundant given WordPress’s user-friendly administration panel. However, in professional development environments, a programmatic strategy is not only advantageous but often indispensable. Here’s why:
Rapid Website Setup and Development
WordPress developers frequently initiate new projects that require foundational content. Instead of manually inputting basic pages like "About Us," "Contact," or "Privacy Policy," a programmatic solution allows for instant deployment of these essential elements. This saves significant time, enabling developers to focus on core functionalities while providing a structured starting point that site owners can easily customize later.
Efficient Staging and Testing Environments
Beyond initial setup, developers consistently need to create specific data—including posts, custom pages, or even temporary user accounts—to rigorously test themes, plugins, or custom functionalities. Programmatic generation facilitates the rapid construction of consistent testing environments, ensuring that new features or updates can be thoroughly evaluated without impacting live sites. This approach ensures reproducibility and consistency across various testing iterations.
Streamlined Client Project Deliverables
For freelance developers or agencies, delivering a client project with a polished, albeit placeholder, content structure is crucial. A site populated with some dummy posts and pages appears much more professional than an empty one. Programmatic content creation allows for the quick population of a site with illustrative content, making the handover process smoother and presenting a more complete product to the client.
Advanced User Management and Login Access Recovery
Programmatic methods extend to user management, enabling developers to create specific user roles or add new users by incorporating a few lines of code into the theme's functions.php file. This technique is also remarkably effective in critical situations, such as recovering login access when standard password resets prove problematic or when needing to bypass a locked-out administrator account.
Prerequisites: Essential Steps Before You Begin
Before diving into programmatic content creation, it's vital to ensure your WordPress environment is properly prepared. Addressing these prerequisites will streamline your workflow and help prevent potential issues.
Backup Your WordPress Website
Any significant modification to your website's core functionality or database, especially through code, carries inherent risks. Always create a complete backup of your WordPress site before implementing custom code. This safety measure ensures that, should any unforeseen errors occur, you can easily restore your website to its previous stable state, preventing data loss or downtime. This practice is a cornerstone of responsible development.
Utilize a Child Theme
When adding custom code, particularly to your theme's functions.php file, it is imperative to use a child theme. Directly modifying a parent theme's files means that all your custom changes will be overwritten and lost with every theme update. A child theme inherits all the functionalities and styling of its parent while allowing you to safely implement custom code and modifications that persist through updates.
Basic Understanding of WordPress and PHP
While this guide provides ready-to-use code snippets, a foundational understanding of WordPress architecture and PHP is highly beneficial. Knowledge of how WordPress functions, its hook system, and basic PHP syntax will enable you to comprehend the code, troubleshoot issues more effectively, and adapt the examples to your specific needs. This understanding empowers you to move beyond simple copy-pasting to truly customize your site.
Access to Theme Files
To implement the code provided in this guide, you will need access to your WordPress theme's files, specifically the functions.php file within your child theme. This typically requires either administrator access to the WordPress dashboard (for theme file editor access, though FTP/SFTP is preferred) or direct FTP/SFTP access to your web server. Ensuring you have the necessary permissions is a crucial first step.
Enable Debugging in WordPress
Activating WordPress debugging mode is an essential practice during development. If something goes wrong—a syntax error in your code, a conflict, or an unexpected outcome—debugging will display detailed error messages. These messages are invaluable for identifying and resolving issues quickly, preventing frustration and saving time. You can enable it by adding specific lines to your wp-config.php file.
How to Programmatically Create Pages in WordPress
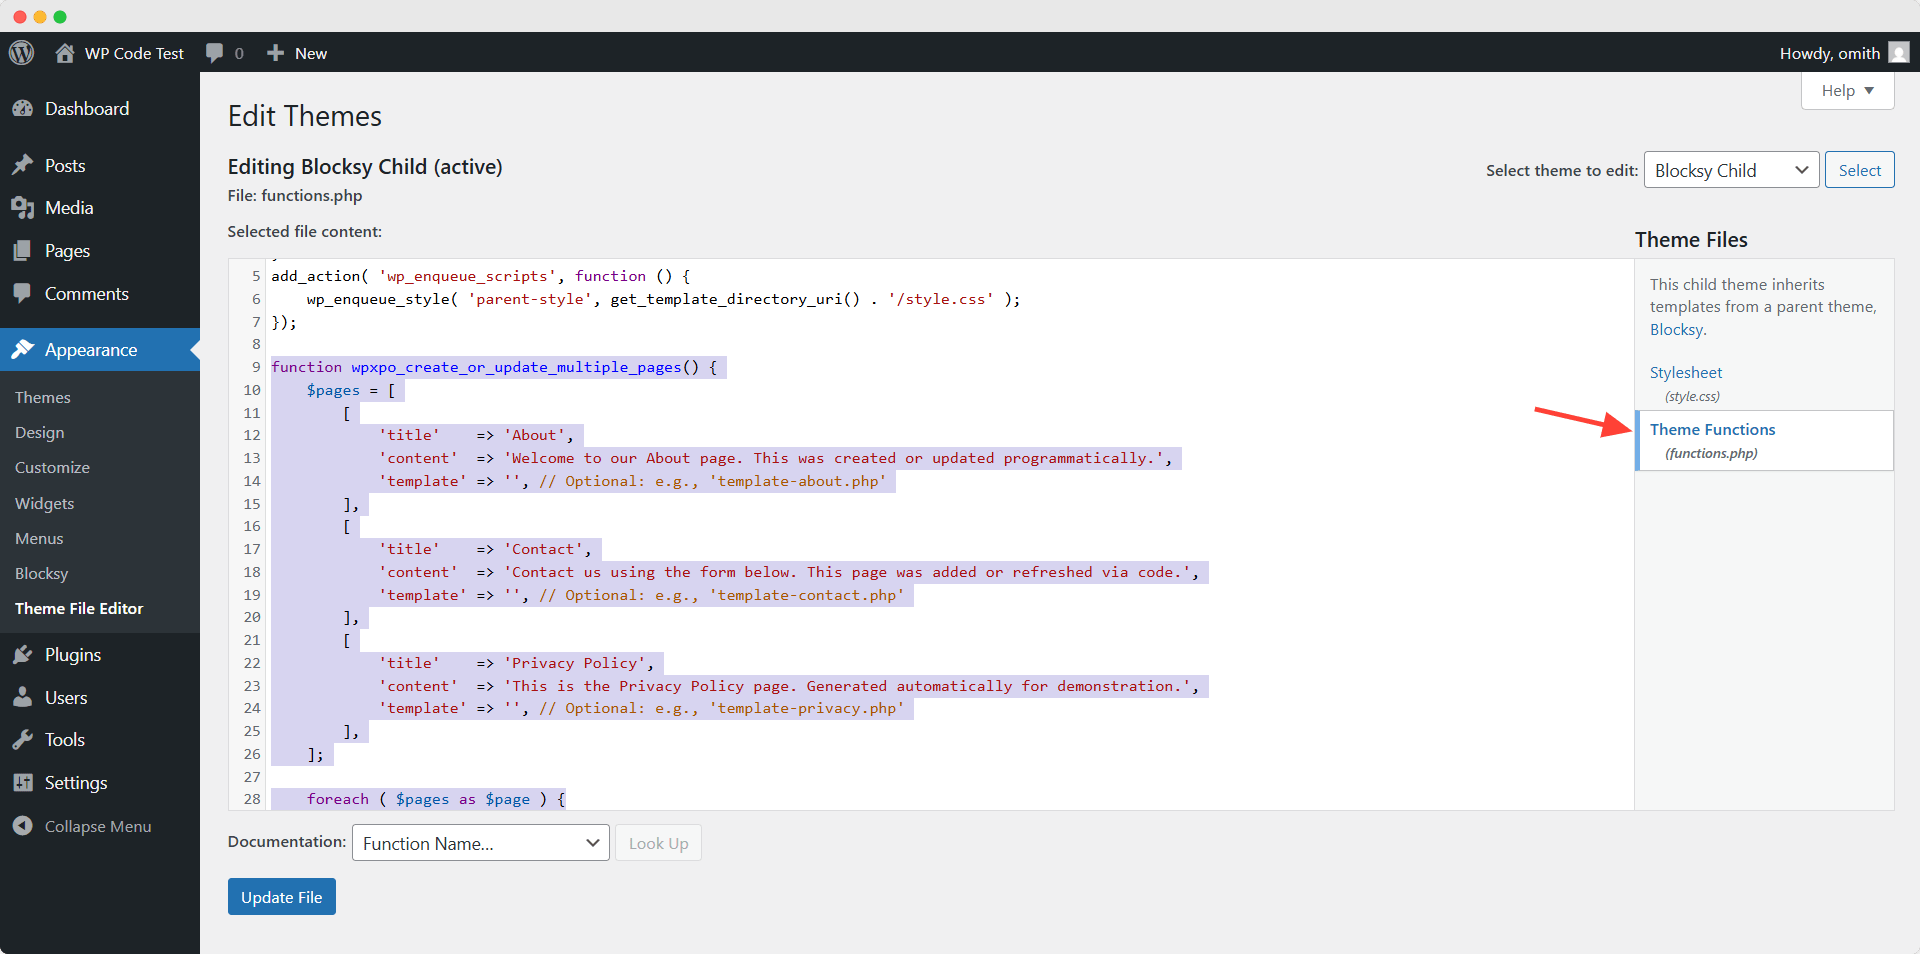
Let's begin by demonstrating how to generate custom pages using code. You will need to open the functions.php file of your child theme and insert the following PHP snippet:
function wpxpo_create_or_update_multiple_pages() {
    $pages = [
        [
            'title'    => 'About',
            'content'  => 'Welcome to our About page. This was created or updated programmatically.',
            'template' => '', // Optional: e.g., 'template-about.php'
        ],
        [
            'title'    => 'Contact',
            'content'  => 'Contact us using the form below. This page was added or refreshed via code.',
            'template' => '', // Optional: e.g., 'template-contact.php'
        ],
        [
            'title'    => 'Privacy Policy',
            'content'  => 'This is the Privacy Policy page. Generated automatically for demonstration.',
            'template' => '', // Optional: e.g., 'template-privacy.php'
        ],
    ];

    foreach ( $pages as $page ) {
        $existing_page = get_page_by_title( $page['title'] );

        if ( $existing_page ) {
            // Update existing page
            wp_update_post( [
                'ID'           => $existing_page->ID,
                'post_content' => $page['content'],
                'post_status'  => 'publish',
            ] );

            if ( ! empty( $page['template'] ) ) {
                update_post_meta( $existing_page->ID, '_wp_page_template', $page['template'] );
            }
        } else {
            // Create new page
            $new_page_id = wp_insert_post( [
                'post_title'   => $page['title'],
                'post_content' => $page['content'],
                'post_status'  => 'publish',
                'post_type'    => 'page',
            ] );

            if ( ! empty( $page['template'] ) ) {
                update_post_meta( $new_page_id, '_wp_page_template', $page['template'] );
            }
        }
    }
}
add_action( 'init', 'wpxpo_create_or_update_multiple_pages' );
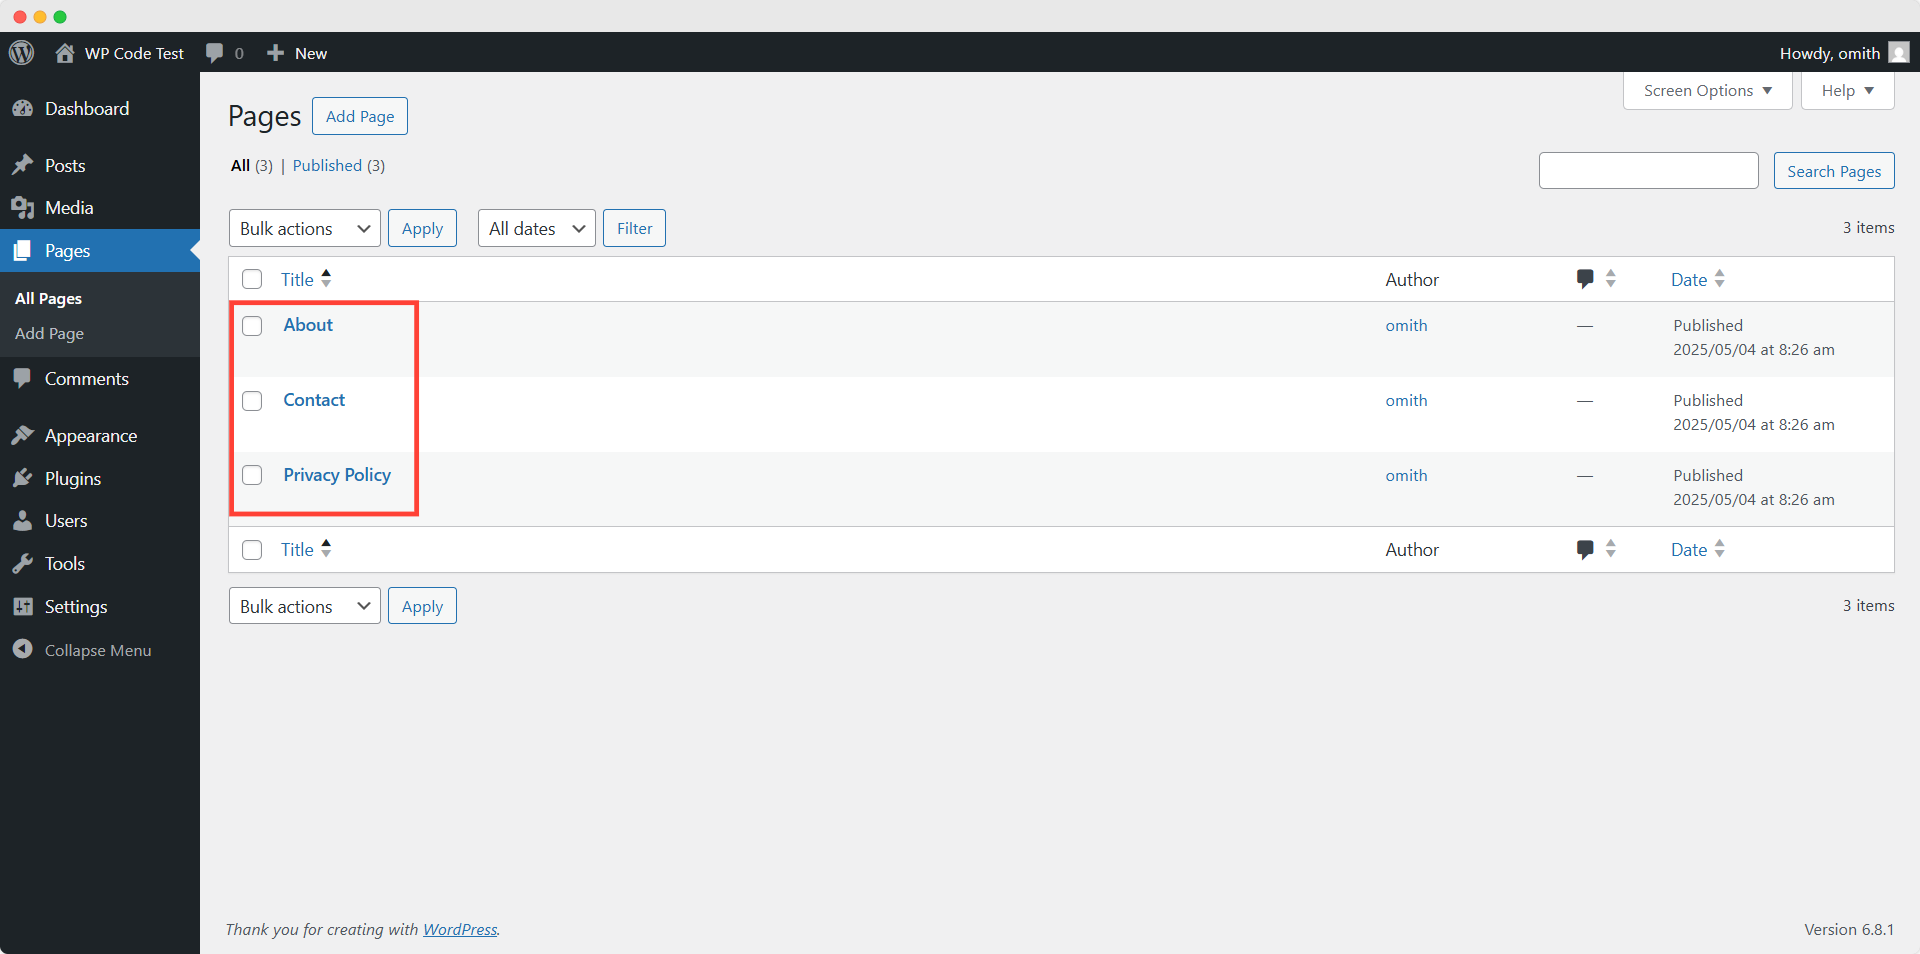
After adding this code and refreshing any page on your website, navigate to the "Pages" section in your WordPress admin dashboard. You will observe that three new pages—"About," "Contact," and "Privacy Policy"—have been successfully created, populated with the dummy content specified in the code. You can easily modify this array to create more or fewer pages, or customize their titles and content to suit your project's requirements.
How to Programmatically Create Posts in WordPress
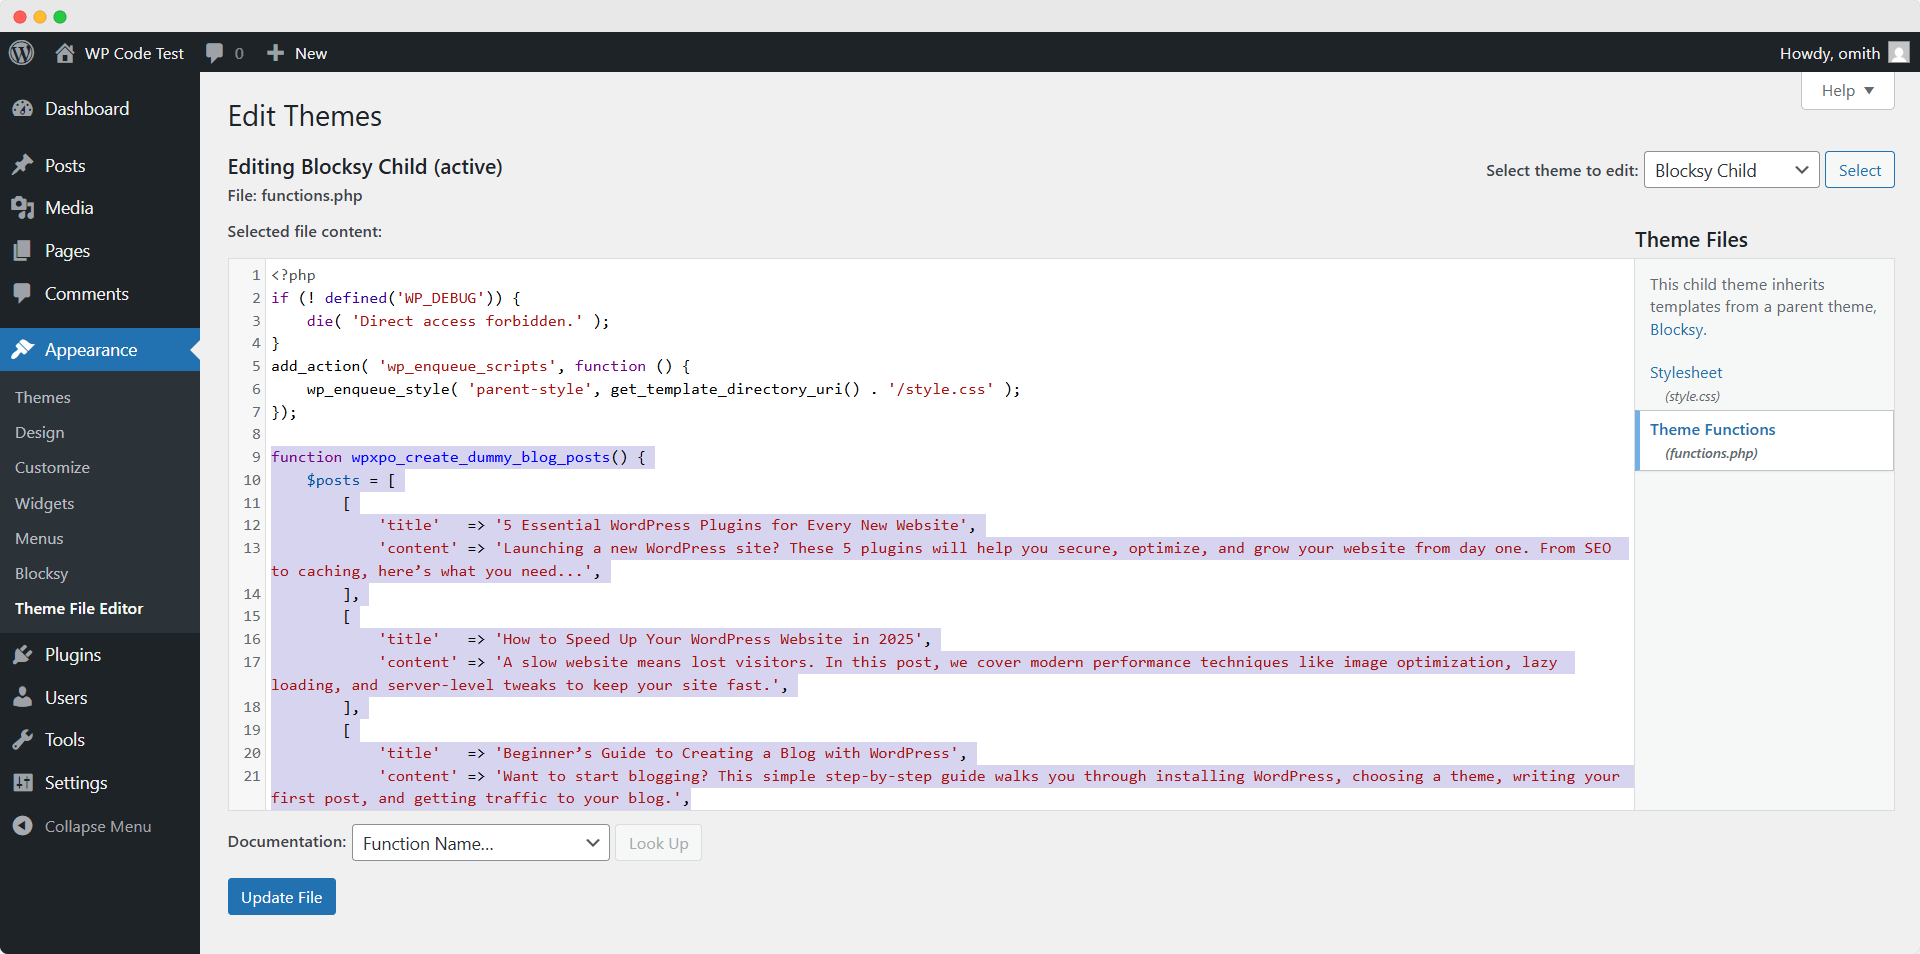
Similar to creating pages, generating blog posts programmatically is straightforward. Add the following code snippet to your child theme's functions.php file. This will automatically create several new blog posts on your website, complete with titles and engaging content.
function wpxpo_create_dummy_blog_posts() {
    $posts = [
        [
            'title'   => '5 Essential WordPress Plugins for Every New Website',
            'content' => 'Launching a new WordPress site? These 5 plugins will help you secure, optimize, and grow your website from day one. From SEO to caching, here’s what you need...',
        ],
        [
            'title'   => 'How to Speed Up Your WordPress Website in 2025',
            'content' => 'A slow website means lost visitors. In this post, we cover modern performance techniques like image optimization, lazy loading, and server-level tweaks to keep your site fast.',
        ],
        [
            'title'   => 'Beginner’s Guide to Creating a Blog with WordPress',
            'content' => 'Want to start blogging? This simple step-by-step guide walks you through installing WordPress, choosing a theme, writing your first post, and getting traffic to your blog.',
        ],
        [
            'title'   => '10 Common WordPress Mistakes and How to Avoid Them',
            'content' => 'Even experienced users make mistakes that can hurt their site. We’ll show you the most common missteps—like using weak passwords, ignoring updates, or choosing bad hosting—and how to fix them.',
        ],
        [
            'title'   => 'What’s New in WordPress 6.5: Features You Should Know',
            'content' => 'WordPress 6.5 has landed! Check out the top new features, including performance improvements, better editor tools, and enhanced full-site editing capabilities.',
        ],
    ];

    foreach ( $posts as $post ) {
        // Check if the post already exists
        $existing_post = get_page_by_title( $post['title'], OBJECT, 'post' );

        if ( $existing_post ) {
            // Update existing post
            wp_update_post( [
                'ID'           => $existing_post->ID,
                'post_content' => $post['content'],
                'post_status'  => 'publish',
            ] );
        } else {
            // Insert new post
            wp_insert_post( [
                'post_title'   => $post['title'],
                'post_content' => $post['content'],
                'post_status'  => 'publish',
                'post_type'    => 'post',
            ] );
        }
    }
}
add_action( 'init', 'wpxpo_create_dummy_blog_posts' );
Upon activating this code and refreshing your site, you will find five new blog posts automatically generated in your WordPress admin area. The code includes logic to either create new posts or update existing ones based on their titles, preventing duplicates if run multiple times. Feel free to customize the post titles and content within the $posts array to suit your specific blogging needs.
How to Programmatically Create a Menu in WordPress
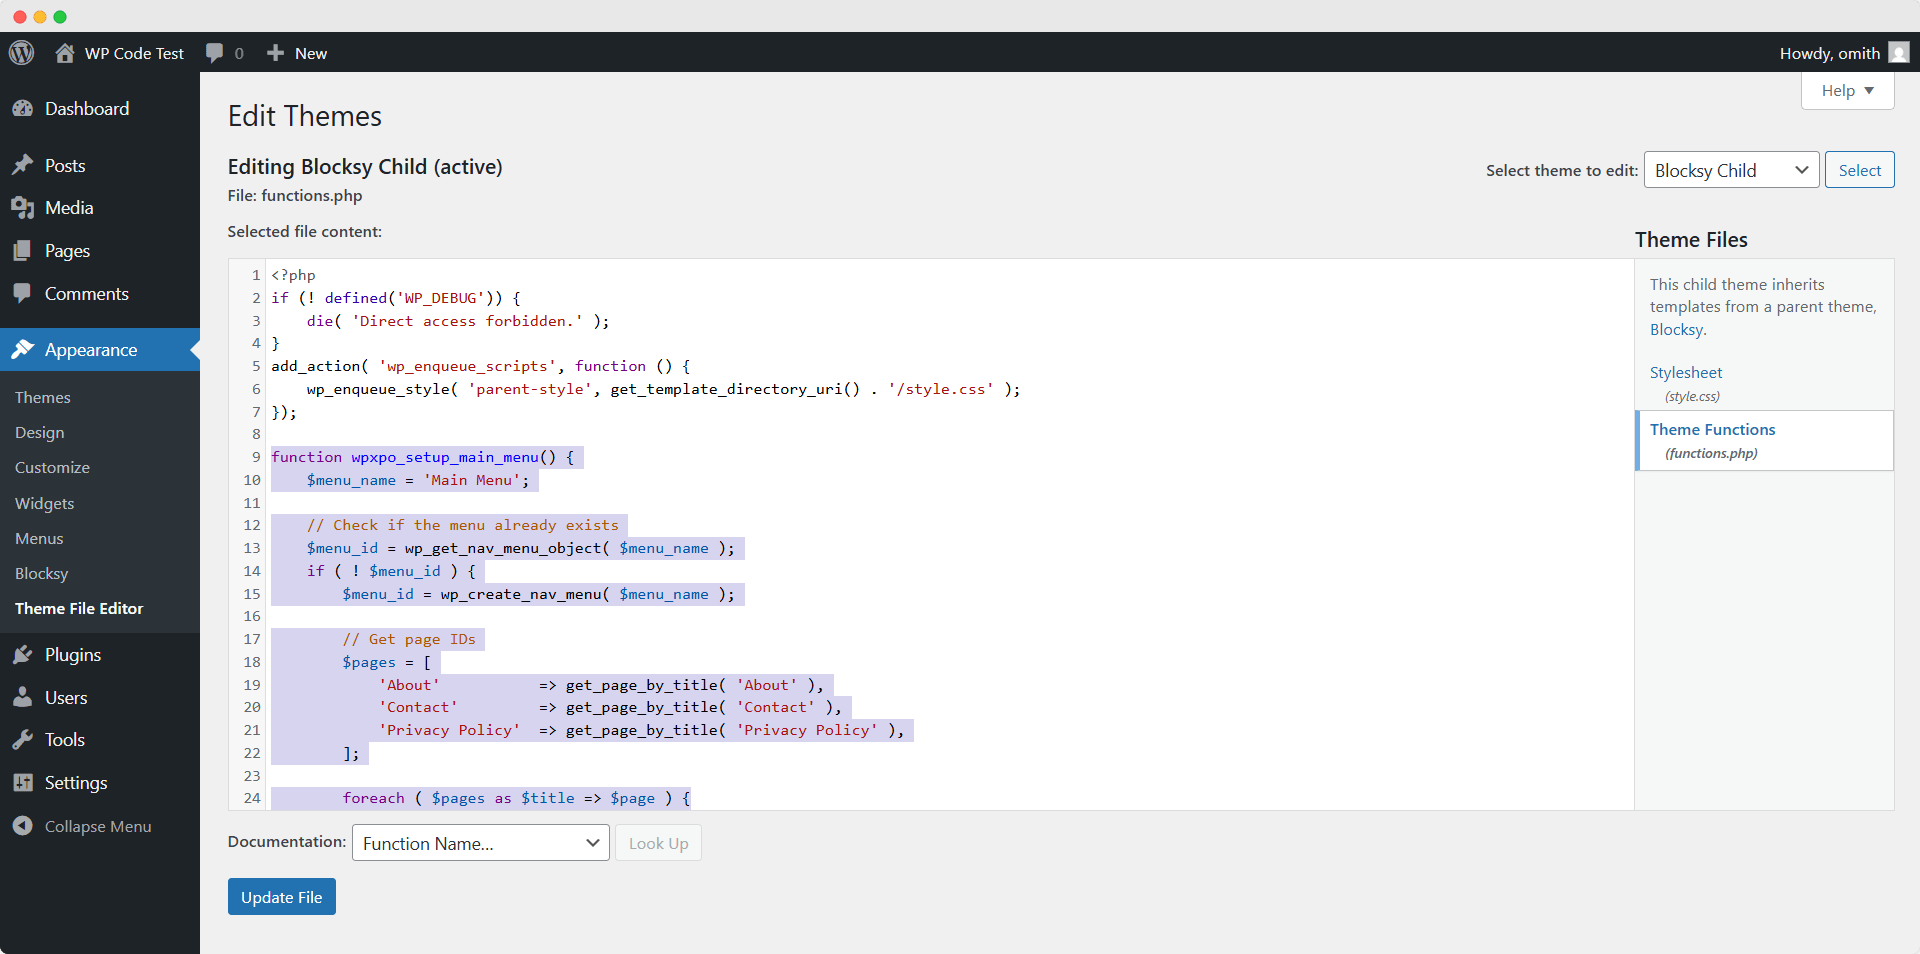
Creating a navigation menu programmatically ensures consistency and automates a typically manual task. The following code is designed to create a "Main Menu" and populate it with the pages we created earlier. You can easily modify the page names within the code to include other existing pages from your site or even custom links.
function wpxpo_setup_main_menu() {
    $menu_name = 'Main Menu';

    // Check if the menu already exists
    $menu_id = wp_get_nav_menu_object( $menu_name );
    if ( ! $menu_id ) {
        $menu_id = wp_create_nav_menu( $menu_name );

        // Get page IDs
        $pages = [
            'About'           => get_page_by_title( 'About' ),
            'Contact'         => get_page_by_title( 'Contact' ),
            'Privacy Policy'  => get_page_by_title( 'Privacy Policy' ),
        ];

        foreach ( $pages as $title => $page ) {
            if ( $page ) {
                wp_update_nav_menu_item( $menu_id, 0, [
                    'menu-item-title'     => $title,
                    'menu-item-object-id' => $page->ID,
                    'menu-item-object'    => 'page',
                    'menu-item-type'      => 'post_type',
                    'menu-item-status'    => 'publish',
                ] );
            }
        }
    }

    // Assign the menu to a theme location
    $locations = get_registered_nav_menus();
    $menu_locations = get_nav_menu_locations();

    // Use 'primary' if available, else first location
    $assign_location = array_key_exists( 'primary', $locations ) ? 'primary' : array_key_first( $locations );

    if ( $assign_location && ( ! isset( $menu_locations[ $assign_location ] ) || $menu_locations[ $assign_location ] !== $menu_id->term_id ) ) {
        $menu_locations[ $assign_location ] = $menu_id->term_id;
        set_theme_mod( 'nav_menu_locations', $menu_locations );
    }
}
add_action( 'init', 'wpxpo_setup_main_menu' );
This script first checks if the "Main Menu" already exists. If not, it creates it and then adds the "About," "Contact," and "Privacy Policy" pages as menu items. Finally, it attempts to assign this new menu to the 'primary' theme location, or the first available location if 'primary' isn't defined. After implementation, verify your menu in the "Appearance > Menus" section of your WordPress dashboard.
How to Programmatically Create a User in WordPress
Programmatically creating new users is particularly useful for setting up test accounts or quickly adding specific users without manual intervention. The following code snippet allows you to define a new username, password, and email, and assign a specific role (e.g., 'editor'). Remember to change these credentials to your desired values.
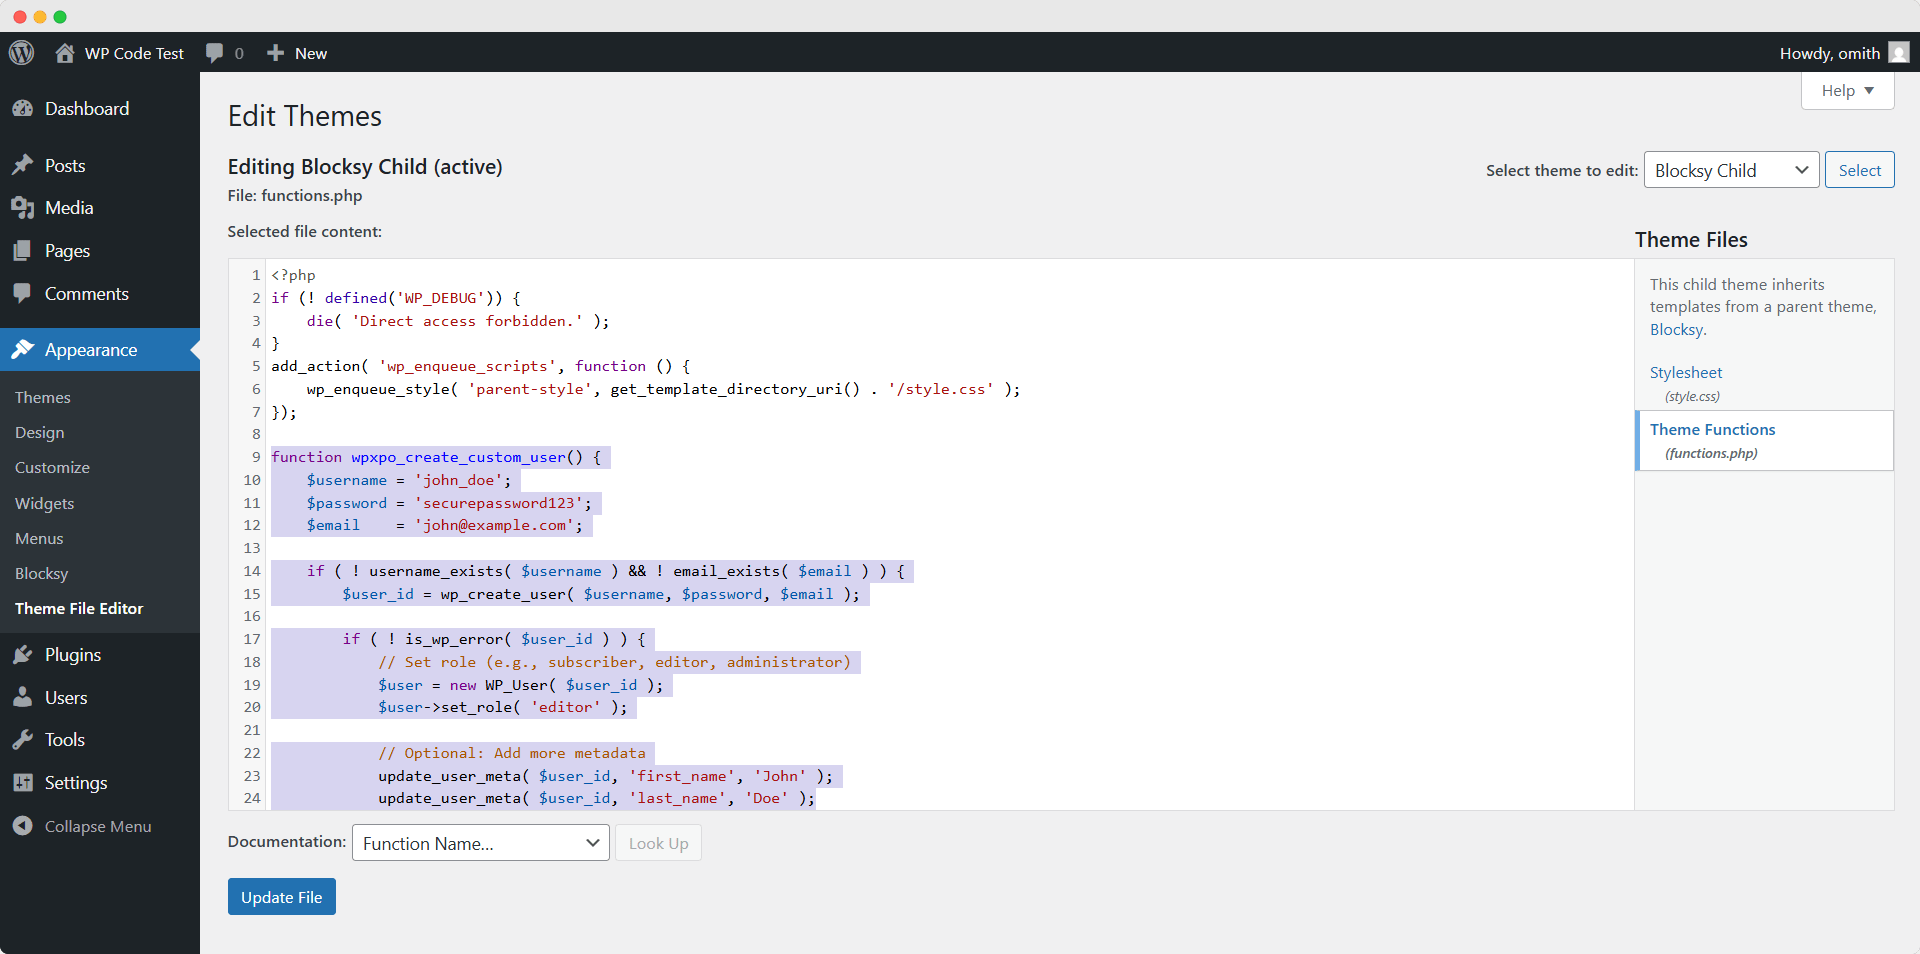
function wpxpo_create_custom_user() {
    $username = 'john_doe';
    $password = 'securepassword123';
    $email    = '[email protected]';

    if ( ! username_exists( $username ) && ! email_exists( $email ) ) {
        $user_id = wp_create_user( $username, $password, $email );

        if ( ! is_wp_error( $user_id ) ) {
            // Set role (e.g., subscriber, editor, administrator)
            $user = new WP_User( $user_id );
            $user->set_role( 'editor' );

            // Optional: Add more metadata
            update_user_meta( $user_id, 'first_name', 'John' );
            update_user_meta( $user_id, 'last_name', 'Doe' );
        }
    }
}
add_action( 'init', 'wpxpo_create_custom_user' );
This code checks if a user with the specified username or email already exists to prevent duplicates. If not, it creates the user, sets their role to 'editor' (which you can change to 'subscriber', 'administrator', etc.), and optionally adds first and last name metadata. Once implemented and the site is refreshed, you will find the new user listed in the "Users" section of your WordPress admin panel.
Important Note: Code Removal After Use
It is crucial to remove these programmatic creation codes from your functions.php file once the desired posts, pages, menus, or users have been successfully generated. Leaving the code in place can lead to undesirable outcomes, such as the creation of duplicate content or unintended updates every time your website loads, potentially causing performance issues or data integrity problems. Deactivate or delete the code after its initial execution to maintain a clean and efficient WordPress environment.
Troubleshooting Common Errors
Even with careful implementation, you might encounter issues. Here are some common problems when programmatically creating WordPress content and their respective solutions:
Error: "Page/Post Not Appearing on the Frontend"
Cause: This often stems from an incorrect post status configuration during the creation process.
Solution: Ensure that the post_status parameter within your code is explicitly set to 'publish'. If it's omitted or set to another value, WordPress might create the posts or pages as drafts, pending, or private, making them invisible on the frontend.
Error: "Menu Items Not Displaying"
Cause: A newly created custom menu may not appear on your website if it has not been correctly assigned to a theme location.
Solution: After programmatically creating a menu, it must be assigned to an active theme location (e.g., 'primary', 'footer'). Verify that your code includes logic to assign the menu using functions like set_theme_mod( 'nav_menu_locations', $menu_locations ), and confirm the assignment in the "Appearance > Menus > Manage Locations" section of your dashboard.
Error: "Incorrect Post Type or Page Template"
Cause: This error typically occurs when attempting to use a custom page template without correctly specifying its name in the creation parameters.
Solution: If your pages are meant to use a custom template (e.g., template-about.php), you must include its filename in the template parameter when calling wp_insert_post() or wp_update_post(), ensuring it points to the correct template file within your theme.
Error: "Missing Content or Fields"
Cause: Incomplete content or metadata can result from improperly structured or missing parameters within your code.
Solution: Double-check that all required post elements, such as post_title, post_content, and any specific metadata, are correctly passed as arguments to functions like wp_insert_post() or wp_create_nav_menu(). Ensure all arrays are correctly formatted and contain the necessary data for each field.
Conclusion
Mastering the programmatic creation of WordPress posts, pages, menus, and users offers a powerful advantage for developers, streamlining workflows and enhancing efficiency in site development and management. By following the guidelines and utilizing the provided code snippets, you can automate routine tasks, build consistent development environments, and maintain greater control over your WordPress installations. We hope this guide has provided you with the knowledge and tools necessary to successfully implement these techniques in your projects. Should you encounter any challenges or have further inquiries, feel free to consult the WordPress developer resources.
