


Managing Domain Name System (DNS) settings might seem daunting initially due to its highly technical terminology. However, with a clear understanding, the process becomes quite manageable. This comprehensive guide aims to demystify DNS management within Plesk, helping you navigate its intricacies with ease.
At its core, DNS functions as a directory system for the internet. It comprises a series of records that translate human-readable domain names (like yourdomain.com) into machine-readable IP addresses (such as 1.2.3.4). Each domain can possess a varying number of DNS records, ranging from a few essential entries to a more extensive list.
This guide will thoroughly explain the various types of DNS records, their specific purposes, and provide detailed instructions on how to effectively configure, update, add, or remove these records for your domain directly within the Plesk interface. By the end, you'll be equipped to manage your domain's DNS with confidence.
Important Consideration: It is crucial to remember that due to the distributed nature of the global DNS system, any modifications made to your domain’s DNS records may require up to 48 hours to fully propagate across the internet. While changes are frequently observed within a few hours, patience is advised during this propagation period. You can monitor the global progress here.
How to Locate Your DNS Settings in Plesk
Before proceeding with any modifications, it’s essential to understand where to find your domain's DNS management interface within Plesk. Please note: if your domain's DNS is managed through your registrar's client center (often indicated by an option like "Manage my DNS records manually"), you should use their specific tools instead of Plesk.
- First, access your Plesk control panel. This typically involves logging in to your hosting account and navigating to the Plesk interface, usually found under a "Control Panel" or "Plesk Login" link.
- Once logged in, you will arrive at the "Websites and Domains" screen. From this list, select the specific domain for which you intend to adjust DNS records.
- Within the selected domain's management area, locate and click on the "Hosting & DNS" tab.
- Finally, click the "DNS Settings" button. This action will direct you to the comprehensive list of your domain's current DNS records.
Upon reaching this page, you will observe a variety of options. Most of these options pertain to the entire set of your domain's DNS records, while "Add Record" and "Remove" specifically target individual entries. To modify an existing DNS record, simply click on the blue text located within the “Host” column corresponding to the record you wish to edit.
- Add Record: This option allows you to create a new DNS record. Detailed instructions for adding and editing records are provided later in this guide.
- Disable: (Warning: This action disables the entire DNS system for your domain, not individual records.) You should only utilize this if your domain’s DNS services are being managed by an external provider.
- Switch to Secondary/Primary: This advanced feature, used for operating multiple DNS systems simultaneously, is generally not required for typical configurations and can usually be disregarded.
- Reset to Default / Apply DNS Template: These options should be used with extreme caution. They will revert all DNS settings to their default state or apply a predefined template, effectively overwriting any custom records you may have configured. Only proceed if you are certain that all existing custom records are no longer needed.
- Transfer DNS: This function enables the import of DNS records, either from a pre-existing file (which often provides a more complete transfer) or by performing a live records lookup (which might occasionally miss certain records).
- Remove: To delete one or more records, select the checkboxes next to the desired entries in the list and then click the "Remove" button. Note: After selecting records for removal, you will be prompted to finalize your changes. It is imperative to confirm this step, otherwise, your alterations will not be applied.

Should you find that the list of records primarily displays only NS (Name Server) records and lacks other common entries, it is highly probable that your DNS management in Plesk is currently disabled. In such a scenario, locate and click the "Enable" button—typically the first button on the left—to re-activate DNS management within Plesk. Additionally, ensure that your domain’s name servers are correctly configured to point to your current hosting plan for proper functionality.
Before adding any new records, it is always a good practice to verify whether a similar record, with the same subdomain and type (e.g., A, TXT, CNAME, MX), already exists. If an entry with an identical "Subdomain/Host" field and "Type" is already present, it is generally recommended to edit the existing record rather than creating a duplicate, to avoid conflicts and ensure proper resolution.
Understanding Subdomains and the Host Field
When you are adding or modifying a DNS record within Plesk, it's important to understand how the "Host" field functions in conjunction with your domain name. Plesk automatically appends your primary domain (e.g., yourdomain.com) to whatever you enter in this field. Therefore, you only need to populate the "Host" field when you are working with a subdomain.
For instance, if you intend to configure a DNS record for xyz.yourdomain.com, you would simply enter xyz into the "Host" field. Plesk will automatically resolve this to xyz.yourdomain.com. Conversely, if the record you are creating or editing is for the root domain itself (e.g., yourdomain.com) and does not involve a subdomain, the "Host" field should be left blank. An illustrative example in the provided screenshot might show ftp.yourdomain.com, where only ftp was entered as the host.
Configuring External Subdomain Hosting: If your objective is to set up a DNS record for a subdomain that will be hosted externally (meaning its website or service will reside on a different server), you should create this DNS record under the parent domain's DNS settings. It is crucial to avoid using the "Add a Subdomain" button found under "Websites & Domains" in Plesk for this purpose, as that action is intended to establish local web and email hosting for the subdomain, which is likely not what you need for an externally hosted service. For example, if you wish to configure shop.yourdomain.com to direct traffic to an external e-commerce platform, you would navigate to the DNS settings for yourdomain.com and then create the necessary DNS records as specified by your store provider.
Understanding Common DNS Record Types
For those who may be uncertain about which specific DNS records require modification, this section provides a clear overview and explanation of the most common record types, helping you identify and configure the correct records for various hosting services.
DNS Records for Website Hosting
The primary DNS record for your website is known as the root A record. This fundamental record dictates where visitors are directed when they access your domain directly (e.g., yourdomain.com). It is characterized by an "A" record type, where the "Host" column explicitly shows only your bare domain (often displayed with a trailing period) and no subdomain like mail, ns1, or ftp. Additionally, it is customary to find a CNAME record for www.yourdomain.com which typically points to your root domain, ensuring that both yourdomain.com and www.yourdomain.com resolve to the same location. A crucial warning: be aware if other records, such as mail records, are configured as CNAMEs pointing to your root record. In such cases, altering your root record will consequently affect these linked records.
DNS Records for Inbound Email
Inbound email routing is primarily managed by MX (Mail eXchange) records. However, this functionality technically relies on two distinct components:
- An MX record type, where the "Host" column is usually left blank (or represented by
@), signifying that it applies to the main domain. This record will then point to another record within your DNS zone, typically an entry likemail.yourdomain.com. - The specific record that the MX entry points to, such as
mail.yourdomain.com. You should locate this record, which corresponds to the mail subdomain. Ideally, this should be an A record that resolves to the IP address of your mail server. Tip: If this record is currently configured as a CNAME pointing to your root domain (represented by@, oryourdomain.com) and you plan to change your root A record, it is advisable to remove this CNAME record and re-add it as an A record pointing to the mail server's IP address before proceeding with the root record modification.
DNS Records for Mail Clients (IMAP/POP/SMTP)
While configurations can vary, in a typical Plesk setup, the mail.yourdomain.com subdomain often serves a dual purpose, functioning for both inbound mail (MX) and for mail client protocols such as IMAP, POP, and SMTP. This implies that the same server handles both aspects of your email services.
In many scenarios, particularly when connecting mail applications, users are directed to use a specific server hostname provided by their hosting provider. In such configurations, the mail.yourdomain.com record primarily functions for MX routing, and mail clients might bypass it in favor of the direct server hostname for IMAP/POP/SMTP connections.
How to Remove a DNS Record
The process of removing a DNS record is straightforward. To do so, simply locate the record(s) you wish to delete from the list, check the corresponding box next to each entry, and then click the "Remove" button. Following this action, you will be prompted to finalize your changes. It is crucial to confirm this step to ensure that the selected alterations are saved and take effect across the DNS system.
Adding or Modifying DNS Records
To edit an existing DNS record, navigate to its entry in the DNS settings list and click on the "Host" field (typically displayed as blue text). This action will open a configuration page similar to the example shown below. To add an entirely new DNS entry, locate and click the "Add Record" button, which will also direct you to a similar configuration interface.

On the record configuration page, you will find a "Record type" drop-down menu. This menu allows you to select the specific type of DNS entry you wish to create or modify. If you are adding or editing a 'root' DNS record (often represented as '@' or just your domain in other systems), simply leave the "Domain name (subdomain)" field blank in Plesk.
As mentioned previously, if you only observe "NS" or "Name Server" entries in your list of record types, it signifies that your DNS management in Plesk is disabled. In this situation, you must return to the main DNS settings page and click the "Enable" button to activate DNS functionality. Refer to the "How to Locate Your DNS Settings in Plesk" section above for detailed guidance.
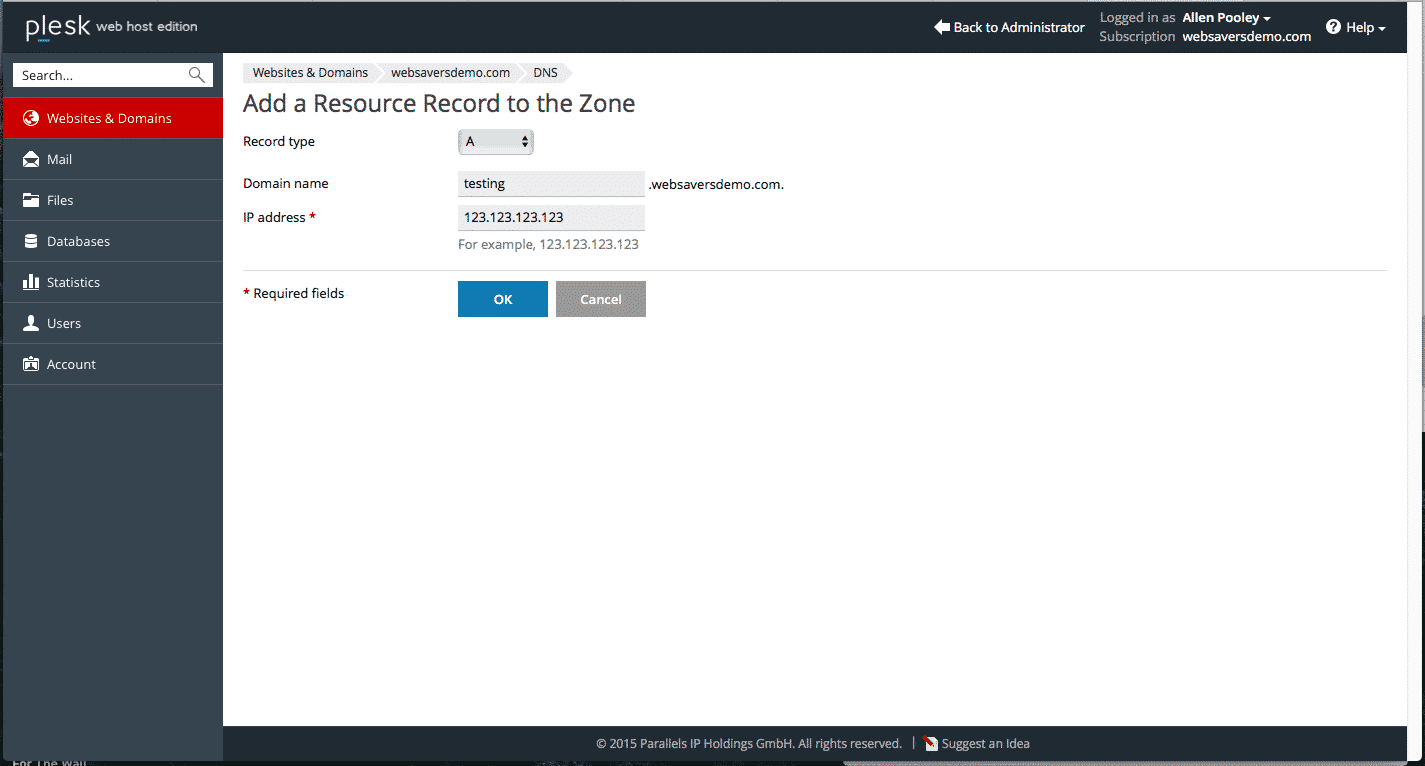
A Record (Address Record)
The "A" record is one of the most fundamental and frequently used DNS record types. Its primary function is to link a domain name or a subdomain to an IPv4 Address. An IPv4 address is a standard 32-bit numerical address, typically presented in a dot-decimal notation format, such as xxx.xxx.xxx.xxx. It uniquely identifies a device or server on the internet.
When configuring an A record, you will encounter two primary input fields: one for the subdomain and another for the IP address. For example, entering testing in the subdomain field and a corresponding IP address (e.g., 192.0.2.1) in the IP address field will effectively create a subdomain testing.yourdomain.com that points to that specific IPv4 address. After entering the necessary information, click "OK" to save your changes.
AAAA Record (IPv6 Address Record)
Similar in function to the A record, the "AAAA" record serves to link a domain name or subdomain to an IPv6 address. The distinction lies in the address format, as an IPv6 address is a 128-bit hexadecimal address, appearing in a format like 2002:7b7b:7b7b::1. The configuration process for AAAA records mirrors that of A records, requiring you to specify the subdomain (if applicable) and the target IPv6 address.
CNAME Record (Canonical Name Record)
A CNAME, or Canonical Name record, acts as an alias for a domain or subdomain. When a user's browser or email application queries the DNS system for a subdomain linked to a CNAME, the DNS effectively responds by indicating that the IP address for that subdomain is the same as the target domain or hostname you specify. It essentially creates a pointer from one name to another existing name.
The most common application for a CNAME record is to associate the www subdomain with the root domain. For instance, www.yourdomain.com might be configured as a CNAME that points to yourdomain.com, ensuring both resolve to the same server. It is important to note that a CNAME record itself does not dictate URL forwarding; that function is managed by the web server configuration. To learn more about setting your preferred domain for web server redirection, consult your web hosting documentation, such as Plesk's guide on hosting types.
To configure a CNAME, enter the desired subdomain (or leave it blank for the root domain) and then specify the target for the alias in the "Canonical domain" field.
MX Record (Mail eXchange Record)
The MX (Mail eXchange) record is paramount for the proper functioning of email services with your domain. This record instructs sending email servers on where to route incoming mail for email addresses associated with your domain (e.g., [email protected]). In typical default configurations, it might point to mail.yourdomain.com, which in turn resolves to your local server's IP address. However, this setting will require modification if you are utilizing an external email service.
The MX DNS configuration screen usually presents three key fields:
- Domain (Subdomain) to Receive Mail For: This field specifies the domain or subdomain for which the MX record applies. For configuring mail on your primary domain, this field should typically be left blank or empty. You would only enter a subdomain here if you specifically intend to receive mail for accounts like
[email protected], which is less common for most users. - Destination Mail Server: This defines the hostname of the server responsible for receiving mail. This value must be a hostname (an A or CNAME record), not an IP address. For example, if your mail server is at
1.2.3.4, you would first create an A record, such asmail.yourdomain.com, pointing to1.2.3.4. Then, you would set your MX record's destination tomail.yourdomain.com. - Priority of the Mail Exchange Server: This numerical value indicates the preference for mail delivery among multiple MX records.
Understanding MX Priorities
Priority is a unique concept to MX records, designed to manage scenarios involving backup mail servers, common with enterprise email solutions like Google Workspace or Microsoft 365. Essentially, it creates a sequence for mail delivery: "Attempt delivery here first; if unsuccessful, try the next option, and so forth." When configuring MX records, any instructions you follow should provide guidance on appropriate priority settings.
If you are migrating or copying MX records from another DNS host and their priority numbers they use are different from what's available in Plesk, simply select the closest available numbers. The precise numerical value of the priority is less critical than its relative order. Lower numbers denote higher priority, meaning the server with the lowest priority number is the primary recipient for mail. If that server is unresponsive, the system will then attempt delivery to the next lowest number in sequence.
Important Note: MX records should never be configured to point directly to IP addresses. Instead, they must point to a hostname (an A or CNAME record) that, in turn, resolves to the mail server's IP. External mail providers will have already configured the necessary A records on their end, so your task will primarily be to create MX records that point to the hostnames they provide.
PTR Record (Pointer Record)
PTR records, also known as reverse DNS records, are used to map an IP address back to a domain name, which is the reverse function of an A record. While essential for certain email validation processes and network diagnostics, PTR records are typically managed by your internet service provider or hosting provider at the IP address level. If you have a dedicated IP address through your hosting provider and require reverse DNS configuration, you would typically need to contact their support team directly, as this configuration is usually outside the scope of direct Plesk DNS management.
TXT Record (Text Record, also SPF Record)
The TXT record is one of the most frequently modified DNS records, especially for new website administrators. This is due to its invaluable role in verifying domain ownership for various online services and platforms, including search engines, cloud providers, and email authentication systems like Google, Microsoft, and others.
Furthermore, TXT records are extensively used to publish SPF (Sender Policy Framework) records, a highly effective method for preventing email spoofing and forgery. SPF records specify which mail servers are authorized to send email on behalf of your domain, significantly enhancing email security. You can find more comprehensive information about how SPF works here.
In most scenarios, particularly for domain verification, you do not need to enter anything into the "Domain name (subdomain)" portion of the TXT record; many services, such as Google, instruct users to leave this section blank. The verification string or SPF record content provided by the service will be entered into the "TXT record" field, which is typically the second input box on the screen.

SRV Record (Service Record)
The SRV record type is often perceived as the most complex among DNS entries, typically required only for advanced configurations. If you are setting up services like auto-discovery for Microsoft 365, Skype for Business, or any other service that mandates an SRV record, there's no need to be overwhelmed. While its structure appears intricate, it's manageable once you understand how to break it down.
Often, an SRV record is presented as a single, long string of text, such as this example: _sip._tls.sipdir.online.lync.com.
When inputting this into Plesk, you need to parse it into its individual components:
- Service name:
sip - Protocol name:
tls - Domain name: (leave blank, as this field is used only when adding to a specific subdomain, which is rare for SRV records)
- Target host:
sipdir.online.lync.com - Target port:
443
Consider another example for an autodiscover SRV record:
_autodiscover._tcp.yourdomain.com priority 100, weight 1, port 443, yourdomain.autodiscover.outlook.com
When translating this into Plesk fields, the components are:
- Service name:
autodiscover - Protocol name:
tcp - Domain: (leave blank)
- Priority:
100(Note: Plesk typically caps this at 50, so use50if 100 is not available) - Weight:
1(Plesk often allows values from 0 to 5 before increasing in larger increments) - Target port:
443 - Target host:
yourdomain.autodiscover.outlook.com
This structured information allows a mail client, for example, attempting to auto-detect its settings, to query your domain's DNS. It would then discover that for an "autodiscover" request, it should connect to yourdomain.autodiscover.outlook.com on port 443 to retrieve the necessary configuration details – an elegant solution for automated setup.
Troubleshooting Common DNS Issues
Here’s a common issue you might encounter when managing DNS records in Plesk, along with its resolution:
Problem: When attempting to add a subdomain record, Plesk displays a warning message stating, “This record will conflict with the glue record for the zone.” This typically happens when a subdomain has been prematurely added within Plesk for hosting purposes, but your actual intent is merely to create a single DNS record for that subdomain (e.g., pointing it to an external service). The conflict arises because Plesk has already generated its own set of records for the subdomain, which then clashes with your new, intended record.
Solution: To resolve this, first, locate and remove the problematic subdomain entry from the "Websites and Domains" section in Plesk, treating it as you would any other domain. Once the subdomain has been removed from that section, navigate to the DNS settings of the parent domain and proceed to add your desired DNS record there. This approach ensures that the new record is created without conflict.
