A well-designed navigation menu is crucial for directing visitors through your WordPress website, ensuring they can effortlessly locate the information they seek. Whether you are launching a new site or enhancing an existing one, mastering the creation and customization of navigation menus is a valuable skill. WordPress provides an intuitive drag-and-drop menu interface, making it simple to construct header menus, drop-down options, and various other navigational structures. This comprehensive, step-by-step guide will walk you through the process of adding a navigation menu in WordPress with ease.

A navigation menu serves as a curated list of links that guide users to key sections of a website. Typically, these menus appear as a horizontal bar of links prominently positioned at the top of every page on a WordPress site. Such menus are fundamental for establishing clear site structure and enabling visitors to efficiently find desired content.

WordPress simplifies the process of adding both main menus and sub-menus. You can incorporate links to your most important pages, specific categories or topics, individual blog posts, and even custom links like your social media profiles. The precise placement of your menu largely depends on your chosen WordPress theme. Most themes offer several placement options, allowing you to create distinct menus for different areas of your site. For instance, a primary menu often appears at the top, while some themes may also include secondary menus, footer menus, or dedicated mobile navigation menus. Let's explore how to create a custom navigation menu in WordPress.
Creating Your First Custom Navigation Menu
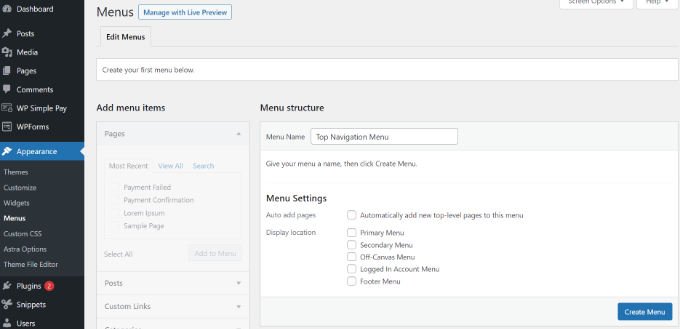
To begin creating a navigation menu, navigate to the Appearance » Menus page within your WordPress admin dashboard.
Note: If you do not see the ‘Appearance » Menus’ option and instead see only ‘Appearance » Editor’, it indicates that your theme has Full Site Editing (FSE) enabled. In this case, please refer to our dedicated section on Implementing Navigation Menus with the Full Site Editor (FSE) for instructions.

Upon reaching this page, you will be prompted to provide a name for your new menu, such as ‘Main Navigation’ or ‘Primary Menu’. After entering a descriptive name, click the ‘Create Menu’ button. This action will expand the menu area, revealing the interface for adding and organizing menu items.

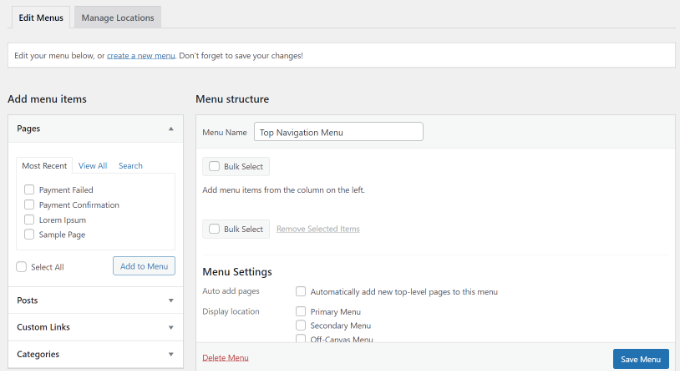
The next step involves selecting the pages you wish to include in your menu. You have the option to automatically add all newly created top-level pages, or you can manually select specific pages from the left-hand column. To view all available pages, click the ‘View All’ tab. Then, check the box next to each of the pages you want to add to your menu, and finally click the ‘Add to Menu’ button.
Once your chosen pages have been added, you can effortlessly reorder them by dragging and dropping them within the ‘Menu Structure’ section. This intuitive functionality allows you to arrange your menu items precisely as you desire.
Important: In the menu editor, all items are displayed in a vertical list. However, when the menu goes live on your website, its orientation (vertical or horizontal) will be determined by the specific location you select for it within your theme.
Most WordPress themes offer several predefined locations where you can display your menus. For instance, many themes provide options for a primary header menu, a footer menu, or a sidebar menu. After adding and arranging your desired pages, select the appropriate location for your menu from the available options and click the ‘Save Menu’ button.
Tip: If you are unsure which location corresponds to which area of your website, experiment by saving the menu to different locations and then previewing your site. This will help you identify the ideal placement for each menu.
Creating Drop-Down (Nested) Menus
Drop-down menus, often referred to as nested menus, offer an excellent way to organize your website's navigation by allowing you to group related content under a main menu item. When a user hovers their cursor over a parent item, a sub-menu containing all its child items will gracefully appear. This design helps in presenting a clean main navigation while still offering extensive options.
To construct a submenu, simply drag an item you wish to make a child item below its desired parent item. Once positioned, drag it slightly to the right. This indentation visually establishes its status as a sub-item. For instance, you could place multiple specific service pages as sub-items under a primary 'Services' menu entry.
While WordPress supports multiple layers of dropdowns (a sub-menu having its own sub-menu), it's important to consider that this can sometimes lead to a cluttered appearance, and not all themes fully support multi-layered drop-down menus effectively. Simplicity often works best for user experience.
Adding Categories to Your WordPress Menus
For websites featuring a blog, integrating your blog categories directly into your WordPress navigation menu can greatly improve content discoverability. This allows visitors to quickly browse content by topic.
Adding categories to your menu is straightforward. On the left side of the menu screen, click the 'Categories' tab. If you don't see all your categories, ensure you've clicked the ‘View All’ tab. Select the categories you wish to include in your menu by checking their respective boxes, then click the ‘Add to Menu’ button.
Once added, these categories will initially appear as regular menu items at the bottom of your menu list. You can then drag and drop them into their desired positions. A common practice is to place them as sub-items under a main 'Blog' or 'Topics' menu item, creating an organized drop-down structure.
Adding Custom Links to Your Navigation Menus
Beyond standard pages and categories, WordPress offers the flexibility to incorporate custom links into your navigation menu. This feature is incredibly useful for directing visitors to external resources such as your social media profiles, an online store, or other related websites you manage.
To add a custom link, locate and click the ‘Custom Links’ tab on the Menu screen. You will need to provide both the URL (the web address) and the link text you want displayed in your menu. After entering this information, click the ‘Add to Menu’ button. This simple process allows for robust customization of your site's navigation.
For more advanced customization, you can even explore options to integrate social media icons directly into your menu or strategically place call-to-action buttons to encourage specific user interactions and conversions.
Editing or Removing Menu Items
When you initially add pages or categories to your custom navigation menu, WordPress automatically uses their respective titles or names as the default link text. However, you have complete control to modify this display text to something more concise or descriptive, if desired.
To edit any menu item, simply click on the downward arrow icon positioned next to that item. This action will reveal additional options, including a field where you can alter the menu item's name. Should you need to remove a link from your menu entirely, you can do so by clicking the ‘Remove’ button.
For users who may find the drag-and-drop interface challenging, WordPress also provides dedicated ‘Move’ links within each menu item's expanded options. These links allow you to precisely reposition menu items up, down, to a parent, or to a submenu, offering an alternative method for organizing your navigation.
Implementing Navigation Menus with the Full Site Editor (FSE)
The innovative Full Site Editor (FSE) empowers users to customize their WordPress themes comprehensively using the block editor. Introduced in WordPress 5.9, FSE allows for the integration of various blocks into your templates to craft a truly unique and dynamic design.
To manage navigation menus using the Full Site Editor, begin by navigating to Appearance » Editor from your WordPress dashboard. For the purpose of illustration, we often use a default FSE-compatible theme, such as Twenty Twenty-Three.
Once inside the editor, locate and click on the ‘Navigation’ tab to expand its settings. This action will reveal new configuration options in the left-hand column. From there, click the ‘Edit’ icon situated at the top.
This will activate the Full Site Editor interface, where you can then click the ‘+’ icon to add a new navigation menu item. A prompt will appear, offering various options from a dropdown menu, such as pages, posts, or categories.
Should you wish to add a custom link, simply input a label and the corresponding URL for your navigation menu item within the block panel. This flexibility even allows for enhancements like integrating a search option directly into your menu.
After an item has been added, you can further refine its appearance by switching to the ‘Styles’ tab from the column on the right. Here, you can adjust aspects such as typography, overall appearance, height, spacing, letter case, and text decoration, providing extensive control over your menu's visual presentation.
The Full Site Editor also facilitates the creation of submenus; simply click on the appropriate icon within the block toolbar. Once all adjustments are complete, you can preview the changes to see your menu's real-time appearance on your site. Remember to click the ‘Save’ button at the top to apply your modifications.
Integrating Menus into Sidebars and Footers
While themes provide specific display locations for menus, you are not limited to these predefined areas. WordPress allows you to incorporate navigation menus into any widget-enabled section of your site, such as sidebars or footers, offering greater flexibility in layout and design.
To achieve this, navigate to Appearance » Widgets. Then, click the ‘Add Block’ (+) button at the top of the screen and select the ‘Navigation Menu’ widget block to add it to your desired widget area, such as a sidebar.
Once the widget is placed, you can assign a title to it (e.g., "Quick Links" or "Explore"). From the ‘Select Menu’ dropdown list, choose the specific navigation menu you wish to display in that widget area. After making your selection, click the ‘Update’ button to save your changes.
For example, a custom WordPress footer menu can be an excellent way to provide supplementary navigation, linking to privacy policies, contact information, or other essential, non-primary pages without cluttering your main header.
Advanced Navigation Menu Options
For websites requiring extensive navigation with numerous links and rich content, implementing a "mega menu" can be an ideal solution. Mega menus transform a standard drop-down into a much larger panel that can host multiple columns of links, category listings, and even images or promotional content.
This advanced menu type is particularly beneficial for large-scale websites, such as expansive online stores, comprehensive news portals, or corporate sites with a vast array of services. Leading platforms often leverage mega menus to enhance user experience and content accessibility.
Frequently Asked Questions About WordPress Menus
How do I add a homepage link to a WordPress menu?
Adding your homepage to a navigation menu is a common requirement. To do this, navigate to the 'Pages' section within the menu editor and click on the ‘View All’ tab. You should then see your homepage listed. Check the box next to ‘Home’ and click ‘Add to Menu.’ Always remember to save your menu changes after making additions.
How do I add multiple navigation menus in WordPress?
WordPress allows you to create an unlimited number of navigation menus. To display these menus on your website, you will need to assign them to one of your theme's available menu locations (e.g., primary, secondary, footer) or to a widget area. After creating your desired menus as outlined in the sections above, go to the ‘Manage Locations’ tab within the Menus screen. Here, you can select which menu to display in each of the menu locations offered by your active theme. If you require new menu locations beyond those provided by your theme, this often involves custom theme development.


