


A well-structured navigation menu is essential for guiding visitors through your WordPress site and ensuring they can easily find the information they need. It serves as a roadmap, allowing users to navigate your content effortlessly.
Whether you are setting up your first website or seeking to improve the user experience on an existing one, mastering the skill of adding and customizing a navigation menu is crucial. WordPress simplifies this process with a user-friendly drag-and-drop interface, enabling you to effortlessly create header menus, menus with sophisticated dropdown options, and much more.
This step-by-step guide will walk you through the process of easily adding a navigation menu in WordPress, helping you build a more accessible and intuitive website.
A navigation menu is fundamentally a list of links pointing to the most important areas of a website. These are typically displayed as a horizontal bar of links located at the top of every page on a WordPress site, though their placement can vary.
These menus are vital for giving your site a clear structure and significantly helping visitors locate the information they are searching for. Below is an example of how a well-designed navigation menu typically appears:

WordPress makes it incredibly easy to add both main menus and sub-menus. You have the flexibility to include links to your most important pages, specific categories or topics, individual blog posts, and even custom links like your social media profiles or external resources.
The precise location where your menu appears will largely depend on your chosen WordPress theme. Most themes offer several placement options, allowing you to create different menus tailored for various display areas. For instance, a typical WordPress theme will feature a primary menu at the top of the page. Some themes might also provide a secondary menu, a footer menu for less critical links, or a dedicated mobile navigation menu for an optimized mobile experience.
With this understanding, let’s explore how you can create and manage custom navigation menus in WordPress.
Creating Your First Custom Navigation Menu
To begin creating a navigation menu, navigate to the Appearance » Menus page within your WordPress admin dashboard. This is the central hub for all menu management on your site.
Note: If you do not see the ‘Appearance » Menus‘ option and instead only see ‘Appearance » Editor‘, this indicates that your theme has Full Site Editing (FSE) enabled. In such cases, please refer to the section below on "Adding Navigational Menus in Full Site Editor (FSE)" for relevant instructions.
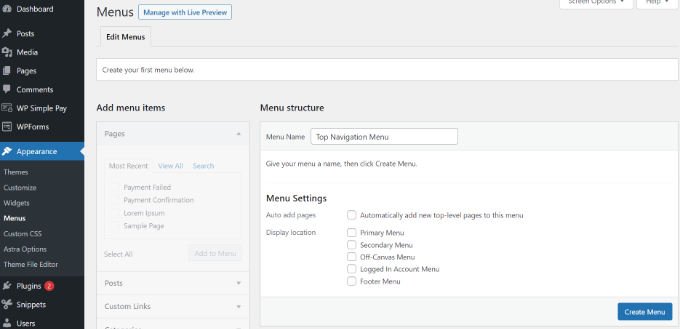
Upon reaching the menu creation page, you will need to provide a distinctive name for your new menu, such as ‘Main Navigation’ or ‘Footer Menu’, and then click the ‘Create Menu’ button. This action will initialize your menu and expand the interface, preparing it for item additions.
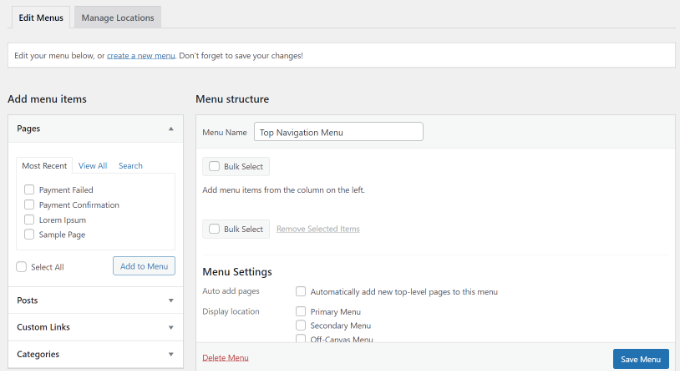
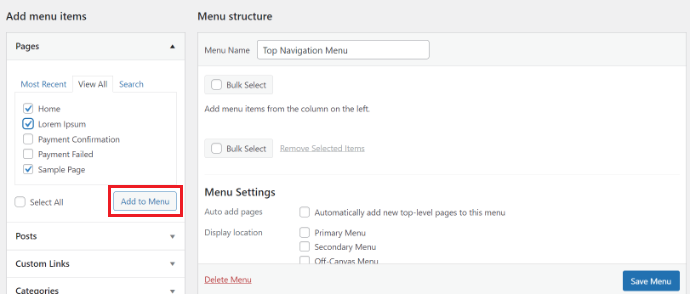
Next, you can select the pages you wish to include in your menu. WordPress offers the convenience of either automatically adding all new top-level pages or allowing you to hand-pick specific pages from the left-hand column. To view all available pages, click the ‘View All’ tab. Then, check the box next to each page you want to incorporate into your menu, and finalize by clicking the ‘Add to Menu’ button.
Once your selected pages have been added to the menu structure, you can easily organize them by dragging and dropping them into your desired order within the ‘Menu Structure’ section. This intuitive functionality allows you to precisely control the sequence and hierarchy of your navigation links.
Note: All menu items are listed vertically (from top to bottom) within the menu editor. However, when the menu is displayed live on your website, its orientation (vertical or horizontal, left to right) will depend on the specific location you choose for it within your theme.
Most themes offer several distinct locations for displaying menus, providing flexibility in design. After populating your menu with pages, select the appropriate location where you intend for it to be displayed, and then click the ‘Save Menu’ button to apply your changes.
Tip: If you are unsure which location corresponds to which area of your website, a helpful approach is to try saving the menu in different locations one by one. Then, visit your site to observe how each placement looks. While you likely won’t use every available location, experimenting can help you determine the optimal spots for your navigation.
Creating Drop-Down Menus in WordPress
Drop-down menus, often referred to as nested menus, are a sophisticated way to organize your navigation by including parent and child menu items. This structure allows for a cleaner main navigation bar, with detailed sub-options appearing only when needed.
The functionality is simple: when a user hovers their cursor over a parent item, all associated child items will elegantly appear beneath it in a sub-menu. To create a submenu, simply drag a desired item below its intended parent item and then indent it slightly to the right. This visual indentation indicates its status as a child item. For instance, you might have a ‘Services’ parent item with multiple sub-items like ‘Web Design’, ‘SEO’, and ‘Content Writing’ nested beneath it.
It is even possible to implement multiple layers of dropdowns, allowing your sub-menu to have its own sub-menu. However, it’s worth noting that excessive layering can sometimes lead to a cluttered appearance, and not all WordPress themes fully support multi-layer drop-down menus. It’s always best to test your menu thoroughly to ensure optimal user experience.
Here’s the sub-menu live on our demo site:
Adding Categories to WordPress Menus
If you are running a blog on your WordPress site, integrating your blog categories into your navigation menu is an excellent way to help visitors explore your content by topic. This approach allows users to quickly find articles related to their interests, enhancing content discoverability.
You can easily add categories to your menu by accessing the ‘Categories’ tab located on the left side of the menu screen. If you don't immediately see all your categories, you may need to click the ‘View All’ tab to expand the list. Simply select the categories you wish to add to your menu, and then click the ‘Add to Menu’ button.
Initially, the selected categories will appear as standard menu items at the bottom of your menu structure. From there, you can drag and drop them into their desired positions. For example, you might choose to place all your categories as sub-items under a main ‘Blog’ or ‘Topics’ menu item, creating a neat dropdown of content areas.
This organizational method ensures that your site’s diverse content is accessible and well-categorized for your audience.
Here’s how different categories are often displayed within a navigational menu on a demo site:
Adding Custom Links to Your WordPress Navigation Menus
Beyond standard pages and categories, WordPress offers immense flexibility by allowing you to incorporate custom links into your navigation menu. This feature is particularly useful for linking to external resources, such as your social media profiles, an online store hosted on a different platform, or other websites you manage.
To implement custom links, simply utilize the ‘Custom Links’ tab available on the Menu screen. Here, you will input the full URL for the external destination and the descriptive text you want to display in your menu. After entering these details, click the ‘Add to Menu’ button.
You can further enhance your menu's functionality and visual appeal by adding elements like social media icons, which visually represent your online presence, or incorporating prominent call-to-action buttons designed to boost engagement and conversions. This customization allows your navigation to serve as a dynamic gateway to all relevant aspects of your online footprint.
Editing or Removing a Menu Item in WordPress Navigation Menus
When you add pages or categories to your custom navigation menu, WordPress automatically uses the page title or category name as the default link text. However, you have complete control to modify this text to be more concise, descriptive, or aligned with your navigation strategy.
Any existing menu item can be edited by clicking on the downward arrow icon positioned next to it within the menu structure. This action will reveal an expanded set of options. From this expanded view, you can easily change the display name of the menu item to something more suitable for navigation.
Should you decide that a particular link is no longer needed, you can click the ‘Remove’ button to completely delete it from your menu. Additionally, for users who may find the drag-and-drop interface challenging, WordPress provides alternative ‘Move’ links, allowing you to reposition menu items precisely by clicking the appropriate directional options.
Adding Navigational Menus in Full Site Editor (FSE)
The introduction of the full site editor in recent WordPress versions revolutionized how users customize their themes, leveraging the power of the block editor. This innovative feature allows for the integration of various blocks into your templates, enabling a unique and highly personalized design for your entire website.
To add a navigational menu using the full site editor, access the Appearance » Editor option from your WordPress dashboard. This will lead you to the site editing interface.
Once you are within the editor, proceed by clicking on the ‘Navigation’ tab to expand its settings. This action will reveal new configuration options in the left-hand column, specifically for managing your site's navigation.
From this new panel, simply click the ‘Edit’ icon located at the top. This will launch the full site editor on your screen, presenting an environment where you can visually interact with your site’s layout. Here, you can click the ‘+’ icon to add a new navigation menu item.
A prompt will appear, offering various options from a dropdown menu for the type of item you wish to add. If you intend to add a custom link, you can easily input a label and URL for the navigation menu item directly within the block panel. This flexibility allows for linking to any internal or external page.
Once an item has been added, switch to the ‘Styles’ tab in the column on the right. This tab provides extensive customization options, allowing you to adjust the typography, overall appearance, height, spacing, letter case, and text decoration for your menu items. This ensures your navigation perfectly matches your site's aesthetic.
Furthermore, the block toolbar offers an icon for adding submenus, enabling you to create hierarchical navigation structures directly within the editor. After completing your adjustments, you can preview the changes to see how the menu looks in real-time. Always remember to click the ‘Save’ button at the top to preserve your modifications.
Adding WordPress Menus in Sidebars and Footers
Your menu display options are not limited to the primary locations defined by your theme. WordPress offers the flexibility to incorporate navigation menus into any widget-ready area of your site, such as your sidebars or footer, significantly extending your layout possibilities.
To achieve this, simply navigate to Appearance » Widgets. Here, click the ‘Add Block’ (+) button at the top of the interface and then search for and add the ‘Navigation Menu’ widget block to your desired widget area, like a sidebar or footer section.
Next, you will need to provide a title for the widget, which will display above your menu (e.g., "Quick Links" or "Explore"). Then, select the appropriate menu you wish to display from the ‘Select Menu’ dropdown list. This allows you to reuse existing menus or create new ones specifically for these areas.
Once your selections are complete, simply click the ‘Update’ button to save and activate your widget. This method provides a powerful way to enhance user navigation and accessibility across different sections of your website.
Here’s an example of a custom footer menu that effectively utilizes this feature:
Going Further with Navigation Menus
For websites with extensive content or complex structures, such as large online stores or comprehensive news portals, traditional dropdown menus may not be sufficient. In these scenarios, a "mega menu" can be an incredibly powerful solution for enhancing user navigation.
Mega menus are advanced dropdown menus that can display a vast array of links, often organized into multiple columns, and can even include rich content like images, promotional banners, and short descriptions. This allows for a more comprehensive and visually engaging navigation experience, making it easier for users to explore a wide range of content without feeling overwhelmed.
Implementing a mega menu enables you to create a sophisticated, multi-tiered navigation system that is both functional and aesthetically pleasing. It’s an ideal choice for sites needing to showcase a diverse catalog of products, categories, or content areas efficiently.
FAQs About WordPress Menus
How do I add a homepage link to a WordPress menu?
Adding your homepage to a navigation menu is a straightforward process. First, you'll need to navigate to the ‘View All’ tab located under the 'Pages' section in your menu editor. From this comprehensive list, you should easily locate your website's homepage, typically labeled ‘Home’.
Simply check the box positioned next to ‘Home’ and then click the ‘Add to Menu’ button. This action will place the homepage link into your menu structure. Remember to save your changes by clicking the ‘Save Menu’ button to ensure the link is live on your site.
How do I add multiple navigation menus in WordPress?
WordPress provides the flexibility to create an unlimited number of navigation menus, allowing you to tailor distinct menus for different areas of your website. To display these menus on your site, you will need to assign them to one of your theme’s designated menu locations or to a widget area, as detailed in the sections above.
After creating the various menus you desire, navigate to the ‘Manage Locations’ tab within the menu editor. From this interface, you can effortlessly select which specific menu you wish to display in each of the available menu locations provided by your active theme. This empowers you to manage a diverse and functional navigation system across your entire WordPress site.
