In the event of data corruption or loss, restoring from a backup file is a crucial step towards data recovery. This guide outlines the comprehensive process of restoring your valuable data using the platform's robust backup features.
When performing a restoration, you have the flexibility to either restore all data encompassed within the backup or selectively choose specific objects, such as a particular website, all databases, or other individual components.
It is important to note that only backups created with version 17.0 and later of the platform are supported for restoration.
Note: It is critical to understand that restoring objects from a backup will overwrite and replace any existing objects with identical names. The system will not issue a prompt before an object is overwritten. Consequently, any changes made to these objects after the backup was created will be permanently lost.
Restoring All Objects
To initiate the restoration of all objects from a comprehensive backup, follow these detailed steps:
- Navigate to Websites & Domains, then select Backup Manager. This section provides a comprehensive view of all backups, whether they are stored locally on the server or within configured remote storage solutions.
- Click on the specific backup file you wish to restore from the available list.
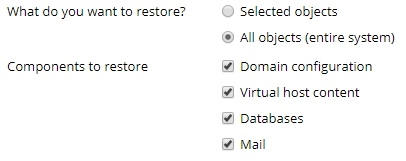
- Under the “What do you want to restore?” prompt, select the “All objects (entire system)” radio button to indicate a full system restoration.
- Within the “Components to restore” section, you have the option to deselect checkboxes corresponding to object classes you wish to exclude from the restoration. For instance, if the “Databases” checkbox is marked, all associated databases and their users will be restored. Conversely, deselecting this option will prevent any databases from being restored.

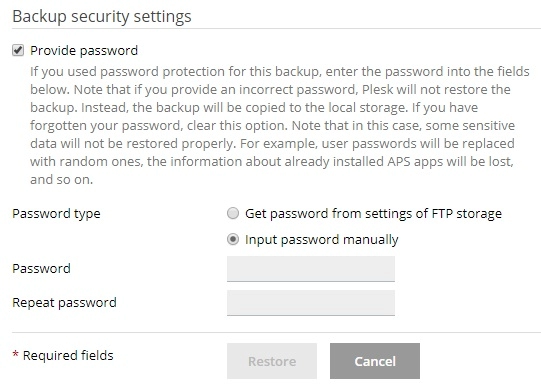
- If the backup you are restoring is password-protected, choose the “Get password from settings of Remote storage” option. The platform will then attempt to automatically retrieve the password. Should automatic retrieval fail (e.g., if the backup originated from a different server), opt for the “Input password manually” radio button and enter the password into the designated fields.

- In situations where the password cannot be retrieved automatically and you do not possess it, deselect the “Provide password” checkbox. The system will still proceed with the backup restoration, but all passwords for the restored objects (e.g., database users, mail accounts) will be randomly generated for security.
- With the backup prepared for restoration, you can further refine the process by configuring several optional settings:
- Activating the “Suspend domains until the restoration is completed” checkbox is advisable if you wish to guarantee the integrity and validity of the restoration process. This action will temporarily render your website inaccessible, displaying a 503 HTTP status code error page to visitors until the restoration is fully finalized.
- Enable the “When the restoration is completed, send a notification to” checkbox if you prefer to receive an email alert upon the successful completion of the restoration. Please verify that the specified email address is accurate.
- Once all settings are configured to your preference, click Restore to commence the backup restoration process.
Upon initiating the restoration, you will be redirected to the Websites & Domains > Backup Manager screen. Here, you can monitor the progress of the backup restoration. The duration of this process will vary based on the total volume of content being restored. A clear notification will appear on this screen once the backup restoration has been successfully completed.

Restoring Individual Objects
It is not always necessary to restore the entirety of configuration and content from a backup file. The system offers granular control, allowing you to precisely select which objects to restore. This could range from a specific domain and its associated elements to a single mail account, or even individual files.
To proceed with the restoration of individual objects from a backup file, follow these instructions:
- Access the Websites & Domains section, then proceed to the Backup Manager. This interface displays all available backups, irrespective of whether they are stored on the server or in designated remote storage locations.
- Click on the backup from which you wish to restore specific objects.
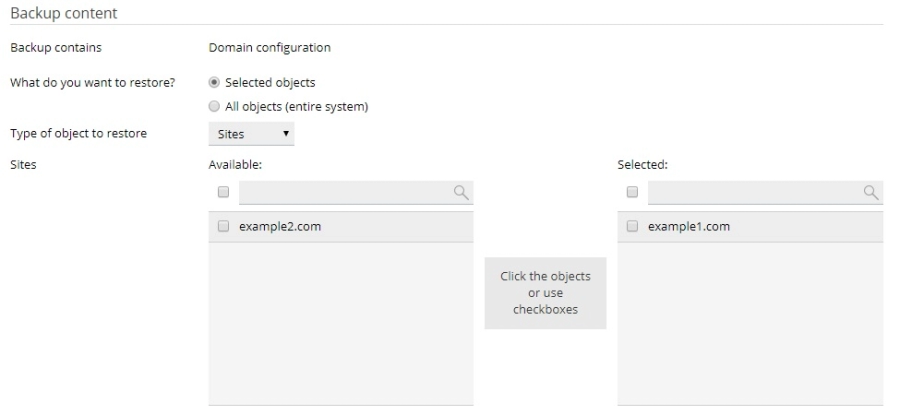
- Under the “What do you want to restore?” section, select the “Selected objects” radio button.
- In the “Type of object to restore” section, specify the category of objects you intend to restore:
- Mail account: Restore individual mail accounts.
- Database: Restore individual databases.
- Sites: Restore individual websites along with all associated objects and content (such as mail accounts and databases).
- DNS Zone: Restore DNS zone contents for specific domains.
- Files of domains: Restore individual files.
It is important to note that if your restoration plan involves objects of diverse types (e.g., a single mail account and two distinct databases), you will need to perform separate restoration operations: one for the databases and another for the mail account.
- Carefully select the specific objects for restoration. All available objects corresponding to the chosen type will be listed in the “Available” column on the left. Click on the desired objects, and they will be transferred to the “Selected” column on the right.

- Should you have chosen “Files of domains” in the preceding step, click Add files, then navigate to and select the specific file(s) you wish to restore, concluding with a click on OK.

- Within the “Restore” section, specify whether your intention is to restore only the configuration settings of the selected objects, or both their configuration and their associated content.

- For instance, when restoring a database, choosing to restore only the configuration will reinstate the database structure and associated user accounts, but will not restore the actual tables or the data within them. If the backup file itself exclusively contains configuration data without content, this particular option will not be available.
- With the backup now configured for individual object restoration, you have the opportunity to fine-tune the process by adjusting several optional settings:
- Activating the “Suspend domains until the restoration is completed” checkbox is advisable if you wish to guarantee the integrity and validity of the restoration process. This action will temporarily render your website inaccessible. Until the restoration process is finished, visitors to your website will see an error page with the 503 HTTP status code.
- Enable the “When the restoration is completed, send a notification to” checkbox if you prefer to receive an email alert upon the successful completion of the restoration. Please verify that the specified email address is accurate.
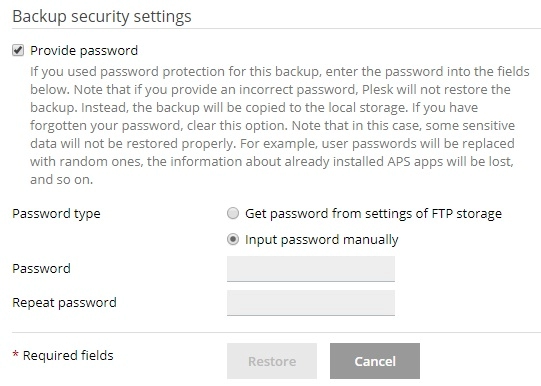
- Should the backup you are restoring be protected by a password, the system will prompt you to enter it. It is generally recommended to select the “Get password from settings of Remote storage” option, as this will attempt to automatically retrieve the password previously saved in your Remote storage configurations. If automatic retrieval is unsuccessful (e.g., due to the backup originating from a different server), choose the “Input password manually” radio button and accurately type the password into the provided fields.

- In instances where automatic password retrieval fails and you cannot recall the password, proceed by clearing the “Provide password” checkbox. The system will still initiate the backup restoration, though some data may not be fully recovered. For example, all passwords within a restored database will be randomly generated to maintain security.
- Once your selections and settings are confirmed, click Restore to commence the restoration of the chosen objects.
Upon initiating the restoration, you will be redirected to the Websites & Domains > Backup Manager screen. Here, you can monitor the progress of the backup restoration. The duration of this process will vary based on the total volume of content being restored. A clear notification will appear on this screen once the backup restoration has been successfully completed.


