


A well-structured navigation menu is fundamental for guiding visitors through your website and ensuring they can easily locate the information they seek. Whether you are launching a new site or enhancing the user experience on an existing one, mastering the creation and customization of navigation menus is a crucial skill for any website owner.
WordPress offers an intuitive drag-and-drop interface that simplifies the process of creating various menu types, including header menus, menus with dropdown functionalities, and much more. This guide draws upon extensive experience in designing diverse menu styles across various online platforms, offering insights into effective menu structures, essential links, and optimization strategies for an improved user experience.
In this comprehensive, step-by-step guide, we will walk you through the straightforward process of adding and managing navigation menus in WordPress.
Essentially, a navigation menu serves as a curated list of links directing users to crucial sections of your website. Typically, these are displayed as a horizontal bar of links prominently positioned at the top of every page on a WordPress site. These menus are vital for providing clear site structure, enhancing usability, and helping visitors quickly locate desired content.
Consider how a well-designed navigation menu guides users intuitively, similar to this example:

WordPress simplifies the process of creating both main menus and sub-menus. You have the flexibility to add links to your most important pages, specific categories or topics, individual blog posts, and even custom URLs such as your social media profiles.
The precise placement of your menu is largely determined by your chosen WordPress theme. Most themes offer multiple display locations, allowing for the creation of distinct menus tailored to different areas of your site. For example, a primary menu is commonly found at the very top of a page. Additionally, themes often support secondary menus, footer menus, or dedicated mobile navigation menus to cater to various user interactions and screen sizes.
With this understanding, let’s explore the process of creating a custom navigation menu in WordPress.
Creating Your First Custom Navigation Menu
To begin creating a navigation menu, navigate to the Appearance » Menus page within your WordPress admin dashboard.
Important Note: If you do not see the 'Appearance » Menus' option and instead only find 'Appearance » Editor', this indicates that your theme utilizes Full Site Editing (FSE). In such cases, you will want to proceed directly to the section on adding navigation menus in the Full Site Editor.
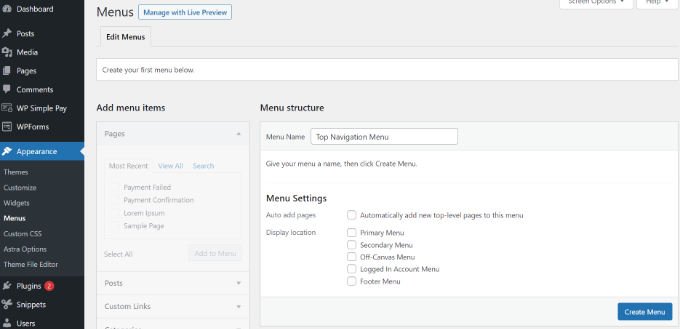
Upon reaching the menu creation screen, you will need to provide a descriptive name for your new menu, such as ‘Main Navigation’ or ‘Primary Menu’. After entering the name, click the ‘Create Menu’ button.
This action will expand the menu configuration area, presenting you with the tools to begin adding items:
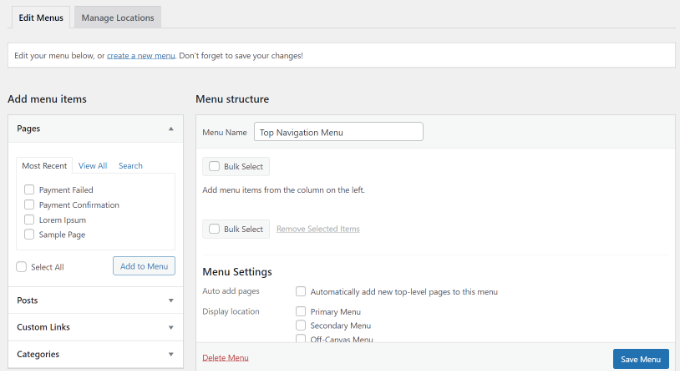
The next step involves selecting the pages you wish to include in your menu. You have the option to automatically add all newly created top-level pages, or you can manually select specific pages from the left-hand column.
To view all available pages on your site, click the ‘View All’ tab. Then, select the checkbox next to each page you want to add to your menu and click the ‘Add to Menu’ button.
Once the pages have been added, you can easily reorder them by dragging and dropping them into your desired sequence within the ‘Menu Structure’ section. This flexible arrangement allows you to define the exact display order of your menu items.
Note: While menu items are displayed vertically in the editor, their live appearance on your site (either vertical or horizontal) will depend on the specific menu location you choose within your theme.
Most WordPress themes offer several distinct locations for displaying menus. For instance, a common theme might provide options for a primary header menu, a footer menu, and possibly a sidebar menu.
After arranging your pages in the menu, select the preferred location for its display and then click the ‘Save Menu’ button.
Tip: If you are unsure about the exact placement of each menu location, we recommend saving the menu to different locations and then previewing your website to see how it appears. While you may not utilize every available location, experimenting can help you determine the optimal placement for your site's navigation.
After these steps, your newly created menu will be visible on your website, providing clear navigation for your visitors.
Creating Drop-Down Menus in WordPress
Drop-down menus, also known as nested menus, are navigation menus designed with a hierarchical structure of parent and child menu items. When a user hovers their cursor over a parent item, a sub-menu containing all associated child items will elegantly appear beneath it.
To construct a submenu, simply drag an existing menu item and position it directly below its intended parent item. Then, drag it slightly to the right. This indentation signifies its status as a child item. For example, you might place several sub-items under a main 'Services' menu entry to organize related offerings.
It is possible to create multiple layers of dropdowns, allowing a sub-menu to contain its own sub-menu. However, it's important to note that excessive nesting can lead to a cluttered user experience, and not all themes fully support multi-layered dropdown menus. Simplicity and clarity are key for effective navigation.
Here is an example of a functional sub-menu on a demonstration site:
Adding Categories to WordPress Menus
For those managing a blog on WordPress, integrating blog categories directly into your navigation menu can significantly enhance content discoverability. This allows visitors to quickly browse articles by topic, improving overall site engagement.
Adding categories to your menu is a straightforward process. On the left side of the menu screen, click the 'Categories' tab. If you don't see all your categories listed, click the ‘View All’ tab to reveal them.
Simply select the categories you wish to include in your menu by checking their respective boxes, then click the ‘Add to Menu’ button. These categories will initially appear as standard menu items at the bottom of your current menu structure.
You can then reposition them by dragging and dropping them into their desired location. A common practice is to organize all blog categories as sub-items under a main 'Blog' or 'Topics' menu entry, creating a clean and logical hierarchy.
This approach ensures that various categories are clearly presented within the navigational menu, as demonstrated on many websites.
Adding Custom Links to Your WordPress Navigation Menus
Beyond standard pages and categories, WordPress provides the flexibility to incorporate custom links into your navigation menu. This feature is particularly useful for directing users to external resources, such as your social media profiles, an external online store, or other websites you manage.
To implement this, locate the ‘Custom Links’ tab on the Menu screen. Here, you will input the desired URL (the link) and the accompanying link text that will appear in your menu. After filling in these details, click the ‘Add to Menu’ button.
This functionality also allows for creative enhancements to your menu. For instance, you could integrate social media icons to visually represent your online presence or embed call-to-action buttons designed to encourage specific user actions and improve conversion rates.
Editing or Removing Menu Items in WordPress Navigation Menus
When you add pages or categories to your custom navigation menu, WordPress automatically uses the respective page title or category name as the displayed link text. However, you have the option to easily customize this text to better suit your menu's overall design and clarity.
To edit any menu item, simply click on the downward arrow icon located next to that item. This action will expand its settings.
Within these settings, you can modify the menu item’s navigation label (its displayed name). Additionally, if a link is no longer needed, you can click ‘Remove’ to delete it from your menu entirely.
For users who may find the drag-and-drop interface challenging, WordPress also provides alternative 'Move' links to precisely reposition menu items up, down, to the left, or to the right, ensuring everyone can manage their menu structure effectively.
Adding Navigation Menus with the Full Site Editor (FSE)
The innovative Full Site Editor, introduced in WordPress 5.9, empowers users to customize their themes using the intuitive block editor. This feature allows for the integration of various blocks into your templates, enabling the creation of unique and personalized designs.
To incorporate a navigation menu using the Full Site Editor, begin by navigating to Appearance » Editor from your WordPress dashboard. This will open the site editor interface.
For demonstration purposes, we will refer to a standard block-based theme. Once inside the editor, proceed by clicking on the ‘Navigation’ tab to reveal its settings.
This action will display several new configuration options in the left-hand column. From there, locate and click the ‘Edit’ icon positioned at the top of these options.
The Full Site Editor will then launch, presenting an interactive screen where you can click the ‘+’ icon to add new navigation menu items. A prompt will appear, allowing you to select from available options in a dropdown menu, such as pages, posts, or categories.
Should you wish to add a custom link, you can specify both a label and the URL for the navigation menu item directly within the block panel. The Full Site Editor also offers the capability to integrate a search option into your menu, enhancing user convenience.
After adding an item, switch to the ‘Styles’ tab located in the right-hand column. Here, you gain control over the visual presentation of your menu items, including typography, overall appearance, height, spacing, letter case, and text decoration, allowing for fine-tuned design.
Additionally, you can create submenus by clicking on the dedicated submenu icon found in the block toolbar. This method provides a visual and flexible way to structure your menu hierarchy within the FSE environment.
Once you have finalized your changes, it's highly recommended to preview them to see how the menu appears in real-time on your site. Finally, ensure you click the ‘Save’ button at the top of the editor to apply all modifications.
Adding WordPress Menus in Sidebars and Footers
Your menu display options are not limited to the default locations provided by your theme. WordPress allows for significant flexibility, enabling you to integrate navigation menus into any widget-enabled area, such as your website’s sidebar or footer.
To achieve this, navigate to Appearance » Widgets. From there, click the ‘Add Block’ (+) button, typically found at the top, and then select and add the ‘Navigation Menu’ widget block to your chosen widget area, such as the sidebar.
Following this, you will need to assign a title to your widget and then select the appropriate menu from the ‘Select Menu’ dropdown list. This ensures the correct menu is displayed in the widget area.
Once your selections are made, click the ‘Update’ button to save and apply your changes. This method is excellent for adding supplementary navigation or quick links in less prominent but still accessible areas of your site, like a custom footer menu.
Advanced Navigation Menu Techniques
For websites requiring extensive navigation or a visually rich menu experience, considering advanced menu techniques like a 'mega menu' can be highly beneficial. A mega menu allows for the creation of expansive dropdowns that can accommodate numerous links, even including images and other rich content.
Mega menus are particularly well-suited for large websites, such as extensive online stores, comprehensive news portals, or corporate sites with many sections. They provide a structured way to present a vast amount of information without overwhelming the user, much like those seen on major websites known for their detailed navigation.
Frequently Asked Questions About WordPress Menus
1. How do I add a homepage link to a WordPress menu?
Adding your homepage to a navigation menu is straightforward. Within the menu editor, navigate to the ‘Pages’ section on the left and click the ‘View All’ tab. You should then see your homepage listed. Check the box next to ‘Home’ and click ‘Add to Menu’. Always remember to save your menu changes after making modifications.
2. How do I add multiple navigation menus in WordPress?
WordPress allows you to create an unlimited number of distinct navigation menus. To display these menus on your website, you must assign them to one of your theme's available menu locations or to a widget area, as detailed in the sections above. To add multiple navigation menus, first create each menu individually by following the steps outlined in this guide.
Once your menus are created, click on the ‘Manage Locations’ tab within the Appearance » Menus section. Here, you can select which specific menu you wish to display in each of the menu locations provided by your active theme. This enables a highly organized and flexible approach to website navigation.
