


Implementing page and image caching is one of the most effective strategies for enhancing your WordPress website's performance. When correctly configured, especially on a server utilizing LiteSpeed Cache, it dramatically improves your website's responsiveness.
This improvement positively impacts your Search Engine Optimization (SEO) efforts, potentially leading to higher search engine rankings. Furthermore, a more responsive website can contribute to increased sales conversions, particularly for an online store. LiteSpeed Cache stands out as one of the most robust and comprehensive WordPress caching plugins available, and this tutorial will delve into its functionalities.
Following the plugin's installation process, we will explore some technical aspects, such as how cached web pages are served and the various types of caching. However, before discussing these details, let's first establish a foundational understanding of caching.
Important Note: This guide serves as a comprehensive overview of the LiteSpeed Cache plugin's settings and their locations, rather than a step-by-step setup tutorial. Given that optimal caching configurations are unique to each website, providing a universal, one-size-fits-all solution is impractical. Our aim is to guide users to where each setting is situated, empowering them to customize according to their specific requirements.
What is Caching?
When discussing the LiteSpeed Cache plugin, our primary focus is on page caches. A cached page is essentially a stored copy or a pre-rendered version of a web page. The fundamental question then arises: how does creating a copy of a page benefit website visitors?
Ordinarily, when a web browser requests a WordPress website page, the server executes numerous functions to dynamically assemble that page. Before any content can be displayed in the browser, the server must perform a series of essential tasks, which typically include:
- Retrieving the most recent posts or content.
- Generating the header and footer sections.
- Locating and positioning sidebar widgets.
- Determining how various media elements should be displayed.
For more intricate pages, such as those found on e-commerce platforms, displaying a single page can involve dozens of intricate processing steps. While many of these individual functions occur in milliseconds, their cumulative effect can significantly extend the overall page loading time.
A caching plugin addresses this by creating a static copy of the fully assembled page, comprising all its dynamic elements. This pre-built copy is then served to subsequent visitors for a predetermined duration. This means that if multiple visitors request the same page within a short timeframe, the page only needs to be "built" once by the server. Subsequent visitors receive the instantly available, pre-built copy, resulting in significantly faster load times as the server bypasses the dynamic generation process.
Consequently, caching empowers your website to respond more swiftly, contributing to a substantial improvement in its overall SEO performance and, crucially, delivering a superior user experience for your visitors.
Introducing LiteSpeed Cache (LSCache)
LiteSpeed Cache, often referred to as LSCache, is an integrated caching solution for WordPress. It provides robust server-level caching combined with an extensive array of optimization features.
LSCache is designed to support multi-site WordPress installations and maintains compatibility with a wide range of popular plugins, including leading SEO tools and e-commerce platforms.
Key features offered by LiteSpeed Cache include:
- Minification of CSS, JavaScript, and HTML files to reduce their size.
- Automatic generation of critical CSS for faster initial page rendering.
- Minification of inline CSS and JavaScript within HTML documents.
- Advanced image optimization capabilities, supporting both lossless and lossy compression.
- The functionality to combine multiple CSS and JavaScript files into fewer requests.
- Lazy loading of images and iframes, improving perceived page load speed.
These features represent just a fraction of what LSCache offers. For those seeking to implement comprehensive website caching and optimization with minimal manual configuration, the LSCache plugin presents an ideal solution.
Next, we will proceed with the installation of the plugin and explore some of its key configuration options.
Utilizing the LiteSpeed Cache Plugin
Step 1: Installing LiteSpeed Cache
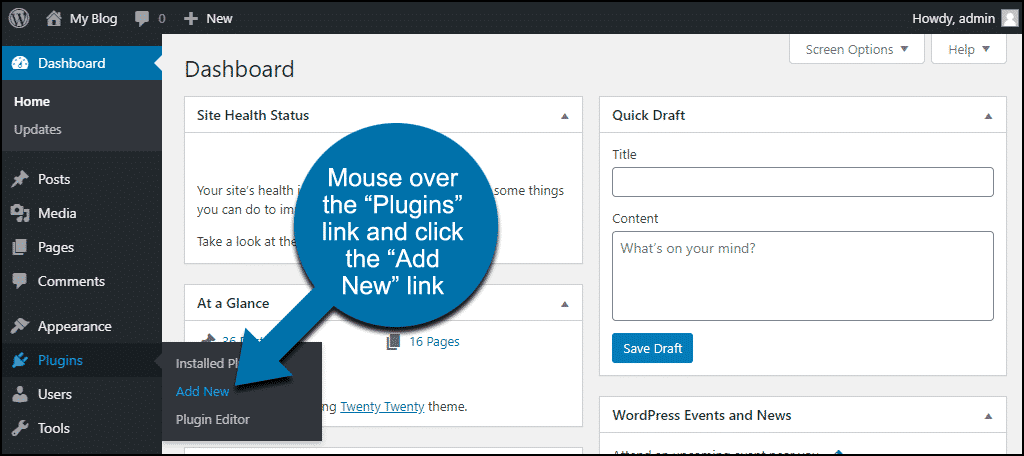
To begin, navigate to the WordPress admin dashboard. In the left-hand navigation menu, hover over the "Plugins" link and then click on "Add New."
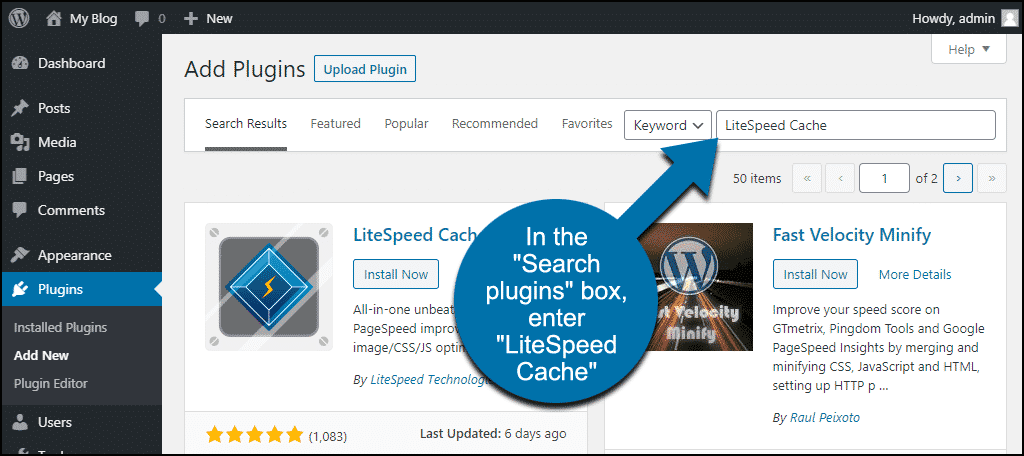
In the "Search plugins..." field, type "LiteSpeed Cache" and press Enter.
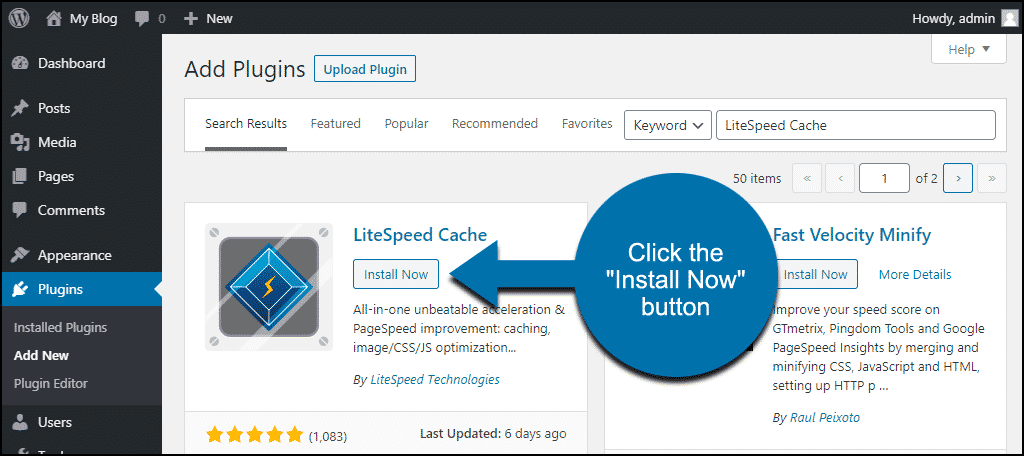
Once you locate the LiteSpeed Cache plugin in the search results, click the "Install Now" button.
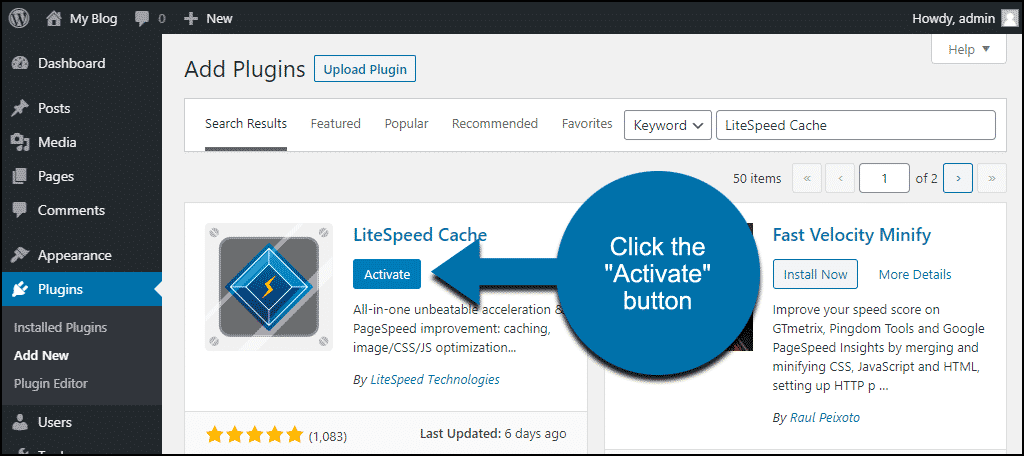
After the installation is complete, the plugin must be activated to become functional. Click the "Activate" button to enable LiteSpeed Cache on your website.
Step 2: LiteSpeed Cache Overview and Initial Configuration
Upon activation, LiteSpeed Cache immediately begins enhancing your website's speed, even prior to any specific configuration. It's important to understand that the LSCache plugin operates under two distinct conditions:
- Without a LiteSpeed server: In this scenario, you can leverage the plugin's extensive optimization features, but the core caching functionalities will not be active.
- With a LiteSpeed Web Server: This configuration unlocks the full spectrum of the plugin's capabilities, including both advanced optimization and powerful caching features.
To fully utilize the caching features, it may be necessary to consult with your hosting provider to ensure your website is running on a LiteSpeed Web Server. (Note: Many modern hosting environments, especially those optimized for WordPress, often include LiteSpeed servers by default, and may even pre-install the LiteSpeed Cache plugin when WordPress is set up.)
Now, let's explore the plugin's settings. In your WordPress admin panel, hover over the "LiteSpeed Cache" link in the left-hand navigation menu. This action will reveal a comprehensive list of available options:
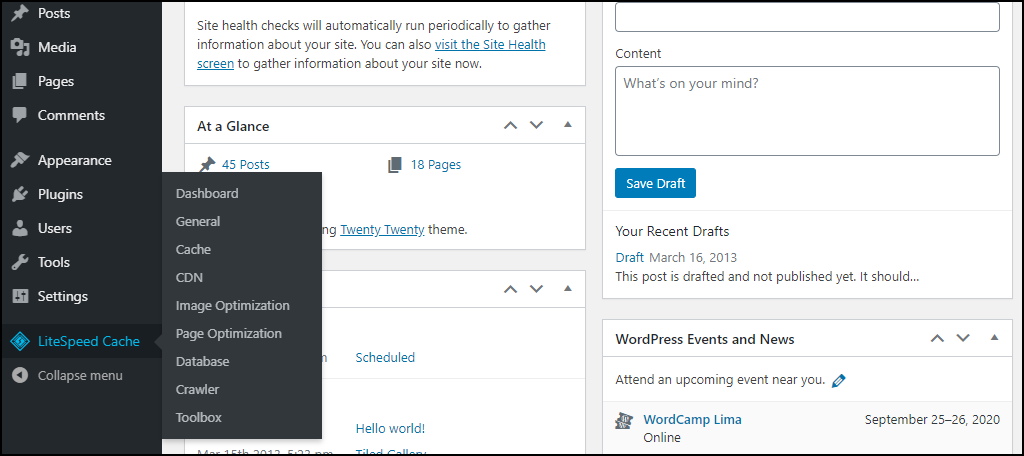
- Dashboard
- General
- Cache
- CDN
- Image Optimization
- Page Optimization
- Database
- Crawler
- Toolbox
Some of these options are considered advanced or may require integration with specific external services. For the scope of this tutorial, we will concentrate on the more straightforward LSCache configuration settings that are immediately accessible and offer significant impact: specifically, the "Cache" and "Page Optimization" sections. Although these represent a subset of the available tools, they encompass the critical controls for achieving substantial performance improvements.
Step 3: Configuring LiteSpeed Cache Settings
To access the primary caching controls, navigate to the WordPress admin panel, hover over "LiteSpeed Cache," and then click on the "Cache" link.

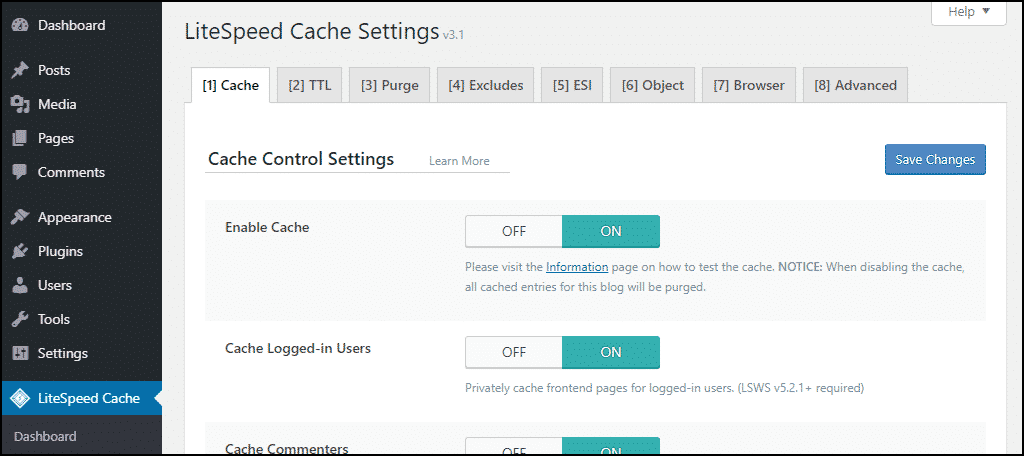
Within this section, you will find various tabs, each dedicated to specific caching functionalities:
- Cache: These settings govern caching for particular content types, including REST API calls and login pages.
- TTL (Time-To-Live): This crucial setting determines the duration for which specific content types remain stored in the cache before being refreshed.
- Purge: The purge settings manage how content is cleared from the cache. By default, the LiteSpeed Cache plugin intelligently purges the cache automatically whenever WordPress core, themes, or plugins are updated, ensuring content freshness.
- Excludes: Here, you can define specific content types or URLs that you wish to exempt from caching.
- ESI (Edge Side Includes): ESI offers an advanced caching mechanism that allows for the independent caching of distinct portions of a single web page.
- Object: Object caching stores the results of frequently executed database queries, enabling quicker retrieval and reducing the need for repetitive database operations.
- Browser: Activating this option instructs your site to cache certain files directly within the visitor's web browser, further accelerating subsequent visits.
- Advanced: This tab contains more sophisticated settings, such as controls for login cookies and link hover preloading, designed for fine-tuning performance.
Important Consideration: It is critical to thoroughly test your website after making any modifications to these cache options (or the page optimization settings discussed below). Incorrect configurations can potentially disrupt site functionality, so careful validation is essential.
Step 4: Exploring LiteSpeed Page Optimization Settings
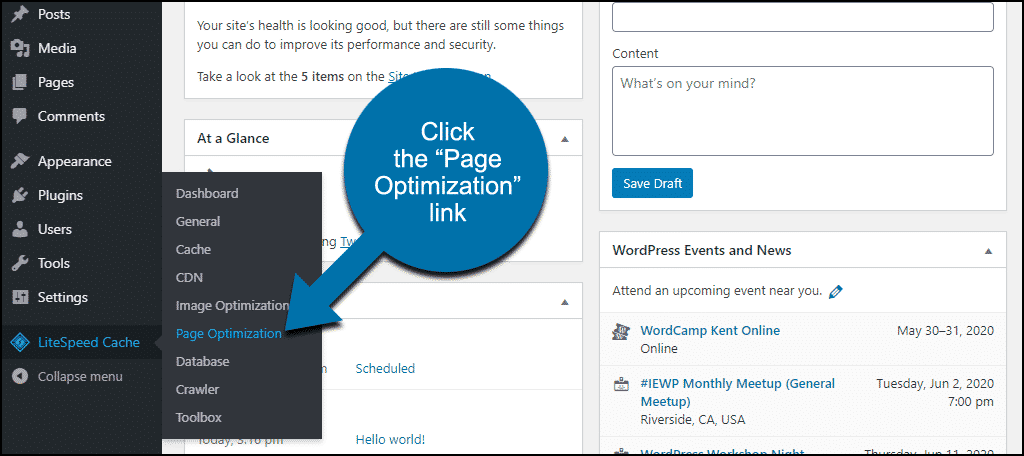
To access the page optimization functionalities, return to the "LiteSpeed Cache" menu in the left column navigation and click on the "Page Optimization" link.
This section is organized into several tabs, each controlling distinct aspects of page optimization:
- CSS Settings: This tab offers controls for CSS minification, loading strategies, and caching, alongside options for font display.
- JS Settings: Here, you can manage JavaScript (JS) minification, combining multiple JS files, inlining scripts, and other related optimizations.
- HTML Settings: These settings include options for HTML minification and lazy loading. You will also find controls for WordPress emojis, Google Fonts, and other HTML-related enhancements.
- Media Settings: This section provides controls for image placeholders and LQIP (Low-Quality Image Placeholder) settings. It's important to note that while a "Lazy Load Images" setting exists here, WordPress automatically implemented lazy loading for images starting from version 5.4. Therefore, if you are running an updated version of WordPress, enabling lazy loading within this plugin is generally not necessary.
- VPI: This tab manages settings related to viewport images, optimizing how images appear within the user's visible screen area.
- Media Excludes: These settings allow you to define exceptions for images that should not be lazy loaded.
- Localization: This tab typically contains settings for Gravatar caching.
- Tuning (JS): Specific tuning options for JavaScript files.
- Tuning (CSS): Specific tuning options for CSS files.
As evident, the LiteSpeed Cache plugin offers a vast array of configuration options. For a more detailed exploration and understanding of each setting, it is highly recommended to consult the official LiteSpeed Cache documentation.
It's important to reiterate that while we've outlined the available settings, the ideal configuration for LiteSpeed Cache will vary significantly from one website to another. Each site has unique requirements and characteristics, necessitating a tailored approach to optimization. The official documentation serves as an invaluable resource to help you comprehend the purpose and impact of each setting, guiding you in adjusting them according to your specific needs.
Further insights into default settings and efficient plugin usage can often be found through dedicated webinars or advanced guides provided by the developers.
Understanding How Cached Web Pages Are Delivered
Implementing a caching solution like the LiteSpeed Cache plugin significantly accelerates your website's performance by altering how web pages are served to visitors.
When caching is active, the web server stores a static HTML file of your web pages. This cached version is typically stored in the server’s Random Access Memory (RAM), which provides exceptionally fast retrieval speeds.
Consequently, when a browser requests a page, the server bypasses the intensive, dynamic processing steps typically required to build the page from scratch. Instead, it directly delivers the pre-existing cached version, resulting in substantially faster page load times for the user.
A common question arises concerning how caching handles website updates, such as making changes to content or publishing new posts or pages. Every robust caching plugin, including LSCache, incorporates mechanisms to manage these scenarios. The specific behavior often depends on the caching settings you have configured.
Generally, a properly configured caching plugin on your WordPress website will automatically detect relevant changes and intelligently clear the cached versions of affected pages, such as your homepage, archives, or any specific pages you've designated. It will then generate new, updated cached versions of these pages for future visitors. Other pages that remain unchanged may continue to be served from the existing cache. This adaptive behavior underscores the importance of customizing your caching settings to align with your site's update frequency and content structure.
Distinguishing Between Types of Caching
Primarily, caching can be categorized into two main types: browser caching and server-side caching. Browser caching, as its name suggests, occurs on the visitor's device, while server-side caching, exemplified by solutions like LSCache, operates directly on the website's server.
Let's delve into the key differences and functionalities of each:
Browser Caching: This mechanism allows a web browser to store various files (such as images, CSS, and JavaScript) from websites a user frequently visits. By retaining these files locally, the browser avoids the need to download them repeatedly during subsequent visits to the same site, thereby significantly speeding up page rendering for the user.
Server Caching: In contrast to processing every individual request from scratch, server caching involves the server storing the pre-processed results of common requests. When a subsequent request for the same content arrives, the server can rapidly deliver the stored, static result, dramatically reducing the computational load and response time. This is particularly effective for dynamically generated content, where the server avoids redundant database queries and script executions.
The Indispensable Role of Website Caching
Website caching is unequivocally crucial for optimal web performance. When implemented and configured correctly, it leads to a dramatic improvement in website speed. This enhancement directly contributes to an overall uplift in your Search Engine Optimization (SEO) efforts, primarily because page load speed is a significant factor considered by major search engines when determining website rankings. Faster websites not only rank better but also provide a superior experience for visitors, reducing bounce rates and encouraging longer engagement.
Concluding Thoughts on the LiteSpeed Cache Plugin
As we've explored throughout this guide, the LiteSpeed Cache plugin is a sophisticated and powerful tool. Fully leveraging its extensive capabilities often requires dedicated time for exploration and understanding of its intricate settings. Its advanced nature allows for deep optimization, which, when properly applied, can yield substantial performance gains.
While the designation of "best" is subjective and dependent on individual needs and server environments, LiteSpeed Cache is widely regarded among the top caching solutions currently available for WordPress. Its comprehensive feature set and server-level integration often set it apart from other options in the marketplace.
It's true that there are alternative caching plugins that might offer a simpler installation and management experience, such as other well-known caching and optimization tools. However, for users seeking professional-grade functionality, advanced optimization features, and a high degree of control over their website's caching mechanisms, LiteSpeed Cache stands out as an exemplary choice. Its robust architecture is designed to cater to the demands of performance-critical websites.
Before concluding, a critical piece of advice: should you opt to use an alternative caching plugin, it is imperative to first disable LiteSpeed Cache. It is a fundamental best practice in WordPress site management to never operate more than one caching plugin simultaneously. Running multiple caching solutions can lead to conflicts, unexpected behavior, and potentially detrimental effects on your website's performance and stability. Always ensure only one caching plugin is active at any given time to maintain optimal site health.
Experimenting with different settings and observing their impact on your website's speed and user experience is encouraged. Understanding how LiteSpeed Cache can be adapted to your unique site configuration is key to unlocking its full potential and ensuring your WordPress site runs at its peak performance.
