How to Use Plesk: A Comprehensive Guide to Website Management
- Monday, 8th September, 2025
- 15:28pm
Plesk is a powerful hosting control panel known for its intuitive graphical user interface and extensive features designed to streamline web management tasks. It simplifies complex operations, making it accessible for both beginners and experienced users.
This article provides a comprehensive guide on leveraging Plesk to manage your websites, domains, and email accounts efficiently. We will cover the installation process, essential functionalities, and recommended best practices to enhance your website management workflow.
Getting Started with Plesk
This section outlines how to begin utilizing Plesk to manage your online presence.
1. Installation and Initial Setup
The Plesk interface provides two primary viewing modes, which can be selected from the Interface Management menu:
- Service Provider View: Ideal for web hosting providers, this mode allows for the management of customer accounts, service plans, and reseller accounts.
- Power User View: Designed for individual users managing their own websites, this interface provides a streamlined experience for personal use. For the purpose of this guide, we will focus on the Power User interface.

Regardless of the chosen interface, the Plesk dashboard typically organizes information into the following key areas:
- Sidebar: This navigation panel presents all manageable items, including websites, domains, email accounts, and core Plesk settings.
- Main Menu: Displays specific settings and shortcuts for the currently selected item, such as database management or file manager access for your website.
- Top Bar: Contains a convenient search bar, the logged-in username, notifications, and a help button for quick assistance.
Managing Domains and Email Accounts
After successfully setting up your Plesk server, the next step is to add a new domain. If you do not yet have a domain, you can easily acquire one from an ICANN-accredited registrar.
Once you have a domain, open Plesk and follow these steps to add it:
- From the sidebar, click Websites & Domain.
- Select Add domain → Blank website.
- Provide the necessary information, such as your domain name and desired webspace settings. Click Add Domain to confirm your entry.
- Plesk will then display your new domain’s configuration menu. Navigate to Hosting & DNS → DNS.
- Point your domain to your VPS hosting by using the information provided in the Records tab. Your domain should become fully accessible within approximately 24 hours, once the DNS propagation process is complete.
Plesk simplifies the management of multiple domains by allowing you to configure them from a single, centralized screen. By clicking on a specific domain name, you can access options to manage SSH access, security features, and domain-based email accounts.
To establish a new email account, click the Mail tab → Mail Accounts → Create Email Address. Enter your preferred local part (the portion before the '@' symbol), set a strong password, and click Ok to finalize the creation process.
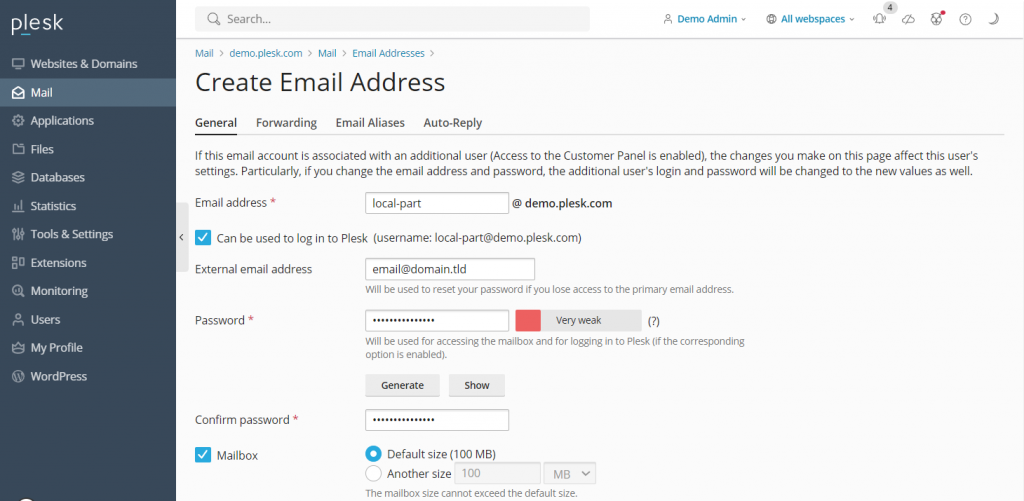
Within the same menu, you can also adjust various mail settings, such as enabling or disabling the service and applying Secure Sockets Layer (SSL) certificates for enhanced security. To create emails for other domain names, simply navigate to the Mail section on the sidebar.
Managing Websites
The process of setting up a website within Plesk varies depending on your chosen development method, whether it involves manual coding, utilizing a built-in site editor, or deploying a Content Management System (CMS).
Plesk provides robust support for various popular CMS platforms, including WordPress, Joomla, and Drupal. For this guide, we will focus on WordPress, as Plesk offers a specialized toolkit that automates database generation and admin account setup, significantly accelerating the installation process.
For other CMS platforms, you can install them via the Applications section on the sidebar. To create a new WordPress website on your Plesk server, follow these steps:
- From the sidebar, select Websites & Domains. Choose the specific domain name where you intend to host your new website.
- Click PHP settings and ensure the PHP support box is checked. If unchecked, enable it, then click Apply and OK.
- Return to the domain settings menu and select Install Application → WordPress.
- Enter the required installation information and click Install.
- Once the installation is complete, you will be redirected to the WordPress configuration page. Click Log in to access your website’s administration area.
To access the WordPress toolkit, simply click the WordPress icon associated with your domain name. This dedicated menu allows you to efficiently manage databases, plugins, themes, and SSL certificates for your WordPress installation.

Furthermore, Plesk incorporates a powerful File Manager, enabling you to effortlessly modify your website's files directly through the control panel, negating the need for an external FTP client. It also features a convenient website staging tool, which is invaluable for testing changes in a secluded environment before deploying them to your live production site.
Pro Tip: Instead of creating a new website from scratch, Plesk facilitates the transfer of existing websites. Refer to the official Plesk website migration guide for detailed instructions on this process.
Managing Server Settings
Plesk empowers you to directly modify its server settings, offering granular control over your hosting environment. For instance, user permissions can be adjusted via Restricted Mode Settings to prevent unauthorized alterations to your Plesk server configuration.
This particular setting allows you to enable or limit specific features for the administrator, such as access to the action log, remote API, server reboot functionality, and IP restriction management. Additionally, you can configure permissions for various aspects of hosting, PHP, web server, mailing, and DNS management.
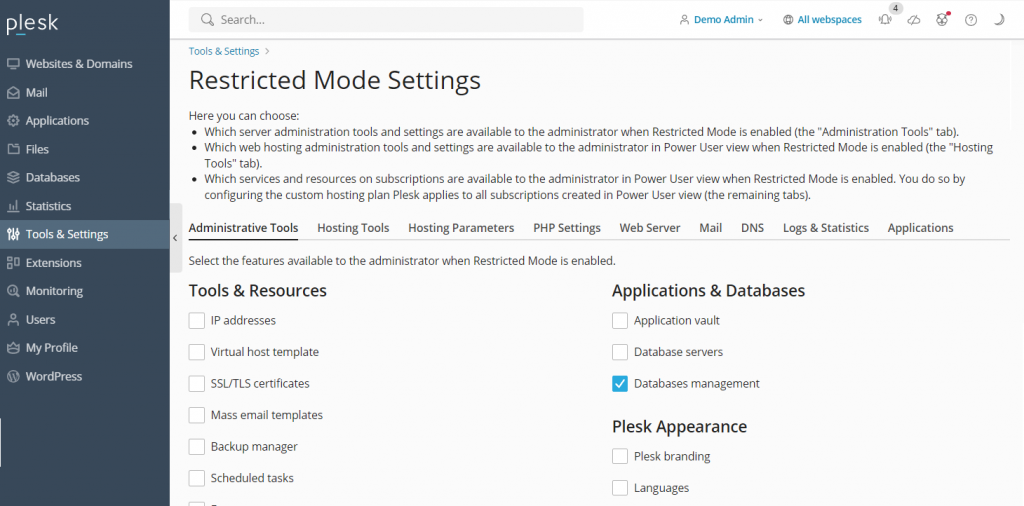
To activate Restricted Mode, navigate to Tools & Settings on the sidebar and select Restricted Mode Settings located under the Plesk category. Here, you can check the specific features you wish to allow for the administrator, then enable the Enable Restricted Mode box to apply your changes.
Plesk also simplifies data protection with its Backup Manager, which allows you to easily create backups of your server's settings and user data. To access this essential feature, go to Tools & Settings → Tools & Resources → Backup Manager.
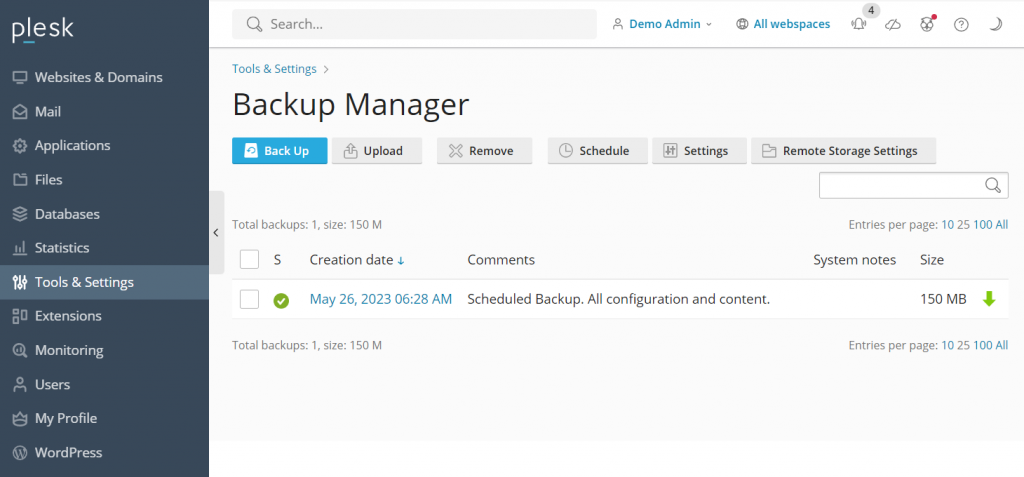
Within the Backup Manager interface, you will find a list of your previously created backups, which can be used to restore data as needed. To initiate a new backup, click Back Up, then select the data you wish to include, specify the storage directory, and choose the backup type. Confirm your selections by clicking OK.
For effective server optimization, Plesk integrates two key website analytics tools: Grafana and Plesk 360. While Plesk 360 requires you to sign in and connect your account, Grafana can be installed directly from your Plesk server dashboard for immediate use.
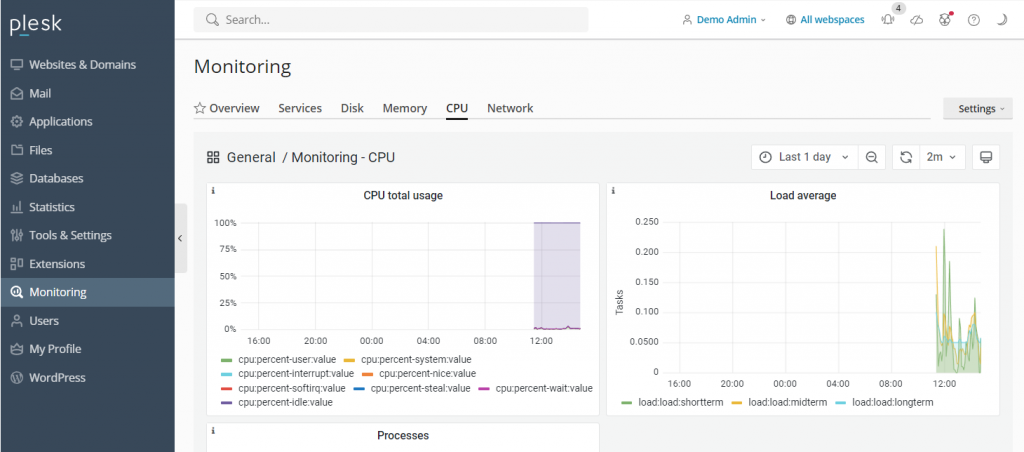
To install Grafana, navigate to Monitoring on the sidebar and select Use Built-In Monitoring at the bottom of the screen. This dashboard provides comprehensive insights into your server's performance by monitoring disk usage, running services, memory consumption, and network load, enabling proactive optimization.
Integrating Advanced Plesk Features
The Plesk extensions catalog is a rich resource offering over a hundred add-ons that significantly expand the control panel’s native functionality. These extensions span diverse categories, including web development tools, security enhancements, server utilities, and site editing features, allowing users to tailor Plesk to their specific requirements.
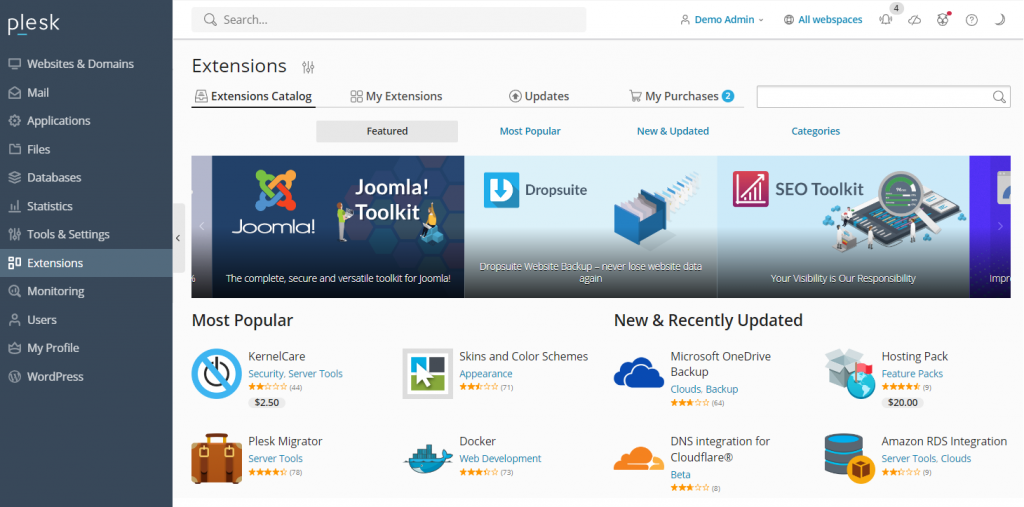
To install an add-on, navigate to Extensions on the sidebar, search for the desired tool, and click Get it Free for complimentary options. Paid extensions can be conveniently purchased directly through the Plesk dashboard.
Plesk also provides a robust command-line interface (CLI) for advanced users who wish to integrate and manage third-party applications or script server tasks. The CLI is commonly used for managing server settings, user accounts, websites, and services with greater precision.
On Linux servers, the Plesk CLI is typically located in the /usr/local/psa/bin directory. To utilize it, establish an SSH connection to your Plesk server and execute the command utility using the following syntax:
plesk bin <utility name> [parameters] [options]Alternatively, you can run the utility from any directory using the full path:
/usr/local/psa/bin/<utility name> [parameters] [options]For instance, to view all action log entries from a specific date up to today in JSON format, you would use a command similar to this:
plesk bin action-log --show -since YYYY-MM-DD -jsonBest Practices for Efficient Plesk Usage
To maximize your efficiency in managing websites and servers with Plesk, adhering to certain best practices is highly recommended. These guidelines will help ensure optimal performance, security, and ease of management.
Keep Your Plesk Installation Up To Date
Plesk regularly releases updates, patches, and new features. Ensuring your installation is always up to date offers numerous advantages:
- Avoids the need for annual major version upgrades.
- Provides immediate access to the latest features, tools, and improvements.
- Ensures that security vulnerabilities are promptly patched.
- Delivers speed and overall performance enhancements.
- Guarantees robust user data protection.
Depending on your web hosting provider, you might encounter Plesk Onyx or Obsidian. Plesk Obsidian, being the more current version, offers an enhanced user interface, more extensive features, and consistent updates compared to the deprecated Onyx. Users of Plesk Onyx can often upgrade to Obsidian without additional license costs.
Utilize Plesk's Automation Features
Plesk's automation capabilities are invaluable for managing server tasks, allowing you to schedule cron jobs to run PHP scripts, execute custom commands, and fetch URLs. Automating these routine tasks significantly saves time and effort, freeing you to concentrate on other critical aspects of your online presence.

Beyond cron jobs, Plesk enables the automation of essential tasks such as software updates and data backups. Automating these processes ensures your server benefits from the latest security patches and maintains up-to-date data reserves, providing a crucial safeguard against potential cyber attacks or data loss. Furthermore, Plesk can automate updates for other software on your VPS, including WordPress plugins and themes.
Take Advantage of Plesk Security Features
A virtual private server, if not properly managed, can be susceptible to various security vulnerabilities. Plesk integrates several features designed to help users significantly enhance their server security with minimal effort. Key security offerings include:
- SSL it!: This feature simplifies the process of purchasing and installing SSL certificates directly from within the Plesk control panel, ensuring secure data transmission.
- Firewall: The integrated firewall provides a critical layer of defense, blocking unauthorized connections to your VPS that could compromise its security.
- Server Name Indication (SNI): SNI helps secure email communications, preventing unauthorized parties from intercepting sensitive information.
- Self-repair kit: An invaluable tool that automatically detects and resolves common issues related to your VPS, mailing clients, DNS, and databases, maintaining server integrity.
Customize Your Plesk Dashboard to Suit Your Needs
Plesk is designed with an intuitive and user-friendly interface straight out of the box. However, it also offers extensive customization options, allowing you to tailor the dashboard to perfectly align with your specific workflow and preferences. To customize your Plesk environment, navigate to Tools & Settings → Plesk Appearance.
For a truly personalized user experience, Plesk provides several customization capabilities, such as:
- Adjusting the default language of the administrator interface.
- Adding custom buttons that link directly to other web pages or internal resources.
- Replacing the default Plesk logo and title with your own branding elements.
Advanced users can also modify Plesk’s CSS stylesheet to alter various decorative elements, including the color scheme, background, and font styles, providing complete visual control. Detailed instructions on implementing custom themes are available in the official Plesk documentation.
Use Plesk’s Community Resources
For users who encounter questions or need assistance, Plesk offers a vibrant community forum where individuals can seek help, share knowledge, and find solutions to various issues. This forum covers a wide array of discussion topics, from Plesk compatibility with different operating systems to specific questions about the WP toolkit and extensions.
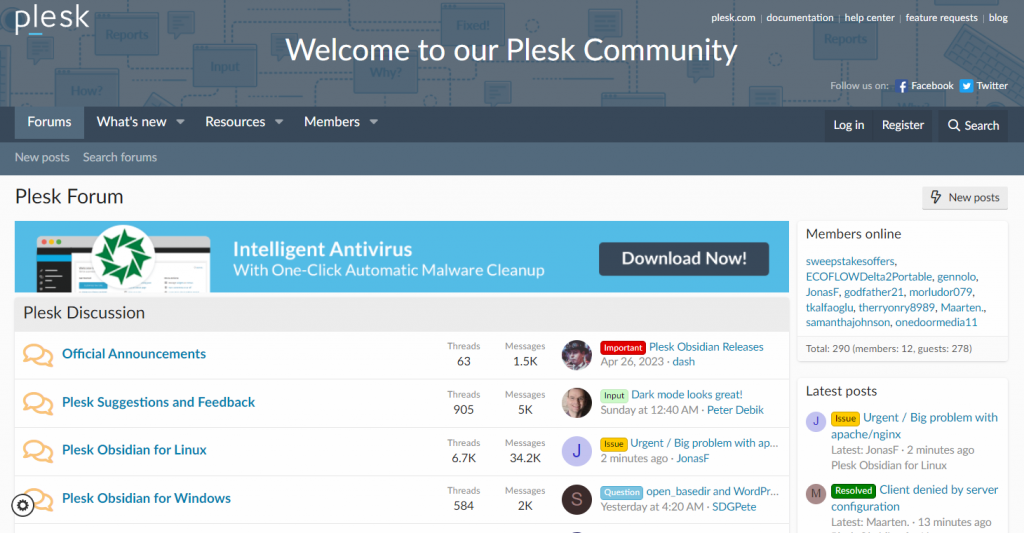
These community resources provide invaluable assets and step-by-step instructions for managing various tasks within Plesk. Additionally, Plesk maintains comprehensive official documentation that thoroughly explains how to effectively use and configure the control panel.
Conclusion
Plesk stands as a robust web hosting control panel, equipped with an extensive suite of features designed to significantly simplify website management tasks. It offers a streamlined approach for users to oversee their online projects.
To access the Plesk dashboard, open your web browser and enter https://example:8443, ensuring you replace example with your Virtual Private Server's (VPS) domain name or IP address. After entering your username and password, you will gain access to the control panel's main interface.
The sidebar serves as your primary navigation, allowing you to locate and configure various items such as websites, domains, and email accounts. Settings for these items can then be easily modified and saved directly from the dashboard’s central menu.
Beyond its core functionalities, Plesk provides flexibility by allowing users to expand its capabilities through extensions installed directly from the dashboard or by integrating third-party applications via its command-line interface (CLI).
To maximize your efficiency in website management, it is highly recommended to leverage Plesk’s automation features and customize its appearance to align with your personal workflow. Furthermore, actively engaging with the Plesk community forum can provide valuable support and troubleshooting assistance.

