
How to Install a WordPress Plugin
- Monday, 8th September, 2025
- 15:36pm
If you're new to the world of content management systems, particularly WordPress, the process of installing and activating plugins might initially seem daunting. However, understanding how to effectively manage plugins is crucial, as they are the very components that unlock WordPress's extensive versatility and power. For instance, a well-chosen plugin can significantly enhance your website's search engine optimization, or seamlessly transform your site into a fully functional online store, all without requiring any complex coding knowledge.
This guide aims to demystify the plugin installation process. We will walk you through the various tried-and-true methods you can employ to successfully integrate plugins into your WordPress environment, ensuring you can harness the full potential of your website with confidence.
Before You Begin
It's important to differentiate between WordPress.com and a self-hosted WordPress.org installation. If you are utilizing WordPress.com, the ability to install custom plugins is generally restricted unless you subscribe to their Business plan or a higher tier. Many users encounter a common issue where the 'Plugins' menu is absent from their WordPress dashboard, which is typically due to the limitations inherent in a WordPress.com setup.
Conversely, with a self-hosted WordPress.org website, you have complete freedom to install any plugin you desire right from the start. This distinction is critical for anyone planning to extend their website's functionality through plugins.
Method 1: Install a Plugin Using the WordPress Plugin Search
After setting up your WordPress installation, one of the foundational skills for any new site owner is learning how to install plugins. Mastering this straightforward process is essential for customizing and enhancing your website's capabilities.
The most user-friendly method for plugin installation involves using the built-in WordPress plugin search function. It's worth noting that this method is primarily for plugins available within the official WordPress plugin directory, which exclusively features free plugins.
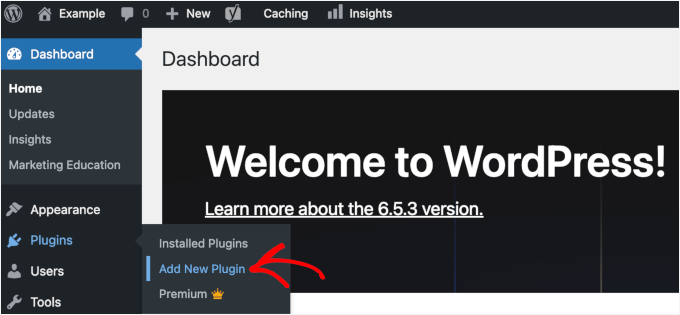
To begin, navigate to the Plugins » Add New Plugin page within your WordPress administration area.
On this page, you can easily locate the plugin you wish to install by typing its name or the specific functionality you require into the search bar. For example, if you are looking for a form builder, you might type "form builder" into the search field.
Once the search results load, you will see a variety of listings relevant to your query, similar to the example below:
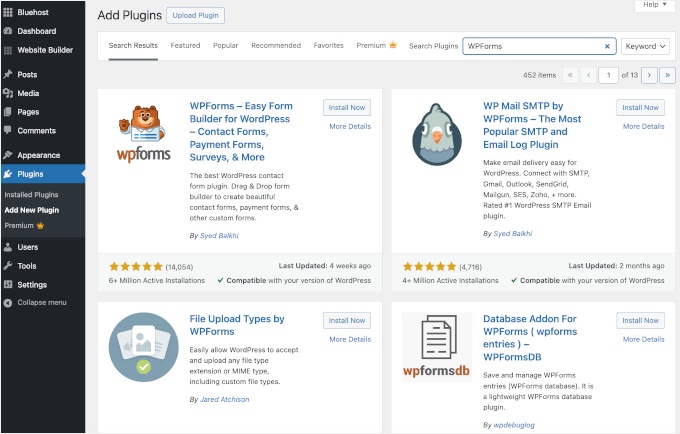
Identify the plugin you want and click the 'Install Now' button located next to its listing.
WordPress will then proceed to download and install the plugin automatically. Upon completion of the installation, you will observe that the 'Install Now' button transforms into an 'Activate' button.

It is crucial to remember that a WordPress plugin will not function on your website until it has been activated. Therefore, click the 'Activate' button to enable the plugin and begin utilizing its features on your WordPress site.
Congratulations! You have successfully installed and activated your first WordPress plugin. The subsequent step involves configuring the plugin's specific settings, which will vary considerably depending on the plugin you have chosen. These detailed configuration steps are beyond the scope of this general installation guide.
Method 2: Install a Plugin Using the WordPress Admin Plugin Upload
Many premium WordPress plugins, often purchased directly from developers or marketplaces, are not listed in the official WordPress plugin directory. Consequently, these plugins cannot be installed using the search method described previously. For such plugins, WordPress provides a convenient upload method, allowing you to install them directly from your administration area.
The first step is to download the plugin file, which typically comes as a zip archive, from the vendor or marketplace where you acquired it. Once you have this zip file, navigate to Plugins » Add New within your WordPress admin dashboard.
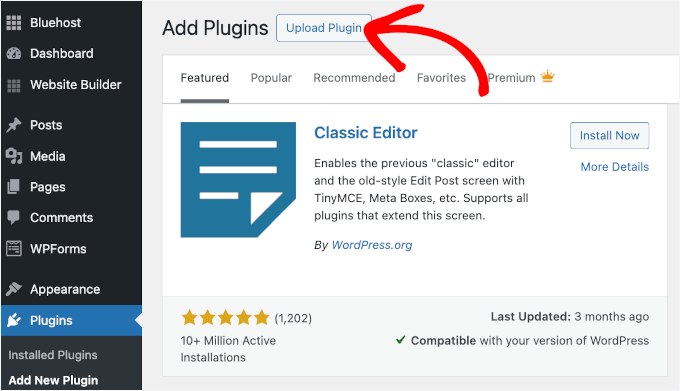
On the 'Add Plugins' page, locate and click the 'Upload Plugin' button situated at the top of the screen.
This action will reveal the plugin upload form. Here, you will click the 'Choose File' button to open a file selection dialog. Browse your computer and select the plugin's zip file that you downloaded earlier.
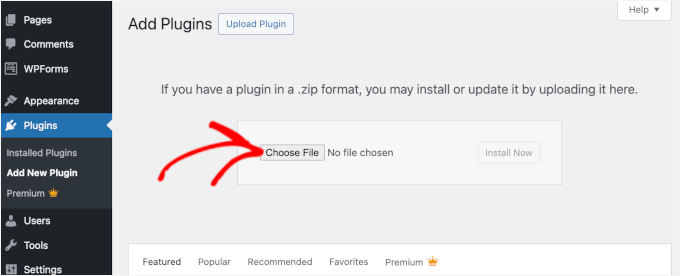
After selecting the correct zip file, proceed by clicking the 'Install Now' button.
WordPress will then upload the plugin file from your local machine and initiate its installation. Upon successful installation, you will receive a confirmation message.
The final step is to click the 'Activate Plugin' button to enable the plugin and integrate its features into your website.
Similar to the previous method, the next phase involves configuring the plugin's individual settings to align with your specific requirements. These settings are unique to each plugin and are not covered in this general installation tutorial.
Method 3: Manually Install a WordPress Plugin Using FTP
In certain scenarios, typically due to specific server configurations or file restrictions imposed by your web hosting provider, you might encounter difficulties installing plugins directly from the WordPress administration area. When faced with such limitations, the most reliable alternative is to manually install the plugin using File Transfer Protocol (FTP).
This method, while effective, requires a slightly more technical approach and might be less intuitive for complete beginners. However, with clear instructions, it remains a viable option.
To begin, download the plugin's zip file to your computer. Once downloaded, you will need to extract the contents of this zip file. Extracting the archive will create a new folder, typically named after the plugin. This folder contains all the necessary plugin files.
Next, you will need an FTP client application installed on your computer. Before proceeding, ensure you have your FTP username and password. If you don't have these credentials, you should contact your web hosting provider for assistance. They will be able to provide you with the necessary login details.
With your extracted plugin folder and FTP login details ready, open your FTP client and connect to your website's server using the provided credentials. Once connected, navigate through your website's directory structure to locate the /wp-content/plugins/ folder.
Inside this /wp-content/plugins/ directory, upload the entire folder you extracted from the plugin's zip file on your local machine. This process transfers all the plugin's files to the correct location on your web server.
After the file transfer is complete, return to your WordPress administration area and click on the 'Plugins' menu item in the sidebar.
On the plugins page, you should now see that your plugin has been successfully installed. To activate and begin using the plugin, locate its listing and click the 'Activate' link within its section.
Upon activation, you may be prompted to configure the plugin's settings. As noted with the other methods, these settings are unique to each WordPress plugin and will require individual attention based on the specific functionality the plugin offers.
Frequently Asked Questions About Installing WordPress Plugins
For those new to WordPress, questions about plugin installation are common. Drawing on extensive experience, we address some of the most frequently asked questions regarding this essential process.
1. How do I find the best WordPress plugins for my website?
With tens of thousands of plugins available in the free WordPress plugin directory, and numerous premium options besides, finding the ideal plugin for a specific feature can seem overwhelming. A good starting point is to identify your website's needs and then research plugins that directly address those requirements. Look for plugins with strong reviews, regular updates, and good compatibility with your WordPress version. Additionally, many established communities and resources offer curated lists of recommended plugins for various purposes.
2. What is the difference between installed and active plugins?
In WordPress, installing a plugin means its files have been uploaded to your website's server, making it available for use. However, for a plugin to actually function and affect your site, it must be 'Activated'. You can view both installed and active plugins by visiting the 'Plugins' page in your WordPress administration area. Active plugins are typically highlighted, indicating they are currently running on your site. Plugins that are installed but not active are present on your server but are not performing any actions.
3. Should I delete inactive plugins?
It is generally recommended to delete any inactive plugins from your website. While inactive plugins do not actively consume server resources, they can still pose potential security risks or contribute to a cluttered environment if left unattended. Removing unused plugins helps maintain a cleaner, more secure, and potentially more efficient WordPress installation.
4. How many plugins can I install in WordPress?
There isn't a strict limit to the number of plugins you can install on WordPress. The performance of your website is less about the sheer quantity of plugins and more about the quality and efficiency of those plugins. A few poorly coded plugins can impact performance more severely than many well-optimized ones. Focus on installing only the plugins you genuinely need and ensure they are from reputable sources and kept up-to-date.
5. How do I uninstall a WordPress plugin?
To uninstall a WordPress plugin, navigate to the 'Plugins' page within your WordPress administration area. If the plugin is currently active, you must first deactivate it. Once deactivated, a 'Delete' option will appear. Clicking this button will remove the plugin's files from your website.
6. Is it safe to use an outdated plugin?
Using outdated plugins is generally not recommended and can expose your website to several risks. These include security vulnerabilities that hackers can exploit, compatibility issues with newer WordPress versions or other plugins, and potential performance degradation. It is crucial to keep all your plugins, themes, and WordPress core up-to-date to ensure your website remains secure, stable, and efficient.
Video Tutorial: How to Install a WordPress Plugin
For a visual guide to the installation process, we have prepared a video tutorial demonstrating how to install a WordPress plugin. You can watch the tutorial below to see these methods in action.
