
Installing the WordPress LiteSpeed Cache Plugin from cPanel
- Tuesday, 9th September, 2025
- 08:01am
Introduction to LiteSpeed Cache for WordPress
LiteSpeed Cache offers robust caching solutions for a wide range of open-source applications, with WordPress being a prominent example. For WordPress users, there are primarily two distinct methods to install this powerful caching solution. One approach involves utilizing the integrated LiteSpeed Web Cache Manager directly within your cPanel interface. The alternative method entails installing the plugin from the official WordPress plugin repository via your WordPress administration dashboard. This guide will focus specifically on the installation process initiated from cPanel, providing a comprehensive walkthrough to get you started.
Initiating the Installation Process
To commence the installation of the LiteSpeed Cache plugin, the initial step requires logging into your cPanel account. After successfully logging in, direct your attention to the "Advanced" features group within the cPanel interface. Here, you will easily locate and identify the "LiteSpeed Web Cache Manager" icon, which serves as your gateway to the caching functionalities.

Upon clicking this icon, you will be seamlessly redirected to the dedicated LiteSpeed Web Cache Manager interface. At the top of this page, you'll be greeted with a welcome message, accompanied by a concise section detailing the various advantages and benefits that LiteSpeed Cache brings to your website's performance.

As you scroll further down the page, you will encounter the "Flush LSCache" section, prominently featuring a "Flush All" button. This particular option proves incredibly valuable, especially for users managing multiple websites, as it allows for the swift and simultaneous clearing of the LiteSpeed plugin cache across all your sites without the need to access each individual WordPress admin area.

Finally, within this manager, you will find the crucial "LiteSpeed Cache Management" section. Beneath this heading, the "WordPress Cache" option is presented. Selecting this option will navigate you to a new page where you can execute various actions related to LiteSpeed Cache. Most importantly, this is where you will be able to initiate the installation of the plugin for your specific WordPress website(s).

Installing the WordPress LiteSpeed Cache Plugin
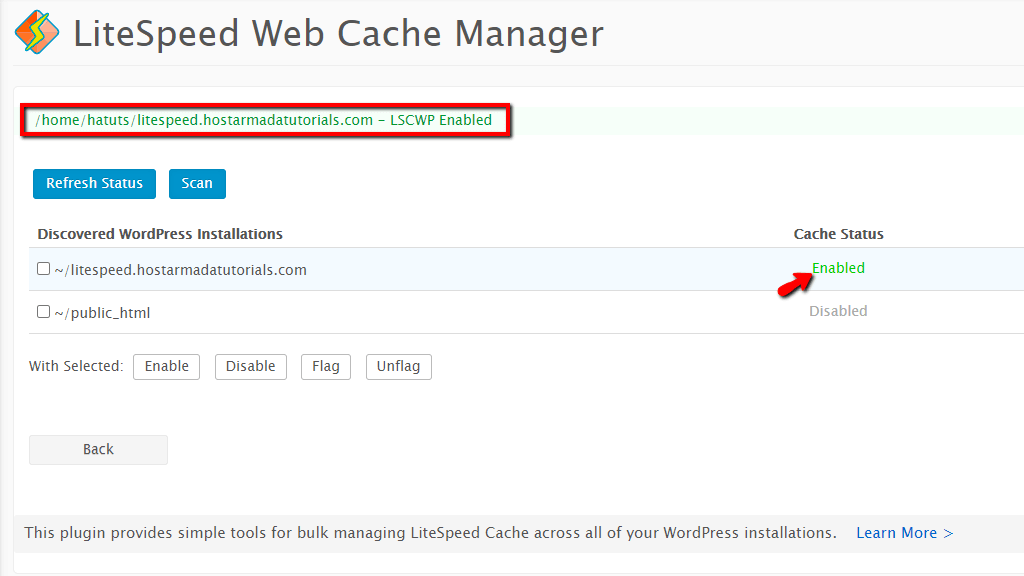
Upon reaching this dedicated management page, you will observe a table section positioned in the center. Initially, this table will likely appear empty, especially if this is your first time accessing this feature. To populate the table with a list of your existing WordPress installations, simply locate and click the "Scan" button, which is conveniently situated above the table.

Activating the "Scan" button will prompt the system to detect and display all WordPress installations present on your web hosting account within the table. To proceed with the plugin installation for a specific site, identify the checkbox corresponding to your desired WordPress installation and mark it. Following this, click the "Enable" button, which is located directly beneath the table.

After clicking "Enable," a brief loading screen will appear. Once the process is complete, a confirmation message will be displayed, signifying that the plugin has been successfully activated. Concurrently, the "Cache Status" column for your selected site will update to show an "Enabled" status, confirming the successful deployment of LiteSpeed Cache.
With these steps meticulously followed, the LiteSpeed Cache plugin is now successfully enabled on your WordPress-powered website, ready to begin optimizing its performance and user experience.
Accessing and Configuring WordPress LiteSpeed Cache
With the LiteSpeed Cache plugin successfully installed, the next logical step is to access your WordPress admin dashboard to manage its various cache options and fine-tune the plugin's configuration. To achieve this, simply append "/wp-admin" to your domain name. For example, if your domain is "yourwebsite.com," you would navigate to "yourwebsite.com/wp-admin." This action will present you with the WordPress login page, where you will enter your administrative credentials to gain access to your website's backend.

Once successfully logged into your WordPress admin area, direct your attention to the module menu located on the left side of the screen. Towards the bottom of this menu, you will clearly see the "LiteSpeed Cache" functionality, now fully integrated into your admin dashboard. From here, you can explore its extensive settings and begin optimizing your website's performance with advanced caching features.

Congratulations! You have successfully completed the installation of the LiteSpeed Cache plugin directly from your cPanel interface. This comprehensive guide was designed to provide you with clear and detailed instructions, enabling you to accomplish this task efficiently. By leveraging LiteSpeed Cache, your WordPress website is now poised for enhanced speed and responsiveness.
