
How to Configure AutoSSL in cPanel: Installation, Configuration, and Troubleshooting
- Wednesday, 10th September, 2025
- 00:01am
Ensuring your website is secure is paramount in today\'s digital landscape. An SSL (Secure Sockets Layer) certificate encrypts the connection between your website and its visitors, protecting sensitive data and building trust. AutoSSL, a powerful utility integrated into cPanel, simplifies this process by automating the procurement and installation of free SSL certificates from providers like Let\'s Encrypt. This guide will walk you through the process of enabling AutoSSL, validating its installation, and troubleshooting common issues to ensure your website maintains a secure and trusted presence online.
What is AutoSSL?
AutoSSL is a convenient cPanel feature designed to automatically obtain and install SSL certificates for your domains. Essentially, it provides free SSL certificates, typically issued by Let’s Encrypt, to help website owners establish secure connections over the internet. This automatic process not only enhances overall website security and builds user confidence but also contributes positively to your search engine rankings by ensuring your site uses HTTPS.
How to Enable AutoSSL?
Activating AutoSSL for your domain names through cPanel is a straightforward process. Follow these steps to secure your website:
- Log into cPanel: Begin by accessing your cPanel account using the credentials provided by your web hosting provider.
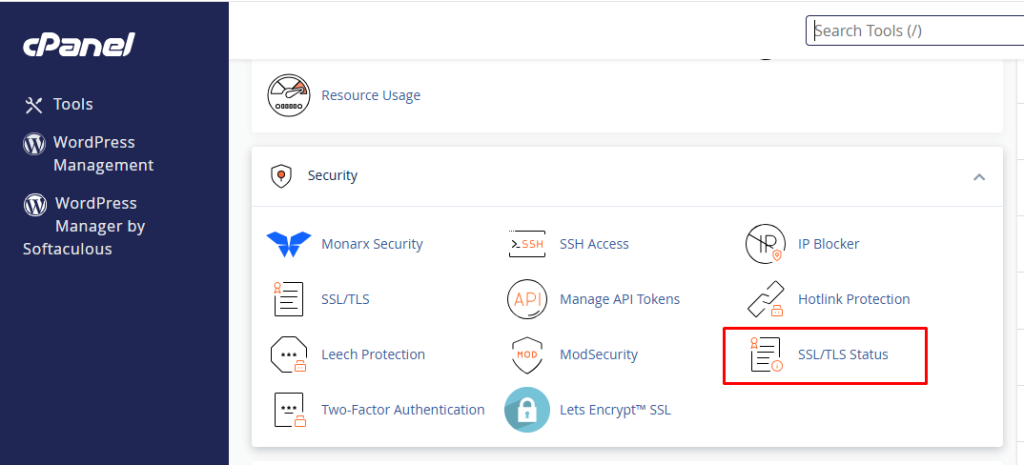
- Locate the Security Section: Once logged in, navigate to the "SECURITY" section within the cPanel interface. This area typically contains various tools and settings related to website security.
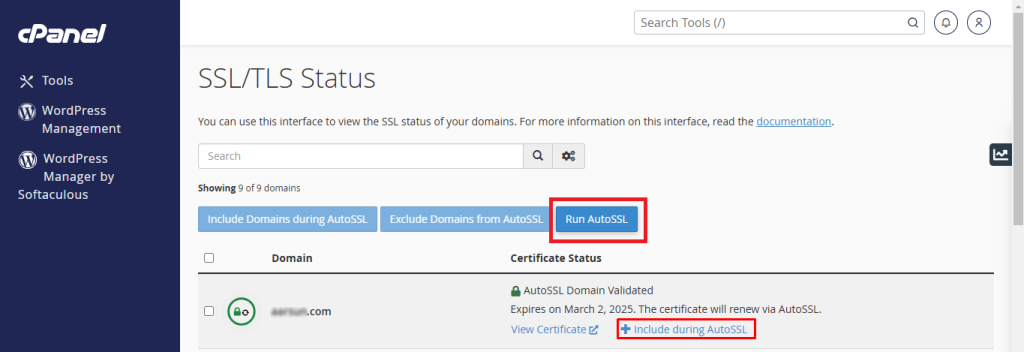
- Select SSL/TLS Status: Within the "SECURITY" section, find and click on the "SSL/TLS Status" option. This interface allows you to view the current SSL certificate status for your domains and manage their settings.
- Enable AutoSSL for Your Preferred Domains: In the "SSL/TLS Status" interface, you will see a comprehensive list of all your domains and subdomains. Carefully review this list and ensure that the checkboxes next to all the domains you wish to secure with an SSL certificate are selected.
- Initiate AutoSSL: After selecting your desired domains, click the "Run AutoSSL" button. This action will prompt the system to request and install the necessary SSL certificates for your chosen domains.
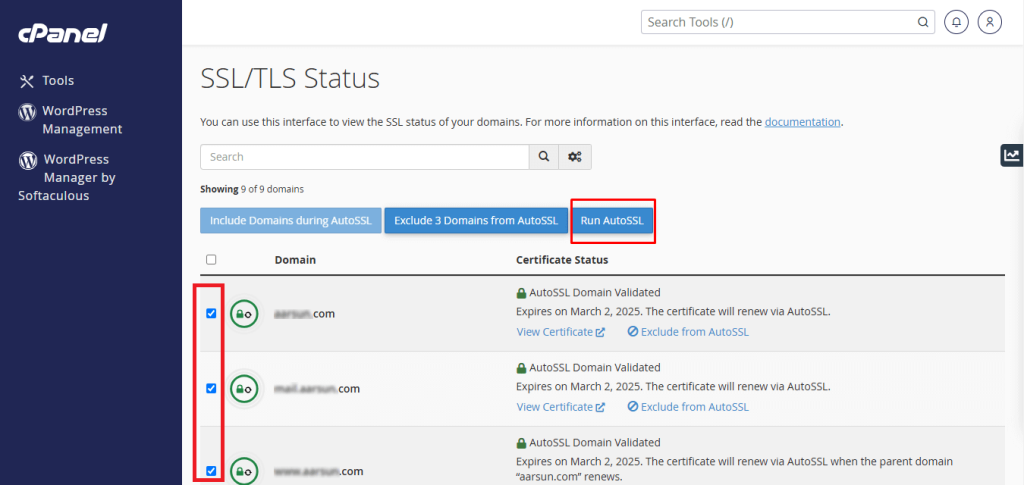
- Important Note on Waiting Period: Please be aware that the process of obtaining and applying SSL certificates can take some time. There might be a short waiting period, typically up to an hour, for the certificates to be fully applied and active across your selected domains.
Validating Your SSL Certificate
Once you\'ve initiated AutoSSL, it\'s crucial to verify that the SSL certificate has been successfully installed and is active on your domain. You can easily check the installation status using various external online tools. For example, a popular choice like SSL Shopper offers an SSL checker that can confirm if your certificate is correctly installed and functioning.
Troubleshooting Common AutoSSL Errors
After enabling AutoSSL, your website should display a padlock icon in the browser, indicating a secure connection. However, if your site still shows "Not Secure" or lacks the padlock, it could be due to several common issues. Here are some recommendations for troubleshooting AutoSSL errors:
1. Mixed Content Issues
One of the most frequent causes of an insecure site, even with an SSL certificate, is mixed content. This occurs when a secure website (HTTPS) attempts to load resources (such as images, scripts, stylesheets, or fonts) over an insecure connection (HTTP). This blend of secure and insecure content compromises the overall security of the page, preventing the padlock from appearing and potentially impacting user trust and search engine rankings. To resolve this, you must ensure all resources on your website are loaded via HTTPS.
2. Conflicting Certificates
AutoSSL may encounter issues if there are existing SSL certificates, whether self-signed, expired, or previously installed, on your domain. These older certificates can conflict with the new Let\'s Encrypt certificate AutoSSL attempts to install.
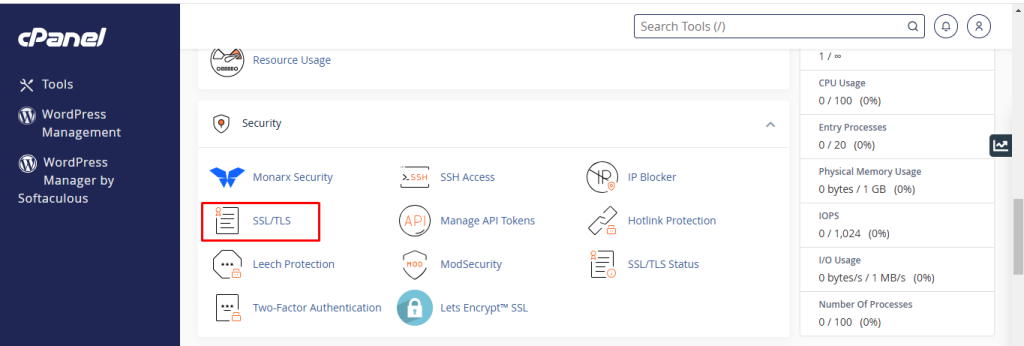
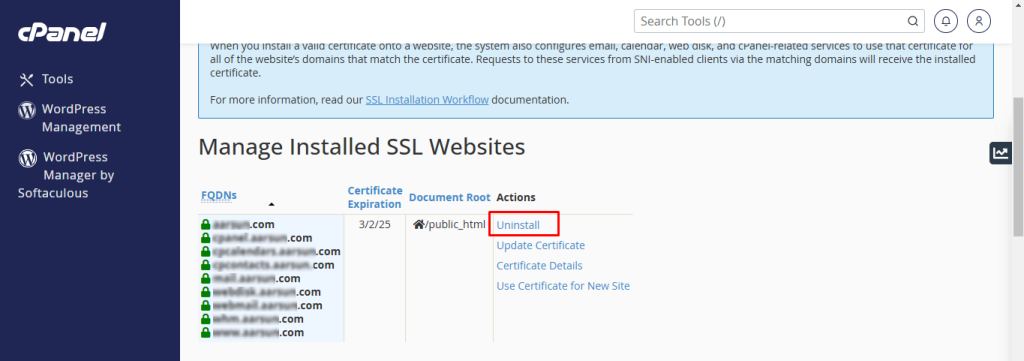
- To identify any prior certificates, navigate to the "SSL/TLS" section in your cPanel and select "Manage SSL Sites." This will display a list of all installed certificates.
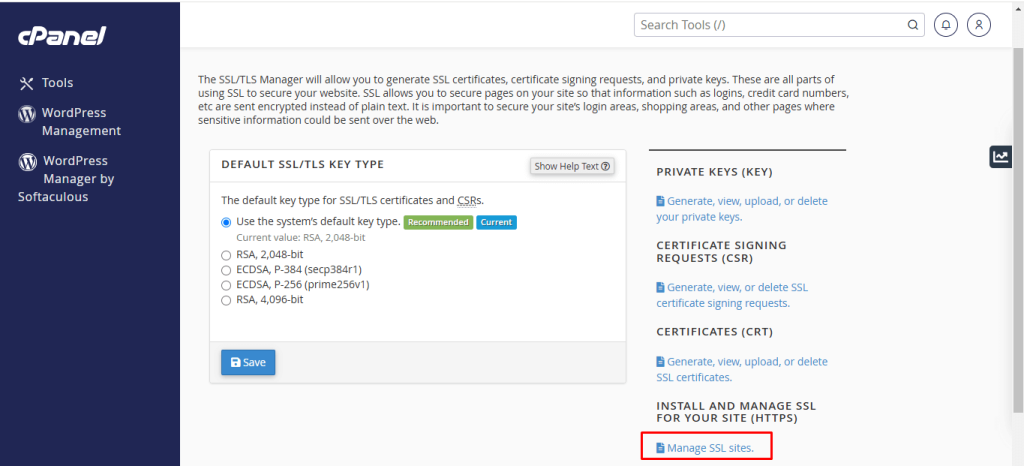
- If you find any outdated or invalid certificates, it is crucial to remove or uninstall them. After clearing these conflicting certificates, return to the "SSL/TLS Status" interface and run AutoSSL again for each affected domain to ensure a clean installation.
3. Domain Verification Failures
For Let\'s Encrypt to issue an SSL certificate, it needs to verify that you are the legitimate owner of the domain in question. If AutoSSL is failing, verification issues are a common culprit. This often relates to how your domain\'s DNS records are configured, ensuring they point to the correct server where the SSL will be installed.
4. Incorrect Domain Name Servers (DNS) Configuration
A fundamental requirement for AutoSSL to function correctly is that your domain\'s DNS records must resolve to the IP address of your web hosting server. If your domain is pointing to a different server, AutoSSL will attempt to install the certificate in the wrong location, leading to failure. You can use online tools like "whatsmydns.net" to check the current A record for your domain and confirm it matches the server IP address provided by your hosting account information.
5. Unnecessary AAAA Records
Even if your A records correctly point to your web host\'s IP address, extraneous AAAA (IPv6) records can sometimes interfere with AutoSSL validation. Many DNS managers might automatically add these records, which are not always needed and can cause conflicts. If you identify any AAAA records that are not essential for your website\'s operation, especially if your hosting provider primarily uses IPv4, consider removing them. You can check for these records using tools like "whatsmydns.net" as well.
6. Website Code Interference
In some instances, specific code within your website, particularly in the .htaccess file, can inadvertently interfere with the AutoSSL validation process. This interference typically occurs during the reconciliation phase before any files or code are deployed. To prevent this, you can add a specific snippet of code to the beginning of your website’s .htaccess file. This code ensures that AutoSSL\'s verification requests are not blocked or redirected, allowing the certificate to be issued successfully.
RewriteCond %{REQUEST_URI} !^/[0-9]+\..+\.cpaneldcv$
RewriteCond %{REQUEST_URI} !^/\.well-known/acme-challenge/.+$
RewriteCond %{REQUEST_URI} !^/\.well-known/acme-challenge/[0-9a-zA-Z_-]+ $
RewriteCond %{REQUEST_URI} !^/\.well-known/pki-validation/[A-F0-9]{32}\.txt(?:\ Comodo\ DCV)?$
7. AutoSSL Feature Suspended
If you find that the "Run AutoSSL" option is missing or unavailable within your cPanel interface, it typically indicates that the AutoSSL feature has been disabled at a higher level, such as by your web hosting provider\'s administrator or reseller. In such cases, you will need to contact your web hosting support team and request that the AutoSSL feature be enabled for your account.
8. Excluding Specific Domains (Optional)
Occasionally, you might encounter persistent issues with specific domain names that prevent AutoSSL from working correctly, or you might simply wish to exclude certain domains from automatic SSL installation. Most web hosting providers offer guides or support options that detail how to exclude particular domains from the AutoSSL process. Refer to your hosting provider\'s documentation or support channels for instructions on managing such exclusions.
Conclusion
Configuring and enabling SSL via AutoSSL in cPanel is a highly intuitive and beneficial feature that automatically secures your website with free SSL certificates from services like Let\'s Encrypt. Implementing SSL not only significantly boosts user confidence and data protection but also plays a vital role in improving your website\'s search engine optimization. By proactively securing your site, you demonstrate a responsible approach to online operations, fostering trust among your visitors—an indispensable attribute in today\'s interconnected world. Regular checks and prompt troubleshooting ensure continuous protection, making your website a safe environment for all users.
