
Managing Domains: A Comprehensive Guide to Adding, Moving, and Removing Websites
- Thursday, 11th September, 2025
- 08:02am
Understanding Domain Management
Efficient domain management is crucial for maintaining a robust online presence. If your hosting package permits the use of multiple domain names for your websites, you can seamlessly integrate additional domains onto your server. Before initiating the addition of a new domain that will utilize a second-level domain name, such as example.com, it is imperative to ensure that this domain name is officially registered. Depending on your hosting provider's services, domain registration might be available directly through your Customer Panel. Otherwise, you will need to register your domain name with an accredited third-party domain name registration authority.
Types of Domain Configurations
The control panel offers a versatile range of site configurations, providing flexibility to tailor your web presence to specific needs. These configurations cater to various requirements, from full-fledged websites to specialized sub-sections.
-
Website Addressed by a Second-Level Domain Name
This configuration typically refers to a primary website, accessible via a unique second-level domain name like example.com. Such websites come equipped with a comprehensive suite of services, including:
- A distinct internet address (domain name), such as example.com.
- The option to utilize additional domain names, often referred to as domain aliases, to point to the same website.
- Subdomains, which are organized divisions of your main site, accessible through memorable addresses like mail.example.com. These enhance site structure and navigation.
- Provision for separate FTP accounts, facilitating collaborative content management. For each FTP account, you can precisely define the directories that can be accessed.
- Tools for content creation, including robust site builders.
- Simplified deployment of various web applications, such as content management systems, photo galleries, e-commerce platforms, and blogging tools, to extend site functionality.
- Secure data exchange via the SSL/TLS protocol, which is vital for protecting sensitive information. For optimal security, this often necessitates hosting the site on a dedicated IP address, ensuring it is not shared with other users or websites.
- Comprehensive email services, including mailboxes and mailing lists.
- Detailed statistics on website visits, offering valuable insights into user engagement and traffic patterns.
-
Website or a Division of a Website Addressed by a Third-Level Domain Name (Subdomain)
A subdomain typically represents a specific section or division of an existing main website. It is identified by an internet address comprising three parts, separated by dots (e.g., blog.example.com). Subdomains offer several dedicated services:
- A separate document root from the main site. The document root is the designated directory on the server where the web pages for a specific site or subdomain are stored.
- FTP access for efficient content management and updates.
- Content creation capabilities using intuitive site builders.
- Streamlined deployment of web applications, similar to main domains, to enhance functionality within the subdomain.
- Secure data exchange facilitated by the SSL/TLS protocol, ensuring secure communication.
- Access to detailed statistics on site visits, allowing for performance monitoring of the subdomain.
Adding New Domains
To effectively host a new website utilizing a second-level domain name, follow these straightforward instructions:
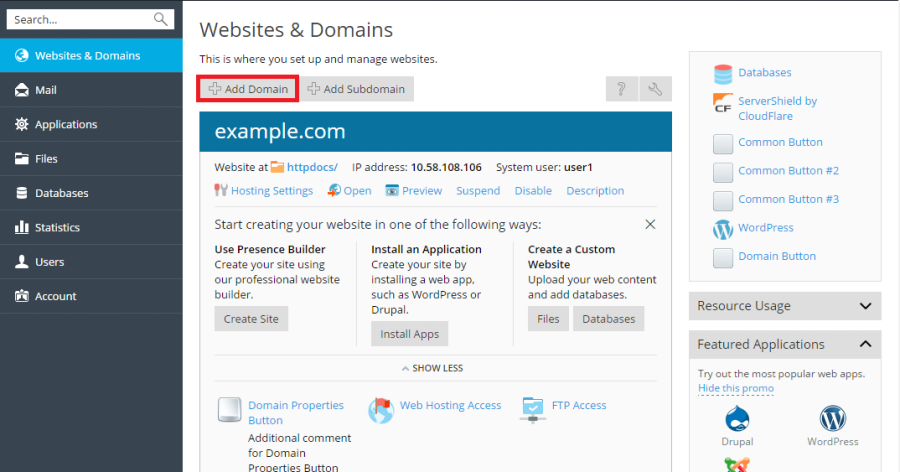
- Navigate to the Websites & Domains section, then click on Add Domain and proceed by following the on-screen prompts.
Note: The specific information and options available on the Add Domain screen may vary based on your control panel edition and its configuration.
Important: If you opt for the recommended setup, it is crucial to align the DNS settings associated with your domain name with those at your domain registrar. To achieve this, you will need to input the platform's name server IP address into the relevant NS record provided by your registrar. The procedure to obtain this IP address is as follows: go to Websites & Domains > [your domain name] > DNS Settings. Locate the NS record, and then identify the A record that corresponds to the NS record's value.
For instance, if your NS record is:
example.com. NS ns.example.com*
You would then look for the A record associated with `ns.example.com`, which might appear as:
ns.example.com. A 192.0.2.12
The resulting value, `192.0.2.12`, represents the platform's name server IP address that you will need for your registrar's settings. - Click OK to finalize the addition.
- The newly added domain name will now be displayed within the list at the bottom of the screen.
- If your account has the privilege to modify hosting settings, you can click on the domain name of the new website to review or adjust its hosting configurations. This allows for fine-tuning various parameters to suit your website's requirements.
With your new domain successfully added, you can now commence building your website using a integrated site builder or upload your existing web content to the subscription associated with this domain. This prepares your website for launch and public access.
Customizing Your Domain View
The “Websites & Domains” interface offers distinct visual modes, influencing the layout, visible controls, and overall user experience. Selecting the appropriate view mode can significantly enhance your efficiency when managing multiple domains.
- Dynamic List mode is often considered the optimal choice as it intelligently combines the benefits of other viewing modes. It provides a concise layout suitable for a large number of domains, while also featuring an expandable list that reveals all available controls when needed. Furthermore, Dynamic List is unique in its ability to display domain favicons, aiding in quick identification.
- The Active List mode is particularly well-suited for users managing a moderate number of domains who require immediate access to all available management controls.
- The Classic List mode is designed for users with an extensive portfolio of domains, typically exceeding 100. While effective for handling large quantities, it may not display all controls directly, requiring additional navigation for certain tasks.
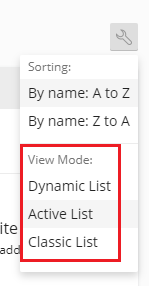
To select your preferred view mode, navigate to Websites & Domains, click on the  icon, and then choose the desired mode from the available options.
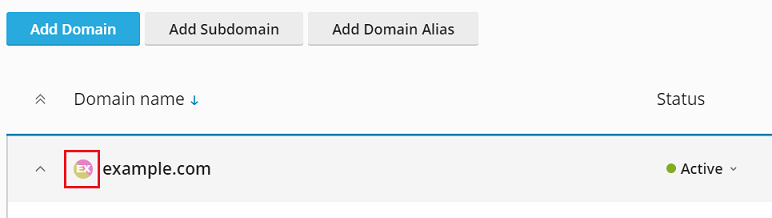
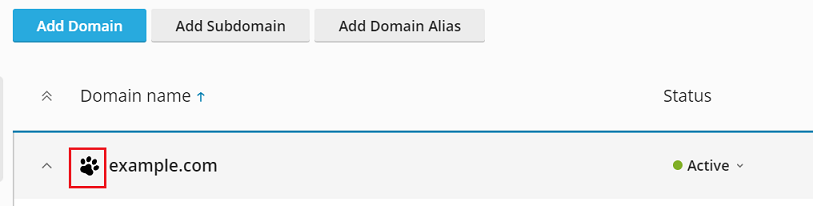
Enhancing Domain Identification with Favicons
A domain favicon is a small, distinctive image displayed by the interface next to a domain name when the Dynamic List view is active. These favicons are visible on the Websites & Domains screen and serve as a quick visual identifier.
Upon the creation of a new domain, the system automatically generates and displays a default favicon, typically derived from the first two characters of the domain name.
However, you have the option to upload a custom favicon, perhaps mirroring the favicon used for your website that appears in browser tabs. Custom domain favicons offer several advantages:
- They significantly simplify the process of quickly locating a specific website within your domain list.
- They aid in distinguishing between different domains, especially when managing many similar names.
To add a custom favicon for a domain in Dynamic List view, follow these steps:
- Select a high-quality image in PNG, SVG, or ICO format that you intend to use as your favicon.
- Rename the chosen favicon image to any of the following standard names:
favicon.svgfavicon-32x32.pngfavicon.pngfavicon-16x16.pngapple-touch-icon.pngfavicon.ico
- Using the built-in File Manager, upload the image file to one of the following designated website directories:
- The document root directory, which is typically
httpdocsby default (unless your hosting provider has configured a custom document root). - The
/imagessubdirectory located within the document root. - The
/assets/imagessubdirectory located within the document root.
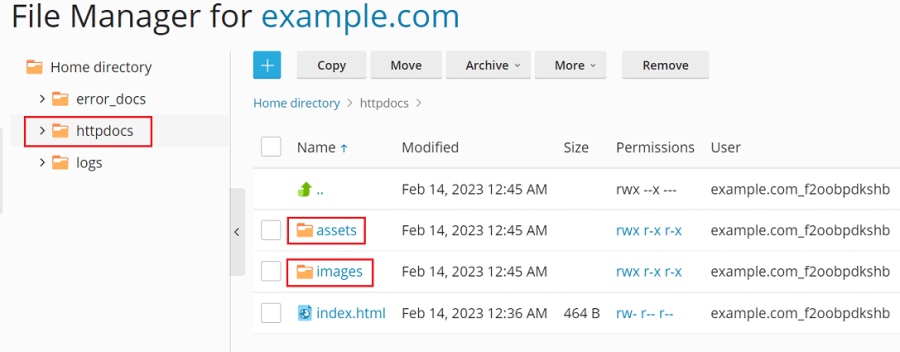
Note: It is crucial to upload the favicon to one of the precise directories mentioned above. The system performs a non-recursive search for exact file name matches within these specific directories. If, for example, you upload the
favicon.svgfile to a subdirectory like/images/favicon, the system will not be able to locate and display your custom image because/images/faviconis a sub-directory of the required location. - The document root directory, which is typically
Once your custom favicon image has been uploaded, allow a short period for the changes to propagate, or simply refresh your control panel page to see your new favicon displayed.
Tip: For websites powered by WordPress, you can simultaneously create both the website and domain favicon using the Favicon by RealFaviconGenerator plugin. The control panel automatically detects a website favicon generated by this plugin's wizard and applies it for the domain within the Dynamic List view.
Relocating Domains Between Subscriptions
The ability to move add-on domains – those created subsequent to the initial domain within a subscription – between existing subscriptions provides significant operational flexibility. This feature is particularly beneficial for scenarios such as separating staging websites from production environments, allowing for a seamless transition of websites from development to live production stages.
When a domain is moved, it is transferred along with its associated content, configuration files, log files, PHP settings, any installed APS applications, and all its subdomains and domain aliases, if applicable. This ensures a complete and consistent transfer of the website's environment.
Note: It is essential that the target subscription, to which you intend to move your domain, possesses adequate available resources, including sufficient allocations for websites, subdomains, domain aliases, or mail accounts.
To move an add-on domain to an alternative subscription, follow these steps:
- Navigate to Websites & Domains, locate the add-on domain you wish to relocate, click on the
 icon, and then select Move Domain.
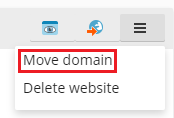
- Choose an available target subscription from the presented options and then click Move to initiate the transfer.
Upon completion of the moving process, your domain will be successfully assigned to the selected subscription, with all its associated components. This relocation allows for better organization and resource management across your hosting environment.
Note: If a domain with an installed web application (such as WordPress, Joomla!, or any other compatible application) is moved, its corresponding database is not automatically transferred. While this typically does not immediately impact website functionality, you might consider manually moving the database to the subscription the domain is now assigned to for better organizational consistency.
Important Considerations and Limitations for Domain Relocation
When moving domains, be aware of the following known issues and limitations to ensure a smooth process:
- Certain domains cannot be moved, including:
- The default domain, which is the very first domain created under a subscription.
- A subdomain without its parent domain.
- A domain alias without its parent domain.
- A domain cannot be relocated to a subscription that does not offer hosting services.
- If a domain has active mail services, it cannot be moved to a subscription that lacks mail service capabilities.
- Domain relocation is not possible if the target subscription already owns a domain with an identical document root. To proceed with the move, you would need to adjust the "Document root" value within the Hosting Settings of the domain in question.
- Should a domain with custom Apache or Nginx directives be moved to a different subscription, these directives are preserved. It is advisable to review them post-relocation to ensure they remain appropriate for the new environment.
- If a domain is moved to a target subscription where its PHP settings diverge from those of the domain, the target subscription may become locked, and a notification will be displayed to inform you of this status.
- In cases where a domain being moved has both a web application installed (e.g., WordPress, Joomla!, etc.) and an additional control panel user designated as the application’s administrator, the additional user will lose access to the application. The login credentials and password for the application’s administrator will be changed; these new details can be found in the application’s settings.
- If you move a domain that includes a mail user to a subscription belonging to a different owner, the email address will be detached from that specific mail user.
Deleting Domains from Your Account
When you initiate the deletion of a domain from your control panel, all associated data pertaining to that specific website are permanently removed from the server. This action is irreversible, so proceed with caution.
Note: It is important to remember that the main domain of your subscription—the initial domain name created for your account, often referred to as the default domain—cannot be deleted. However, it is possible to rename this default domain if necessary.
To safely remove a domain from your account, follow these steps:
- Go to Websites & Domains and precisely locate the name of the domain or subdomain you wish to remove.
- Click either Remove Website or Remove Subdomain, depending on the type of domain you are deleting.
- Carefully confirm the removal request, understanding its implications, and then click OK to finalize the deletion.
Important: Removing domain names from your Customer Panel only deletes their hosting configuration and content from the server. This action does not cancel the registration of these domain names with your domain registrar. If you have previously registered these domain names, they remain registered under your ownership and can still be used for other websites or services in the future.
