


Managing multiple WordPress installations can often be a complex and time-consuming endeavor. However, with the innovative WordPress Manager utility, you gain a powerful, centralized solution designed to significantly simplify your site administration. This comprehensive tool empowers you to oversee and update a myriad of critical settings for all your WordPress websites directly from a single, intuitive interface, eliminating the need to log into each individual WordPress admin panel. It stands as an indispensable feature for anyone seeking to enhance efficiency and maintain robust control over their entire WordPress ecosystem.
Contents
- Overview
- Accessing WordPress Manager
- Install WordPress
- Auto Login to WordPress Admin Panel
- Upgrade Installation
- Auto Upgrade Core Settings
- Auto Upgrade Plugins/Themes Settings
- Enable/Disable Search Engine Visibility
- Enable/Disable WordPress CRON
- Enable/Disable WordPress Debug Mode
- Change Website URL
- Change Site Name
- Change Password
- Manage Plugins
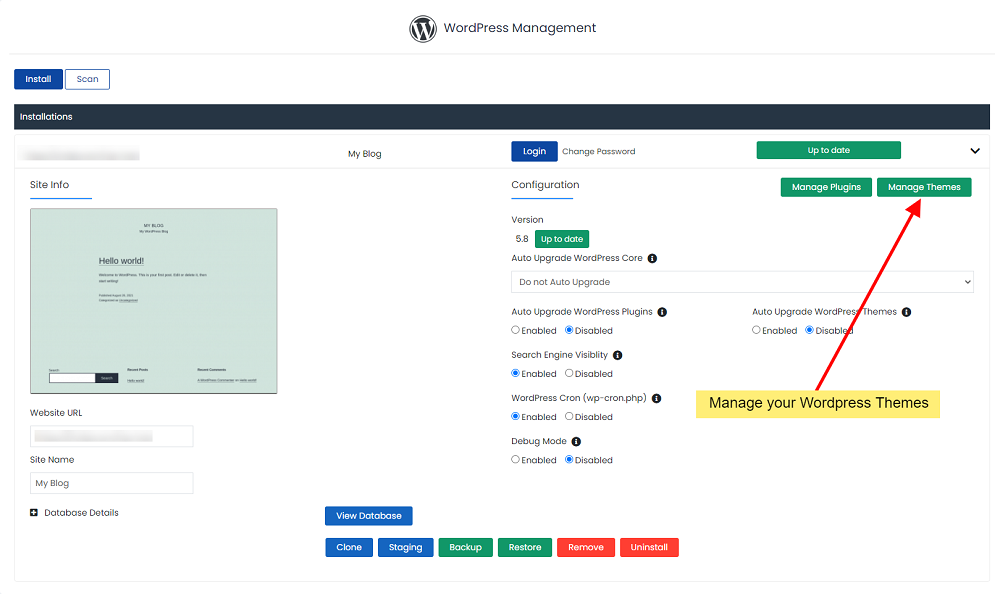
- Manage Themes
- Add User
- Install Featured Plugins
Overview
WordPress Manager serves as your central hub for efficiently managing all your WordPress installations. This powerful utility streamlines various administrative tasks, allowing you to update critical settings for your WordPress websites without the necessity of logging into each individual WordPress admin panel. It provides a significant advantage for users who oversee multiple sites, ensuring consistent management and time-saving operations.
Note: This advanced feature was introduced with Softaculous version 5.6.1, enhancing the capabilities for WordPress users significantly.
Accessing WordPress Manager
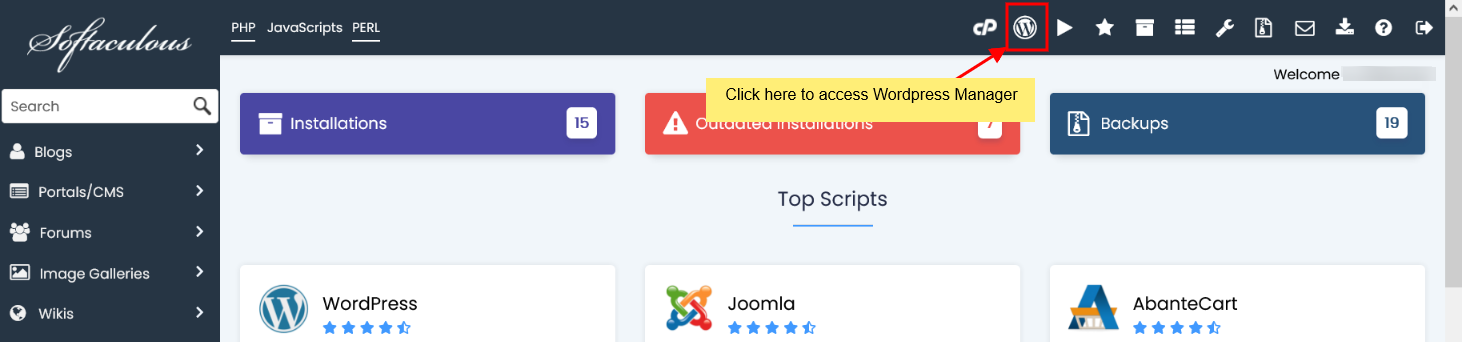
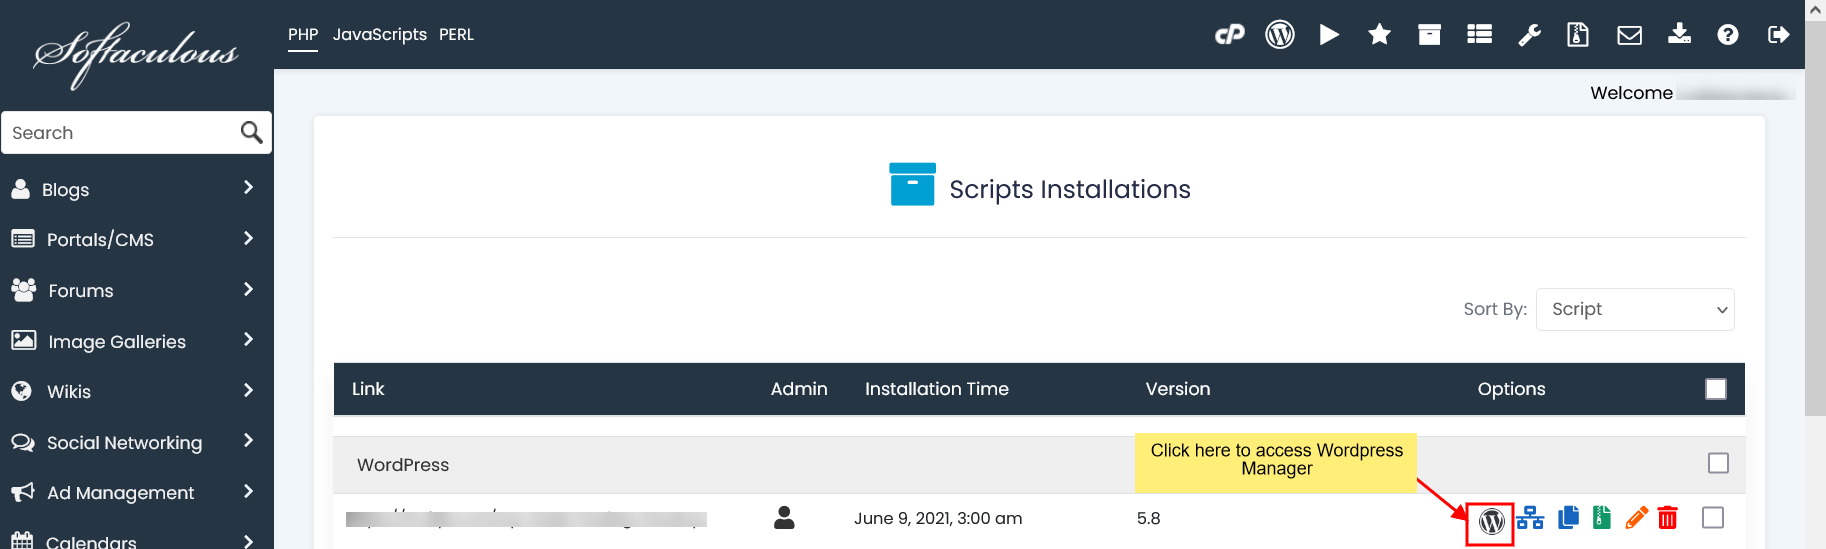
You can conveniently access WordPress Manager through two primary methods within your Softaculous end-user panel, providing flexibility based on your current workflow:
- Navigate to the upper right corner of your Softaculous end-user panel and click on the "WordPress" icon. This provides a quick gateway to the manager, ideal for general access.
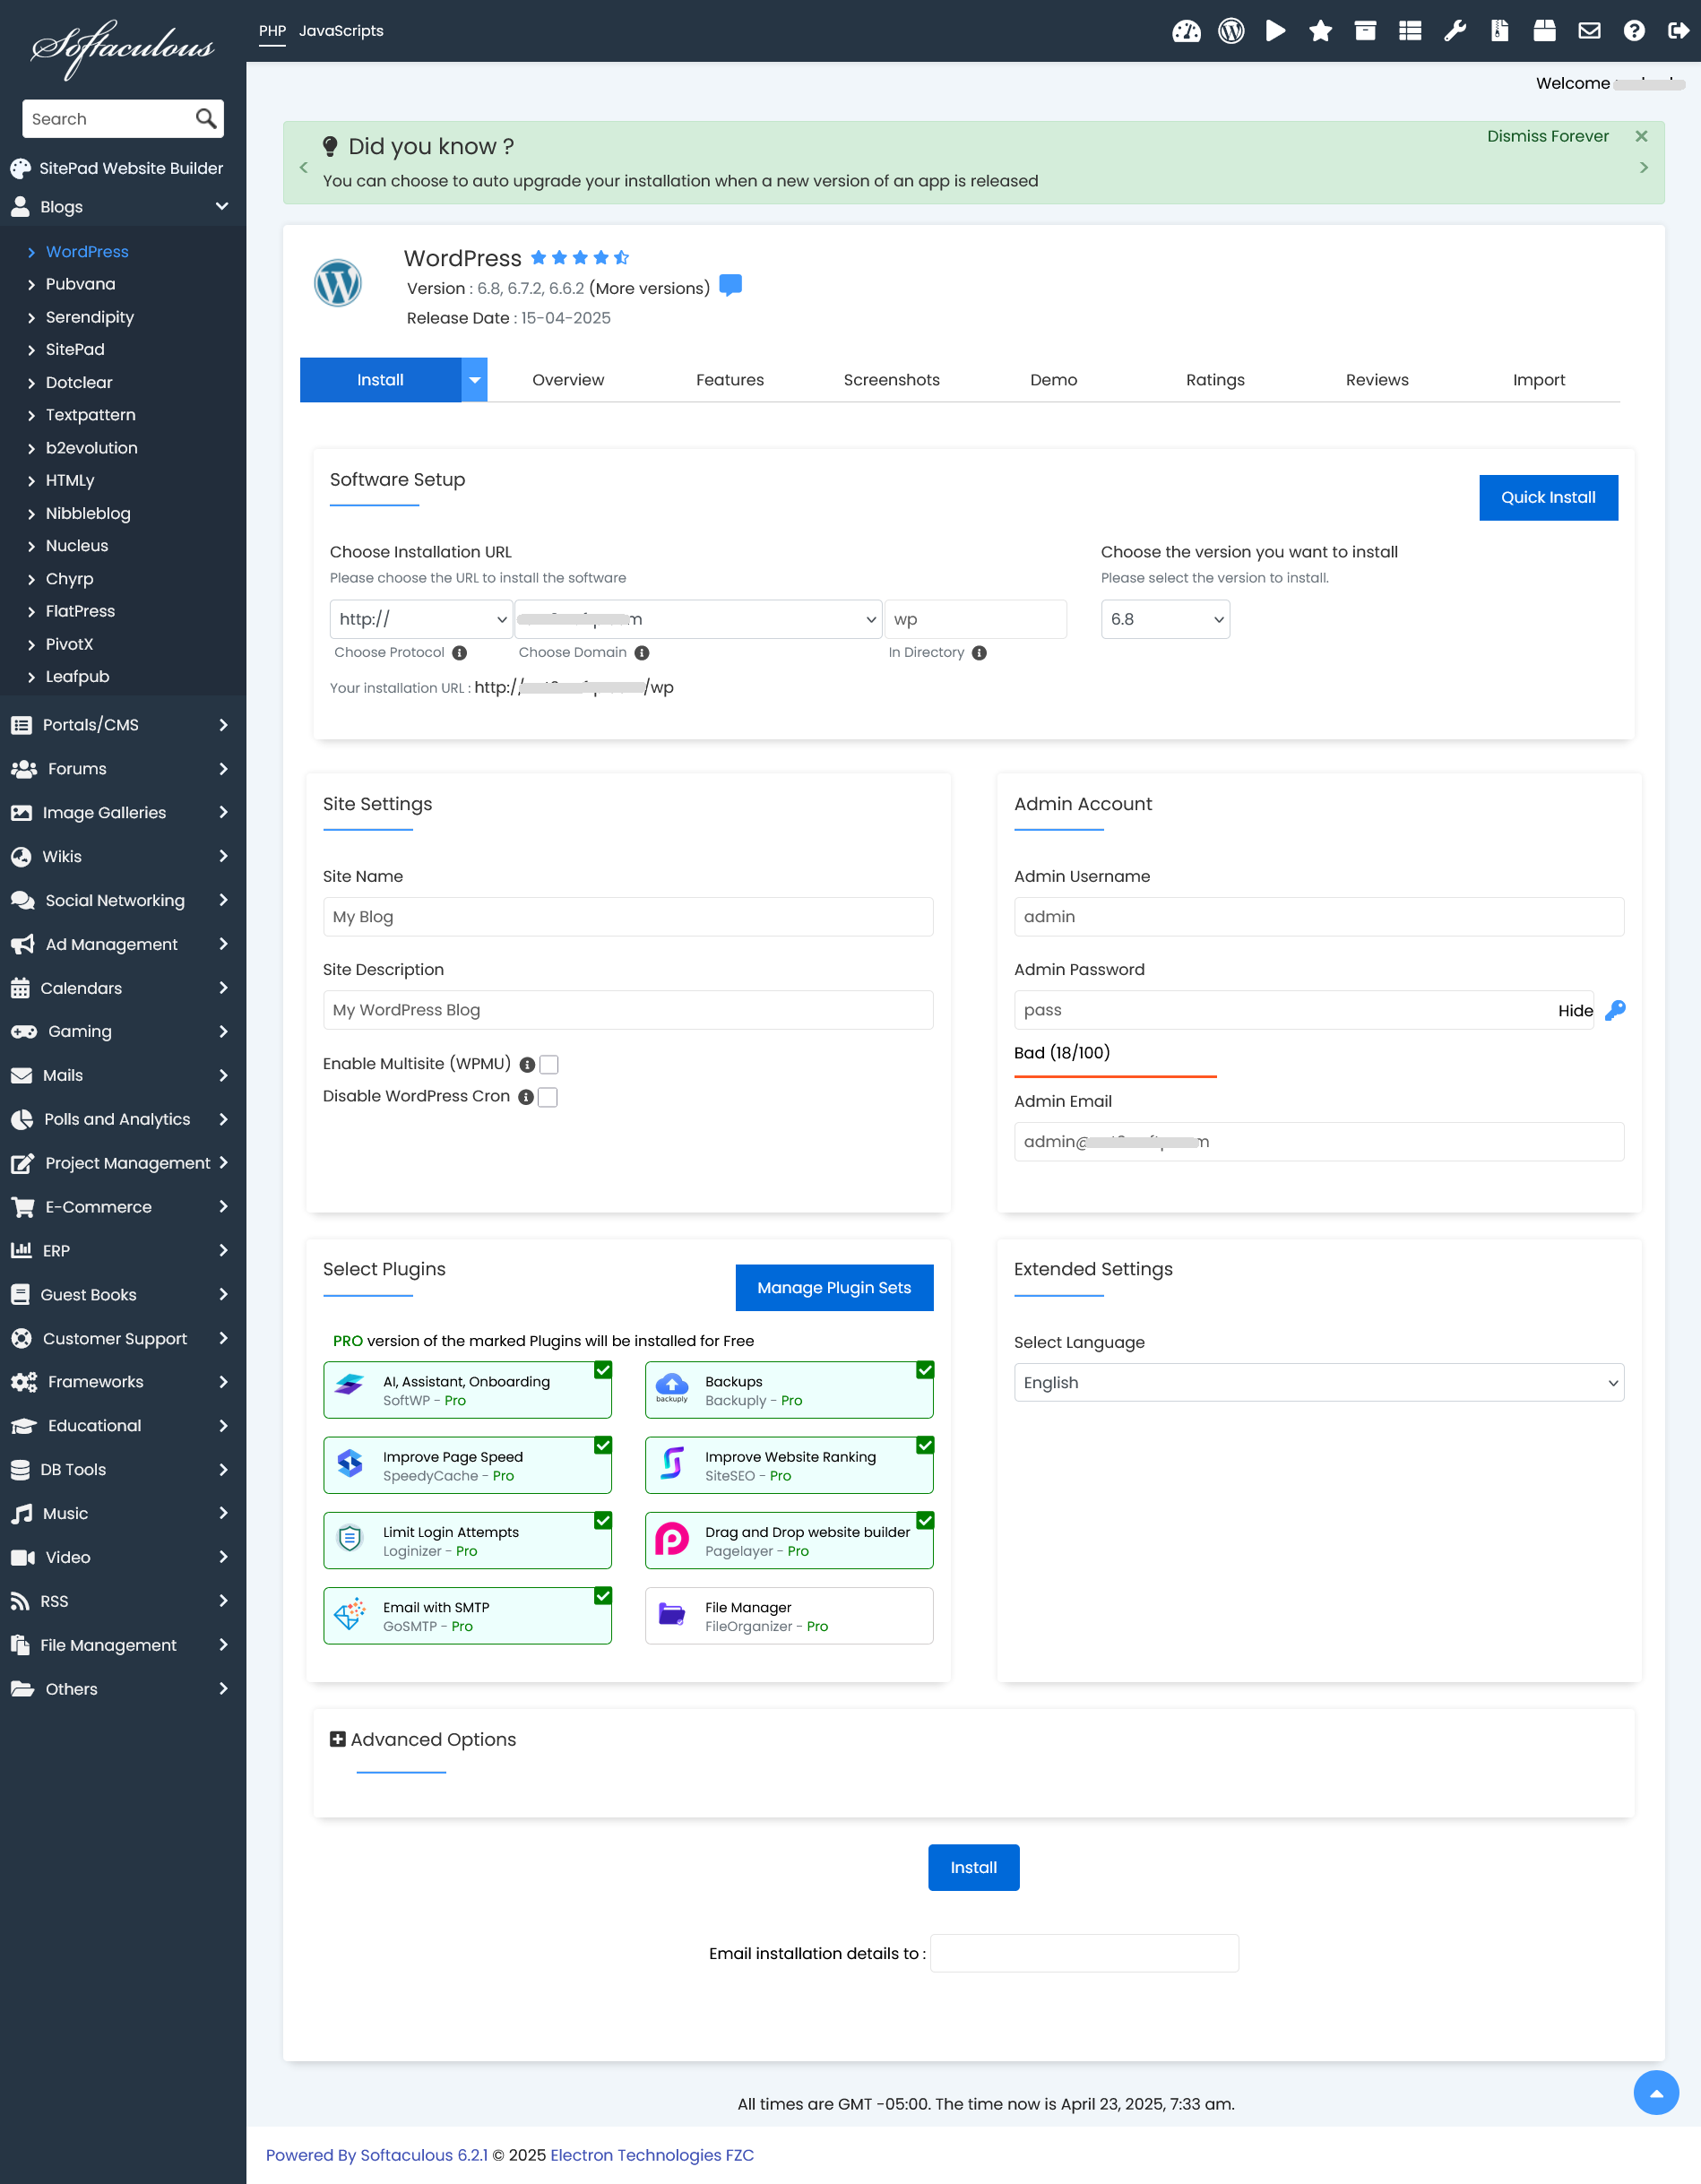
Install WordPress
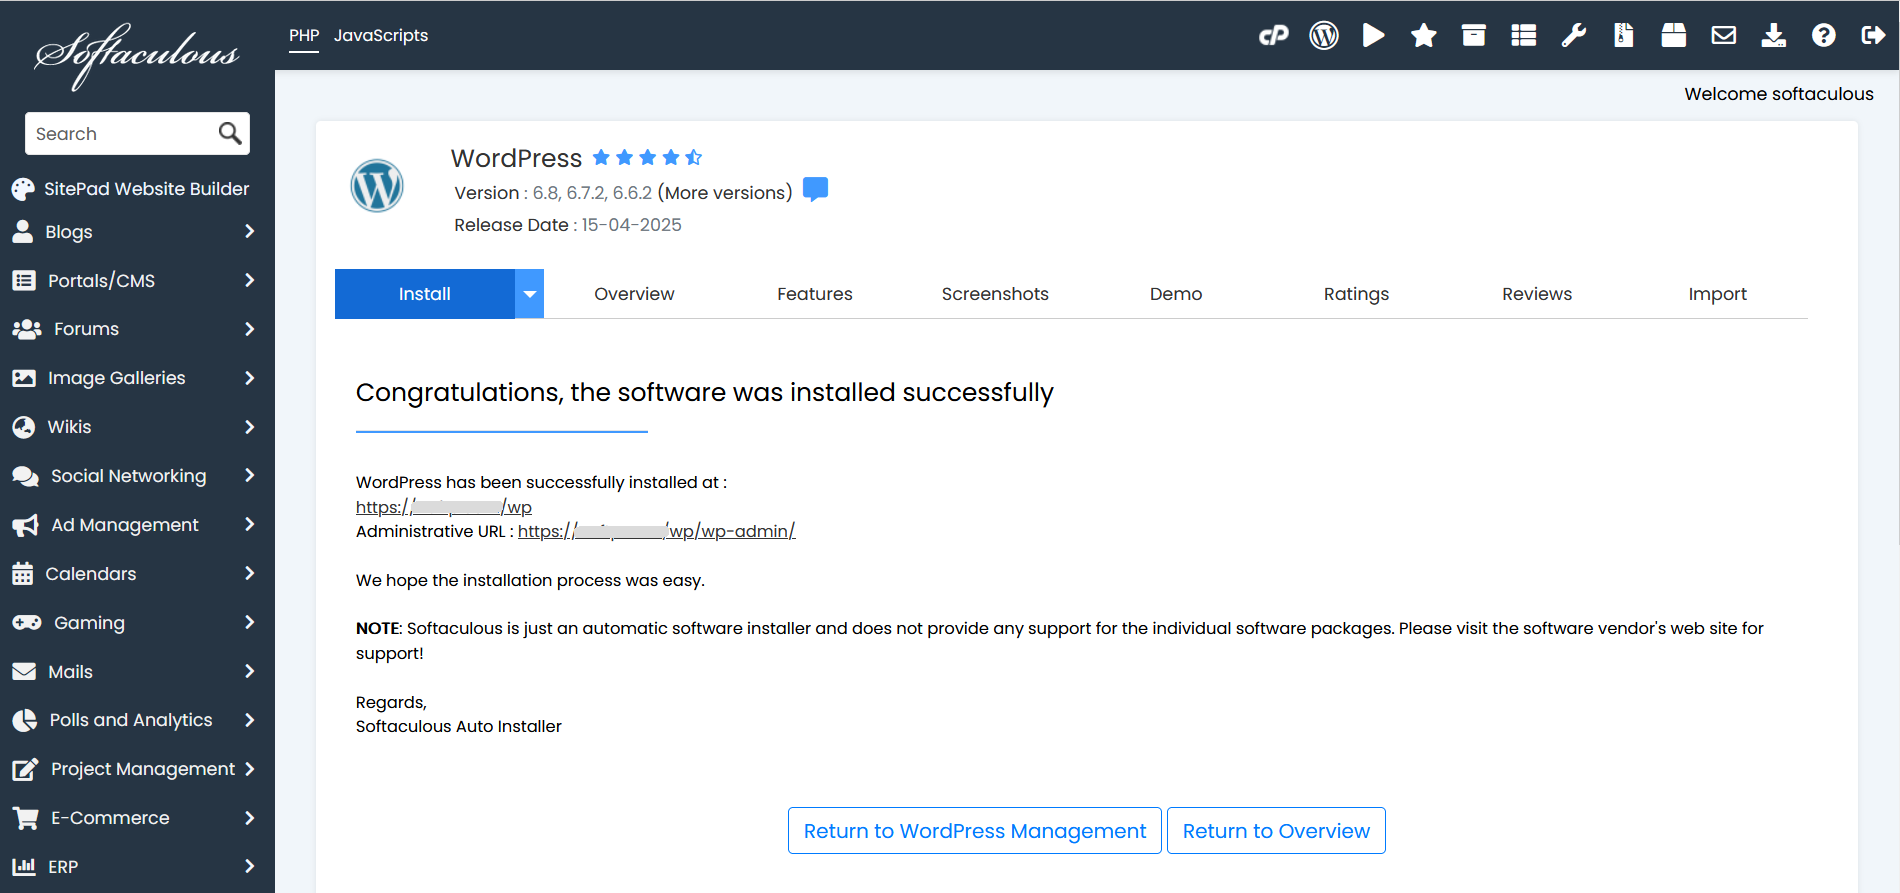
Installing a new WordPress site is made straightforward and efficient with WordPress Manager. Follow these comprehensive steps to get your new website up and running quickly and seamlessly:
- Begin the process by clicking on the prominent Install button. This action will initiate the guided installation wizard.

Auto Login to WordPress Admin Panel
For enhanced convenience and to significantly streamline your workflow, WordPress Manager offers an exclusive auto-login feature. To instantly access your WordPress admin panel as an administrator without the need to manually enter your password, simply click the dedicated "Login" button. This button is conveniently located directly next to your site's URL within the manager interface. This functionality is particularly beneficial for users managing multiple sites, as it saves considerable time and simplifies the overall login process.

Upgrade Installation
Keeping your WordPress installation updated to the latest version is paramount for maintaining optimal security, performance, and access to new features. WordPress Manager proactively notifies you when an update is available for any of your sites. If your installation has a new version, you will observe a clear "Upgrade Now" button conveniently displayed next to the current version number. Simply clicking this button will seamlessly guide you through the upgrade page, ensuring your site remains current with the latest features, security patches, and performance improvements.

Auto Upgrade Core Settings
Maintain the integrity and security of your WordPress core by configuring its auto-upgrade settings to suit your preferences and operational needs. WordPress Manager provides flexible options to meticulously manage how your WordPress core receives updates, ensuring a balance between automation and control:
- Do not Auto Upgrade: Choose this option if you prefer to manually control all core updates. This gives you complete oversight and allows for thorough testing before applying any new version.
- Upgrade to Minor versions only: This prudent setting ensures your site receives essential patch releases and minor updates (e.g., updating from WordPress 5.5.1 to 5.5.x), which typically contain bug fixes and security enhancements. However, it will not automatically upgrade to new major versions (e.g., from 5.5.x to 5.6.x), a strategy often preferred for stability-critical websites.
- Upgrade to latest version available (Major as well as Minor): Select this option for comprehensive automatic updates to both minor and major versions (e.g., from 5.5.1 to 5.5.x, and then seamlessly to 5.6.x when available). This keeps your site on the leading edge of WordPress development, with access to the newest functionalities and improvements as soon as they are released.
Once you select your preferred option, your settings will be automatically saved, and you will receive a success confirmation message, guaranteeing your chosen update strategy is active.

Auto Upgrade Plugins/Themes Settings
Beyond the WordPress core, you can extend the convenience of automation to your site's plugins and themes. WordPress Manager allows you to enable or disable automatic upgrades for these crucial components. When auto-upgrades are enabled for plugins or themes, the system will diligently check for available updates once every 24 hours and apply them automatically. This proactive feature helps ensure that your site's extensions are consistently up-to-date, allowing you to benefit from the latest functionalities, improved compatibility, and crucial security fixes without manual intervention. Simply toggle the Enable/Disable button to instantly save your preference and receive a clear success confirmation.

Enable/Disable Search Engine Visibility
Effectively control whether search engines can crawl and index your WordPress site directly from within WordPress Manager. This setting is directly synchronized with the "Search Engine Visibility" option found within your WordPress Reading settings, offering a centralized point of control. It is a particularly useful feature in several key development and deployment scenarios:
- Disabling Visibility: This is an ideal setting when you are in the process of developing a new site, actively working on a staging environment, or cloning a live site to a development site. Disabling visibility prevents search engines from indexing incomplete, duplicate, or under-construction content, thereby avoiding potential SEO penalties and ensuring a clean launch.
- Enabling Visibility: Once your website is fully complete, thoroughly tested, and ready for public access, enabling this setting instructs search engines to discover, crawl, and index your content. This crucial step makes your site visible in search results and accessible to a wider online audience.
Simply toggle the Enable/Disable button to instantly apply your preference, and a success message will confirm the change has been implemented.

Enable/Disable WordPress CRON
WordPress incorporates a built-in CRON job system (`wp-cron`) that is responsible for automating various scheduled tasks on your site. These tasks include publishing scheduled posts, checking for updates, and performing essential maintenance operations. While incredibly beneficial, on large or heavily trafficked websites, the default WordPress CRON implementation can, at times, consume significant server resources. WordPress Manager provides the flexibility to enable or disable this `wp-cron` setting:
- Disabling `wp-cron`: If you are experiencing performance issues or prefer to manage CRON tasks externally (e.g., by setting up a more robust server-level CRON job), you can disable the WordPress CRON here. This allows for fine-tuned control over task scheduling.
- Enabling `wp-cron`: This is the default and recommended behavior for most sites, allowing WordPress to gracefully handle its scheduled tasks automatically without external intervention.
Simply tap the Enable/Disable button to implement your desired preference, and a confirmation message will clearly appear, indicating the change has been saved.

Enable/Disable WordPress Debug Mode
WordPress Debug Mode, while disabled by default for optimal security and performance, is an exceptionally valuable diagnostic tool. Enabling it can provide crucial insights into any issues you encounter on your site by displaying detailed error messages, warnings, and notices that occur within your site's code. WordPress Manager facilitates the easy toggling of this essential setting:
- Enabling Debug Mode: Activates detailed error reporting, significantly aiding developers and administrators in diagnosing and resolving problems more effectively during development or troubleshooting.
- Disabling Debug Mode: This is strongly recommended for all live production sites. Displaying debug information publicly can pose serious security risks by revealing sensitive information and can also degrade the overall user experience.
Simply click the Enable/Disable button to activate or deactivate debug mode as needed. A success message will confirm your choice has been applied.
Important Note: It is critically advised not to leave debugging mode enabled on your production website. Always ensure debug mode is disabled once you have successfully finished troubleshooting to safeguard your site's security, performance, and user privacy.

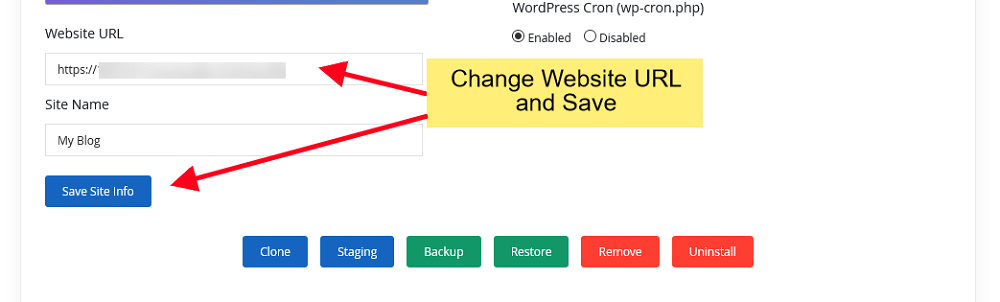
Change Website URL
Should you ever need to update your website's primary URL, or if you find yourself locked out of your WordPress admin panel due to an invalid URL change, WordPress Manager provides a secure and convenient way to rectify this. This feature is particularly helpful if you accidentally modify the site URL from within your WordPress admin panel to an incorrect address. With WordPress Manager, you can easily revert to a previous correct URL or set a new one. Simply modify the "Website URL" value in the designated field and click the "Save Site Info" button. The changes will be applied directly and accurately to your WordPress database, promptly restoring access and full site functionality.
Change Site Name
The display name of your WordPress website can be effortlessly updated using WordPress Manager. This allows you to quickly adjust the title that appears in your WordPress general settings and potentially across various parts of your site's front end, such as the browser tab title or header. Simply enter the new "Site Name" value into the provided field and click the "Save Site Info" button. The updated site name will be automatically and accurately reflected in your WordPress database, ensuring consistency across your installation.

Change Password
Whether you have forgotten your WordPress account password or need to reset the password for any user on your site, WordPress Manager simplifies this critical process with a secure and straightforward utility:
- Access the Manage Users Utility within WordPress Manager. This dedicated interface provides comprehensive options for all aspects of user management.

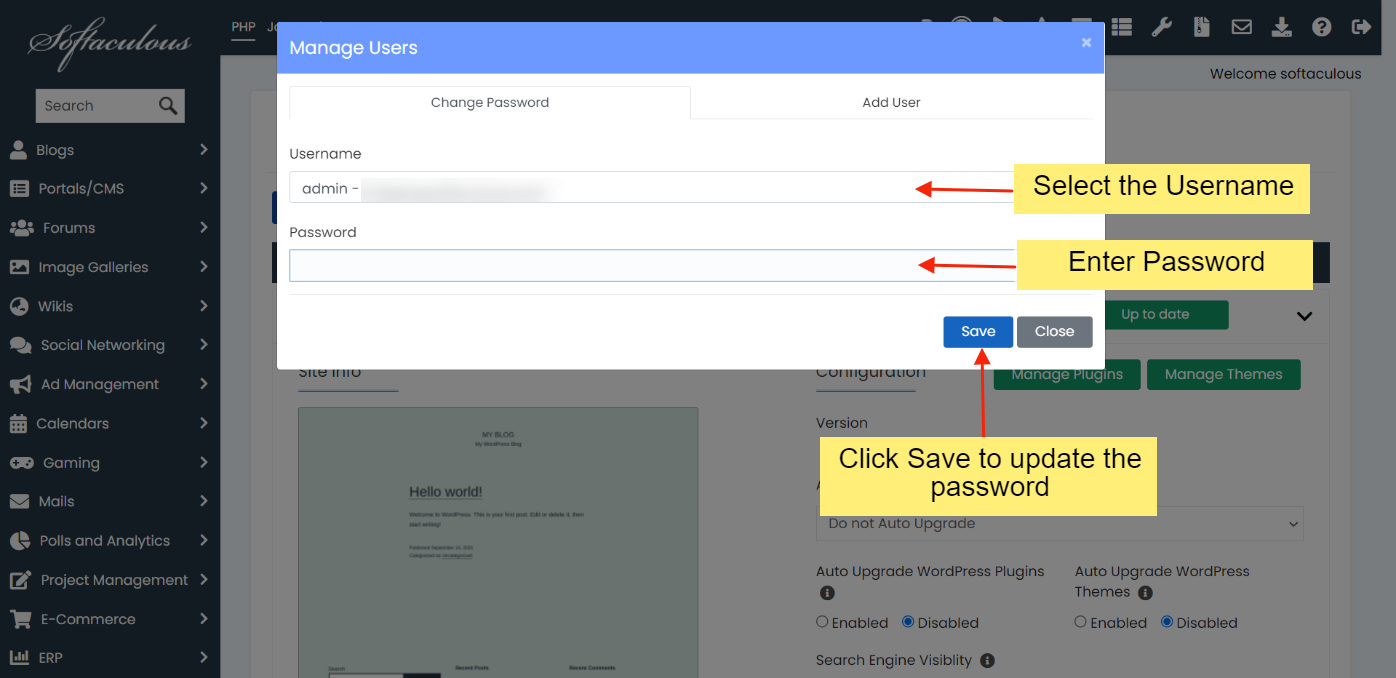
This utility ensures secure and efficient password management for all your WordPress users, enhancing the overall security posture of your website.
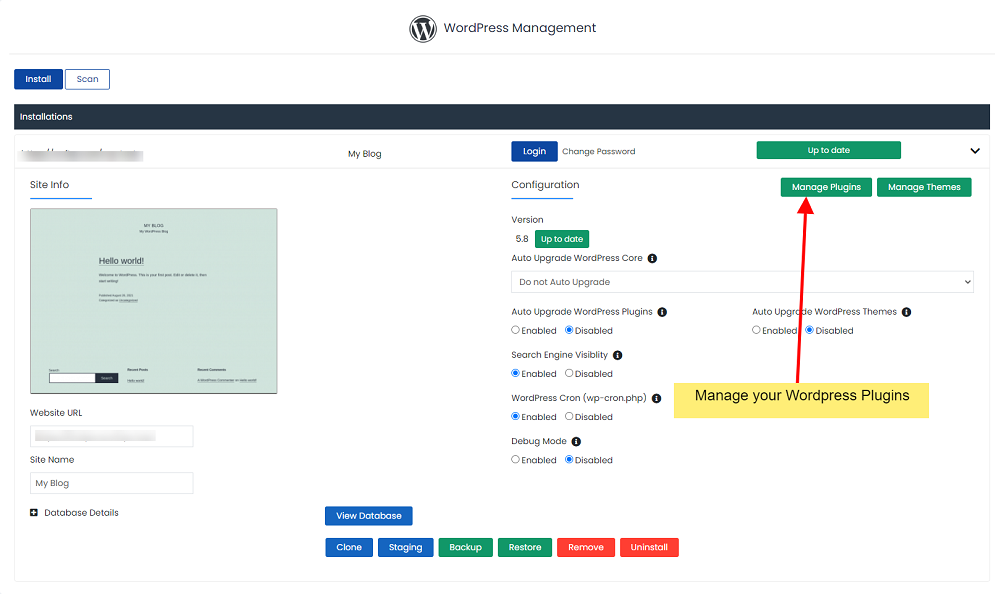
Manage Plugins
WordPress Manager offers a robust and user-friendly suite of tools specifically designed for managing your site's plugins. This comprehensive functionality allows you to easily control their status (activate/deactivate), update them, and introduce new functionalities, all from a single, convenient location.
Installed Plugins
The "Installed" section provides a clear and organized overview of all plugins currently present within your WordPress installation. From this intuitive interface, you are granted complete control to activate, deactivate, or safely delete plugins as needed. This ensures your site's functionality remains precisely optimized, secure, and free from unnecessary or conflicting extensions.

Add New Plugins
Expand your website's capabilities and introduce new features effortlessly by adding new plugins. The "Add Plugins" section allows you to seamlessly search the extensive official wordpress.org plugin directory and install any desired plugin directly to your site. A key benefit is that selected plugins are automatically activated upon installation, saving you an additional step and immediately integrating new functionalities into your website.

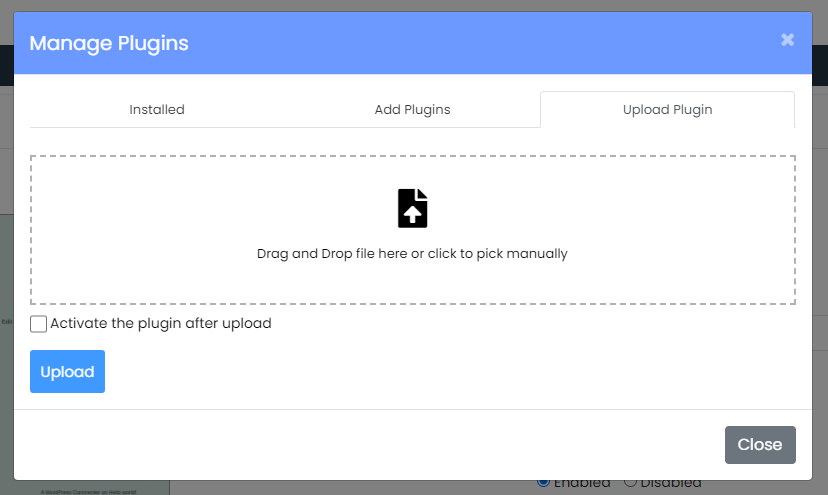
Upload Plugin
For plugins not available directly through the wordpress.org repository, such as premium plugins, custom-developed solutions, or those obtained from third-party marketplaces, the "Upload Plugin" section provides a convenient and secure method for installation. This feature allows you to install a plugin by simply uploading its compressed zip file, and WordPress Manager will handle the extraction and integration process for you.
Manage Themes
Just like with plugins, WordPress Manager offers robust and intuitive capabilities for theme management, empowering you to control your site's appearance, design, and overall aesthetic with remarkable ease and flexibility.
Installed Themes
The "Installed" section presents a comprehensive and organized list of all themes currently installed on your WordPress site. From this interface, you can effortlessly activate, deactivate, or securely delete themes, allowing you to easily switch between different designs or remove unused templates to maintain a clean, efficient, and well-organized installation.

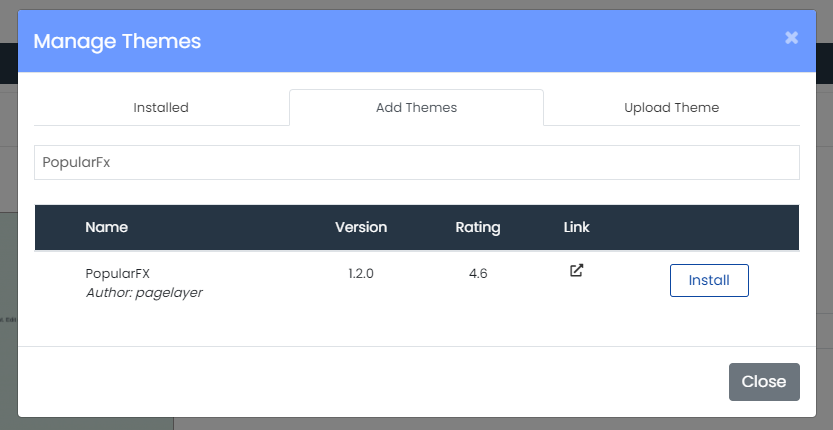
Add New Themes
Explore an extensive collection and install new themes directly from the official wordpress.org repository using the "Add Themes" section. This feature significantly streamlines the process of discovering and applying fresh designs to your website. Upon successful installation, the selected theme is automatically activated, gracefully replacing any previously active theme and instantly transforming your site's visual appearance.
Upload Theme
For themes not readily available in the wordpress.org directory, such as premium themes purchased from marketplaces or custom-developed designs, the "Upload Theme" section offers a straightforward and secure installation method. This functionality allows you to install a theme by simply uploading its compressed zip file, providing maximum flexibility and ensuring you can apply any theme to your WordPress installation with utmost ease.

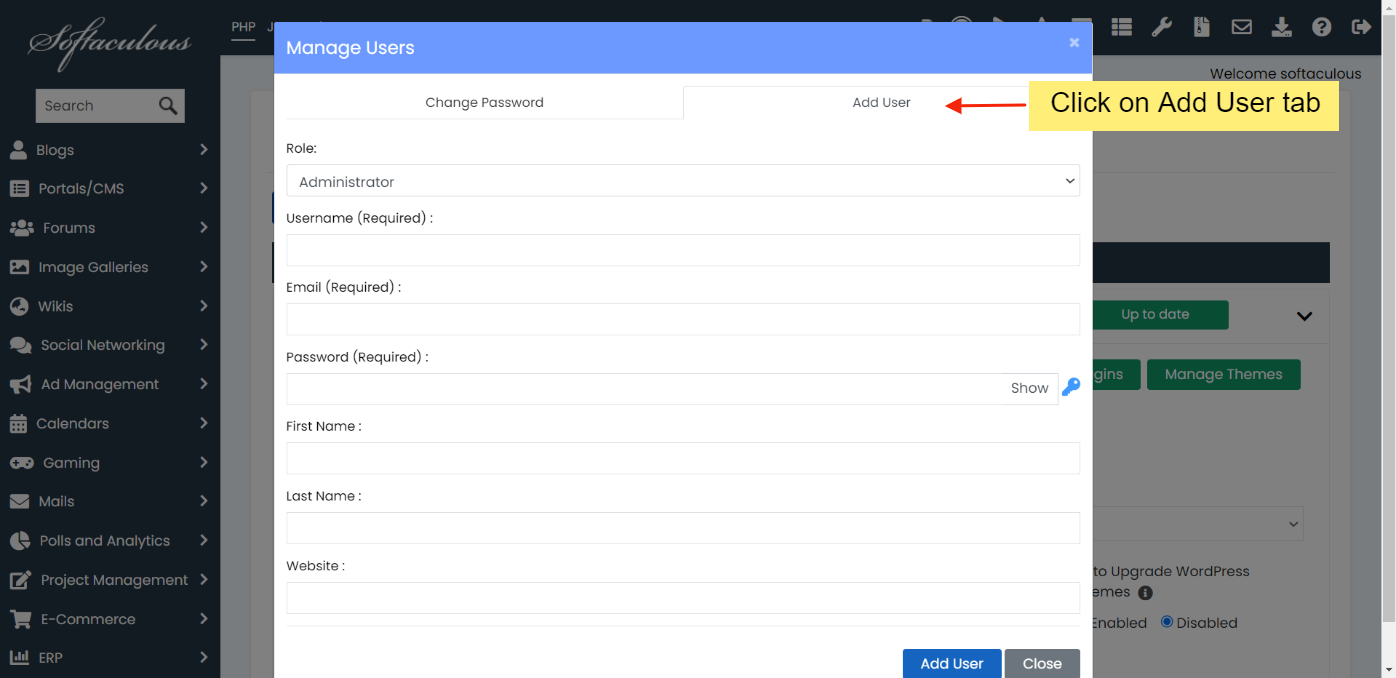
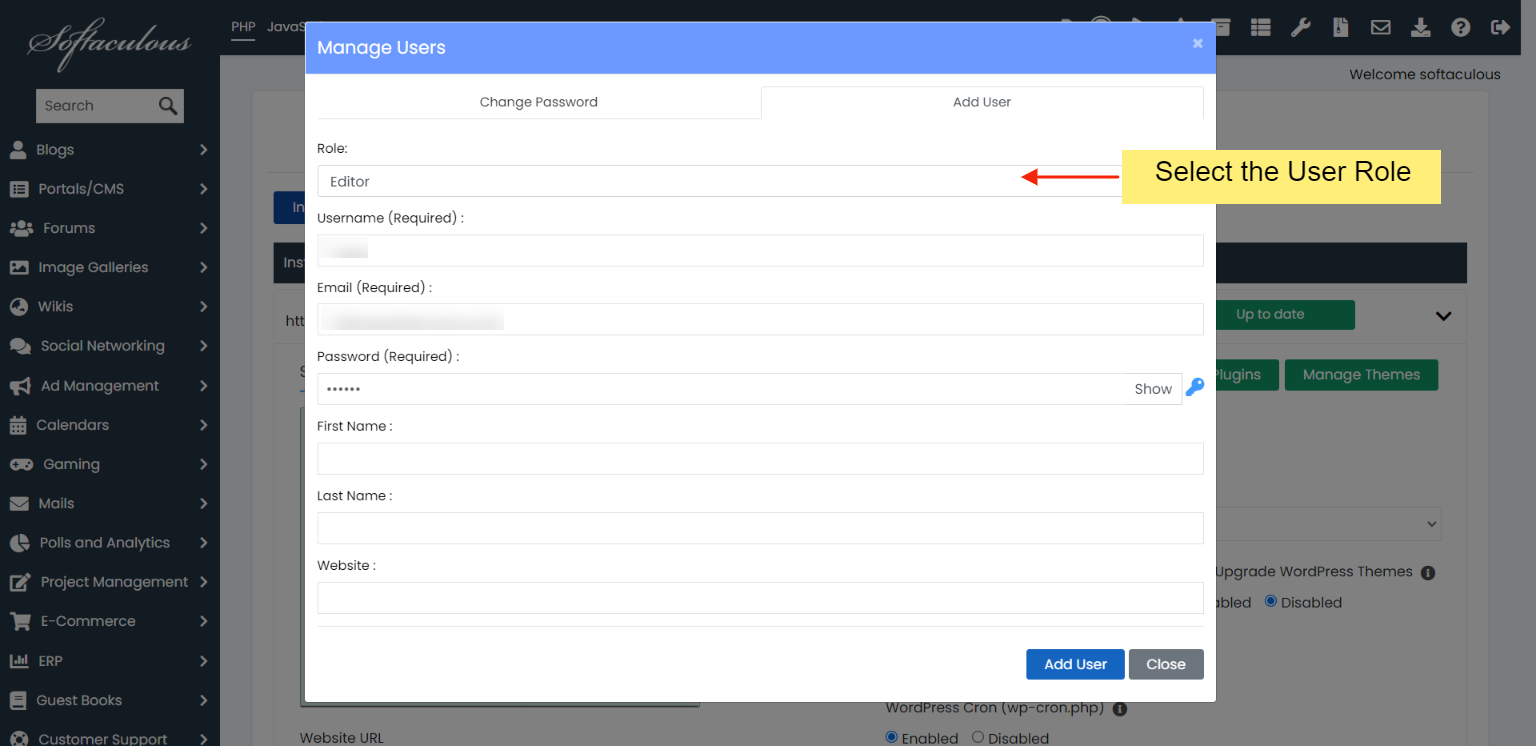
Add User
WordPress Manager by Softaculous comes equipped with a convenient, built-in tool that simplifies the process of adding new users to your WordPress blog. This utility supports assigning various roles, such as Editors, Authors, or Subscribers, directly from your control panel, streamlining user administration significantly:
- Access the Manage Users Utility within WordPress Manager. This dedicated interface provides a comprehensive set of options for overseeing and adding new users.

Install Featured Plugins
The Softaculous team has diligently developed a comprehensive suite of powerful WordPress plugins and themes, specifically designed to equip your website with essential functionalities right out of the box. These carefully curated featured offerings cover critical areas such as robust security solutions, reliable backup systems, advanced SEO tools, efficient caching mechanisms, intuitive page builders, dependable SMTP services, and comprehensive file management capabilities, alongside a versatile theme boasting an impressive library of over 600 professionally designed templates.
Notably, the Pro versions of these premium plugins and themes are often included as a valuable benefit of your Softaculous license. If you or your hosting provider maintains an active Softaculous license, you are entitled to enjoy the full, premium features of these powerful tools at no additional cost, providing significant value.
To effortlessly install these valuable plugins and themes across your WordPress installations, follow these straightforward steps:
- Access Softaculous from your control panel as you normally would, navigating to its main interface.
- Proceed to the WordPress Manager section, where you oversee all your WordPress sites.
- Carefully select all the WordPress installations on which you wish to deploy the plugins. After making your selections, click on the distinctive Featured Plugins button to proceed.
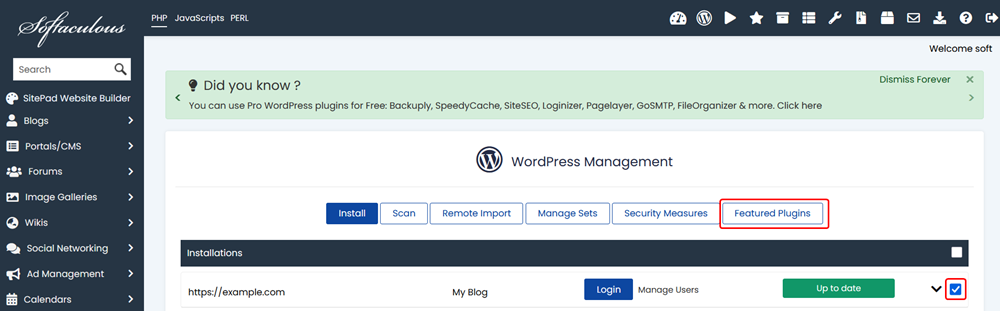
(Image: Select WordPress Installations and click on Featured Plugins button to continue)
On the subsequent screen, easily locate the specific plugin you want to install and click the corresponding Install button next to it. The plugin will be automatically installed and activated across all the WordPress installations you selected in the previous step, ensuring consistent functionality.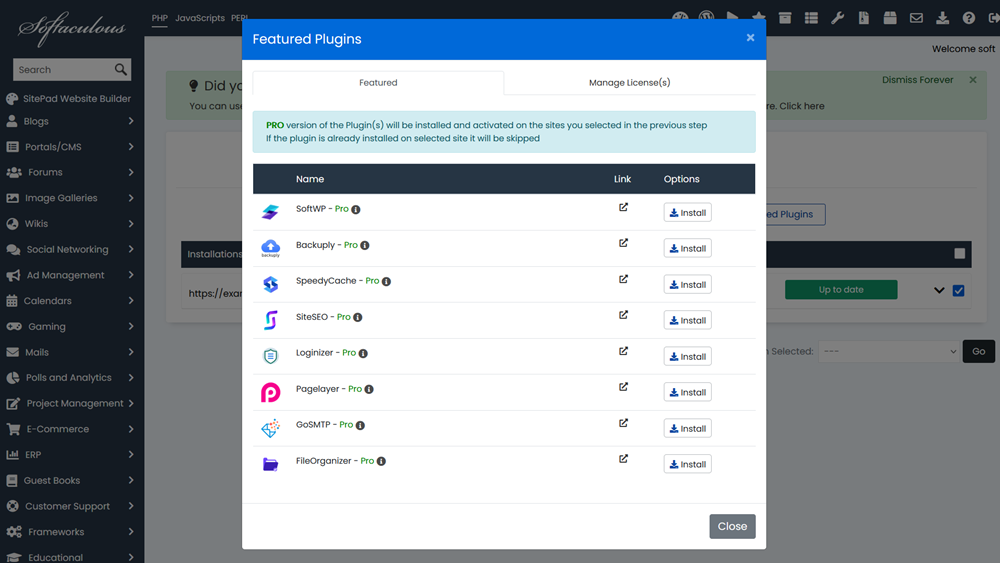
(Image: Click on the Install button to deploy the plugins you wish to use)
License Information: For each WordPress site, a unique license (identifiable by a prefix of SOFTWP-) will be automatically generated. This license will be universally utilized for all the aforementioned Pro plugins. The validity period of this license is precisely synchronized with your Softaculous license expiry date, thereby guaranteeing continuous access to these premium features as long as your Softaculous license remains active.
WordPress Manager is a dynamic and continuously evolving platform. Anticipate even more powerful features, enhancements, and functionalities in upcoming versions, all designed to further simplify and optimize your WordPress administration tasks, making site management more effortless than ever before.
