


Effectively managing server operations often requires the execution of specific scripts or commands at predetermined intervals. Plesk Obsidian provides a robust task scheduler, commonly known as Cron jobs on Linux systems, to automate these processes. This powerful facility ensures your system automatically runs essential scripts, performs routine maintenance, or executes data processing tasks precisely when needed, enhancing server efficiency and reliability.
Managing Scheduled Tasks
Viewing and Interacting with Existing Tasks
To gain a comprehensive overview of all scheduled tasks configured across your server, including those established at the subscription level and global server-level tasks, navigate to Tools & Settings, then select Scheduled Tasks (Cron jobs). This central interface allows for easy monitoring and management.
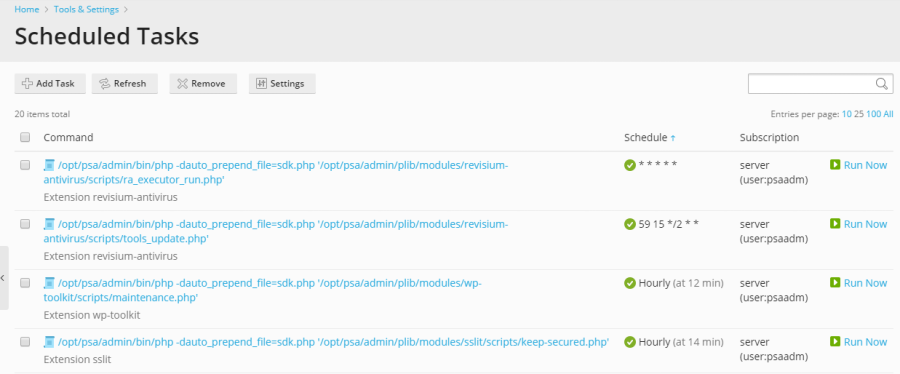
The scheduled tasks interface offers various functionalities for efficient management. You can sort tasks by command, associated subscription, or schedule. Sorting by schedule is particularly useful for diagnosing periods of high server load, as it can help identify resource-intensive tasks running concurrently. For each entry in the list, you have the flexibility to:
- Edit Properties: Click on the task's name to modify its settings and parameters.
- Activate: Enable a deactivated task by clicking the
 icon.
icon. - Deactivate: Temporarily disable a running task by clicking the
 icon.
icon. - Run Immediately: Execute the task on demand, outside of its scheduled time, which is useful for testing or immediate execution.
Important Note for Plesk for Linux Users: By default, scheduled tasks initiated by Plesk users operate within a chrooted shell environment. This security measure confines the task's file system root to the respective system user's home directory. While significantly enhancing server security by isolating user processes, this configuration can sometimes restrict the operational scope for Plesk users. Should you need to modify the shell environment for scheduled tasks across all Plesk users, navigate to Tools & Settings > Scheduled Tasks > Settings. For a deeper understanding of the available shell settings and their implications, please consult the Scheduled tasks shell setting documentation.
Creating New Scheduled Tasks
To configure a new automated task on your server, begin by navigating to Tools & Settings, then Scheduled Tasks, and finally click on Add Task. The initial step involves selecting the appropriate task type that aligns with your specific automation requirements. Plesk offers three distinct task types:
Understanding Task Types
- Run a command: This option allows you to execute any executable file on your server. This includes direct binary files, custom shell scripts (e.g.,
.shfiles), or batch files (on Windows servers). You must provide the complete and absolute path to the executable. - Fetch a URL: Ideal for triggering web-based actions, this task type simply fetches a specified URL. There is no need to manually input commands like `curl` or `wget`; Plesk handles the underlying HTTP request. This is commonly used for triggering cron-like jobs within web applications.
- Run a PHP script: Specifically designed for PHP applications, this task allows you to execute a PHP script directly. You need to specify the full path to the script, for example:
/tmp/script.php. Plesk will execute it using the appropriate PHP interpreter configured on your server.
Configuring Schedule and Settings
After selecting the task type, the next critical step is to define its execution schedule. You will specify how frequently the task should run, along with the precise time and date. By default, all scheduled times are interpreted in the server's local time zone. If your operational requirements necessitate a different time zone for task execution, you can adjust this global setting by navigating to Tools & Settings > Scheduled Tasks > Settings.
Beyond basic scheduling, Plesk offers additional configuration options to refine your task:
- Description: Provide a clear and concise description for your task. This helps in identifying the task's purpose at a glance, especially when managing numerous automated processes.
- System User: Choose the system user under whose security context the task will be executed. This is crucial for permissions and ensuring the task has the necessary access to files and resources.
- Notifications: Configure notification settings to receive alerts regarding task completion or failures. This ensures you are promptly informed about the status of your automated operations.
Testing Your Task
Before finalizing and saving your new scheduled task, it is highly recommended to perform a test run. The "Run Now" option allows you to execute the task immediately, enabling you to verify its configuration and expected behavior. After clicking Run Now, monitor the task's progress and wait for its completion. Should the task conclude with an error during this test phase, it is imperative to diagnose and resolve the underlying issue. Any task that fails during a manual test run will similarly fail when automatically executed by the scheduler, highlighting the importance of thorough testing to ensure reliable automation.
