


The WordPress Manager is a powerful and intuitive utility designed to centralize the management of all your WordPress installations in one convenient location. This robust tool allows users to effortlessly update various settings for their WordPress sites without the need to log directly into the WordPress admin panel, significantly streamlining your workflow and enhancing efficiency.
Note: This essential feature was introduced with Softaculous version 5.6.1, marking a significant enhancement in WordPress management capabilities.
Contents
- Overview
- Accessing WordPress Manager
- Install WordPress
- Auto Login to WordPress Admin Panel
- Upgrade Installation
- Auto Upgrade Core Settings
- Auto Upgrade Plugins and Themes Settings
- Enable/Disable Search Engine Visibility
- Enable/Disable WordPress CRON
- Enable/Disable WordPress Debug Mode
- Change Website URL
- Change Site Name
- Change Password
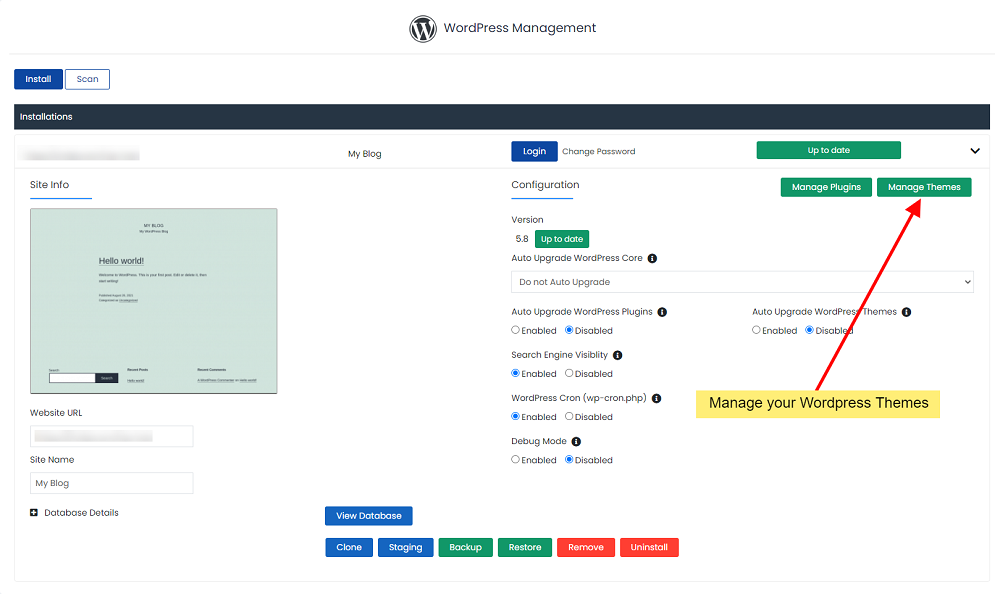
- Manage Plugins
- Manage Themes
- Add User
- Install Featured Plugins
Overview
The WordPress Manager serves as a comprehensive tool designed to centralize the management of all your WordPress installations efficiently. This powerful utility enables you to effortlessly update and configure various settings for your WordPress sites, significantly reducing the need to log into each WordPress admin panel individually. It offers a streamlined approach to maintaining multiple WordPress websites from a single, convenient location.
Accessing WordPress Manager
There are two straightforward methods to access the WordPress Manager:
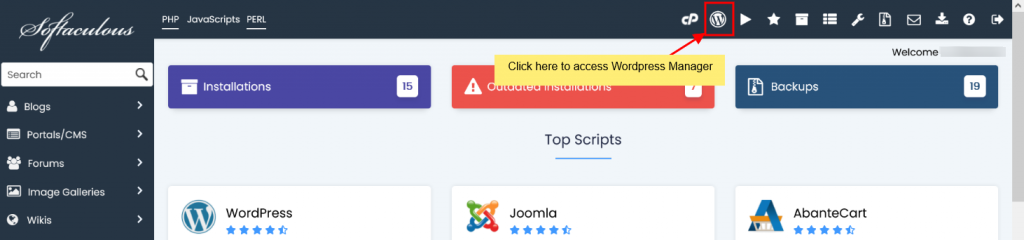
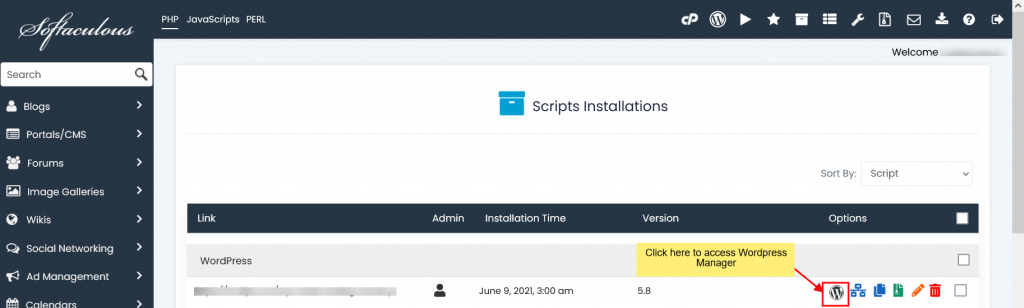
- Method 1: Navigate to your Softaculous end-user panel and locate the "WordPress" icon situated in the upper-right corner. Clicking this icon will grant you immediate access to the WordPress Manager interface.
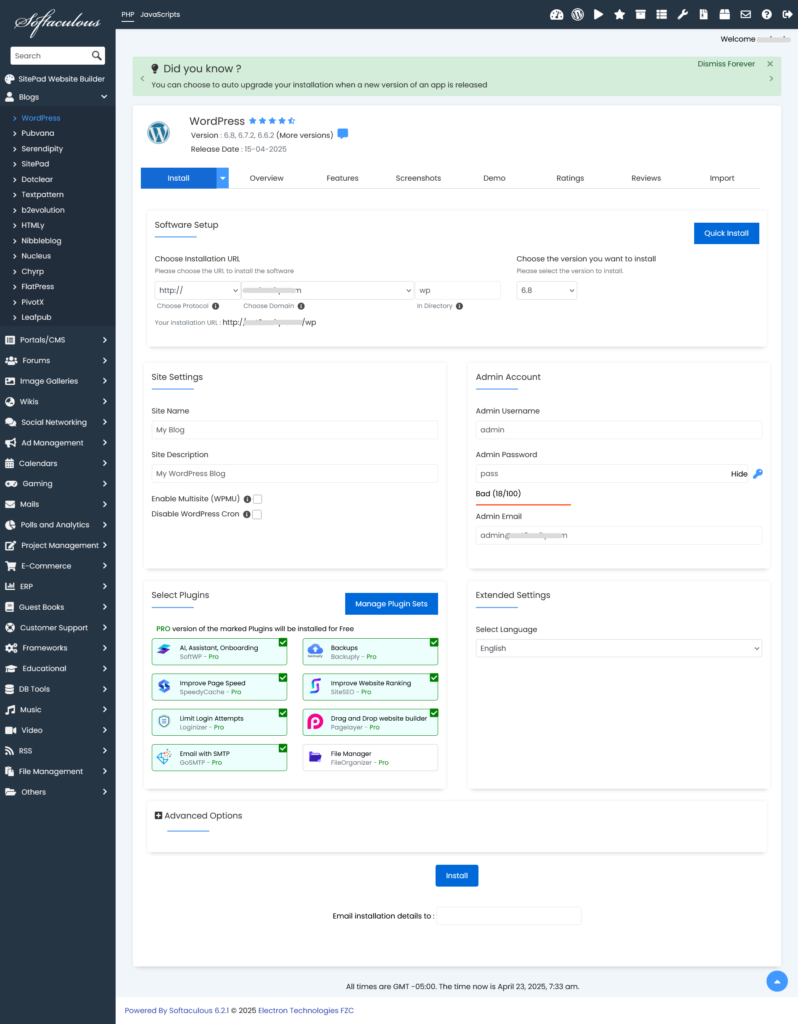
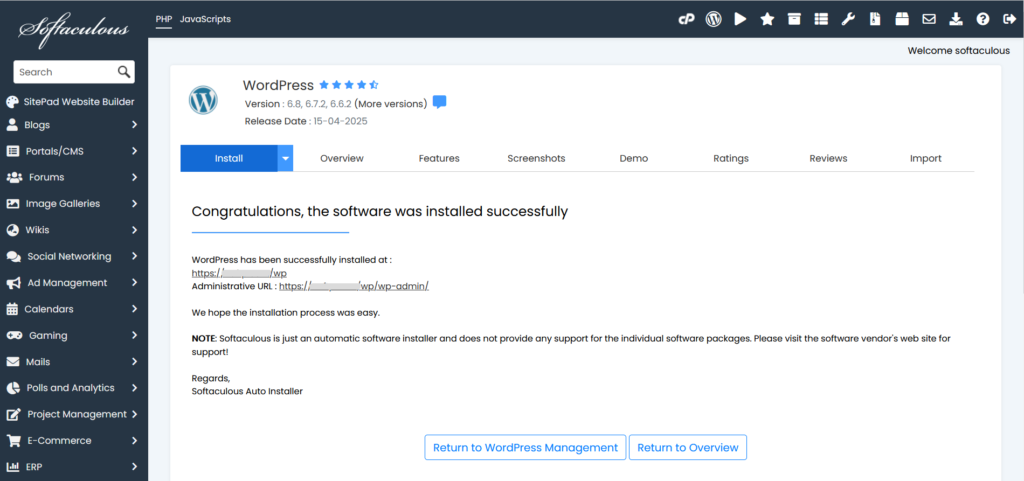
Install WordPress
Installing a new WordPress site through the WordPress Manager is a simple, guided process:
- Initiate the installation by clicking on the dedicated Install button.

Auto Login to WordPress Admin Panel
To effortlessly access your WordPress admin panel as an administrator without repeatedly entering your password, simply click the "Login" button located conveniently next to your site's URL within the WordPress Manager. This feature provides quick and secure access.

Upgrade Installation
Keeping your WordPress installation updated is crucial for security and performance. If an update is available for your WordPress site, the WordPress Manager will display an "Upgrade Now" button adjacent to your current version number. Clicking this button will guide you directly to the upgrade page, ensuring your site remains current with the latest features and security patches.

Auto Upgrade Core Settings
The WordPress Manager offers flexible auto-upgrade settings for your WordPress core, allowing you to choose how your site handles updates automatically:
- Do not Auto Upgrade: Select this option if you prefer to manage all core updates manually, giving you complete control over when and how updates are applied.
- Upgrade to Minor versions only: This setting ensures your WordPress core is automatically updated only for minor releases (e.g., updating from 5.5.1 to 5.5.x, but not to 5.6.x). This is ideal for maintaining stability while still receiving important bug fixes and security patches within the current major version.
- Upgrade to latest version available (Major as well as Minor): Choosing this option allows Softaculous to automatically upgrade your WordPress core to the very latest available version, encompassing both minor and major releases (e.g., updating from 5.5.1 to 5.5.x, and then to 5.6.x when a new major version becomes available). This ensures your site always runs on the newest and most feature-rich version.
Once you've made your selection, the preference will be automatically saved, and a success message will confirm your chosen auto-upgrade setting.

Auto Upgrade Plugins and Themes Settings
Take control of your plugin and theme updates with the WordPress Manager's auto-upgrade feature. You can choose to enable or disable automatic upgrades for both your installed plugins and themes. When enabled, the system will perform checks for updates every 24 hours and apply them automatically. Simply toggle the Enable/Disable button to set your preference, and a success message will confirm your changes, keeping your site's components effortlessly up-to-date.

Enable/Disable Search Engine Visibility
The WordPress Manager allows you to easily manage your site's search engine visibility, mirroring the setting found in WordPress Reading options. This feature is particularly useful in several scenarios:
- If you are working on a development site, a staging environment, or a clone of your live site, you can disable search engine visibility to prevent search engines from indexing incomplete or duplicate content.
- For websites still under construction, disabling this setting ensures that search engines do not crawl and index your site before it is fully ready for public viewing.
Conversely, once your website is complete and ready for public exposure, you can enable this setting to allow search engines to crawl and index your content, improving your site's discoverability. A simple click on the Enable/Disable button saves your preference instantly, followed by a success notification.

Enable/Disable WordPress CRON
WordPress includes a built-in CRON job system that automates various scheduled tasks on your website, such as publishing scheduled posts, checking for updates, and performing maintenance operations. While essential for many sites, on very large websites with extensive traffic or complex operations, the default WordPress CRON can sometimes consume significant server resources.
The WordPress Manager provides the flexibility to enable or disable this wp-cron setting according to your site's needs. If you find that the default CRON is impacting your server performance, you can disable it here and potentially set up a server-level CRON job for more optimized execution. Toggling the Enable/Disable button saves your preference immediately, accompanied by a success message.

Enable/Disable WordPress Debug Mode
The WordPress debug mode, which is disabled by default, is an invaluable tool for troubleshooting and diagnosing issues on your website. When activated, it displays errors, warnings, and notices that can help developers and site administrators identify the root cause of problems.
You can conveniently enable or disable this debug mode directly from the Softaculous WordPress Manager. Simply click the Enable/Disable button to activate or deactivate it, and your preference will be saved with a success confirmation.
Note: It is strongly advised not to leave debugging mode enabled on a live production website. Once you have finished debugging and resolved any issues, always remember to disable debug mode to prevent sensitive information from being exposed and to maintain optimal site performance.

Change Website URL
Accidentally changed your WordPress site's URL from the admin panel to an invalid address, leaving you locked out? The Softaculous WordPress Manager offers a quick and effective solution. You can easily modify your website's Site URL directly through this interface.
Simply update the "Website URL" field with the correct address and click the "Save Site Info" button. The WordPress Manager will automatically update this URL in your WordPress database, restoring access and ensuring your site functions correctly.
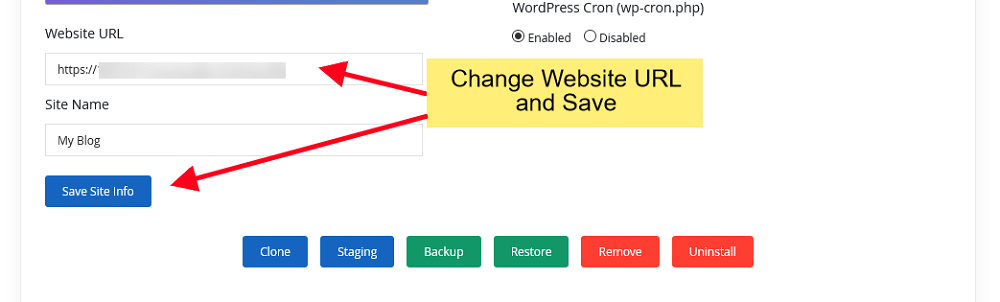
Change Site Name
Should you need to update the display name of your WordPress website, the Softaculous WordPress Manager provides a simple way to do so. Modify the "Site Name" value in the designated field and then click the "Save Site Info" button. The new site name will be automatically reflected in your WordPress database, ensuring consistency across your installation.

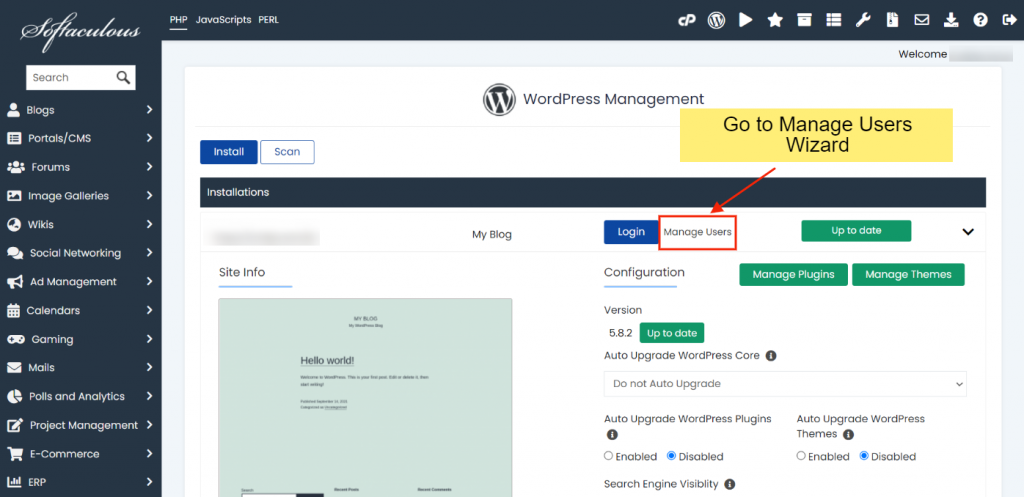
Change Password
Whether you've forgotten your password for a WordPress account or need to reset the password for any user on your site, the Softaculous WordPress Manager offers a secure and straightforward utility:
- Access the Manage Users Utility within the WordPress Manager.

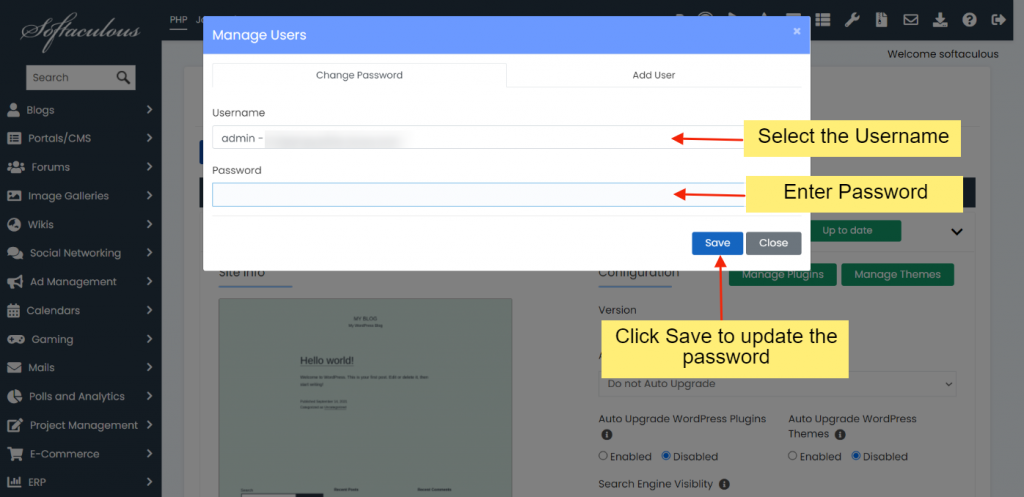
This process allows for quick and secure password resets for any user account associated with your WordPress installation.
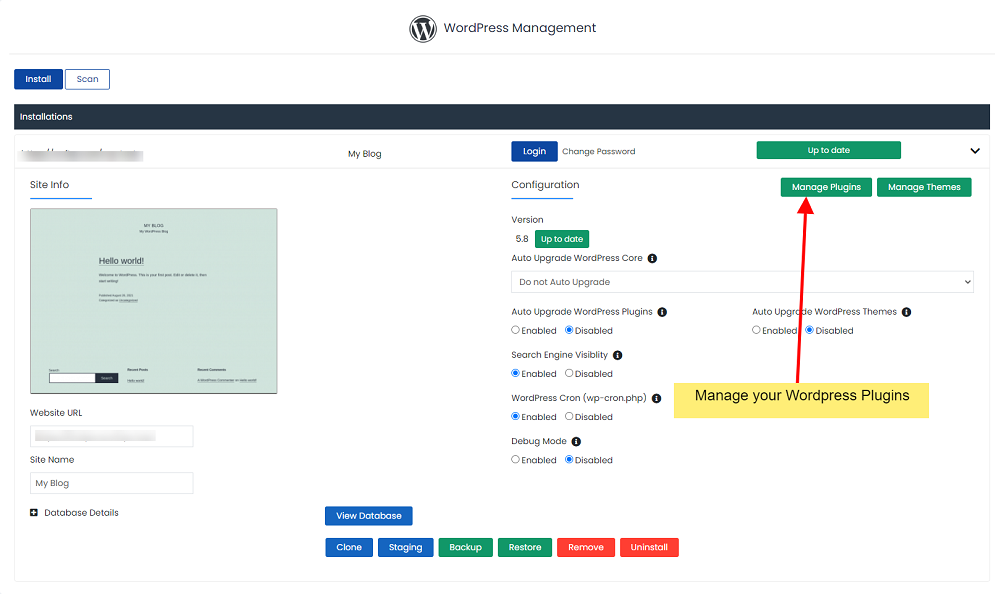
Manage Plugins
The WordPress Manager provides a comprehensive interface for managing all aspects of your WordPress plugins, enabling you to maintain and enhance your site's functionality with ease.
Installed Plugins
This section displays a detailed list of all plugins currently installed on your WordPress site. From here, you have full control to activate, deactivate, or delete plugins as needed, ensuring your site's performance and security are optimized.

Add Plugins
The "Add Plugins" section simplifies the process of expanding your site's capabilities. You can search for and install any plugin directly from the official WordPress.org repository. Plugins selected for installation are automatically activated upon successful integration, making it quick and easy to introduce new features.

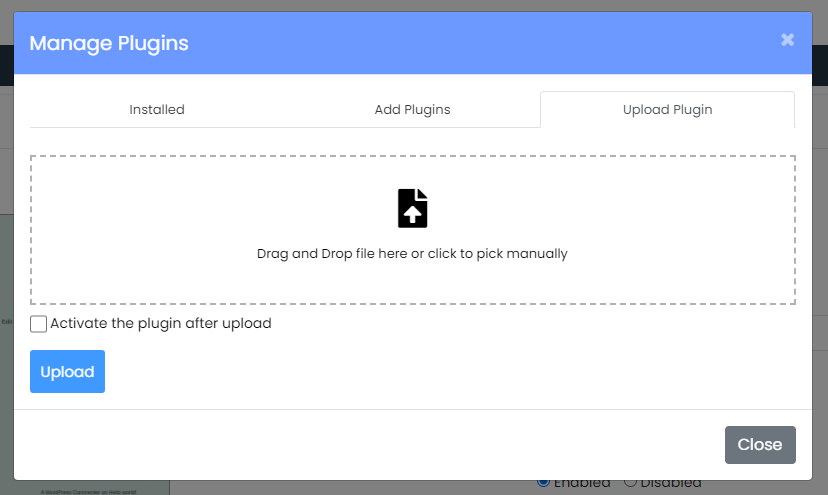
Upload Plugin
For plugins not available directly from the WordPress.org repository, or for custom plugins, the "Upload Plugin" section allows you to install them by simply uploading their ZIP file. This provides flexibility for installing premium or custom-developed solutions.
Manage Themes
Effectively managing your website's appearance is crucial, and the WordPress Manager offers a dedicated area for handling all your WordPress themes, allowing for seamless design changes and updates.
Installed Themes
In this section, you'll find a comprehensive list of all themes installed on your WordPress installation. You can easily activate or deactivate themes, and even delete those no longer in use, helping to keep your site clean and performant.

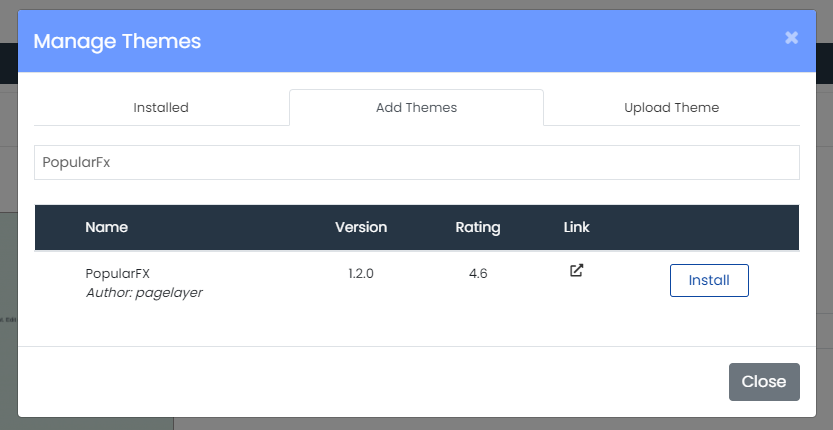
Add Themes
Discover and install new themes from the vast collection available on WordPress.org directly through the "Add Themes" section. When you install a new theme here, it is automatically activated, replacing any previously active theme and instantly updating your site's design.
Upload Theme
The "Upload Theme" section provides a convenient method for installing themes by uploading their ZIP files. This is particularly useful for premium themes or custom-developed themes that are not available through the standard WordPress.org repository.

Add User
Do you need to add new users to your WordPress blog with specific roles, such as Editors, Authors, or Contributors? The Softaculous WordPress Manager includes a powerful built-in tool specifically for adding WordPress users with various access levels.
- Begin by navigating to the Manage Users Utility within the WordPress Manager.


Install Featured Plugins
The Softaculous team has developed a suite of essential WordPress plugins and a versatile theme designed to provide robust features for your WordPress website. These include solutions for critical aspects such as Security (Loginizer), Backups (Backuply), SEO (Site SEO), Cache (SpeedyCache), a Page builder (Pagelayer), SMTP (GoSMTP), a File Manager (File Organizer), and a theme offering over 600 templates (PopularFX).
A significant advantage is that the Pro versions of these plugins and themes are included with your Softaculous license. This means if you or your hosting provider has already purchased a Softaculous license, you can enjoy the premium features of these tools at no additional cost, enhancing your website without extra investment.
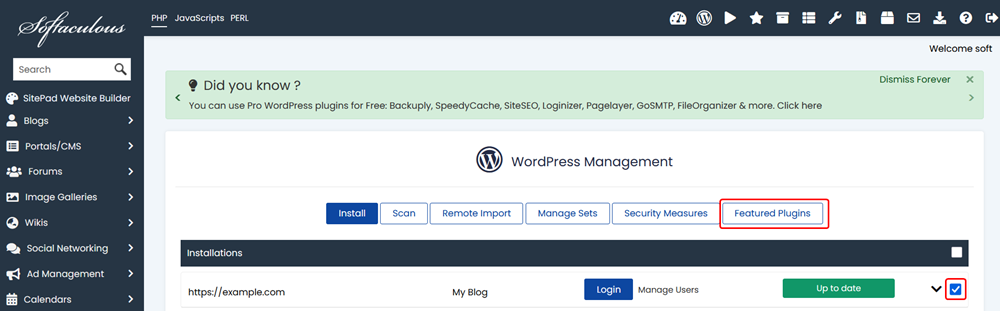
To install these valuable featured plugins, follow these simple steps:
- Access Softaculous from your control panel.
- Click on the WordPress Manager option.
- Select all the WordPress installations where you intend to install these plugins. After making your selections, click the Featured Plugins button.
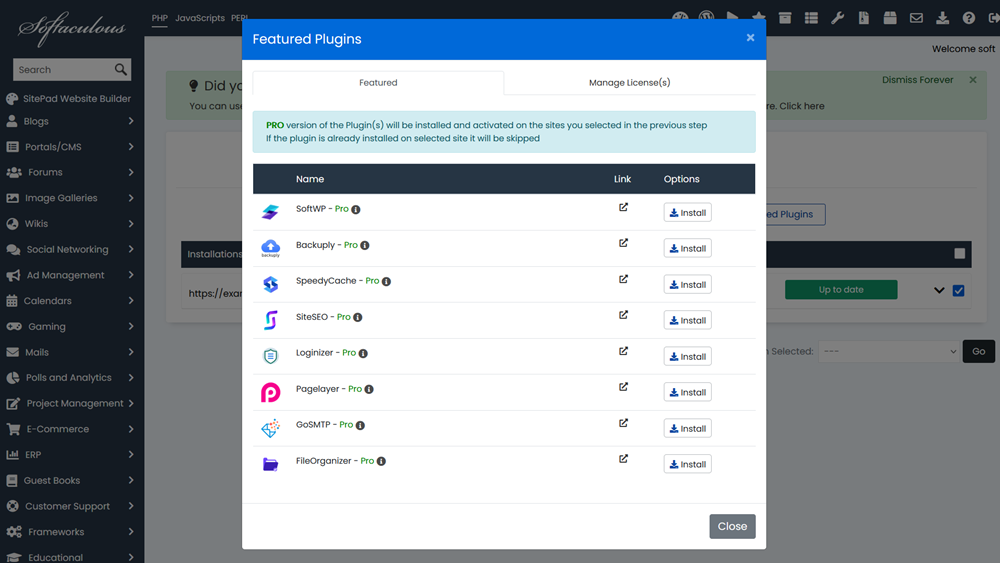
Important Note: A unique license, starting with "SOFTWP-", will be automatically generated for each WordPress site. This license will be utilized for all the aforementioned Pro plugins. The validity of this license is synchronized with your Softaculous license expiry date, ensuring continuous access to premium features as long as your Softaculous license remains active.
The WordPress Manager is continuously evolving, with additional features planned for release in upcoming versions to further enhance your WordPress management experience and provide even greater control over your websites.
