


This guide provides a comprehensive overview of configuring LiteSpeed Web Server in conjunction with Plesk. It covers essential setup procedures, PHP management, caching mechanisms, security enhancements, and other advanced configurations to optimize your web server performance and security.
LiteSpeed Web Server Configuration Overview
PHP Configuration with LiteSpeed and Plesk
LiteSpeed Web Server seamlessly integrates with Plesk PHP environments right out of the box. For optimal compatibility, the PHP handler within Plesk must be configured to FastCGI. This setting is crucial to prevent common mismatched PHP settings issues. By default, LiteSpeed respects Plesk's PHP configurations, requiring no additional setup. However, for users leveraging CloudLinux PHP Selector as their primary PHP management tool, specific extra handlers will be necessary, which will be detailed in a subsequent section on CloudLinux PHP Selector integration.
Disabling PHP Overrides in .htaccess
While configuring your web environment, you may find it necessary to disable PHP overrides within .htaccess files when using LiteSpeed Web Server.
Traditionally, php_value and php_flag directives are employed in Apache configurations or .htaccess files to modify php.ini settings. However, these directives are primarily supported by Apache's mod_php handler, which is largely deprecated in modern control panel systems, having been superseded by more efficient alternatives like php-fpm, FastCGI, or LSPHP. Consequently, attempting to use php_value or php_flag in .htaccess with Apache typically results in an error. For more detailed information, refer to Plesk's official documentation.
Common errors encountered in such scenarios include:
500 internal server error503 Invalid command 'php_flag', perhaps misspelled or defined by a module not included in the server configuration. The following error can be found in the domain error log in Domains > example.com > Logs: /var/www/vhosts/example.com/httpdocs/.htaccess: Invalid command 'php_value', perhaps misspelled or defined by a module not included in the server configuration/var/www/vhosts/example.com/httpdocs/.htaccess: Invalid command 'php_flag', perhaps misspelled or defined by a module not included in the server configuration/var/www/vhosts/example.com/httpdocs/.htaccess: RewriteRule: bad flag delimiters/var/www/vhosts/example.com/public_html/.htaccess: Invalid command 'suPHP_ConfigPath', perhaps misspelled or defined by a module not included in the server configuration.
LiteSpeed Web Server, utilizing LSPHP, inherently supports the use of php_value and php_flag directives within .htaccess files. This means LSWS will not generate a 500 error in such cases, demonstrating a higher tolerance for these PHP overrides compared to Apache.
Nonetheless, there might be situations where disabling these PHP overrides in .htaccess is desired even with LiteSpeed. This can be achieved using the dedicated Apache directive DisablePhpOverride htaccess. This directive is applied at the server level, typically within httpd.conf.
For Plesk environments, you can implement this by creating a file named DisablePhpOverrideLiteSpeed.conf in the appropriate directory, which varies based on your operating system:
- For Debian/Ubuntu systems, place the file in
/etc/apache2/conf-enabled. - For CentOS/RHEL systems, place the file in
/etc/httpd/conf.d/.
The DisablePhpOverrideLiteSpeed.conf file should contain the following configuration block:
<IfModule LiteSpeed>
  DisablePhpOverride htaccess
</IfModule>
After creating this file, a server restart might be necessary for the changes to take effect.
Customizing PHP External Application Configuration
Since LiteSpeed Web Server version 5.3, PHP detection has been automated, eliminating the need for manual PHP external application configuration. Plesk is now the preferred and default manager for PHP versions.
However, scenarios may arise where a customized configuration for a specific PHP version is required. In such instances, you will need to manually create and configure the external application.
You can create individual lsphpXX applications (e.g., lsphp70, lsphp71, lsphp72, and so forth) directly from the LSWS Admin Console. The process involves navigating to the relevant section and adjusting the settings.
When creating these applications, ensure that the Name, Address, and Command settings are accurately updated to correspond with the intended PHP version.
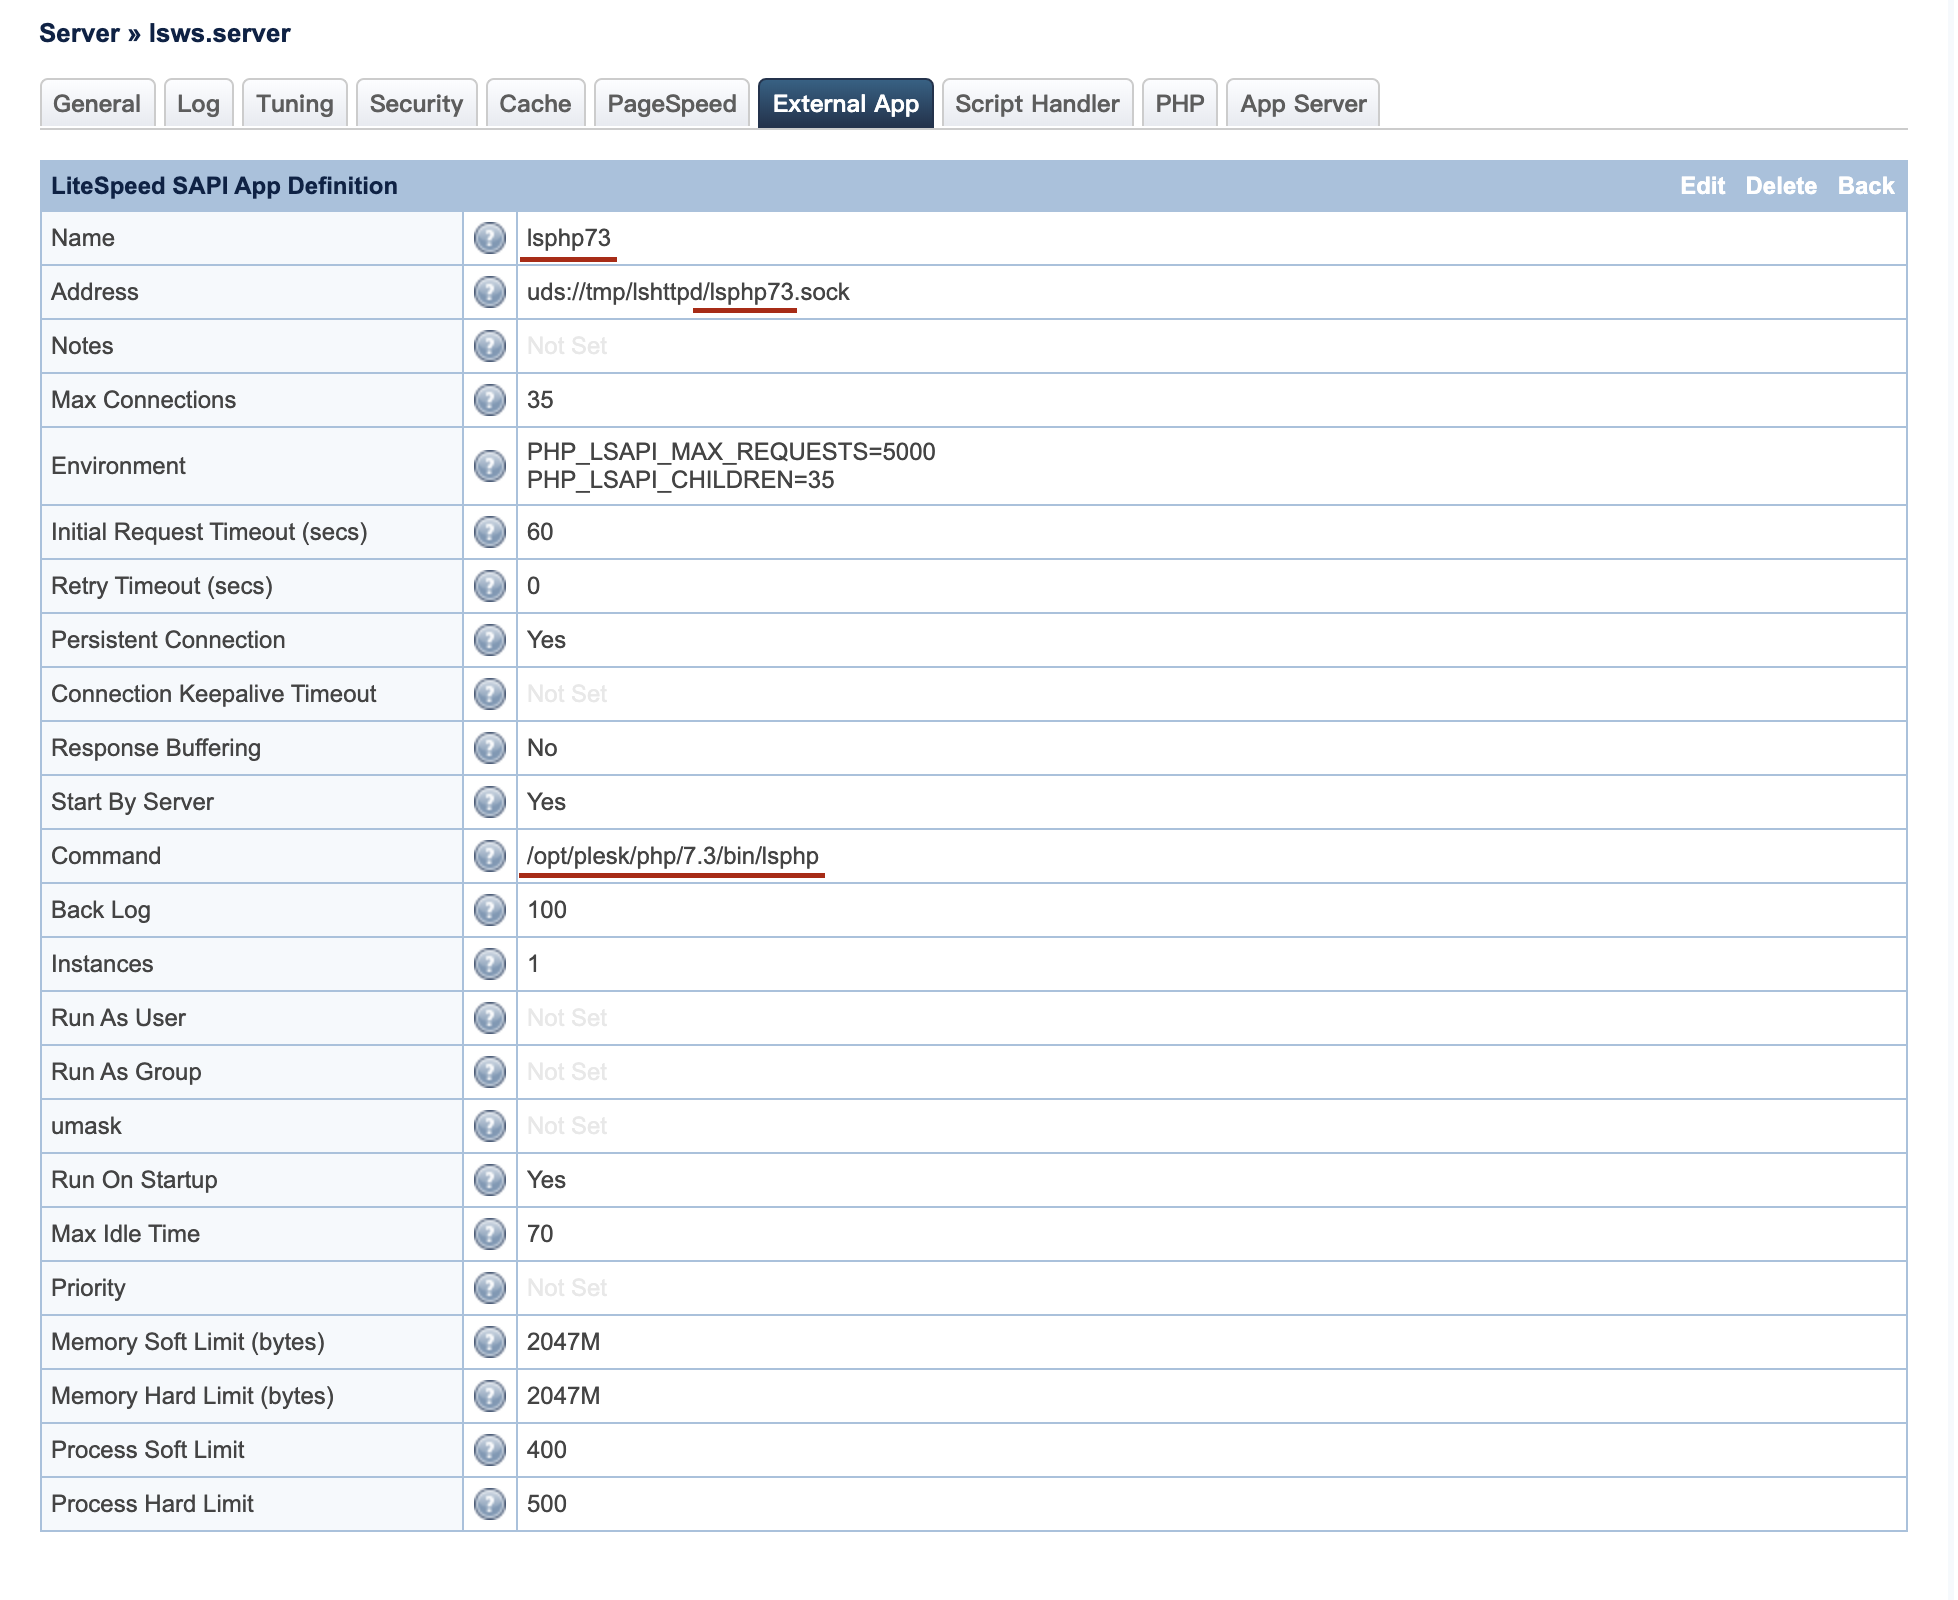
For users who prefer command-line management over the graphical user interface (GUI) tool, the LSWS configuration file, typically located at /usr/local/lsws/conf/httpd_config.xml, can be directly edited. The following <extProcessor> blocks should be added within the <extProcessorList>...</extProcessorList> section to define custom PHP external applications for various PHP versions:
<extProcessor> <type>lsapi</type> <name>lsphp70</name> <address>uds://tmp/lshttpd/lsphp70.sock</address> <maxConns>35</maxConns> <env>PHP_LSAPI_MAX_REQUESTS=5000</env> <env>PHP_LSAPI_CHILDREN=35</env> <initTimeout>60</initTimeout> <retryTimeout>0</retryTimeout> <persistConn>1</persistConn> <respBuffer>0</respBuffer> <autoStart>1</autoStart> <path>/opt/plesk/php/7.0/bin/lsphp</path> <backlog>100</backlog> <instances>1</instances> <extMaxIdleTime>10</extMaxIdleTime> <priority>0</priority> <memSoftLimit>2048M</memSoftLimit> <memHardLimit>2048M</memHardLimit> <procSoftLimit>400</procSoftLimit> <procHardLimit>500</procHardLimit> </extProcessor> <extProcessor> <type>lsapi</type> <name>lsphp71</name> <address>uds://tmp/lshttpd/lsphp71.sock</address> <maxConns>35</maxConns> <env>PHP_LSAPI_MAX_REQUESTS=5000</env> <env>PHP_LSAPI_CHILDREN=35</env> <initTimeout>60</initTimeout> <retryTimeout>0</retryTimeout> <persistConn>1</persistConn> <respBuffer>0</respBuffer> <autoStart>1</autoStart> <path>/opt/plesk/php/7.1/bin/lsphp</path> <backlog>100</backlog> <instances>1</instances> <extMaxIdleTime>10</extMaxIdleTime> <priority>0</priority> <memSoftLimit>2048M</memSoftLimit> <memHardLimit>2048M</memHardLimit> <procSoftLimit>400</procSoftLimit> <procHardLimit>500</procHardLimit> </extProcessor> <extProcessor> <type>lsapi</type> <name>lsphp72</name> <address>uds://tmp/lshttpd/lsphp72.sock</address> <maxConns>35</maxConns> <env>PHP_LSAPI_MAX_REQUESTS=5000</env> <env>PHP_LSAPI_CHILDREN=35</env> <initTimeout>60</initTimeout> <retryTimeout>0</retryTimeout> <persistConn>1</persistConn> <respBuffer>0</respBuffer> <autoStart>1</autoStart> <path>/opt/plesk/php/7.2/bin/lsphp</path> <extMaxIdleTime>10</extMaxIdleTime> <memSoftLimit>2048M</memSoftLimit> <memHardLimit>2048M</memHardLimit> <procSoftLimit>400</procSoftLimit> <procHardLimit>500</procHardLimit> </extProcessor> <extProcessor> <type>lsapi</type> <name>lsphp73</name> <address>uds://tmp/lshttpd/lsphp73.sock</address> <maxConns>35</maxConns> <env>PHP_LSAPI_MAX_REQUESTS=5000</env> <env>PHP_LSAPI_CHILDREN=35</env> <initTimeout>60</initTimeout> <retryTimeout>0</retryTimeout> <persistConn>1</persistConn> <respBuffer>0</respBuffer> <autoStart>1</autoStart> <path>/opt/plesk/php/7.3/bin/lsphp</path>> <extMaxIdleTime>10</extMaxIdleTime> <memSoftLimit>2048M</memSoftLimit> <memHardLimit>2048M</memHardLimit> <procSoftLimit>400</procSoftLimit> <procHardLimit>500</procHardLimit> </extProcessor> <extProcessor> <type>lsapi</type> <name>lsphp74</name> <address>uds://tmp/lshttpd/lsphp74.sock</address> <maxConns>35</maxConns> <env>PHP_LSAPI_MAX_REQUESTS=5000</env> <env>PHP_LSAPI_CHILDREN=35</env> <initTimeout>60</initTimeout> <retryTimeout>0</retryTimeout> <persistConn>1</persistConn> <respBuffer>0</respBuffer> <autoStart>1</autoStart> <path>/opt/plesk/php/7.4/bin/lsphp</path> <extMaxIdleTime>10</extMaxIdleTime> <memSoftLimit>2048M</memSoftLimit> <memHardLimit>2048M</memHardLimit> <procSoftLimit>400</procSoftLimit> <procHardLimit>500</procHardLimit> </extProcessor>
Remember to restart LiteSpeed Web Server after making any modifications to the configuration file for the changes to take effect.
Implementing Per-Domain php.ini Settings
LiteSpeed Web Server has the capability to leverage Plesk's feature for enabling per-domain php.ini files, which is particularly useful for environments with multiple domains and subdomains, such as example.com, sub1.example.com, and sub2.example.com. This functionality allows each domain, including its subdomains, to load a unique php.ini file directly from its respective document root.
Example of Per-Domain php.ini Behavior:
When per-domain php.ini is activated:
- If you update the PHP settings for the main domain,
example.com, and subsequently inspect thephpinfo()output, the displayed path for the loaded configuration file will be/var/www/vhosts/system/example.com/etc/php.ini. - Similarly, updating the PHP settings for
sub1.example.comand checking itsphpinfo()page will reveal the loaded configuration file path as/var/www/vhosts/system/sub1.example.com/etc/php.ini. - This pattern continues for other subdomains; for instance,
sub2.example.comwould show/var/www/vhosts/system/sub2.example.com/etc/php.ini.
By default, LiteSpeed Web Server does not enable per-domain php.ini. In this default state, the phpinfo() output for example.com and all its subdomains would consistently display the loaded configuration file as /var/www/vhosts/system/example.com/etc/php.ini.
Consequently, if any PHP setting is updated for an individual subdomain in this default configuration, only the main domain's php.ini will be modified. This effectively means that PHP settings applied to individual domains are disregarded, and a single php.ini file is utilized across the entire subscription. Furthermore, only the PHP settings from the most recently updated domain will be active, potentially leading to unintended configurations.
This behavior is due to LSWS assigning one PHP handler per account (subscription) by default, with all domains sharing this same handler (a detached worker group).
While enabling per-domain php.ini is feasible, it's important to note that it may not always be the most efficient approach, as each domain will then require its own dedicated PHP handler.
To enable per-domain php.ini, you'll need to perform a manual configuration. Open the LiteSpeed Web Server configuration file, typically found at /usr/local/lsws/conf/httpd_config.xml. Locate the <phpConfig> section and insert the following directive:
<phpAppByDomain>1</phpAppByDomain>
After saving the changes, restart LSWS and execute the command pkill lsphp to ensure that all modifications are fully applied and new PHP processes are initiated with the updated settings.
Integrating CloudLinux PHP Selector
When both CloudLinux PHP Selector and Plesk's native PHP settings are active, it can sometimes be challenging to determine which PHP selector is taking precedence. LiteSpeed Web Server, by default, respects Plesk's PHP selections without requiring any additional configuration. Therefore, if your goal is to utilize the CloudLinux PHP Selector for managing PHP versions, a few specific modifications are necessary:
- You will need to set up an additional handler within LiteSpeed. This handler will direct Plesk PHP to defer to CloudLinux for any non-
alt-phpxxPHP versions. - Within Plesk's PHP settings, it is crucial to select a PHP version that is not designated as an
alt-phpversion.
By implementing both of these actions, you will successfully enable the CloudLinux PHP Selector to manage your PHP environment effectively.
Setting Up an Extra PHP Handler for CloudLinux
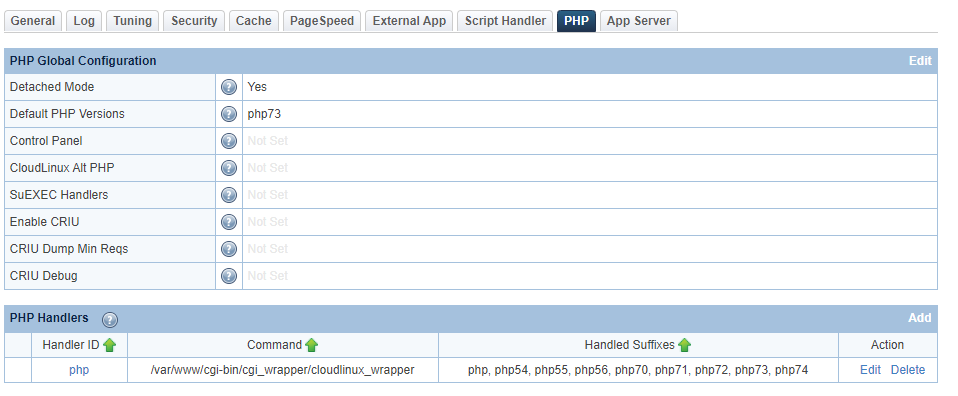
To configure the additional PHP handler, navigate to the LiteSpeed Web Server (LSWS) Web Admin Console. Follow the path: Server > PHP > Add PHP Handlers, and then apply the following settings:
- Handler ID: Set this to
php. - Command: Specify the path as
/var/www/cgi-bin/cgi_wrapper/cloudlinux_wrapper. - Handled Suffixes: Include all relevant PHP versions that you want CloudLinux to manage, such as
php, php54, php55, php56, php70, php71, php72, php73, php74.
These configurations will ensure that the specified Plesk PHP versions are compelled to utilize the CloudLinux PHP selector for their processing.
Alternatively, for those who prefer direct configuration file editing, you can modify LiteSpeed's configuration manually. Open the file /usr/local/lsws/conf/httpd_config.xml using a text editor (e.g., vi). Within the <phpConfig> ... </phpConfig> tags, add the following <phpHandler> block:
<phpHandler>
  <id>php</id>
  <command>/var/www/cgi-bin/cgi_wrapper/cloudlinux_wrapper</command>
  <suffixes>php, php54, php55, php56, php70, php71, php72, php73, php74</suffixes>
</phpHandler>
After making these changes, remember to restart the LiteSpeed Web Server for the new handler to be recognized and applied.
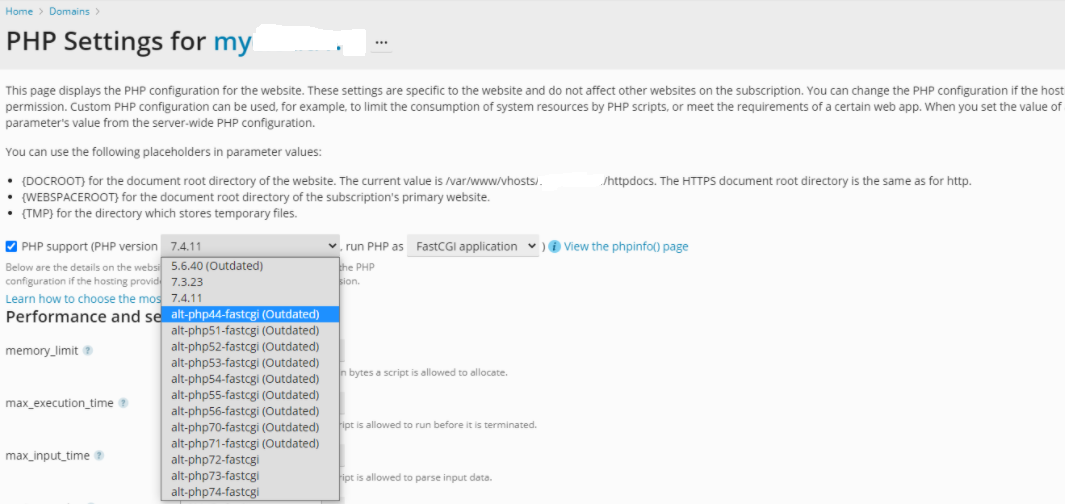
Selecting Plesk PHP for CloudLinux Integration
Once the custom handler has been successfully created, proceed to Plesk's PHP settings. From the available options, select any PHP version that is not one of the alt-php versions. This means choosing a PHP version that corresponds to those listed in the Handled Suffixes of the handler you just configured. This specific choice is vital to ensure that the CloudLinux PHP Selector is correctly activated and utilized for your domain.
LiteSpeed Cache Management
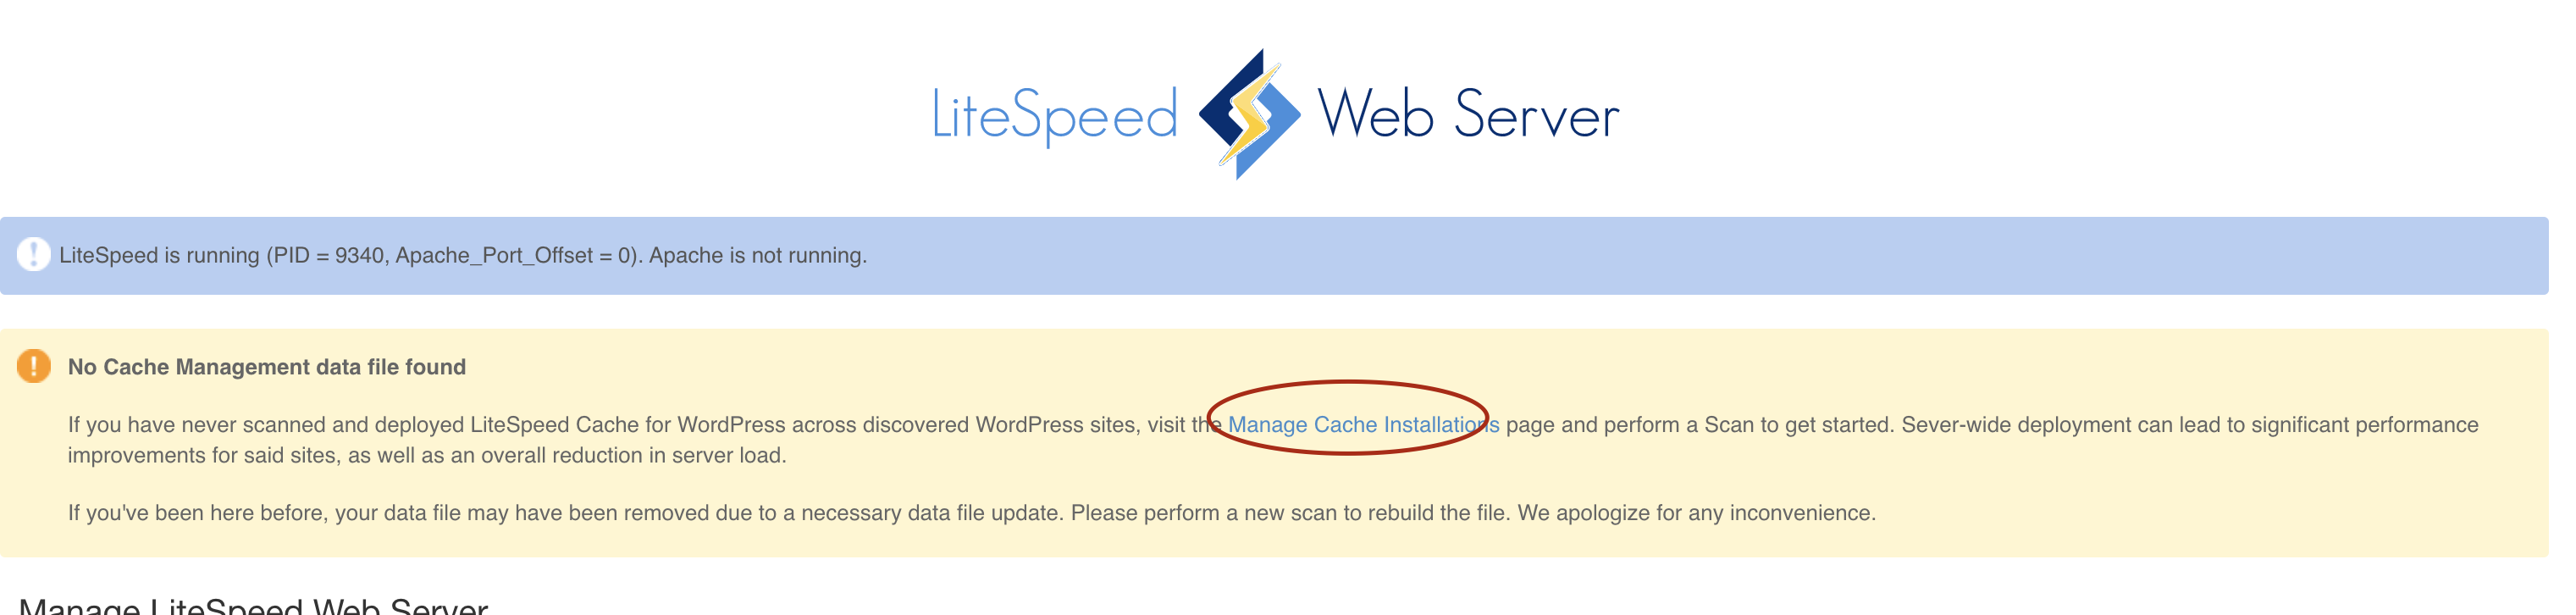
The LiteSpeed Plesk Extension offers the capability to efficiently mass install the LiteSpeed Cache (LSCache) plugin across all WordPress installations hosted on your server. After successfully installing the LiteSpeed Plesk Extension, you might initially encounter a message stating No Cache Management data file found, as illustrated below:
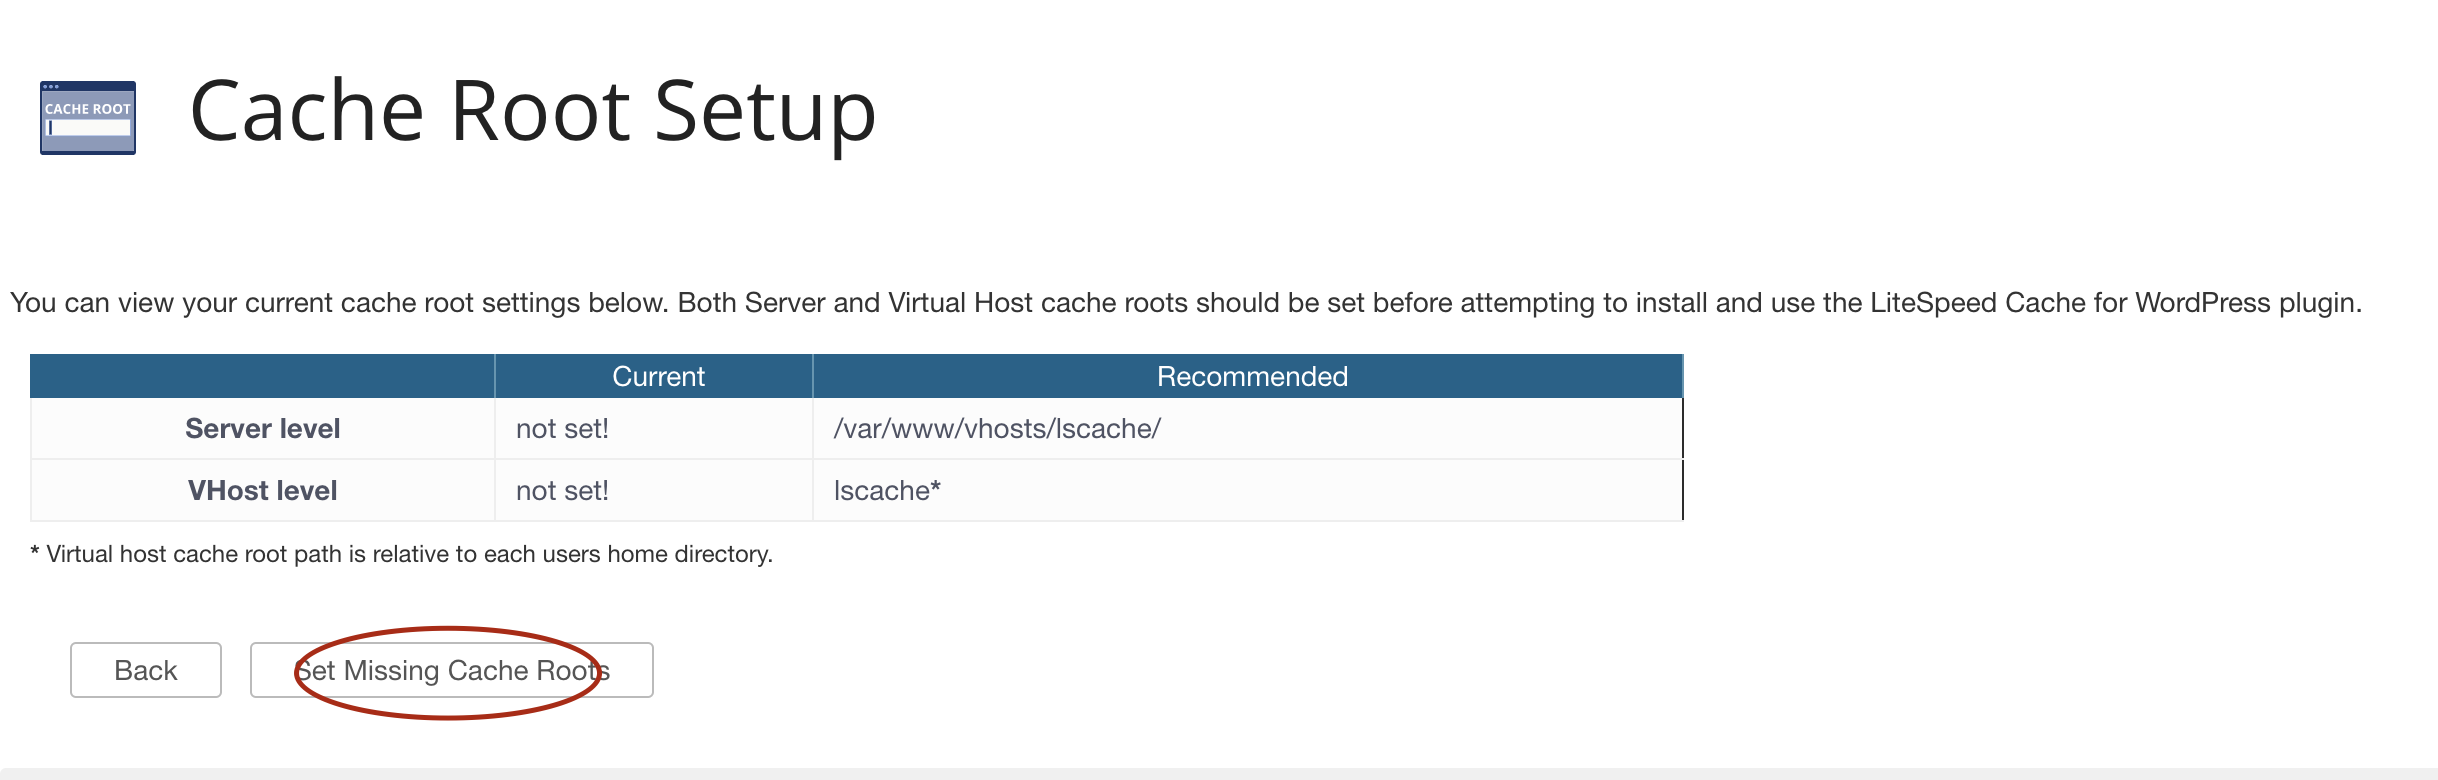
Setting Up the Cache Root
To resolve the "No Cache Management data file found" message and begin configuring LSCache, the first step is to click on Manage Cache Installations within the extension interface.

Following this, locate and click the Set Missing Cache Roots button to initialize the necessary cache directories for your WordPress installations.
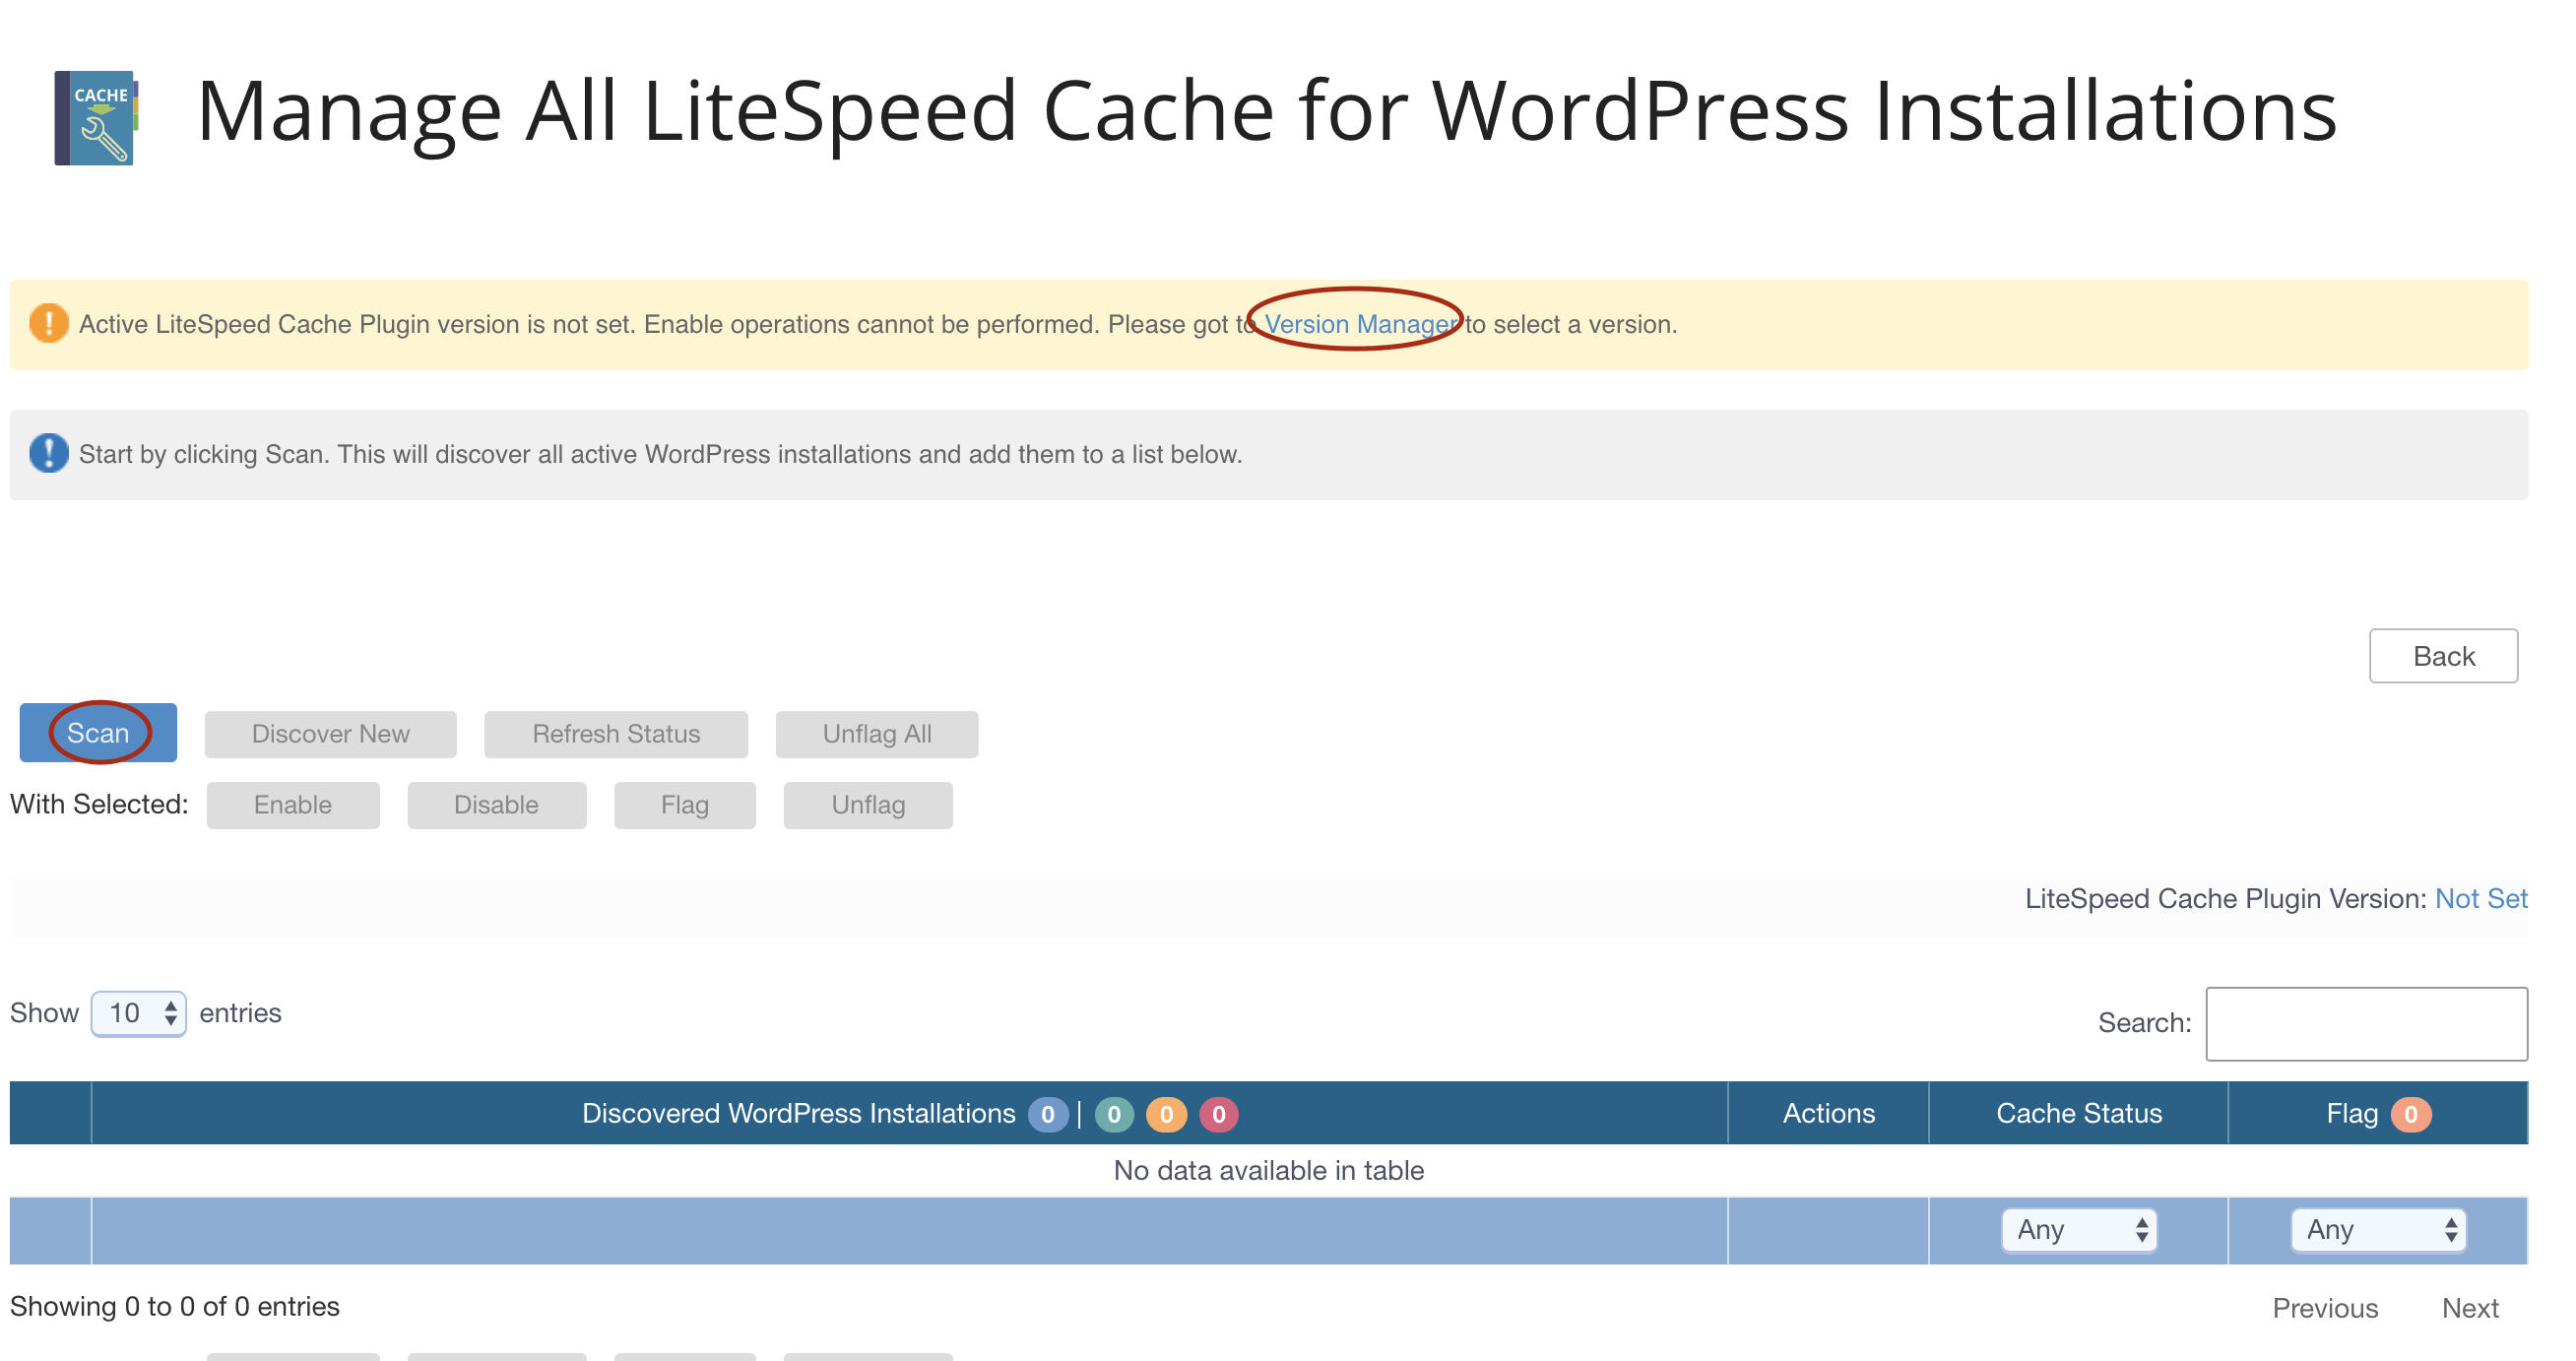
Scanning for WordPress and Enabling LSCache
Once the cache root has been successfully established, return to the main extension page and click on Manage Cache Installations once more. This action will prepare you for the next critical step: scanning for WordPress installations across your server and installing the LiteSpeed Cache Plugin for WordPress (LSCWP) on them.
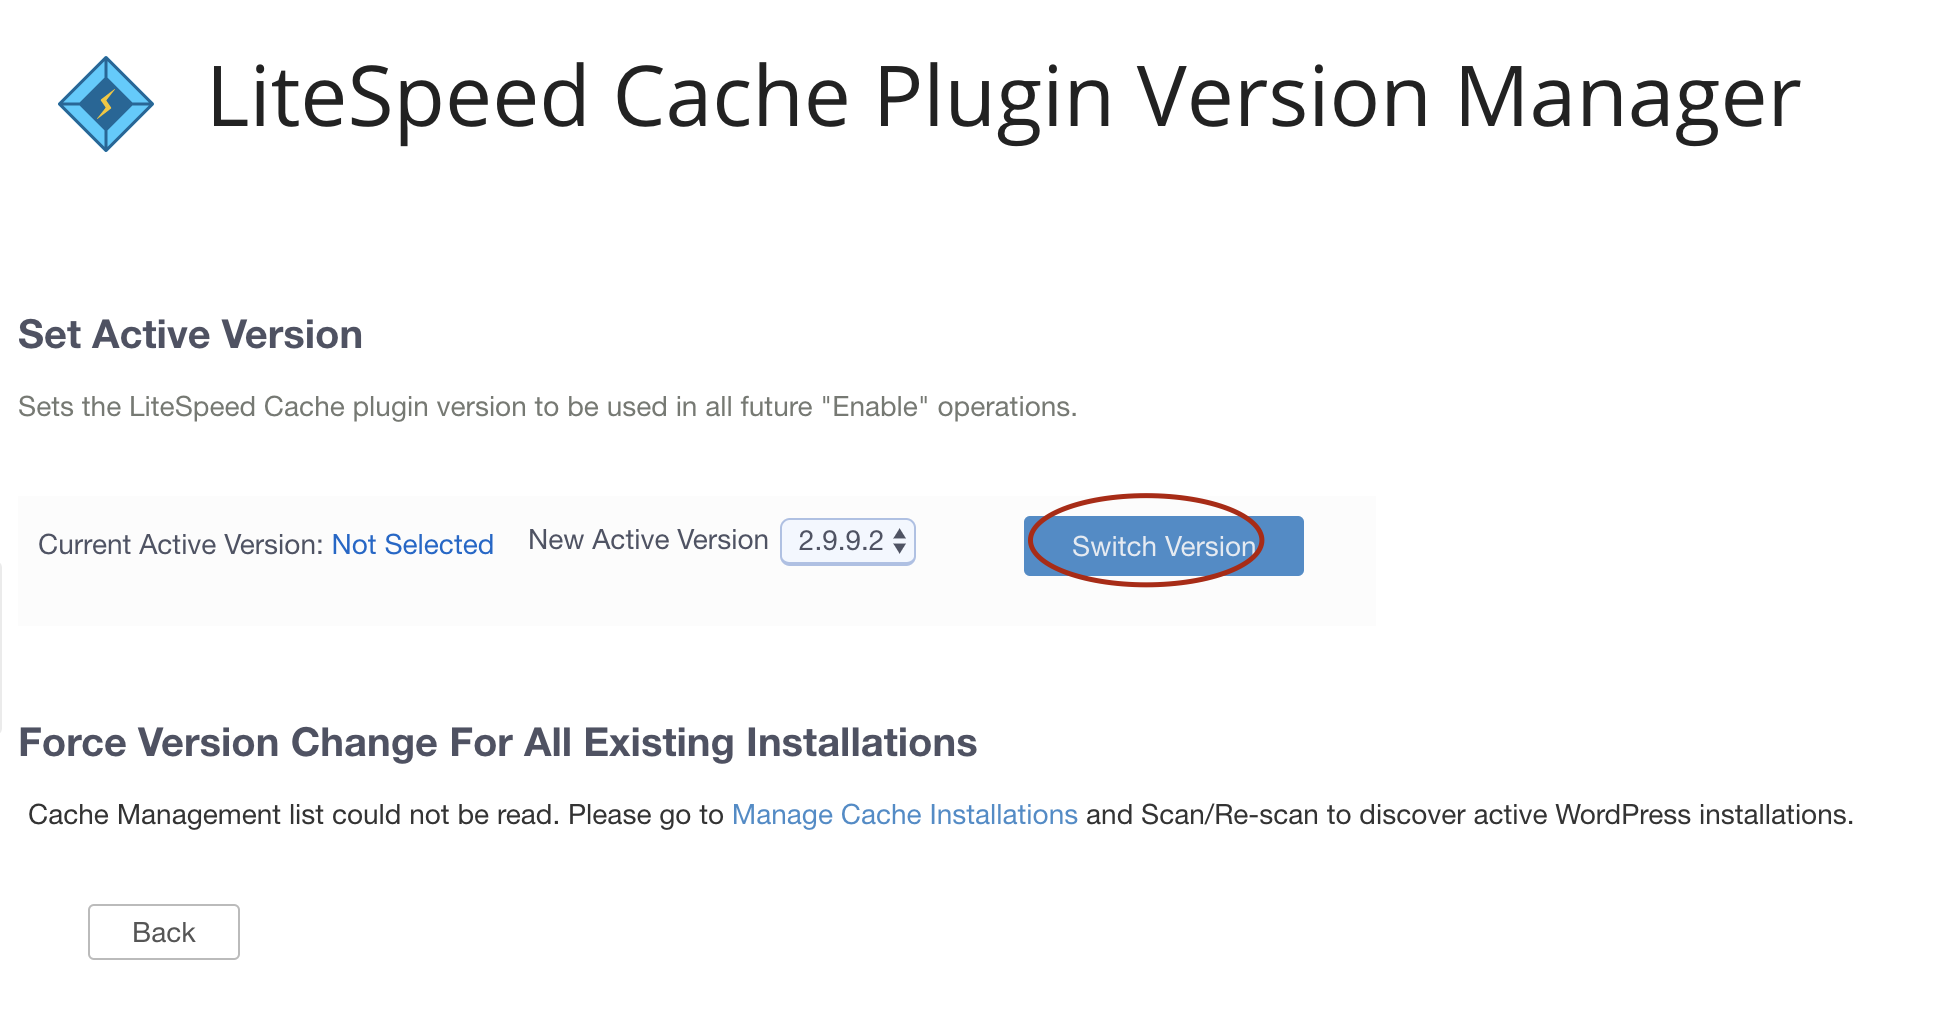
Before initiating the scan, you will be prompted to select the desired version of the LSCache plugin to install. It is generally recommended to choose the latest version available to benefit from the most recent features and security updates.
Ensure you select the most current stable version for optimal performance and compatibility.
The scanning process may take some time, depending on the total number of websites hosted on your server.
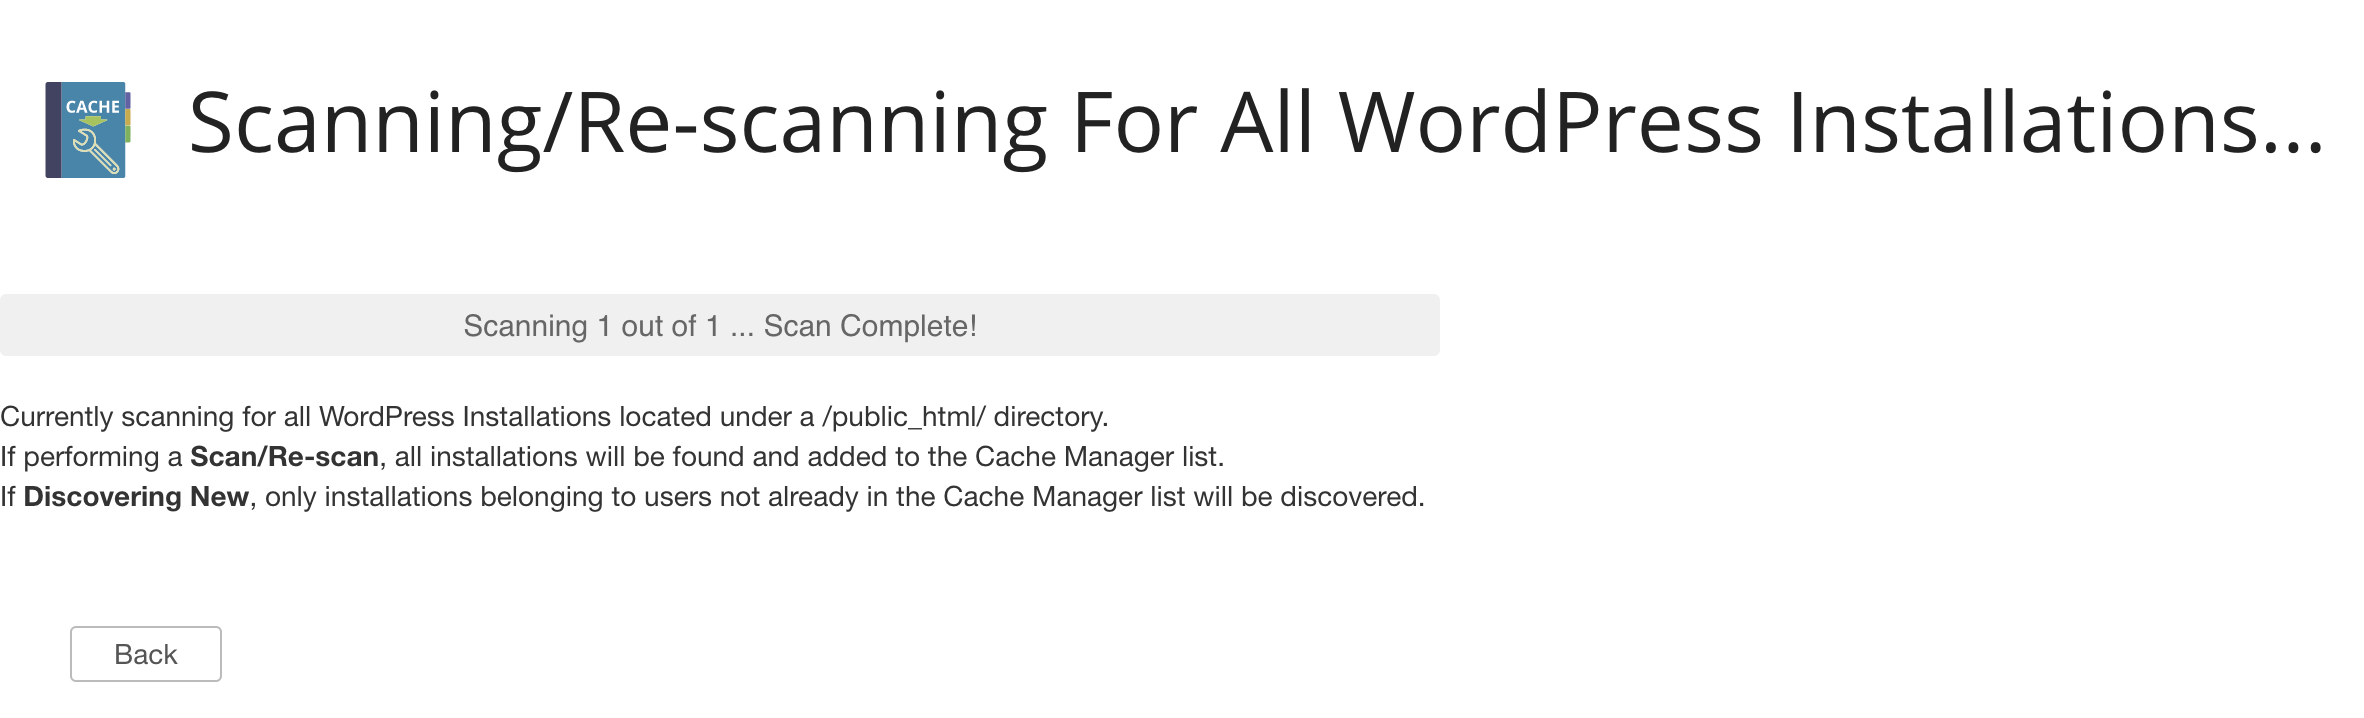
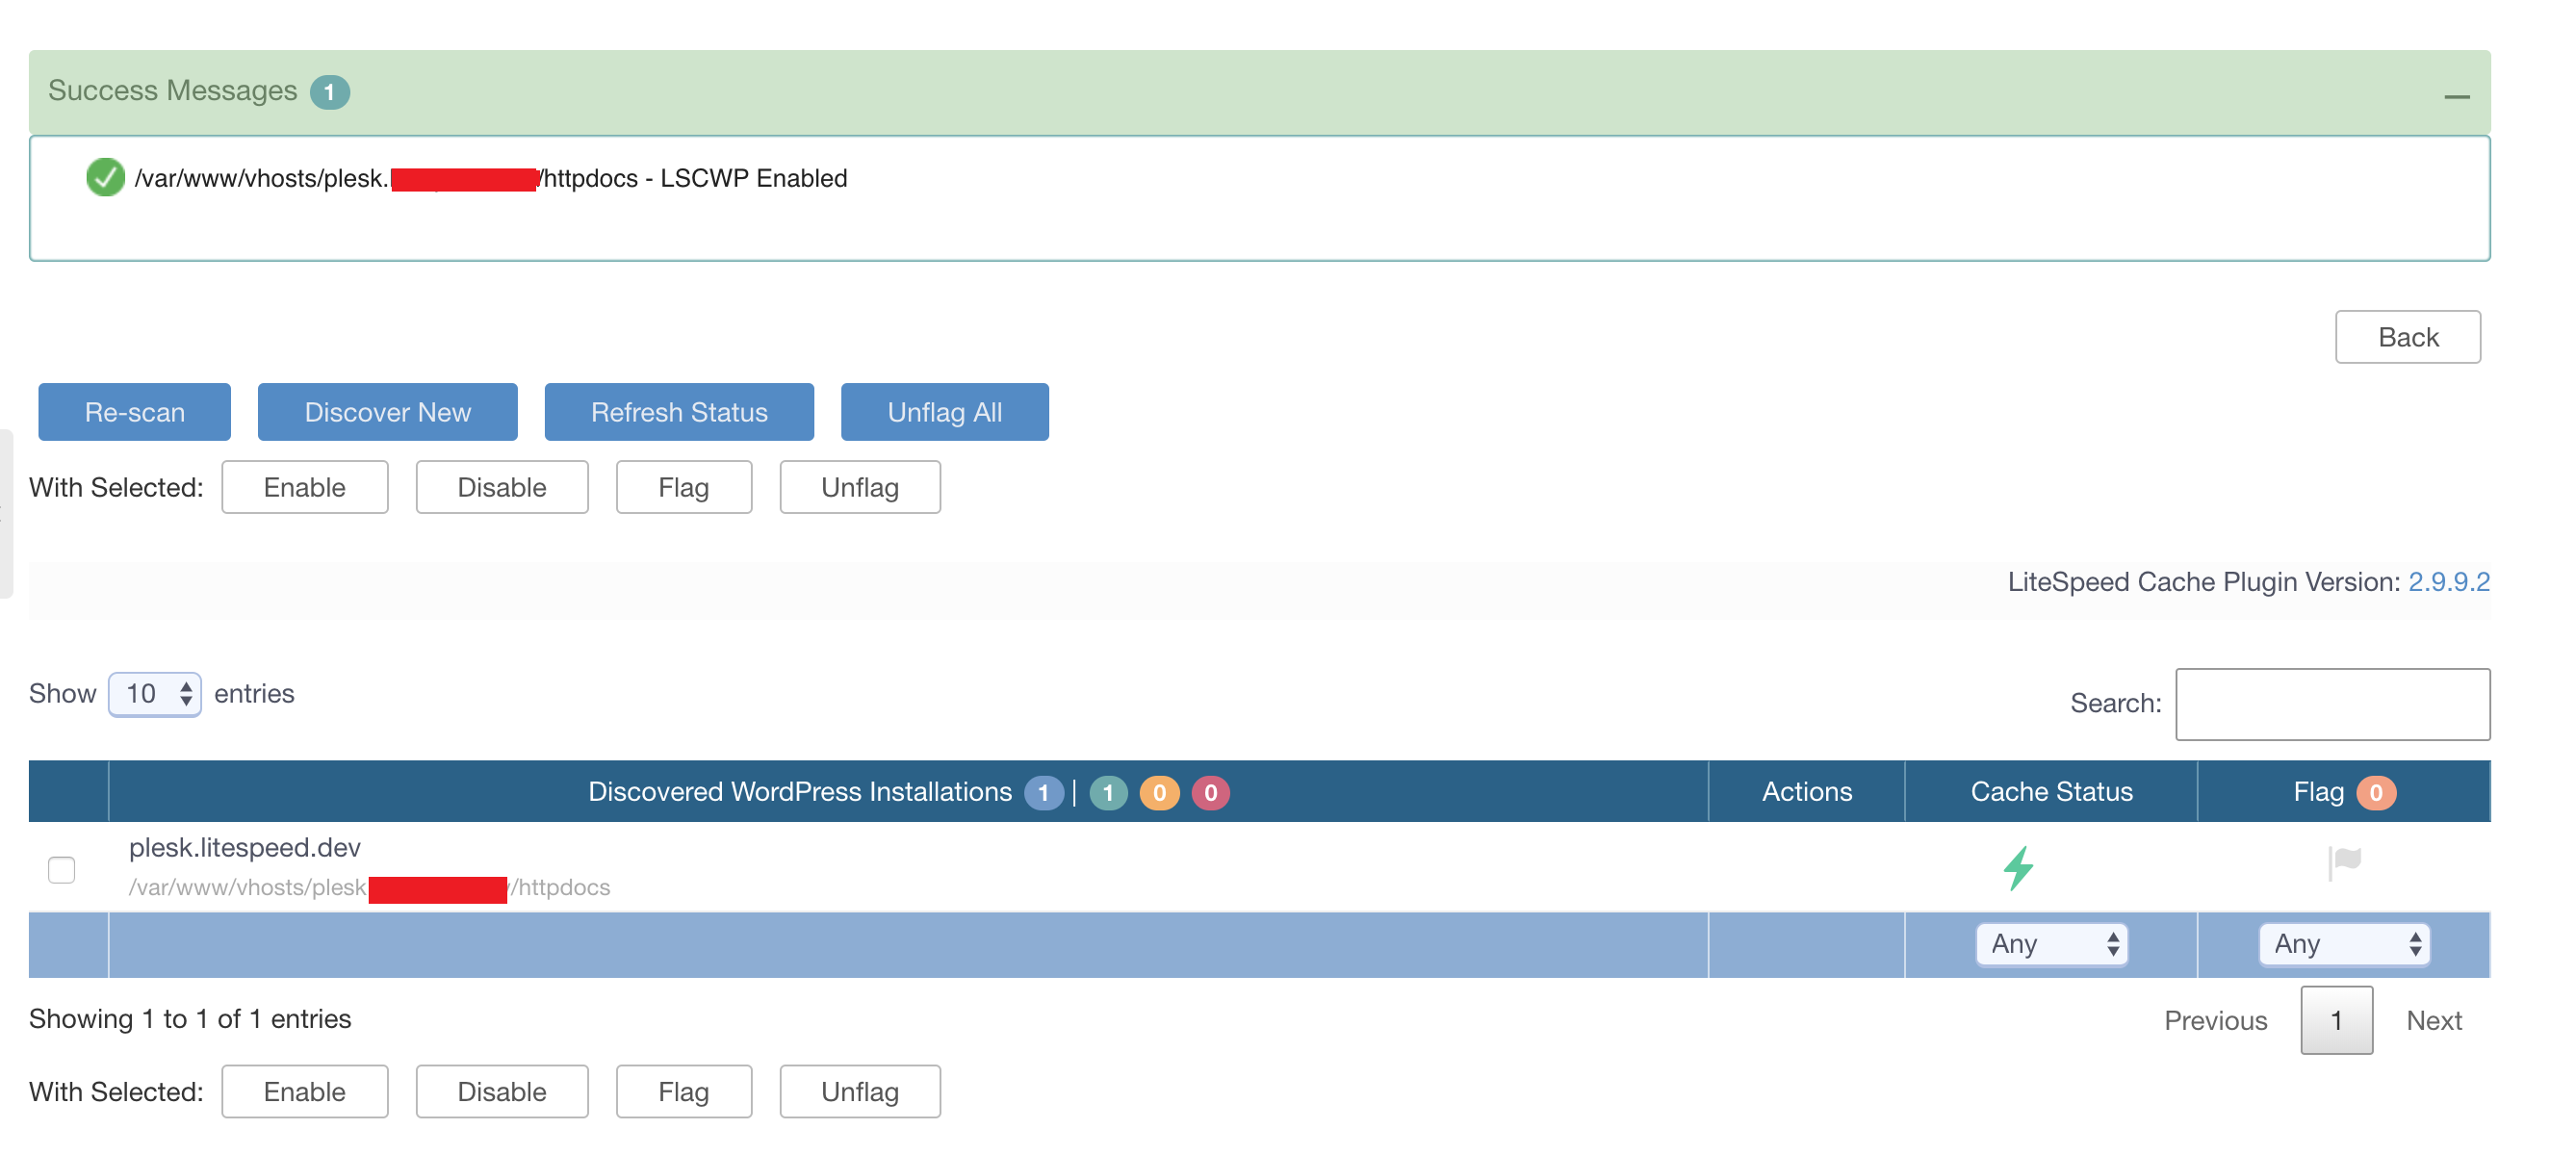
Upon completion of the scan, you will be presented with a list of all discovered WordPress sites, which you can then manage. For future scans, the Discover New button can be utilized to save time, as it will only target sites that have not been previously scanned.
At this point, you have the flexibility to activate the LiteSpeed Cache Plugin for WordPress either for individual sites or to perform a bulk activation across multiple selected sites simultaneously.

Once LSCWP has been successfully activated for a site, a distinctive green light symbol will appear in the Cache Status column, indicating its operational status.
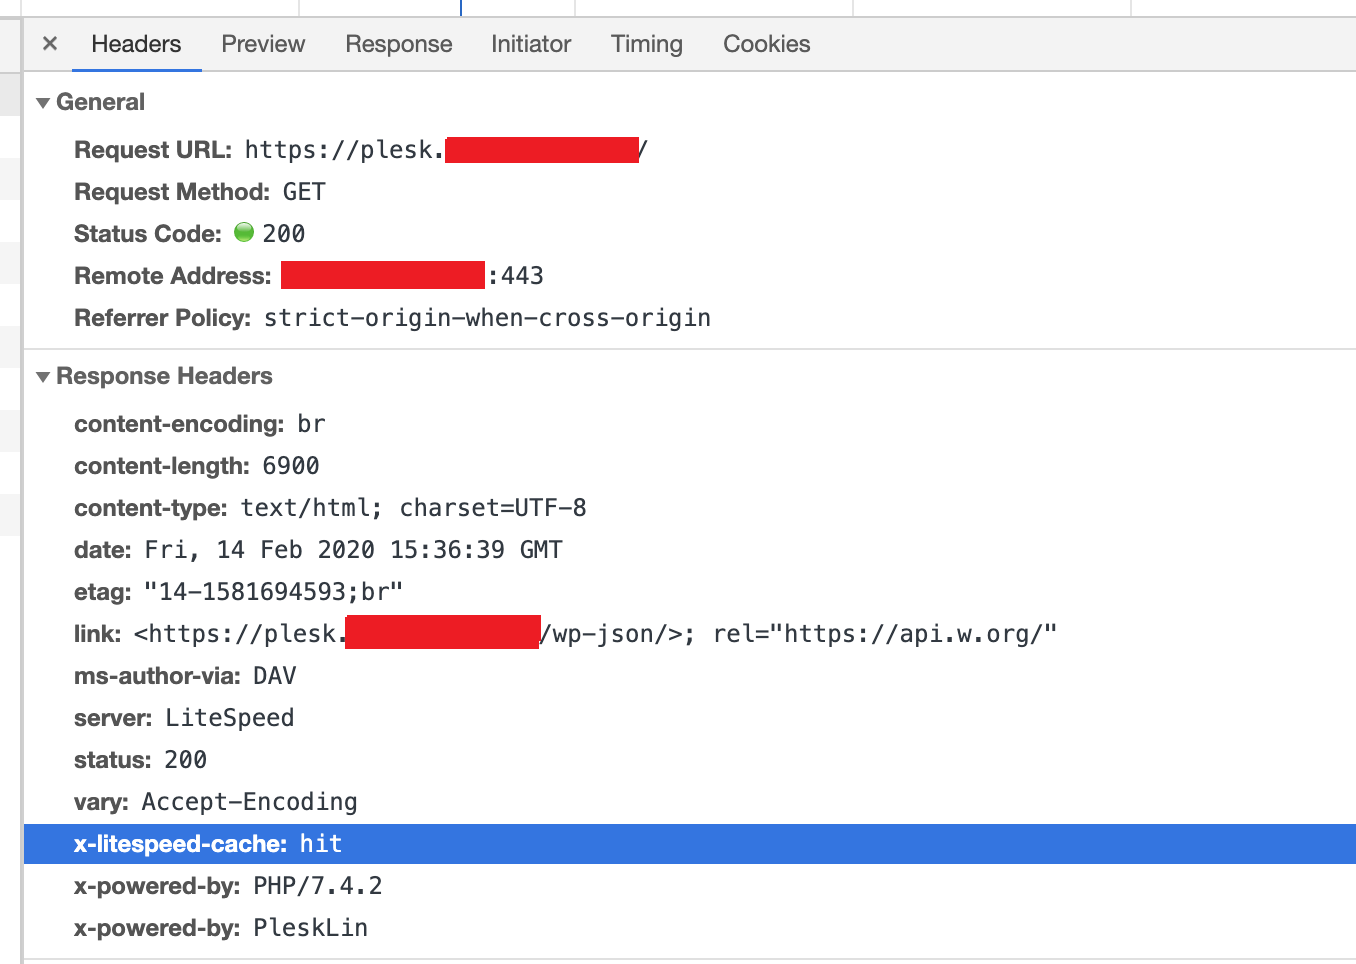
To conclusively verify that a site is actively being cached by LiteSpeed, examine the response headers for the x-litespeed-cache: hit header. The presence of this header confirms that the caching mechanism is functioning as intended.
QUIC Protocol Configuration
For LiteSpeed Web Server to establish QUIC connections, it relies on UDP port 443. It is imperative to ensure that your server's firewall is configured to allow traffic through this port to guarantee proper QUIC functionality.
Enabling HTTP/2 and HTTP/3 via Apache Configuration
LiteSpeed Web Server provides the flexibility to enable or disable various network protocols, including HTTP/2 and HTTP/3, through the httpd.conf configuration file. This is achieved using the SpdyEnabled directive.
Example: Disabling All Protocols
To disable all network protocols, you would add the following within the <IfModule LiteSpeed> block:
<IfModule LiteSpeed>
  SpdyEnabled off
</IfModule>
Example: Enabling Specific HTTP Protocols
If your objective is to enable only HTTP/2 and HTTP/3, while implicitly disabling all other protocols, the configuration would look like this:
<IfModule LiteSpeed>
  SpdyEnabled http2 http3
</IfModule>
By default, HTTP protocols are enabled in LiteSpeed Web Server, while older SPDY protocols are disabled. It is crucial to note that when you explicitly use the SpdyEnabled directive to activate one or more specific protocols, any protocols not explicitly listed will be automatically disabled. For instance, if you set SpdyEnabled http2, only HTTP/2 will be active, and other protocols like SPDY/2, SPDY/3, and HTTP/3 will be turned off. Always exercise caution to avoid inadvertently disabling a protocol you intend to use.
Configuring Redis Object Cache for Users
The "Cache Redis for Users" feature facilitates the installation and activation of a dedicated Redis instance for each user requiring object caching. This functionality is specifically designed for environments that utilize sandboxed or "caged" systems, such as CloudLinux or LiteSpeed Containers. By providing independent Redis instances, this approach ensures both enhanced speed and security for each user's cached data.
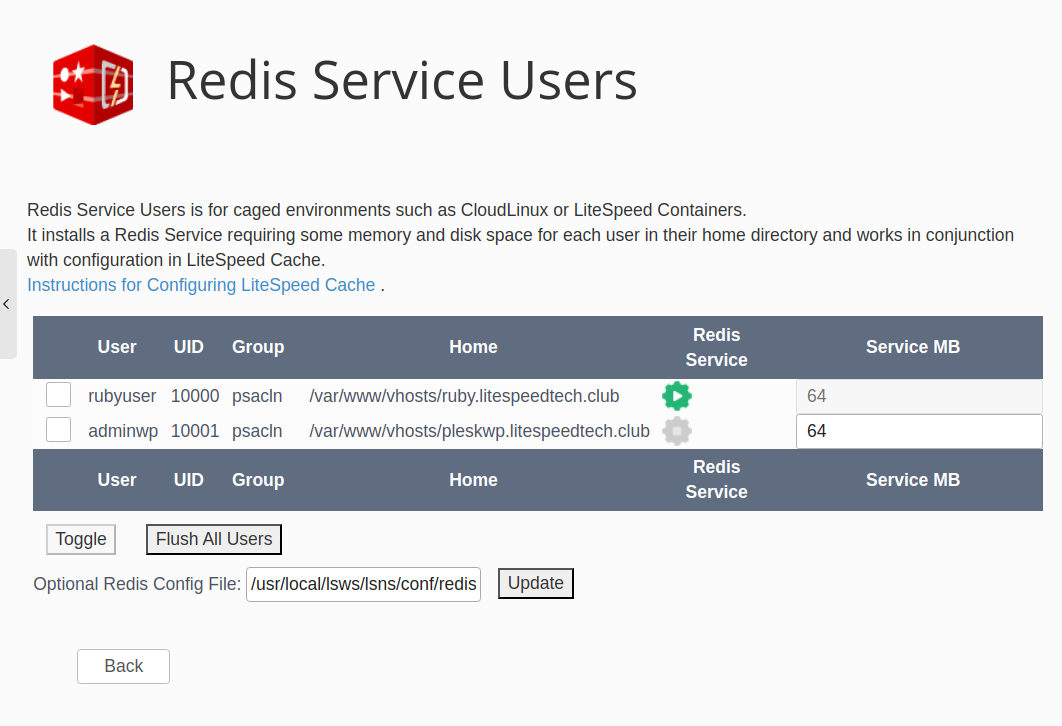
The interface prominently displays a list of all users on your system. As indicated, this particular feature is exclusively compatible with caged environments, including CloudLinux and LiteSpeed Containers. Detailed information on enabling these caged environments can be found in the respective documentation:
- For CloudLinux: Refer to the official CloudLinux documentation and the specific guide on CloudLinux integration with LiteSpeed.
- For LiteSpeed Containers: Consult the Namespace Containers documentation to understand how to enable and manage LiteSpeed Containers.
When activated, this feature deploys a Redis service for each user, which necessitates a certain amount of memory and disk space within their home directory. This service works in tandem with the broader LiteSpeed Cache configuration.
Installing a Redis Service for a User:
To install a Redis service for an individual user, click the enable icon corresponding to that user's entry in the list.

You can specify the Service MB, which determines the memory allocation for each user's Redis instance. This value, in megabytes, can range from 1 to 1024 MB, with a default setting of 64 MB. While a cPanel user can independently enable or disable their Redis service through the plugin, it must first be enabled here, and the size specified here is the size allocated. To modify an existing instance's size, you must first disable the service, adjust the size, and then re-enable it.
Upon successful installation of the Redis Service, the screen will refresh, and the enable icon for that user will appear disabled, indicating the service is active.
Removing a Redis Service for a User:
To remove an active Redis service for a specific user, simply click the disable icon situated on that user's line.

Batch Actions for Redis Services:
The buttons located beneath the table dynamically adapt based on the checkboxes selected and the current state of each user's Redis service. When you select a checkbox, only other users with an identical service state can also be selected for batch operations.
- Disable: This action performs the same function as individually pressing the disable icon for each selected user.
- Enable: This action is equivalent to pressing the enable icon for each selected user that does not currently have a Redis service set up.
- Flush All Users: This command sends a Redis
flushallinstruction to all active Redis services across the system, effectively clearing their entire cache. - Flush: This command sends a Redis
flushallinstruction specifically to the active Redis services of the checked users, clearing their respective caches.
Optional Redis Configuration File:
You have the option to specify a file containing Redis configuration parameters. It is recommended to name this file /usr/local/lsws/lsns/conf/redis.conf. The contents of such a file are often straightforward, for example:
maxmemory-policy allkeys-lru
To apply the settings from the specified Optional Redis Config File to your service definitions, click the Update button. Please note that pressing this button will restart ALL managed Redis services to ensure the new configuration is correctly applied.
Understanding Redis Object Cache Functionality
Each Redis service is uniquely created for a specific user, with its dedicated socket located within the user's home directory. For CloudLinux environments, this socket is found at $HOME/.cagefs/tmp/redis.sock, while for LiteSpeed Containers, it resides at $HOME/.lsns/tmp/redis.sock. In both caged environments, these directories are mounted to /tmp for the user, resulting in a consistent socket name of /tmp/redis.sock across all users.
For LiteSpeed Containers, the Troubleshooting section provides guidance on entering and diagnosing issues related to container caging. Similarly, CloudLinux offers numerous tools to assist in identifying and resolving caging-related problems.
Managing Redis Services via Plesk Packages
Within the Redis Service Users screen, you will notice a column labeled Package, which directly correlates to Plesk's service plans. This feature allows you to manage Redis services for all users within a specific service plan collectively, using the Redis Package Manager. A significant advantage of leveraging packages is that as new users are added to a service plan, Redis services are automatically provisioned for them.
To access and manage these package-level settings, click on the Redis Package Manager icon.
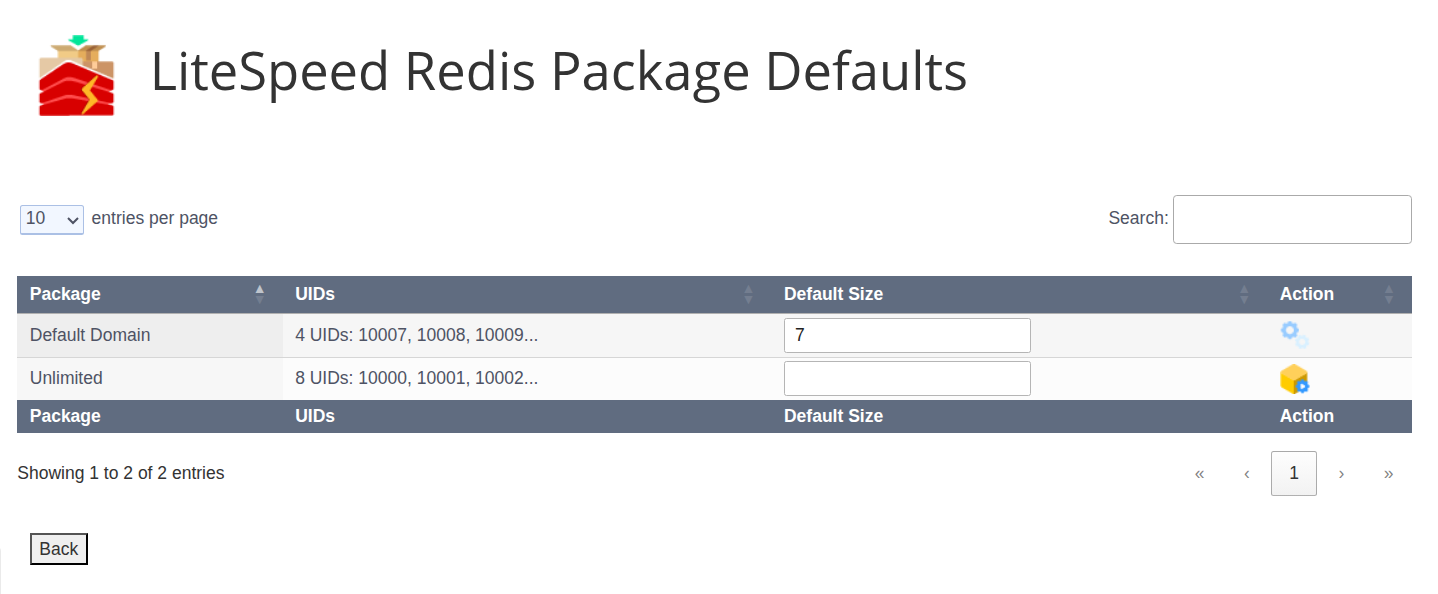
On this screen, the Package column identifies the service plan. The UIDs column indicates the count of user IDs within that service plan, typically showing up to three example UID numbers. The Default Size specifies the memory allocation in MB for the Redis service that will be activated for users in that package. The Action column dynamically presents the available operations, similar to the Redis Service User screen, changing based on the current status of the Redis package definition.
Setting Up and Activating Packages:
To configure a new package, input the desired Default Size for the Redis service within that package and then click the Set Package Default icon.

Subsequently, to activate the Redis services for all users associated with that package, press the Enable All Users icon.

If Redis has been manually disabled for one or more users within a package, the same icon will be displayed but will be relabeled as Enable Pending Users. Clicking this icon will reactivate the Redis services for all users who were previously manually disabled.
Disabling and Removing Packages:
Once enabled, you can disable all users within a specific package by clicking the Disable All Users icon.

Finally, to completely remove the configuration definition for the Package you can press the Remove Package Default icon.

Configuring LiteSpeed Cache to Utilize Redis
To fully leverage the Redis object caching feature, you must configure it within the LiteSpeed WordPress Cache administration panel. Navigate through Plesk > Customers > Domain > Login > LiteSpeed Cache > Cache > Object.
On this page, ensure the following settings are applied:
- Object Cache On: Verify that the Status block explicitly states
Redis Extension: *Enabled*. If it displays*Disabled*, you must install the Redis Extension. Please refer to your Plesk documentation for instructions on how to install it. - Method: Select
Redis. - Host: Set this to
/tmp/redis.sock. - Port: Enter
0.
After configuring these parameters, click the Save Changes button. For more comprehensive details on configuring LiteSpeed WordPress Cache, you can consult the specific documentation on the Object tab settings.
Monitoring Redis Performance and Usage
It is often beneficial to monitor the performance and resource utilization of Redis for individual users, particularly regarding memory consumption. This can be accomplished using the redis-cli program from your command line interface.
For example, to check the memory information for a user named USER in a CloudLinux environment, execute the following command:
redis-cli -s /var/www/vhosts/USER/.cagefs/tmp/redis.sock info memory
This command establishes a connection to the Unix domain socket, which is created by the LiteSpeed Redis Service within the user's home /tmp directory, and then executes the info memory command to retrieve detailed memory statistics. As previously discussed, it is advisable to configure the memory policy to ensure that Redis utilizes only the necessary amount of memory, optimizing resource usage.
Command Line Interface for Redis Management
While the Plesk Plugin panels offer a user-friendly way to deploy and manage Redis installations, a command-line interface (CLI) is also provided. This CLI can be particularly useful for managing a large number of Redis installations efficiently or in scenarios where accessing the graphical panels might be impractical or problematic.
The primary program for CLI-based Redis management is located at:
/opt/psa/admin/sbin/modules/litespeed/redis_user_action.sh
This program must be executed with root privileges and offers most of the functionalities available through the Cache Redis panels. If an error occurs during execution, the program will return a non-zero exit code.
To use this program, the first parameter you provide must be an action. Subsequent parameters will vary depending on the specific action you have chosen to perform.
Enhancing Security with TLS Configuration
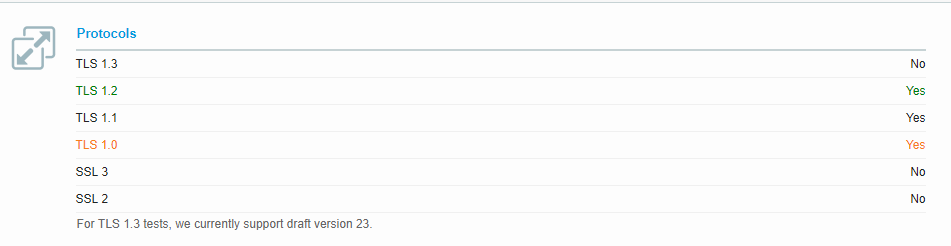
To bolster the security features of your Plesk environment, you can implement configurations to enable TLS 1.3 and simultaneously disable any weak cipher suites. By default, Plesk typically enables TLS 1.0, TLS 1.1, and TLS 1.2. This section will guide you through the process of activating the more secure TLS 1.3 protocol.
Please note that this guide was developed and tested on Plesk 17.8 with CentOS 7.5. For Debian or Ubuntu Plesk installations, the relevant configuration files are generally located in /etc/apache2/mods-available/ssl.conf.
As with all modifications to Apache configuration files, it is crucial to restart the server after applying the adjustments outlined below to ensure they take effect. You can typically restart the server using the appropriate command for your operating system.
Enabling TLS 1.3 on Your Server
To enable TLS 1.3, you will need to edit the file /etc/httpd/conf.d/ssl.conf. Locate the following block and comment it out (by adding a # at the beginning of each line or block):
<IfModule mod_ssl.c>
  SSLProtocol +TLSv1 +TLSv1.1 +TLSv1.2
  SSLCipherSuite HIGH:!aNULL:!MD5
</IfModule>
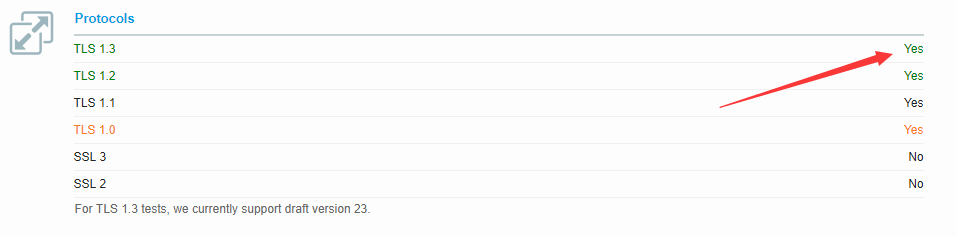
Replace the commented-out block with the following configuration, which enables TLS 1.1, TLS 1.2, and TLS 1.3:
<IfModule LiteSpeed>
  SSLProtocol TLSv1.1 TLSv1.2 TLSv1.3
  SSLCipherSuite HIGH:!aNULL:!MD5
</IfModule>
If you prefer to disable TLS 1.1 as well, for even stronger security, modify the SSLProtocol line to:
SSLProtocol TLSv1.2 TLSv1.3
This ensures only the more secure TLS 1.2 and 1.3 protocols are active.
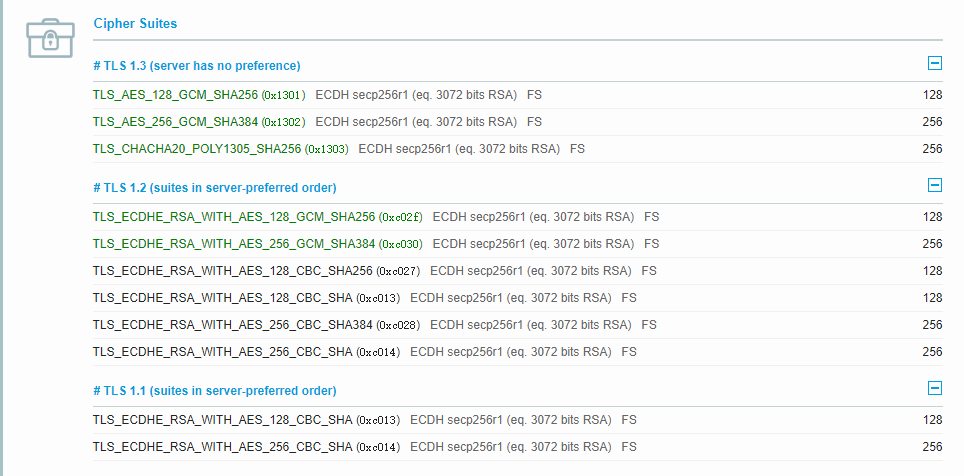
Disabling Weak Cipher Suites (Optional)
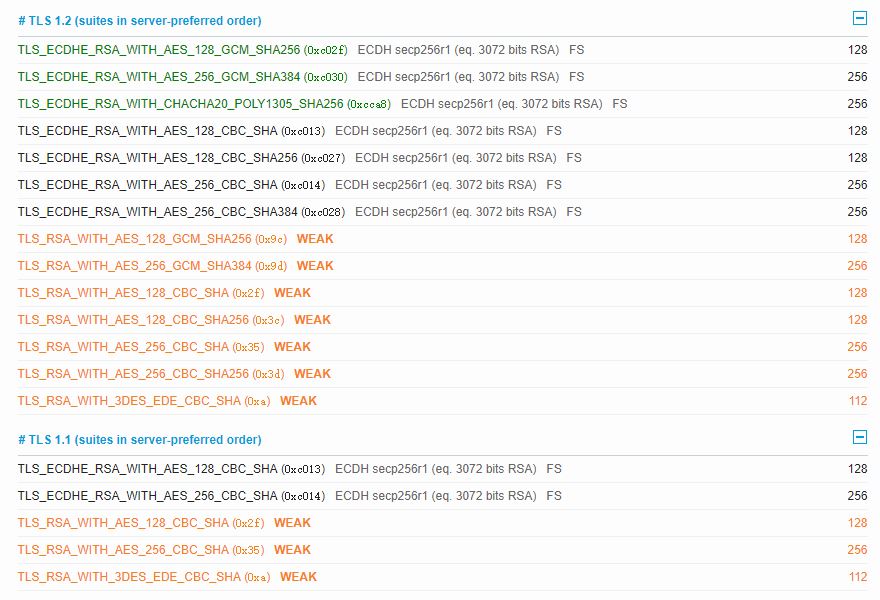
Plesk installations often include certain weak cipher suites by default. To enhance your server's cryptographic security, you can disable these. Locate the following line in your ssl.conf file:
SSLCipherSuite HIGH:!aNULL:!MD5
And replace it with a more robust set of cipher suites:
SSLCipherSuite TLS_CHACHA20_POLY1305_SHA256:TLS_AES_128_GCM_SHA256:TLS_AES_256_GCM_SHA384:TLS_ECDHE_RSA_WITH_AES_128_GCM_SHA256:TLS_ECDHE_RSA_WITH_AES_256_GCM_SHA384:TLS_ECDHE_RSA_WITH_AES_128_CBC_SHA256:TLS_ECDHE_RSA_WITH_AES_128_CBC_SHA:TLS_ECDHE_RSA_WITH_AES_256_CBC_SHA384:TLS_ECDHE_RSA_WITH_AES_256_CBC_SHA:TLS_ECDHE_RSA_WITH_AES_128_CBC_SHA:TLS_ECDHE_RSA_WITH_AES_256_CBC_SHA
It's important to be aware that implementing a more restrictive set of cipher suites might potentially lead to increased CPU load. Therefore, thorough testing is recommended after making these changes.
You can verify the effectiveness of your SSL/TLS configuration and cipher suite strength by conducting tests through reputable online services such as SSL Labs.
Implementing OCSP Stapling for SSL Certificates
The Online Certificate Status Protocol (OCSP) offers a more efficient alternative to the Certificate Revocation List (CRL) protocol for verifying the revocation status of an SSL Certificate. OCSP's primary advantage lies in its ability to allow the server to directly query the certificate authority's responder and then cache the response, significantly speeding up the verification process.
Prerequisites for OCSP Stapling:
To successfully implement OCSP stapling, ensure the following requirements are met:
- You must have a non-self-signed SSL Certificate.
- Port 443 must be enabled in your firewall for HTTPS traffic.
Enabling OCSP Stapling
At the time of writing, OCSP is not enabled by default in Plesk, despite being a frequently requested feature, as highlighted in Plesk's feature requests.
As a practical workaround, you can manually enable OCSP stapling by creating a file named lsocsp.conf and placing it in the appropriate directory for your specific operating system:
- For CentOS-based systems, use the
/etc/httpd/conf.d/directory. - For Debian systems, place it in the
/etc/apache2/conf.d/directory. - For Ubuntu and Debian 11, the correct location is
/etc/apache2/conf-enabled.
The lsocsp.conf file should contain the following configuration block:
<IfModule Litespeed>
  SSLStaplingCache shmcb:/var/run/ocsp(128000)
  SSLUseStapling on
</IfModule>
After creating this file and adding the content, a restart of the LiteSpeed Web Server is required for the changes to take full effect.
Verifying OCSP Stapling Operation
There are three reliable methods to confirm that OCSP stapling is actively working on your server:
- METHOD 1: Utilize SSL Labs
Visit SSL Labs, perform an SSL test for your domain, and then search the comprehensive results forOCSP stapling. A successful implementation will be clearly indicated. - METHOD 2: Check the Cache Directory
Inspect the/dev/shm/lsws/ocspcache/directory. If files have been created and are present within this directory, it signifies that your OCSP stapling is functioning correctly. - METHOD 3: Use the OpenSSL Command
Execute the followingopensslcommand in your terminal:
If OCSP stapling is operational, the output will displayopenssl s_client -connect Your_Domain:443 -status | grep "OCSP Response Status"ok. Additionally, within the OCSP Response Data section, you should verify that the OCSP Response Status issuccessful.
Important Note: The OCSP response is typically cached for a duration of one day. Should you change your SSL certificate provider and observe a cached OCSP response for a domain, you can safely remove the old cache files from the OCSP cache folder. However, ensure that you do not remove the folder itself.
Accessing the LiteSpeed WebAdmin Console
When operating within a Plesk environment, the LiteSpeed WebAdmin Console deviates from its default port 7080 and instead utilizes port 7088. It is essential to verify your firewall settings to ensure that port 7088 is open and enabled. Once the port is accessible, you can access the WebAdmin Console by navigating to https://SERVER_IP:7088 in your web browser, replacing SERVER_IP with your server's actual IP address.
Customizing the Plesk Login Page URL
For enhanced user experience and branding, you have the option to configure your Plesk login page to be accessible without requiring a specific port number in the URL. For example, instead of users needing to navigate to https://192.0.2.0:8443, they could simply access it via https://example.com.
To implement this, you will need to create a virtual host (vhost) within Plesk. Subsequently, place the following rewrite rule within the .htaccess file of that newly created vhost:
RewriteRule ^(.*)$ https://127.0.0.1:8443/$1 [P,L]
This rule effectively redirects requests to the internal Plesk login page without exposing the port in the public URL.
Disabling Apache Fallback in LiteSpeed Web Server
LiteSpeed Web Server (LSWS) requires a valid license to operate. In situations where a valid license cannot be detected or verified, LSWS is designed to automatically switch to Apache. This automatic fallback mechanism is a crucial feature intended to minimize service disruption and keep websites hosted on the server operational.
However, starting with LSWS version 6.2.2, administrators have the ability to override this default behavior. To prevent LSWS from falling back to Apache when a license issue occurs, you can create an empty file named .stay_with_lsws in the /usr/local/lsws/admin/tmp/ directory. This can be done using the following command:
touch /usr/local/lsws/admin/tmp/.stay_with_lsws
It is important to understand the implications of this override: if LSWS fails to detect a valid license and this file is present, the server will not switch to Apache. Consequently, any websites hosted on that server will become inaccessible, resulting in downtime for users. Use this feature with caution and only when you fully understand the potential impact.
