Automating Server Operations with Scheduled Tasks in Plesk Obsidian
For server administrators and website owners, the ability to automate recurring operations is crucial. Plesk Obsidian provides a robust task scheduler, often referred to as cron jobs, allowing you to execute scripts or commands on your server automatically at predefined intervals. This functionality is indispensable for a wide range of tasks, from website backups and data synchronization to routine maintenance scripts and custom application processes.
Managing Existing Scheduled Tasks
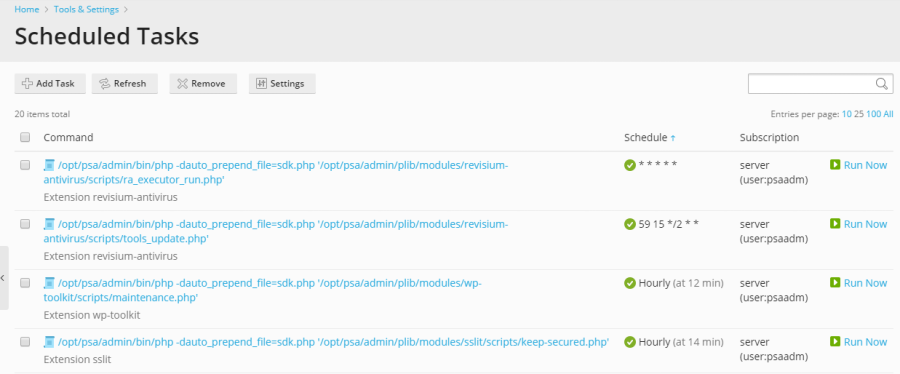
To gain an overview of all scheduled tasks configured across your server, including those set up at the server level and for individual subscriptions, navigate to Tools & Settings, then select Scheduled Tasks (Cron jobs). This central interface offers a consolidated view of all automated processes running on your system.

Within this comprehensive list, you have several options to efficiently manage your tasks. You can sort tasks by command, subscription, or their scheduled timing. Sorting by schedule is particularly useful for diagnosing potential performance bottlenecks, as it allows you to quickly identify resource-intensive tasks that might be spiking server load at specific times. For each entry, clicking on the task’s name enables you to modify its properties. Furthermore, tasks can be activated or deactivated using the dedicated icons, or run immediately for testing purposes:
- Activate a task:

- Deactivate a task:

Important Note for Plesk for Linux Users
In Plesk for Linux environments, scheduled tasks created by Plesk users are executed within a chrooted shell by default. This security measure effectively changes the file system root to the corresponding system user’s home directory, enhancing server security by isolating user processes. However, this configuration can limit certain options for Plesk users. Should you need to adjust the shell used for scheduled tasks across all Plesk users, you can do so by going to Tools & Settings > Scheduled Tasks > Settings. For an in-depth understanding of these shell settings and their implications, please refer to the official documentation on Scheduled tasks shell setting.
Creating a New Scheduled Task
To establish a new automated task on your server, navigate to Tools & Settings > Scheduled Tasks > Add Task. The first step involves selecting the appropriate task type that best suits your objective.
Choosing a Task Type
Plesk offers three distinct task types to accommodate various automation needs:
- Run a command: This option allows you to specify the full path to any executable file on your server. This includes a wide range of scripts and programs, such as binary files, custom shell scripts, and Windows batch files, providing maximum flexibility for server-side operations.
- Fetch a URL: Ideal for triggering web-based actions or cron jobs. Simply provide the URL you wish to access, and Plesk will handle the request without requiring you to manually type commands like
curlorwget. This is perfect for activating remote scripts or API endpoints. - Run a PHP script: Designed specifically for PHP-based automation. You only need to specify the full path to your PHP script, for instance:
/tmp/script.php. Plesk will then execute the script using the appropriate PHP interpreter.
Configuring Task Schedule and Properties
After selecting your task type, the next critical step is to define how often the task will run, along with the precise time and date. By default, task execution times are based on the server's time zone. If your requirements necessitate a different time zone, you can adjust this setting under Tools & Settings > Scheduled Tasks > Settings. Additionally, you can add a descriptive label for your task, specify the system user under whose security context the task will be executed, and configure notification preferences to receive alerts regarding task completion or failures.
Testing Your Scheduled Task
Before finalizing and saving your new scheduled task, it is highly recommended to perform a test run. The "Run Now" button provides an immediate execution of your task, allowing you to verify its configuration and ensure it operates as expected. Observe the output for any errors or unexpected behavior. If the task encounters an error during this test, it will also fail when automatically executed by the scheduler. Therefore, it is essential to identify and resolve any issues at this stage to guarantee the task’s reliable and successful operation.
By leveraging Plesk Obsidian's scheduled task capabilities, you can significantly streamline your server management, reduce manual intervention, and ensure your websites and applications run smoothly and efficiently.


