


To enhance server efficiency and automate routine operations, Plesk Obsidian offers a robust task scheduler, commonly known as cron jobs. This powerful facility allows you to execute various scripts and commands on your server at predefined intervals, ensuring that your system maintains optimal performance and reliability without manual intervention.
Managing Existing Scheduled Tasks
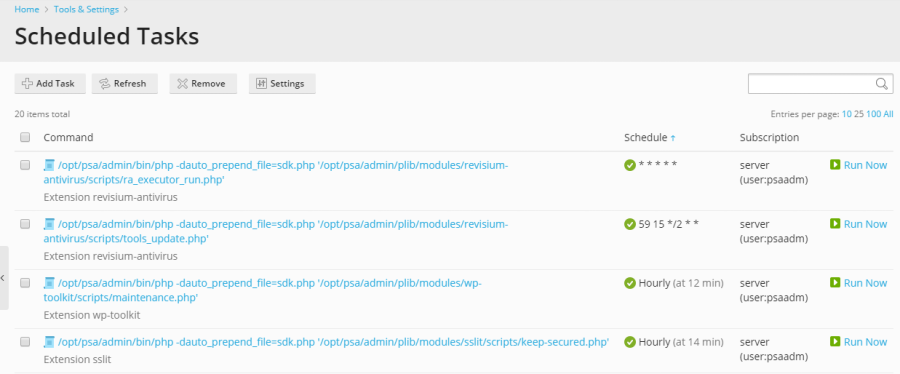
Monitoring and managing your automated processes is crucial for effective server administration. To view a comprehensive list of all scheduled tasks, including those created at the server level and for individual subscriptions, navigate to Tools & Settings > Scheduled Tasks (Cron jobs).
Understanding Task Details and Actions
The scheduled tasks interface provides powerful filtering and management capabilities. You can conveniently sort tasks by command, associated subscription, or schedule. Sorting by schedule is particularly useful for diagnosing periods of high server load, as it can help identify resource-intensive tasks that might be spiking at specific times. For each task listed, you have several direct actions available:
- Modify Properties: Click on a task’s name to access and edit its configuration, including the command, schedule, and user context.
- Activate/Deactivate: Toggle the task's active status using the
 icon to enable execution or the
  icon to temporarily pause its operation.
 - Run Immediately: Execute a task on demand to test its functionality or perform a quick, unscheduled run.
Note for Plesk for Linux Users: By default, scheduled tasks created by Plesk users in Plesk for Linux are executed within a chrooted shell environment. This security measure changes the file system root to the respective system user’s home directory, enhancing isolation and security. However, this may limit certain operations for Plesk users. To adjust the shell used for scheduled tasks across all Plesk users, go to Tools & Settings > Scheduled Tasks > Settings. For an in-depth understanding of these shell settings and their implications, please refer to the Scheduled tasks shell setting documentation.
Creating New Scheduled Tasks
Setting up a new automated task is a straightforward process designed to cater to various operational needs. To begin, navigate to Tools & Settings > Scheduled Tasks > Add Task. The first step involves selecting the appropriate task type based on your objective:
Choosing a Task Type
- Run a command: This option allows you to execute any binary file, shell script, or batch file by specifying its full path. It's ideal for system maintenance, custom script execution, or running compiled applications.
- Fetch a URL: Perfect for web-based cron jobs or triggering specific actions on a website. Simply provide the full URL, and Plesk will handle the underlying command (such as `curl` or `wget`) to access it. This is commonly used for CMS maintenance tasks or external service integrations.
- Run a PHP script: Designed for executing PHP scripts directly, for example:
/tmp/script.php. This is widely used for processing data, generating reports, or managing content within PHP-based applications like WordPress or Joomla.
Configuring Task Schedule and Settings
Once you've selected the task type, you will define its execution schedule. Choose how often the task should run (e.g., hourly, daily, weekly, or at specific times) and set the exact time and date. By default, the task execution time is aligned with the server's time zone. If your requirements necessitate a different time zone, you can adjust this setting under Tools & Settings > Scheduled Tasks > Settings.
Beyond the schedule, you can also configure several other vital parameters:
- Description: Add a clear, concise description to help you remember the task's purpose, especially useful when managing numerous scheduled operations.
- System User: Select the specific system user under whose security context the task will run. This is critical for ensuring proper file permissions and access rights for the script or command.
- Notifications: Configure how you wish to be notified about the task's execution status, whether it succeeds or encounters errors, helping you stay informed about your server's automated processes.
Testing and Finalizing Your Task
Before saving your new scheduled task, it is highly recommended to perform a test run to confirm its configuration and functionality. Click the Run Now button and monitor the task's completion. If the test run concludes with an error, it indicates an issue that must be resolved; an uncorrected error will cause the task to fail when executed by the scheduler at its designated time. Thorough testing ensures that your automated processes perform as expected, contributing to a stable and efficient server environment.
