


Managing Scheduled Tasks in Plesk Obsidian
Plesk Obsidian provides a robust task scheduler, often referred to as cron jobs on Linux systems, allowing administrators and users to automate the execution of scripts and commands at predefined intervals. This functionality is crucial for maintaining server health, performing regular backups, updating content, or running any custom application logic without manual intervention. Efficient server management often relies on the automation of routine operations. Plesk Obsidian simplifies this process through its integrated task scheduler, enabling you to set up scripts to run automatically on your server at specified times.
Overview of Existing Scheduled Tasks
To gain a comprehensive view of all scheduled tasks configured across various subscriptions, as well as those set at the server level, navigate to Tools & Settings > Scheduled Tasks (Cron jobs).
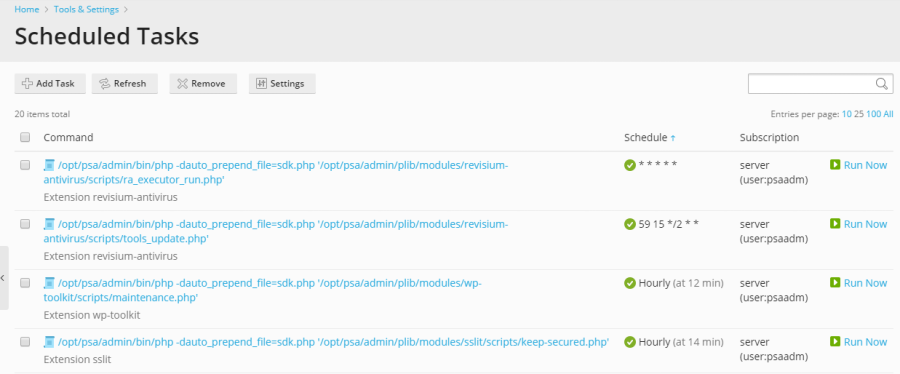
The scheduled tasks interface offers powerful management capabilities. You can conveniently sort tasks by command, associated subscription, or schedule. Sorting by schedule is particularly useful for diagnosing potential server load spikes, which might indicate a resource-intensive task running concurrently with others. For each task listed, you have the flexibility to modify its properties (by clicking the task's name), activate it by clicking the  icon, deactivate it by clicking the
  icon, or execute it immediately for testing or urgent requirements. This centralized management allows for quick oversight and control over all automated processes running on your server.
Important Considerations for Linux Environments
It's important to note a specific security enhancement in Plesk for Linux. By default, scheduled tasks created by Plesk users are executed within a chrooted shell. This security measure effectively changes the file system root to the corresponding system user’s home directory, enhancing isolation and security. While beneficial for security, this configuration can limit the options available to Plesk users when specifying file paths or accessing certain system resources.
If your specific requirements necessitate a different shell environment for scheduled tasks across all Plesk users, you can adjust this setting. Navigate to Tools & Settings > Scheduled Tasks > Settings. For a detailed understanding of these shell settings and their implications, please refer to the comprehensive documentation on Scheduled tasks shell setting.
Creating New Scheduled Tasks
To establish a new automated task on your server, proceed to Tools & Settings > Scheduled Tasks > Add Task. The initial step involves selecting the appropriate task type that aligns with your automation objective:
- Run a command. This option is ideal for executing any executable file, including binary applications, custom shell scripts, or batch files. You must provide the complete and absolute path to the executable file to ensure successful execution.
- Fetch a URL. When your task involves triggering an action via a web request, such as a cron job for a web application, this type is suitable. Simply specify the URL; there is no need to prepend commands like
curlorwget, as Plesk handles the web request internally. - Run a PHP script. For executing PHP-based scripts, select this option and provide the full path to your PHP file, for instance:
/tmp/script.php. Plesk will ensure the script is run using the appropriate PHP interpreter.
Following the selection of your task type, you will configure the task's schedule. This includes defining how frequently the task should run, along with the precise time and date. By default, task times are based on the server's local time zone. Should you need to specify an alternative time zone for your tasks, this can be adjusted under Tools & Settings > Scheduled Tasks > Settings.
Furthermore, you have the ability to assign a descriptive name to your task for easy identification, select the specific system user under whose security context the task will be executed, and configure notification settings to receive alerts regarding task completion or errors. Choosing the correct system user is vital to ensure the script has the necessary permissions to operate effectively.
Testing Your Scheduled Tasks
Before finalizing and saving your new scheduled task, it is highly recommended to perform a test run. This crucial step helps verify that the task is configured correctly and functions as expected. Click the Run Now button and allow the task to complete its execution.
If the test run concludes with an error, it is a strong indication that the task will similarly fail when executed automatically by the scheduler. Identifying and resolving any issues at this stage is critical to ensure the reliability and successful operation of your automated processes. Proactive testing prevents unexpected failures and ensures your server automation runs smoothly.
