


Enhance your website's capabilities dramatically through the integration of various web applications. These applications, once installed on your website, can execute a diverse range of functions. For individuals, this might translate into establishing a personal blog to share insights, or setting up an efficient online storage system for media files. Businesses, on the other hand, can leverage powerful e-commerce platforms or robust CRM (Customer Relationship Management) solutions to optimize their online operations. Accessing and installing these versatile applications is straightforward, as they are all conveniently accessible within the Applications section of your Customer Panel.
The selection of available applications is determined by your specific hosting plan. For instance, your plan might grant access exclusively to free applications, or it might not include any applications at all. For comprehensive details regarding the applications accessible to you, it is recommended to consult your hosting provider.
App Types
Web applications generally fall into one of two main categories:
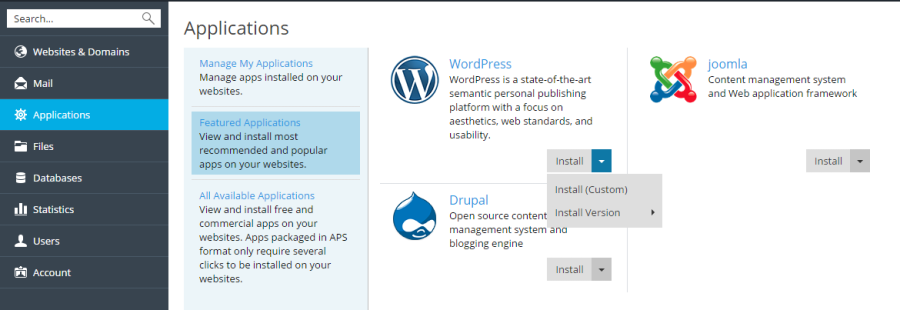
- Directly Installed Apps: These applications are installed directly onto your website's hosting environment. Prime examples include popular content management systems like WordPress for blogging and Joomla! for comprehensive website management.
- Third-Party Hosted Apps: These applications are hosted on external servers and are provided by third-party services, integrating with your website's functionality remotely.
Regardless of their installation method, applications can also be classified as either free or commercial. Commercial applications typically require the acquisition of a valid license key before you can begin utilizing their features and services.
App Installation and Maintenance
The installation process for web applications within Plesk is designed to be fully automated and user-friendly, requiring no specialized technical skills. To understand the step-by-step procedure for installing web applications from your Customer Panel, please refer to the detailed instructions provided in the section titled Installing Apps.
Ongoing app management is equally streamlined. Plesk allows you to effortlessly update or remove applications directly from your control panel. Furthermore, certain applications expose specific functionalities directly within the Customer Panel, eliminating the need to log into the application itself. For example, you can conveniently add new user accounts for SugarCRM directly from your Plesk Customer Panel. Such integrated functionality is referred to as a service provided by the application.
After successfully installing an application, it is crucial to grant access to any additional user accounts that you wish to enable to use the app. For a comprehensive guide on managing your installed applications, please consult the section Managing Apps.
App Databases
When an application requires a database, Plesk intelligently creates it automatically during the application's installation phase. Plesk utilizes specific app database settings for this process, which you can customize in the Main configuration section (accessible via the Show All Settings link) when initiating an app installation. Key settings include:
- Database Name and Server: You can specify the name of the database and the particular database server where the application will store its data.
- Database User Credentials: These credentials are used by Plesk to access the app's database. For convenience, it can be efficient to use a single database user with access to multiple databases. In such cases, you can create a universal user account and specify it during subsequent app installations. For more information on managing database user accounts, please refer to the section Managing Database User Accounts.
It is important to note that if you have reached the maximum number of databases permitted by your subscription, a newly installed application will not create a new database. Instead, it will add its tables to one of your existing databases, utilizing prefixes for the table names. These prefixes serve to clearly distinguish tables belonging to different applications. For example, the WordPress application typically adds the “wpress_” prefix to the names of its tables.
Access to Apps
By default, following the installation of an application, only users assigned the Owner role have immediate access. To extend access to other subscription users, you must adjust their permissions accordingly. For detailed instructions on configuring app access for additional users, please refer to the section Granting Additional Users Access to Apps.
Apps and Additional User Accounts
Certain applications offer the capability to create and manage user accounts directly within the Plesk interface. For instance, the SugarCRM application allows you to add SugarCRM users without needing to log into the application itself. All applications that provide such “account services” can link their internal accounts with the users of a Plesk subscription (i.e., additional users). To establish such an association, you must grant these additional users access to the specific account service, following a similar procedure used for granting access to the apps themselves. For comprehensive details on account association, please consult the section Linking Apps and Additional User Accounts.
Installing Apps
Depending on your specific requirements and technical expertise, you can select from two distinct methods for installing an application:
- Quick Installation: This is the simplest and fastest method to install an app. Choosing this option instructs Plesk to perform a typical installation of the latest available version of the selected application, utilizing default values for all app settings. For example, your Plesk access credentials will typically be used as the app's administrator credentials. However, some applications may still require you to provide specific settings even during a quick installation.
- Custom Installation: This method provides greater control, allowing you to customize various app installation settings. These include administrator credentials, installation location, installation path, and other parameters. Custom installation is particularly useful if you wish to disable automatic updates for the application.
Note: Many applications may not function correctly if the
safe_modePHP directive is enabled. To verify ifsafe_modeis active for your account, navigate to Websites & Domains, click PHP settings, and locatesafe_modein the Common settings section. Ifsafe_modeis on, it should be switched off. If you are unable to modify PHP settings, please contact your hosting provider for assistance.
To install an application, follow these steps:
- Go to the Applications section and locate the desired app.
- Click either the Install button for a quick installation or the Install (Custom) button for a tailored installation.
- (Optional) Disable automatic upgrades for the app. If you prefer that the app is not automatically updated, deselect the option Automatically update this app when updates are available on the installation settings page.
- (Optional) Select a specific app version. There might be instances where you need to install a particular version of an app, perhaps because you plan to use extensions that are incompatible with the latest version. In such cases, click the app name > Install version to choose the required version before proceeding with the installation.
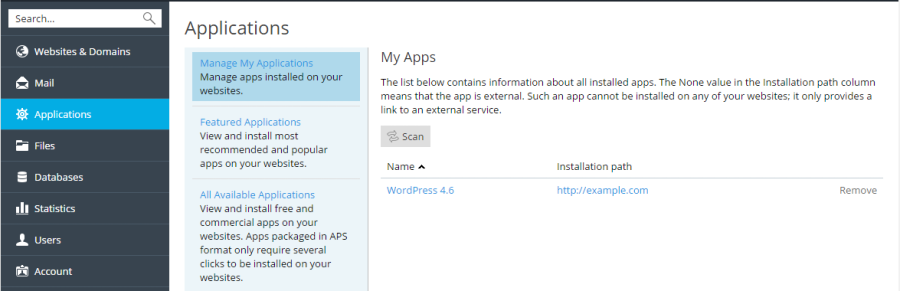
Managing Apps
Once installed, most applications allow for the configuration of their primary parameters directly from the Customer Panel. You can access an app's settings by selecting it from the list found in Applications > Manage My Applications. After choosing an app, you can configure the following aspects:
- General Settings: These are fundamental settings, such as the app administrator's password, which can be modified by clicking Change Settings.
- Service Settings: If an app provides certain functionalities to Plesk as integrated services, you have the option to configure them. For example, the SugarCRM app facilitates the creation of user accounts and exposes this capability as a service within the Customer Panel. By selecting this service under Provided services, you can view all existing app user accounts and create new ones. For some applications, you can also link these app accounts with additional user accounts from your Plesk subscription. Learn more about this account association process in the section Linking App and Additional User Accounts.
Note: If WP Toolkit is installed on your server, it is highly recommended that users leverage this tool for centralized management of all WordPress installations on the server. Further information can be found in the section WP Toolkit.
Granting Additional Users Access to Apps
By default, upon installing an application, access is restricted solely to users with the Owner role. To enable other subscription users to access the application, you must follow these steps:
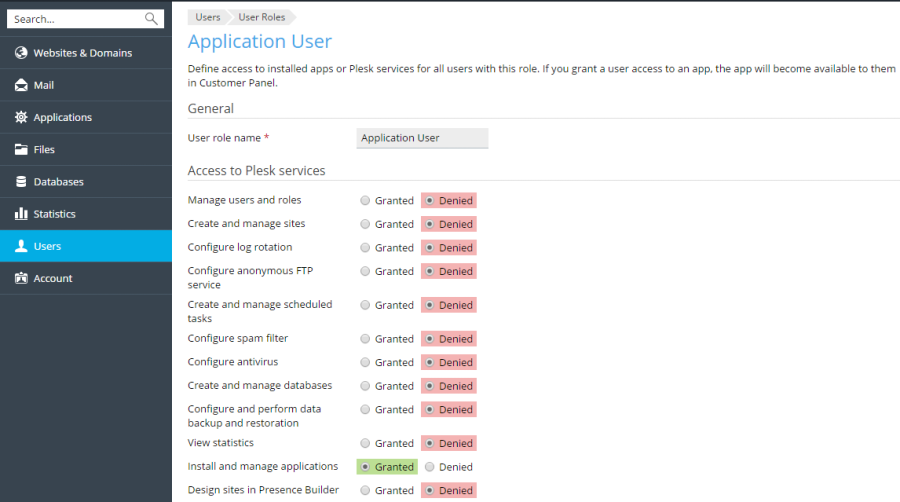
- Grant the necessary permission to access the app to a specific user group within Users > User Roles.
- Ensure that the users you wish to grant access to are assigned to that particular group.
Once you have enabled users to access the app, a convenient link to the application will appear on their Websites & Domains page, listed under the name of the corresponding website. It is important to remember that you can only control app access at the user group level. Therefore, you will either need to modify the permissions of an existing group or create a new group and subsequently assign users to it.
Typically, the app administrator is the subscription user with the Owner role. In addition to accessing apps from the Websites & Domains page, this user also possesses the authority to install and manage applications within a subscription. For these administrative functions, their interface includes an additional Applications page. You can extend these same administrative privileges to other subscription users by granting the Install and manage applications permission to their respective roles in Users > User Roles. This permission bestows full administrative control over all applications within a subscription, allowing these users to install, configure, update, and remove apps via the Applications section in their Customer Panel.
Linking Apps and Additional User Accounts
Some applications are designed to allow you to create and manage user accounts without requiring you to log directly into the application itself. If an app provides such an account service, you have the ability to link existing Plesk subscription users with accounts within that specific application. To establish such an association, proceed as follows:
- Organize the relevant users into a designated group (via Users > User Roles).
- Grant one of the following permissions to this user group:
- Public access: If granted, all users within this group will be able to access the application through a dedicated link on their Websites & Domains page.
- Personal access: If granted, the application will automatically create individual accounts for all users within the group. Subsequently, an additional link will appear on each user's Websites & Domains page, enabling them to log directly into their personal account within the application. Please note that if you revoke the Personal access permission, the application will automatically remove all accounts that were associated with this group.
Updating Apps
Automatic Updates
By default, Plesk automatically installs the latest available versions of applications and updates them promptly as newer versions become available. However, an application update can sometimes introduce significant changes to its functionality. For example, plug-ins or extensions developed for a specific app version might prove incompatible with newer iterations. Consequently, you may wish to disable automatic updates for certain applications.
To toggle automatic updates on or off:
- Navigate to Applications > Manage My Applications and click on the name of the desired application.
- Click Change Settings.
- Select or deselect the Automatically update this app when updates are available option according to your preference.
Manual Updates
If you have chosen to prohibit automatic updates for an application, Plesk will notify you about the availability of newer versions. This notification appears as an “Update available” link positioned below the app name in Applications > Manage My Applications. Clicking this link allows you to review the changes introduced in the new version and then decide whether to proceed with updating the application or to continue using the current version.
Managing PHP Project Dependencies with Composer
Composer is an essential dependency management tool specifically designed for PHP projects. It streamlines the process of finding, installing, and updating the various library packages that your PHP project relies upon. These libraries are typically installed directly into your project's root directory. The Composer utility is conveniently included as part of Plesk, eliminating the need for manual installation within your project. Plesk ensures that Composer itself receives weekly updates to maintain its efficiency and compatibility.
Composer utilizes two primary files to maintain a comprehensive list of modules required for your project:
composer.json: This file explicitly lists the libraries on which your project directly depends. You can create this file in your project's root directory and specify the necessary packages. The ‘composer init’ command can assist you in generating acomposer.jsonfile.composer.lock: This file provides a detailed record of all libraries, including both direct and indirect dependencies, ensuring that all necessary components for your project are accounted for.
For more in-depth information, please refer to the official Composer documentation available at https://getcomposer.org/doc/.
Plesk offers two convenient methods for interacting with Composer:
- Command Line Interface: You can manage Composer dependencies directly via the command line. Consult the Composer documentation for specific instructions.
Note: When using the command line, ensure you operate within a normal environment (not a chrooted environment).
- Plesk User Interface: Composer functionalities are also accessible through the Websites & Domains > Applications section. Refer to the instructions below for guidance on using the UI.
Using the UI for Managing PHP Project Dependencies with Composer
To identify all applications within your hosting environment that contain a composer.json file and are therefore eligible for dependency management, click the Scan button in Websites & Domains > Applications. These applications will then appear in the list within the Applications section. The Composer commands described in this section are exclusively available for applications that include a composer.json file.
Installing Dependencies
To install all the necessary modules for your project, navigate to Websites & Domains > Applications > Manage My Applications. From the list, click the application name, and then select Install Dependencies.
Updating Dependencies
To update your project's module dependencies to their latest compatible versions, go to Websites & Domains > Applications > Manage My Applications, click the application name, and then choose Update Dependencies.
Editing Dependencies
The Edit Configuration button provides direct access to the composer.json file within Plesk's integrated Code Editor, allowing for manual adjustments to your project's dependencies.
Removing Dependencies Management from Your App
When you click the Remove button, the application will no longer be displayed in the list of applications under My Apps. However, it is important to note that the composer.json and composer.lock files will remain present in your application's directory. This means you can easily re-add the application to the list at any time by simply clicking Scan again.
