


Docker is a powerful platform designed to streamline the deployment and management of applications within isolated environments called containers. This technology is particularly beneficial for utilizing specific software, such as Redis or MongoDB, or particular versions of applications that might not be natively supported by your operating system or require complex compilation processes.
Integrated seamlessly into Plesk as an extension, Docker enables you to efficiently run and manage containers built from a wide array of Docker images. This functionality extends to using Docker not only on your local host but also on remote servers, offering flexible deployment options.
Throughout this comprehensive guide, you will learn the essential steps for creating, configuring, and managing Docker containers directly within the Plesk interface. Furthermore, we will explore how to effectively control remote Docker hosts from your Plesk environment, providing a complete solution for containerized application management.
Requirements and Limitations
Warning: The Docker extension downloads images directly from Docker Hub without any pre-configuration. It is crucial to understand that some Docker containers or the software within them are intended for trusted environments only and may necessitate additional security configurations. Before launching any downloaded images in Plesk, you must enhance their security manually. For detailed instructions, please consult the official documentation of the specific container or software vendor. For example, refer to the security section in the Redis documentation for guidance on securing Redis installations.
- Docker is supported in Plesk on the following operating systems: CentOS 7, Red Hat Enterprise Linux 7, Debian 10, Debian 11, Debian 12, Ubuntu 18.04, Ubuntu 20.04, Ubuntu 22.04, Ubuntu 24.04, AlmaLinux 8.x, AlmaLinux 9.x, Rocky Linux 8.x, and Virtuozzo 7 with Update 1 Hotfix 1 (version 7.0.1-686) or later.
- For Plesk on Windows, you can leverage Docker installed on a remote machine. For more details, refer to the Using Remote Docker section later in this document.
- It is not possible to utilize Docker within a Plesk instance that is itself deployed inside a Docker container.
- To access and manage remote Docker services from Plesk, an additional license is required. This license can be acquired separately or as part of a bundle such as the Hosting Pack, Power Pack, or Developer Pack.
- Docker exclusively operates on x64 systems.
- Docker containers managed within Plesk cannot be directly migrated or backed up. However, you can back up the data utilized by these containers (as described in the Volume Mapping section below) or download container snapshots.
- Virtuozzo 7 with Update 1 Hotfix 1 (7.0.1-686) or later is supported. It's important to note that with this update, newly created CentOS 7-based containers have the firewall enabled by default, reflecting Virtuozzo's commitment to enhanced security. Plesk administrators must manually configure the firewall to ensure that all ports necessary for Plesk operation are open.
Prerequisites
Before you can begin leveraging Docker's capabilities, the Docker extension must be installed on your Plesk server. If you are the Plesk administrator, you can install the extension directly from the Extensions Catalog. If not, please contact your hosting provider and request them to install the extension for you.
Once the Docker extension is successfully installed, you will find the "Docker" option conveniently located in the Navigation Pane, indicating you are ready to proceed with container management.
Containers
You can readily access a vast catalog of Docker images from Docker Hub within the "Run Container" section of Plesk (navigate to Docker > Containers > Run Container).
To access this catalog:
- If you haven't previously installed any containers, click Run Container in Docker > Containers.
- If you have installed containers before, click the plus icon
in Docker > Containers.
Utilize the search box to efficiently find available images within the catalog.
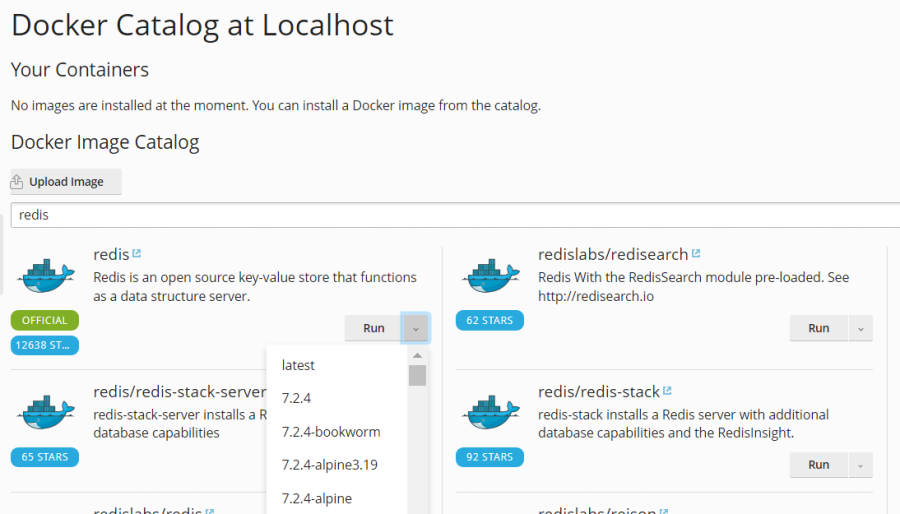
You can specify the image name, the repository, or both to refine your search results.
The following repositories are available for your search:
- Local repository: This contains images that have already been downloaded and are stored on your server with Docker. For further details, refer to the Managing Local Images section later in this document.
- Docker Hub: The official public registry for Docker images.
Many applications offer multiple versions. You can select and run a specific version by choosing the appropriate tag from the available options, as illustrated below:
To run a Docker container:
- Navigate to Docker > Containers > Run Container.
- Use the search box to locate the desired images within the catalog. If an image is stored locally, (local) will be appended after its version.
- To view the image description and access its documentation on Docker Hub, click the more info icon
 . This option is not applicable to local images.
 - Click on the desired image card.
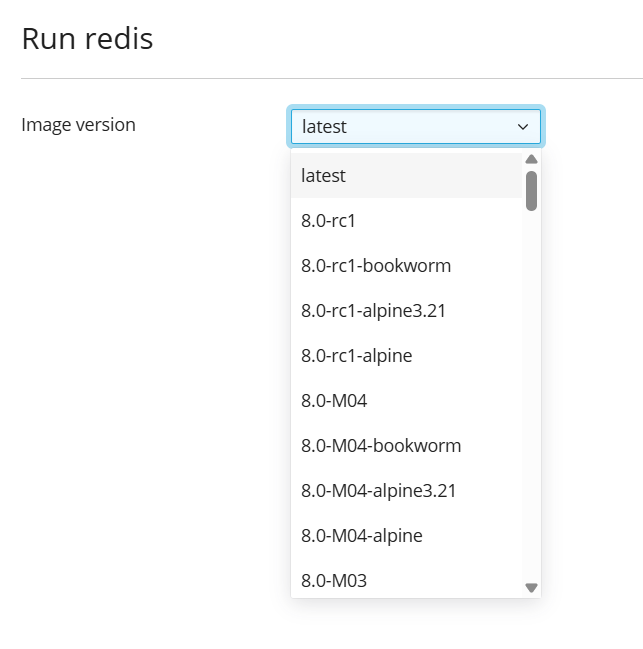
- To run a specific version, select the preferred image version from the Image version drop-down menu and then click Next.
- To run the latest available version of the selected application, simply click Next.
Plesk will then initiate the creation of the container and prompt you to define its settings, such as environment variables. The container will then start running. You have the option to cancel the running process by clicking Cancel on the Settings screen. For a detailed understanding of these settings, please refer to the Container Settings section on this page.
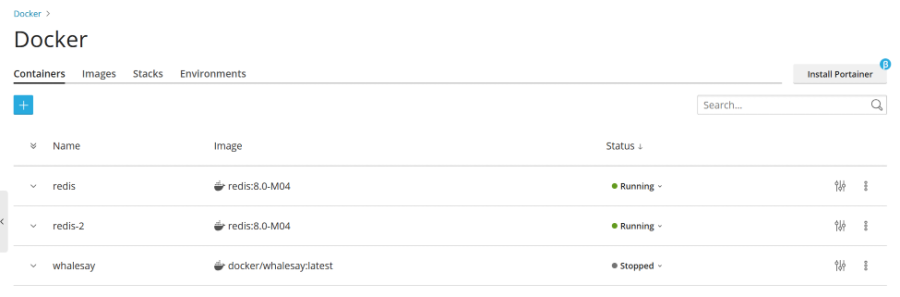
- After adjusting the settings to your requirements, click Run. The newly created container will then appear in the list of containers on the Containers tab.
Always review the Console Log to ascertain whether the container is operating without any issues or errors.
Container Settings
Note: You do not need to stop a container to modify its settings. When you save new configurations, Plesk intelligently recreates the container with the updated parameters, ensuring minimal downtime.
To access and edit container settings, navigate to the Containers tab and click the settings icon ![]() located next to the container you wish to modify.
located next to the container you wish to modify.
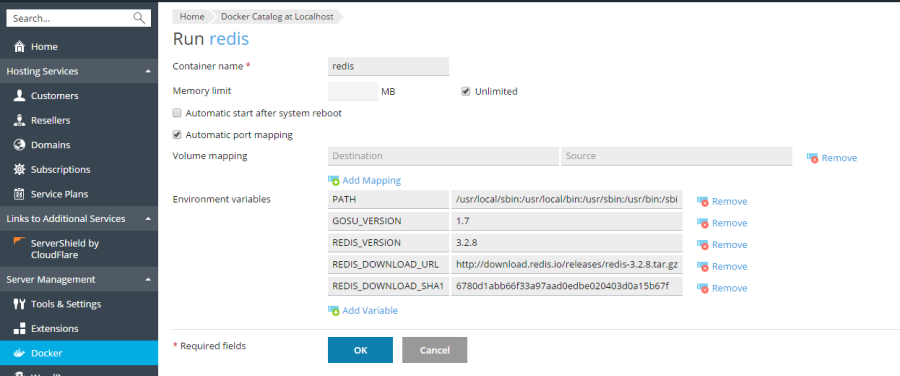
Limiting Memory
By default, Docker containers have unrestricted access to the host system's RAM. To impose a limit on RAM usage, select the Memory limit checkbox and input the desired limit value in megabytes (MB) into the corresponding field.
Note: At present, it is not possible to limit CPU or disk usage for Docker containers within Plesk.
Note: Docker containers are considered administrator-level objects and are therefore not governed by subscription-level cgroup limits (which typically control CPU, RAM, and Disk usage).
Automatic Start
If the option Automatic start after system reboot is not selected, any websites relying on this container might become inaccessible following a system reboot. In such cases, you would need to manually start the container to restore service.
Port Mapping
By default, Automatic port mapping is enabled, which maps the container's internal port to a randomly assigned port on the host system (e.g., 32768). This provides a quick and convenient way to expose container services.
To manually specify the port on the host system, deselect Automatic port mapping and enter a different external port in the Manual mapping field. If Manual mapping does not appear after deselecting the automatic option, it indicates that the specific container does not expose any ports.
When using manual mapping, Docker typically binds only to the specified port on the host system's localhost interface (127.0.0.1) by default. This configuration ensures that the port remains inaccessible from the internet, thereby protecting the application inside the container from external attacks. To allow Docker to bind to the specified port on all network interfaces of the host system, deselect Make the port inaccessible from the Internet. Be aware that doing so will make the application inside the container accessible from the internet via any of the host system's IP addresses on the specified port.
Warning: Docker generally assumes that authentication is handled by the application itself. However, this is not always the case (for instance, MySQL/MariaDB typically requires authentication by default, while Redis might not). Making an application inside a container accessible from the internet without proper authentication and security measures can expose it to potential attacks from malicious actors. Exercise caution and ensure robust security practices.
Volume Mapping
Docker volumes serve as persistent storage mechanisms, allowing you to mount directories from your server directly into a Docker container. This ensures that data persists even when containers are stopped, removed, or recreated, and can be easily accessed from your host system.
Warning: Data stored within Docker volumes will not be included in Plesk backups. To safeguard against data loss, it is highly recommended to back up any critical data residing in a volume using a third-party backup tool.
For more comprehensive information regarding data management in containers, please consult the official Docker documentation on volumes.
To establish a volume mapping, provide the following details:
- In the Host field, specify the absolute path to the directory on your server that you intend to mount into the container.
- In the Container field, specify the absolute path to a directory within the container where the host directory will be mounted.
To map additional directories, simply click Add one more.
Setting Environment Variables
Environment variables are crucial for configuring applications running within a container. You may need to add new variables or modify existing ones to suit your application's requirements. Plesk allows you to add as many environment variables as necessary for your containerized applications.
Operations with Containers
Plesk provides a range of operations to manage your Docker containers effectively:
- You can readily Stop, Start, or Restart a container. In each of these scenarios, the container will be recreated using its current settings.
Note: If you have not saved your data to mounted volumes (refer to the Volume Mapping section above), any unsaved data will be lost during these operations.
- Click the arrow icon
 next to the container name to conveniently view its logs and current resource consumption.
 - To modify container settings, such as environment variables or volume mapping, click the settings icon
 next to the container.
 - You can easily rename a container by accessing its settings and modifying the Container name field.
Clicking the more options icon ![]() next to a container reveals additional actions you can perform:
next to a container reveals additional actions you can perform:
- Recreate: Rebuild the container using the same image version or choose a different one from the catalog.
- Save as Image: Create a new Docker image based on the current state and custom settings of your container.
- Download Snapshot: Obtain a snapshot of your container's current state.
- Remove: Delete the container from your system.
Recreating a Container
Recreating a container is a common procedure, particularly when you need to update an application to a newer version. This process allows you to rebuild a container using any available application version from the catalog, not just the latest one.
All custom settings configured for the container are preserved during recreation. To ensure that data used by the application inside the container is retained, it is crucial to establish volume mapping before initiating the recreation process. Volume mapping provides persistent access to directories used within the container, preventing data loss (refer to Volume Mapping in container settings for more details).
To recreate a container:
- Navigate to Docker and click the more options icon
 next to the specific container you wish to recreate.
 - In the container settings, click Recreate. You will then be prompted to specify the desired image version and whether to utilize default environment variables.
Using Remote Docker
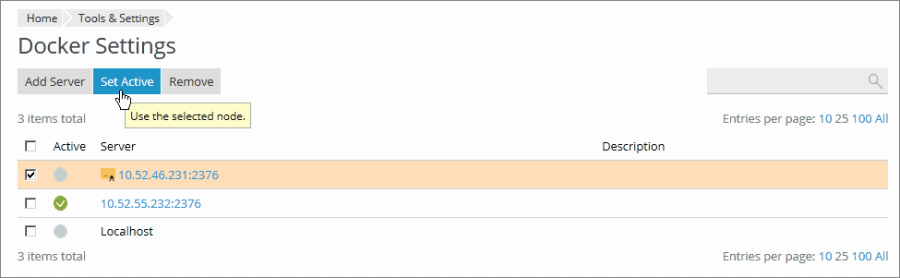
By default, Plesk utilizes Docker installed as a local service on the same server. However, for enhanced flexibility, you have the option to integrate and manage one or more Docker services installed on external, remote machines. It's important to note that only one Docker service (either local or remote) can be active and managed at any given time. The currently active server is displayed in the Environments tab of the Docker settings page within Plesk.
Note: Managing remote Docker services requires a specific Plesk license key add-on. Without this add-on, you are limited to managing only the local Docker service running on your Plesk server.
Configuring Remote Services
Before you can use a remote server as a Docker host in Plesk, you must configure it as described in the official Docker documentation, specifically regarding secure communication using HTTPS.
Managing Remote Services
Plesk facilitates the establishment of a secure connection between a Plesk server with the Docker extension and a remote node hosting a Docker service.
The following configuration steps are applicable to both Plesk for Linux and Plesk for Windows environments.
These steps must be executed on the remote host where Docker is installed:
- Create the `/etc/docker/daemon.json` configuration file for Docker with the following content:
1
2
3
4
5
6
7
8{ "hosts": ["tcp://0.0.0.0:2376", "unix:///var/run/docker.sock"], "tls": true, "tlsverify": true, "tlscacert": "/root/ca.pem", "tlscert": "/root/server-cert.pem", "tlskey": "/root/server-key.pem" } - Prepare the necessary
.pemfiles for secure communication. You can adapt the following example. Remember to replace the IP address on line 4 with the actual IP address of your remote node, then execute each command sequentially:1
2
3
4
5
6
7
8
9
10openssl genrsa -aes256 -out ca-key.pem 4096 openssl req -new -x509 -days 365 -key ca-key.pem -sha256 -out ca.pem openssl genrsa -out server-key.pem 4096 openssl req -subj "/CN=192.0.2.1" -new -key server-key.pem -out server.csr openssl x509 -req -days 365 -sha256 -in server.csr -CA ca.pem -CAkey ca-key.pem -CAcreateserial -out server-cert.pem openssl genrsa -out key.pem 4096 openssl req -subj '/CN=client' -new -key key.pem -out client.csr openssl x509 -req -days 365 -sha256 -in client.csr -CA ca.pem -CAkey ca-key.pem -CAcreateserial -out cert.pem chmod 0400 ca-key.pem server-key.pem key.pem chmod 0444 ca.pem server-cert.pem cert.pem - Execute the following commands to modify the current Docker service, ensuring it starts correctly after the host configuration and with the new settings:
1
2
3
4cp /lib/systemd/system/docker.service /etc/systemd/system/ sed -i 's/\ -H\ fd:\/\///g' /etc/systemd/system/docker.service systemctl daemon-reload systemctl restart docker - Save the outputs of the following files from your remote machine to your local machine. These files are essential for the client to establish a remote connection:
1
2
3cat key.pem cat cert.pem cat ca.pem
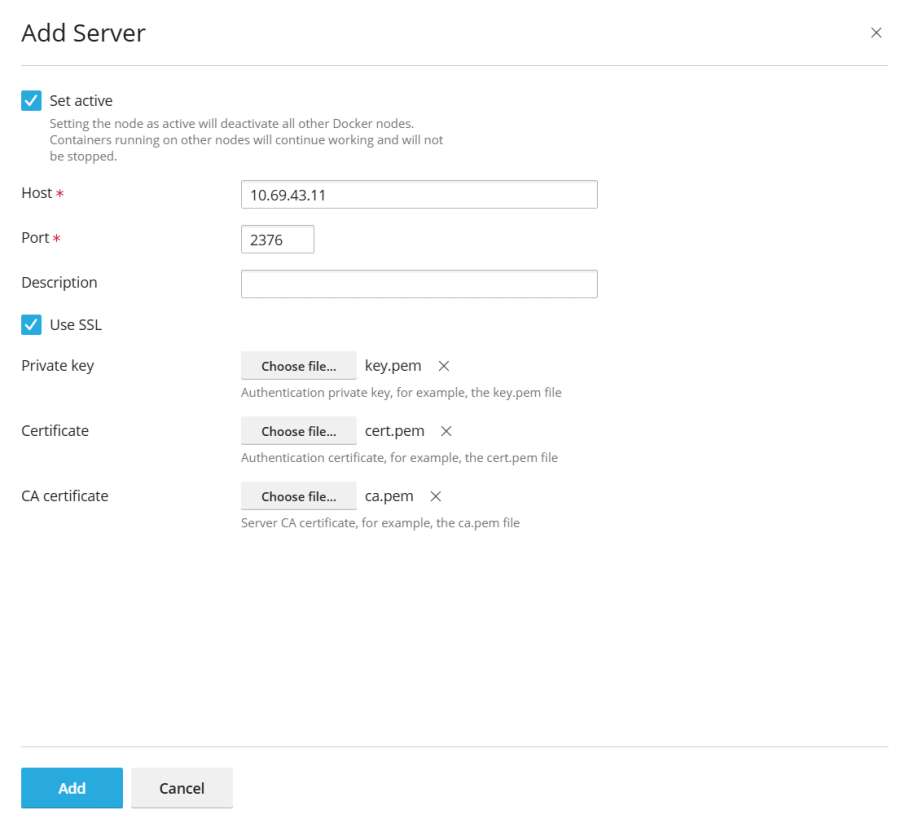
On your local Plesk server, configure the Docker remote host by following these steps:
- Navigate to Docker > Environments.
- Click Add Server and provide the necessary settings for the remote server hosting Docker.
- To immediately activate and begin using this Docker service in Plesk, ensure that Set active is selected.
Once configured, a link to the Docker service will appear in the Navigation Pane.
To switch between different Docker services (local or remote):
- Go to Docker > Environments.
- From the list of available servers, select the Docker node you intend to use and click Set Active.
Alternatively, you can also set a Docker node as active while you are editing its settings.
Creating Images with Custom Settings
If you have made specific modifications or configurations to a container and wish to save these changes as a reusable template, you can utilize the Save as Image command. This action effectively takes a snapshot of your current container's state, which then appears as a new, custom image within your image catalog. This capability is particularly useful for creating images with pre-configured settings, such as custom environment variables, tailored to your application's needs.
To create a new image from one of your existing containers:
Navigate to Docker > Containers. Locate the container you wish to snapshot, click the more options icon ![]() next to it, and then click Save as Image. In the "Save <container name> as Image" side panel, you will need to specify:
next to it, and then click Save as Image. In the "Save <container name> as Image" side panel, you will need to specify:
- The desired Image name for your new custom image.
- An optional Tag, which can be used to indicate the image version. By default, if no tag is specified, the version will be set to “latest”.
The newly created image will then be listed in the Images tab and distinctly marked as a Local image, signifying its origin from your customized container.
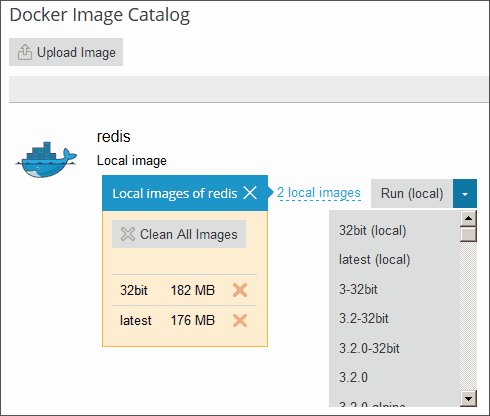
Managing Local Images
Local images are Docker images that are stored directly on your local disk, eliminating the need to download them from the online Image Catalog each time they are used. This significantly speeds up container deployment.
An image becomes local under several circumstances:
- When you select any version (tag) of an image and the download process begins. Even if you later run a container or cancel the running process on the Settings screen, the image remains saved locally.
- When you manually upload an image to Docker within Plesk using the Upload image option in the Docker Images tab.
- When you create a custom image directly from an existing container (as described in the Creating Images with Custom Settings section).
- When you build an image using the Docker command-line interface.
To download an alternative version of an image from the online catalog, click the Pull icon ![]() , select the desired version from the drop-down menu, and then click Pull.
, select the desired version from the drop-down menu, and then click Pull.
If Docker already has at least one downloaded version from a group of versions belonging to a particular image, that image will be labeled as a Local image in the catalog. Plesk also conveniently displays the number of local images available for a specific product.

To view your local images and remove outdated ones:
- Navigate to Docker > Images.
- Utilize the Search bar to find a specific local image if needed.
- To view all local images associated with a particular product, click the link located under the product name. This will display all local images' tags and the disk space they currently occupy.
Setting up Nginx to Proxy Requests from Domains to a Container
Certain Docker containers are configured to expose ports, making the applications running within them accessible via those specific ports. However, directly accessing applications through non-standard ports in a URL can be inconvenient for website users. To enhance user experience and simplify access, you can configure Nginx to proxy requests from your domains to these container ports, allowing domains to utilize standard ports (such as 80 or 443) without the need to explicitly specify the port in the URL.
Requirements
- Nginx must be actively running within your Plesk environment.
- You must manually map the internal port of the container to a specific port on the host system (e.g., 32768).
To manually map the port inside a container:
- Navigate to Docker > Containers and click the settings icon next to the container you intend to configure.
- Disable the Automatic port mapping option.
- Manually map the internal port of the container to a specific port on your host system (for example, 32768). You have the option to make this host port inaccessible from the internet if desired for security.
Once the port is mapped, you can configure Nginx to proxy requests from your domains to this host port. To achieve this, you need to add a new rule for Nginx within the domain settings:
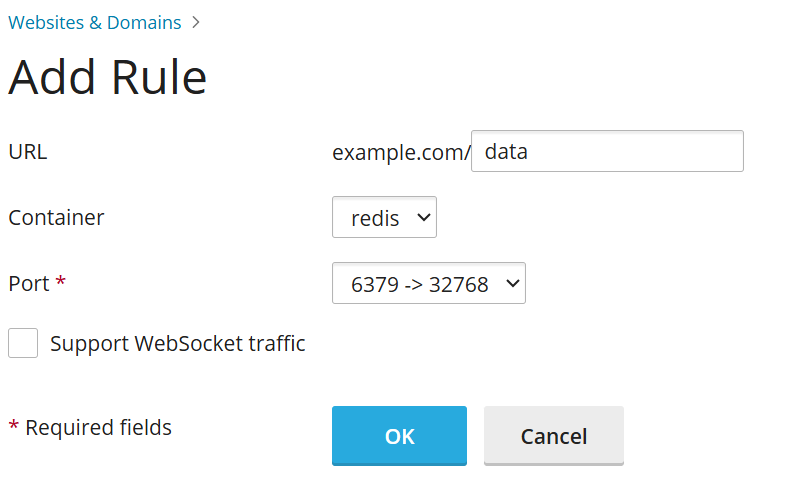
Go to Websites & Domains > select the relevant domain > Docker Proxy Rules > Add Rule, and then specify the following details:
- URL: Define the URL of your website that utilizes the application running in the Docker container. This can be the main website URL or a specific path within it.
- Container: Select the application running as a Docker container from the available list.
- Port: Choose one of the port mappings that you previously defined in the container settings (specifically, the port inside the container mapped to a port on your system). Nginx will then proxy incoming requests to this designated port on your host system.
These proxy rules are implemented directly within the web server configuration, for instance, in the website’s nginx.conf file (typically located in /var/www/vhosts/system/$domain/conf/), appearing similar to this:
#extension docker begin
location ~ ^/.* {
    proxy_pass http://0.0.0.0:9080;
    proxy_set_header Host             $host;
    proxy_set_header X-Real-IP        $remote_addr;
    proxy_set_header X-Forwarded-For  $proxy_add_x_forwarded_for;
}
#extension docker end
It is important to note that proxy rules are designed to function correctly even on servers situated behind Network Address Translation (NAT).
Note: Docker containers connected to a website via Proxy Rules are not counted towards the subscription’s disk space usage. An exception occurs if a website directory is mounted to a Docker container as a volume; in this specific case, all files located within the container will contribute to the disk space usage of the website.
Deploying Docker Compose YAML files
Plesk simplifies the deployment of multi-container Docker applications by supporting Docker Compose YAML files. You can deploy these files through an intuitive online text editor, by uploading a file from your local storage, or by selecting a Docker Compose file already stored within a website’s Home directory. Plesk supports typical stack operations such as up (which includes pull and force-recreate functionalities), stop, and down. You retain the flexibility to modify and update your deployed stacks after their initial creation.
Note: This section is specifically for deploying Docker Compose YAML files and does not support the deployment of Dockerfiles or any other files required by an application.
To deploy a Docker Compose file:
- Navigate to Docker > Stacks > Add Stack.
- Provide a project name and then choose one of the available methods for deploying your Docker Compose file:
- Editor: Directly define or paste the content of your Compose file into the provided text area.
- Upload: Upload a Compose file from your local computer's storage.
- Webspace: Select a Compose file that is already stored within a domain’s Home directory. For this option, you will first choose the domain where the file is located, and then browse to the specific Compose file location.
You have the capability to declare and build custom containers as part of your Docker Compose stack. Any artifacts generated during the build process will be conveniently placed inside the website’s Home directory.
For more detailed information regarding the Docker Compose file format and its capabilities, please consult the official Docker documentation.
Deploying Portainer containers in Docker
Portainer is a comprehensive container management software designed to simplify the deployment of containers and stacks, provide clear visibility into container status and logs, facilitate user and team creation, secure your environments, and much more. It offers a user-friendly interface for managing your Docker ecosystem.
To install Portainer within your Plesk environment, navigate to Docker > Install Portainer. Once the installation process is complete, you can easily access and manage your Portainer containers by going to Docker > Go to Portainer.
Note: Portainer integration is currently available as a beta feature.
For additional information and detailed guidance on using Portainer, please refer to the official Portainer documentation.
