


Ensuring the safety and availability of your website data is paramount. Plesk Obsidian provides robust tools for both manual and scheduled backups, allowing you to protect your configurations, mail messages, databases, and files. This comprehensive guide will walk you through the process of creating and managing backups within Plesk Obsidian.
Creating a Manual Backup
Follow these steps to perform a manual backup of your Plesk environment:
- Navigate to Websites & Domains > Backup Manager > Back up.
- In the "Back up" section, specify the content you wish to include in your backup. Domain configuration is always included. You have the option to exclude "Mail messages" and/or "Databases" by deselecting their respective checkboxes.
- Under "Store in", determine the storage location for your backup. By default, backups are saved on the Plesk server. If you have previously configured remote storage, you can select this option to store your backups externally.
- Select the desired backup type under "Type":
- A Full backup encompasses all data selected in step 2. This is a complete snapshot of your chosen content.
- An Incremental backup includes only the files that have been modified since the most recent previous backup. Incremental backups are generally faster to create and consume less disk space. However, restoring an incremental backup requires the corresponding full backup and all preceding incremental backups to be available.
Note: If no prior backups exist, your initial backup will always be a full backup. Subsequent backups will allow you to choose between full or incremental types. If only "Domain Configuration" was selected in step 2, only a full backup option will be available.
- If you opted for remote storage in step 3, you can divide the backup file into multiple volumes. Activate the "Create a multivolume backup, volume size (MB)" checkbox and then specify the desired volume size. This feature is particularly useful when remote storage imposes limitations on maximum file size.
- Before finalizing the backup creation, you can configure several optional settings:
- Add a descriptive comment about the backup under "Comments". These comments are visible in the Plesk interface and aid in distinguishing between various backups.
- To reduce the backup size, select the "Exclude log files" checkbox to omit log files from the backup.
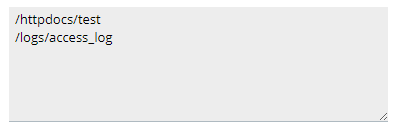
- To exclude specific files or directories, mark the "Exclude specific files from the backup" checkbox. Enter the relative paths to the directories or files you wish to exclude from your home directory. For example:

- If you wish to receive an email notification upon backup completion, select the "When a backup task is completed, send a notification email to" checkbox. Verify that the email address displayed is correct.
- Click OK to initiate the backup process.
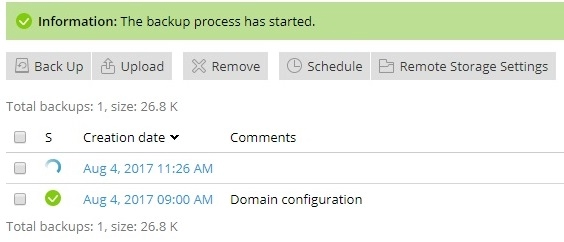
You will be redirected to the Websites & Domains > Backup Manager screen, where you can monitor the backup's progress. The duration of the backup process will vary depending on the amount of content selected in step 2. Once completed, your newly created backup will be listed here.
Creating a Scheduled Backup
Automating your backup process is crucial for maintaining data integrity without constant manual intervention. Here's how to set up scheduled backups in Plesk:
- Access Websites & Domains > Backup Manager > Schedule, and then activate the "Activate this backup task" checkbox.
- Under "Run this backup task", define the desired frequency and the specific time for the backup process to commence. This ensures your backups run consistently.
- Decide whether to enable incremental backups. By default, all scheduled backups are _full_ backups, including all data types specified in step 5.
To enable _incremental_ backups, select the "Use incremental backup" checkbox. Incremental backups capture only changes since the last backup, offering quicker completion times and reduced disk space usage. However, restoring an incremental backup requires access to the corresponding full backup and all intervening incremental backups. If incremental backups are enabled, specify how often a full backup should be performed under "Perform full backup".
- In the "Keep backup files for" field, enter a number if you wish for Plesk to automatically delete outdated full backups. Full backups older than the specified period will be automatically removed, helping manage storage space. Leave this field empty if you prefer to manage full backups manually.
- Under "Back up", select the content you want to include in the scheduled backups. Domain configuration is always included. You can exclude "Mail configuration and content" and/or "User files and databases" by clearing their respective checkboxes.
- For "Store in", choose the location for your scheduled backups. The default is the Plesk server. Should you have configured remote storage, you can select this option for off-server storage.
- If remote storage was selected in the previous step, you can enable multivolume backups. Select the "Create a multivolume backup, volume size (MB)" checkbox and define the volume size. This is beneficial when remote storage imposes file size limitations.
- Before scheduling the backup, consider these optional settings:
- To minimize disk space usage, especially for frequent backups, select the "Exclude log files" checkbox to prevent log files from being included.
- To exclude specific files or directories, mark the "Exclude specific files from the backup" checkbox. Provide the relative paths from your home directory to the files or directories you wish to exclude. For example:
- To receive email notifications for any errors during the scheduled backup task, select the "If errors occur during the execution of this backup task, send a notification email to" checkbox and confirm the accuracy of the email address.
- Click OK to finalize and create the scheduled backup.
Plesk will now automatically generate backups according to your specified schedule and frequency, providing continuous data protection for your websites.
