


Where Did This Plugin Come From?
The LiteSpeed Web Cache Manager plugin for cPanel serves as an essential companion to the LiteSpeed plugin for WHM. This powerful combination allows hosting providers who utilize both LiteSpeed Web Server and the LiteSpeed WHM plugin to seamlessly offer this valuable tool to their cPanel end-users, enhancing their website management capabilities.
Installation
Installing the LiteSpeed Web Cache Manager plugin for cPanel is a straightforward process, made even easier with the LiteSpeed WHM Plugin, specifically from v3.1.0 onwards. This integration streamlines the deployment for administrators.
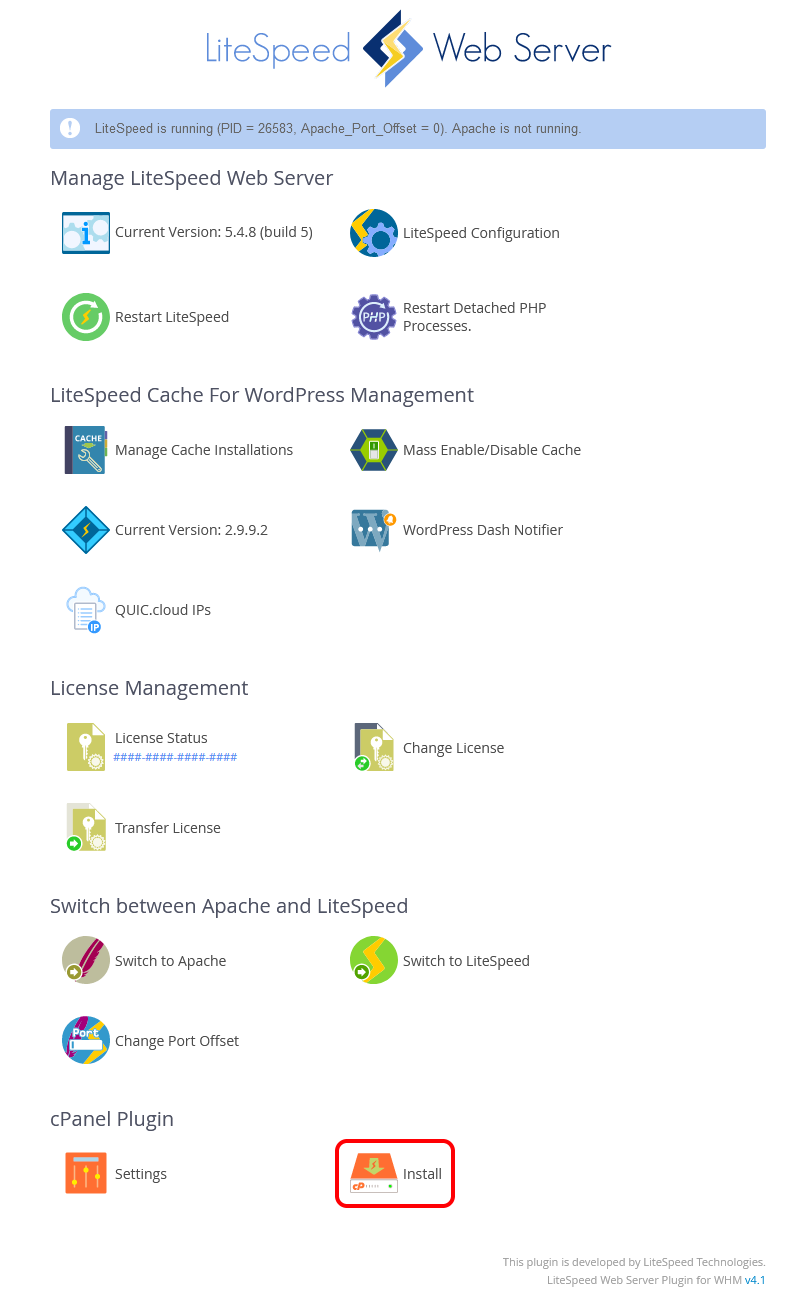
Upon successful installation, the cPanel Plugin section within the WHM plugin interface will update to reflect the new status, indicating that the user-end plugin is now active and ready for use.

Plugin Not Available For cPanel Users?
If the LiteSpeed Web Cache Manager plugin does not appear for your cPanel users even after completing the installation through the LiteSpeed WHM plugin, you can troubleshoot the issue by following these steps:
- Log in to WHM: Access your WHM panel and navigate to the Feature List screen. You can find this under Packages > Feature Manager.
- Manage User Access: From the Feature Manager, you have the ability to either add or remove user access to various plugins by creating or editing existing feature lists.
- Create or Edit Feature List: Select the specific feature list you intend to modify to grant access to the LiteSpeed Web Cache Manager.
- Enable the Plugin: Locate and click the checkbox labeled LS Web Cache Manager. After enabling, press the Save button to apply your changes. This action will integrate the plugin into your chosen feature list, which can then be assigned to a cPanel package if it hasn't been already.
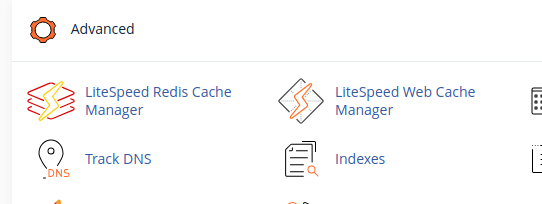
Following these steps, the LiteSpeed Web Cache Manager plugin should now be visible in the Advanced section of the cPanel home screen for all users associated with the package to which this feature list is assigned.
If the LiteSpeed Web Cache Manager item still does not appear in the advanced section of your cPanel home screen, it is essential to ensure that LiteSpeed Web Server is upgraded to at least v5.1.x. Furthermore, to leverage these features, your LiteSpeed license must have LSCache enabled. For more information on obtaining an LSCache-enabled license, please refer to the documentation on How To Get LSCache.
Note: If you wish to install the LiteSpeed Web Cache Manager plugin but do not possess WHM access, please reach out to your server administrator or hosting provider for assistance. They will be able to perform the necessary installation steps on your behalf.
LiteSpeed Redis Cache Manager is an advanced feature exclusively available on sandbox-capable systems, such as CloudLinux or LiteSpeed Containers. This component focuses solely on the Redis functionalities, which are detailed further in the Redis Management section.
Configuration
The LiteSpeed Web Cache Manager plugin for cPanel offers a range of configurable options to fine-tune its behavior. These settings can be accessed and adjusted from the Settings page, located within the cPanel Plugin section of the LiteSpeed WHM plugin.

The following subsections provide a detailed explanation of each available setting, helping you to understand and customize the plugin effectively.
Auto Install
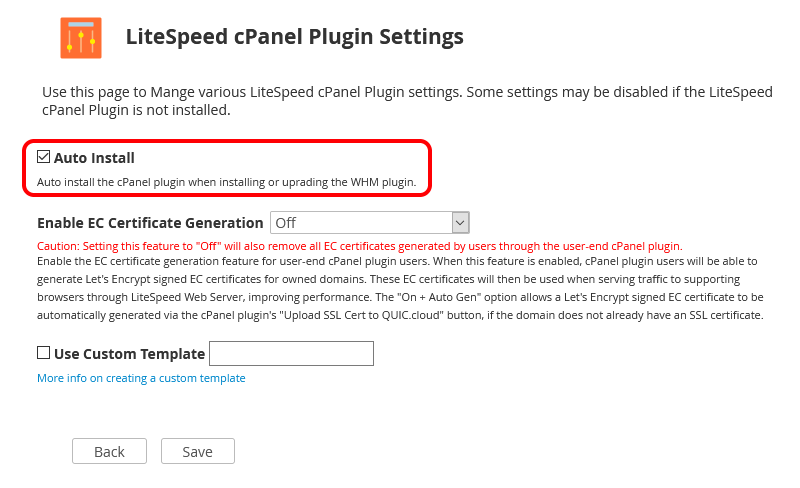
The Auto Install setting dictates whether the LiteSpeed Web Cache Manager plugin for cPanel is automatically installed when the LiteSpeed WHM plugin is either installed for the first time or upgraded. This feature ensures a seamless deployment process for new installations or updates.
Note: This option is automatically checked when the LiteSpeed Web Cache Manager plugin for cPanel is manually installed through the LiteSpeed WHM plugin. Conversely, it will be automatically unchecked if the LiteSpeed Web Cache Manager plugin for cPanel is manually uninstalled via the LiteSpeed WHM plugin, maintaining consistency with manual actions.
Enable EC Certificate Generation
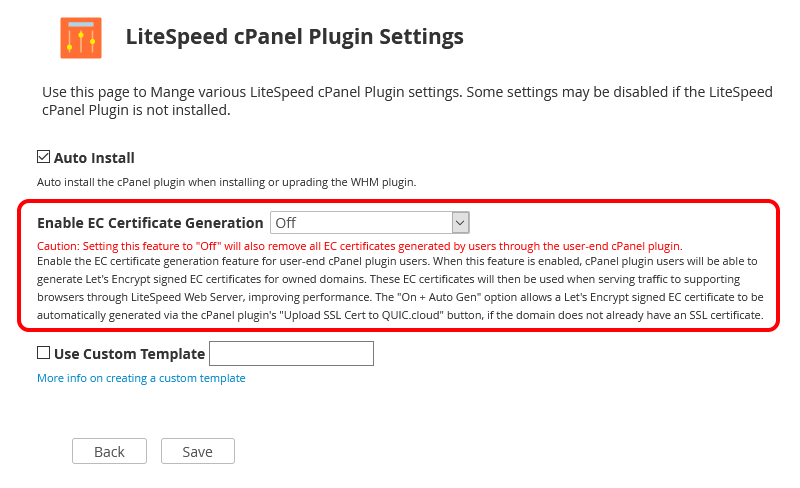
This setting, available in LiteSpeed WHM plugin v4.1 and newer, controls the availability of the EC certificate generation feature within the LiteSpeed Web Cache Manager plugin for cPanel. Once an EC certificate is generated for a domain, LiteSpeed Web Server intelligently uses this certificate when establishing an SSL connection with compatible browsers. This process significantly improves performance compared to SSL connections secured with traditional RSA certificates.
Off: When set toOff, the EC certificate generation feature will be completely disabled. Consequently, the related EC Certificate Management section will not be displayed within the LiteSpeed Web Cache Manager plugin for cPanel.On: ChoosingOnenables EC certificate generation, making the associated EC Certificate Management section visible and accessible within the LiteSpeed Web Cache Manager plugin for cPanel.On + Auto: This setting behaves similarly toOn, with an added automation benefit. If an existing SSL certificate is not detected for a domain, an EC certificate will be automatically generated when the Upload SSL Cert to QUIC.cloud feature is utilized.
Warning: Changing this setting to Off will result in the removal of all EC certificates that have been previously generated through this feature. It is crucial to consider this implication before disabling the option.
Use Custom Template
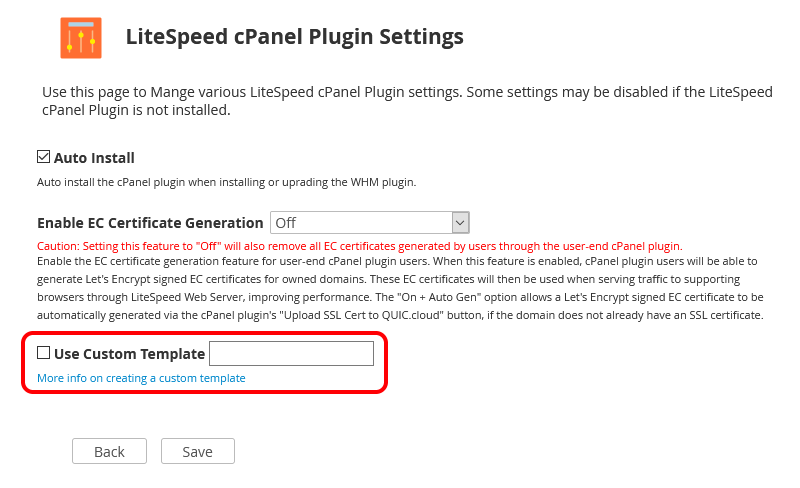
The Use Custom Template setting offers hosting providers a flexible way to customize the appearance and content of the LiteSpeed Web Cache Manager plugin for cPanel landing page. By loading a custom template, providers can modify or entirely replace the default content for all cPanel users without directly altering the core plugin files. This functionality is invaluable for advertising specialized services, promoting unique features, or recommending/upselling relevant hosting packages, thereby enhancing user experience and engagement.
Preparing And Setting A Custom Template
Preparing and implementing a custom template for the LiteSpeed Web Cache Manager plugin for cPanel is a straightforward process, designed for ease of use. Follow these steps to set up your custom template:
- Create Template Directory: Navigate to the directory path
/usr/local/cpanel/base/frontend/paper_lantern/ls_web_cache_manager/landing. Within this location, create a new directory for your custom template. For instance, you might name itmyCustomTemplate. - Populate with Index File: Once your template directory is created, you have two options:
- Copy the existing
index.phpfile from/usr/local/cpanel/base/frontend/paper_lantern/ls_web_cache_manager/landing/defaultinto your new custom directory. This provides a solid starting point for modifications. - Alternatively, you can copy your own custom
index.phpfile into this directory from another location. This file will serve as the entry point for calling any custom code or files required for your new landing page. It will display your customized content while maintaining relative access to all existing classes, functions, and pages already integrated into the plugin.
- Copy the existing
Tip: We strongly recommend creating backups of all your custom template code in a separate, secure location. This precaution helps prevent potential data loss during uninstallation or future upgrades of the LiteSpeed Web Cache Manager plugin. To further safeguard your custom files, consider using a symlink in place of directly copied files within the actual plugin location.
Note: To successfully apply a custom template, first ensure that the LiteSpeed Web Cache Manager plugin has been properly installed through the LiteSpeed WHM plugin.
Once your template is prepared, you can activate it by entering the name of your custom template (e.g., myCustomTemplate) into the Use Custom Template setting field on the cPanel Plugin Settings page, then clicking save. If the specified template folder exists and contains the essential index.php file, the save operation will succeed. From this point forward, all cPanel users accessing the LiteSpeed Web Cache Manager plugin via their cPanel dashboard will see your custom-designed landing page, tailored to your specifications.
Uninstallation
The LiteSpeed Web Cache Manager Plugin for cPanel can be effortlessly uninstalled directly through the LiteSpeed WHM Plugin interface, providing a convenient way to manage installed components.

Warning: Be aware that uninstalling the LiteSpeed Web Cache Manager Plugin for cPanel will also result in the removal of all user-generated EC certificates. This applies specifically when the On or On + Auto option was previously selected for the Enable EC Certificate Generation setting on the LiteSpeed cPanel Plugin Settings page. It is important to back up or consider the implications for any EC certificates before proceeding with uninstallation.
Plugin Breakdown
This section provides a comprehensive overview of the LiteSpeed Web Cache Manager plugin's functionalities, detailing each page and its capabilities. Upon first accessing the plugin page, users are greeted with a main interface comprising five distinct sections, alongside links to dedicated settings and advanced operations pages.
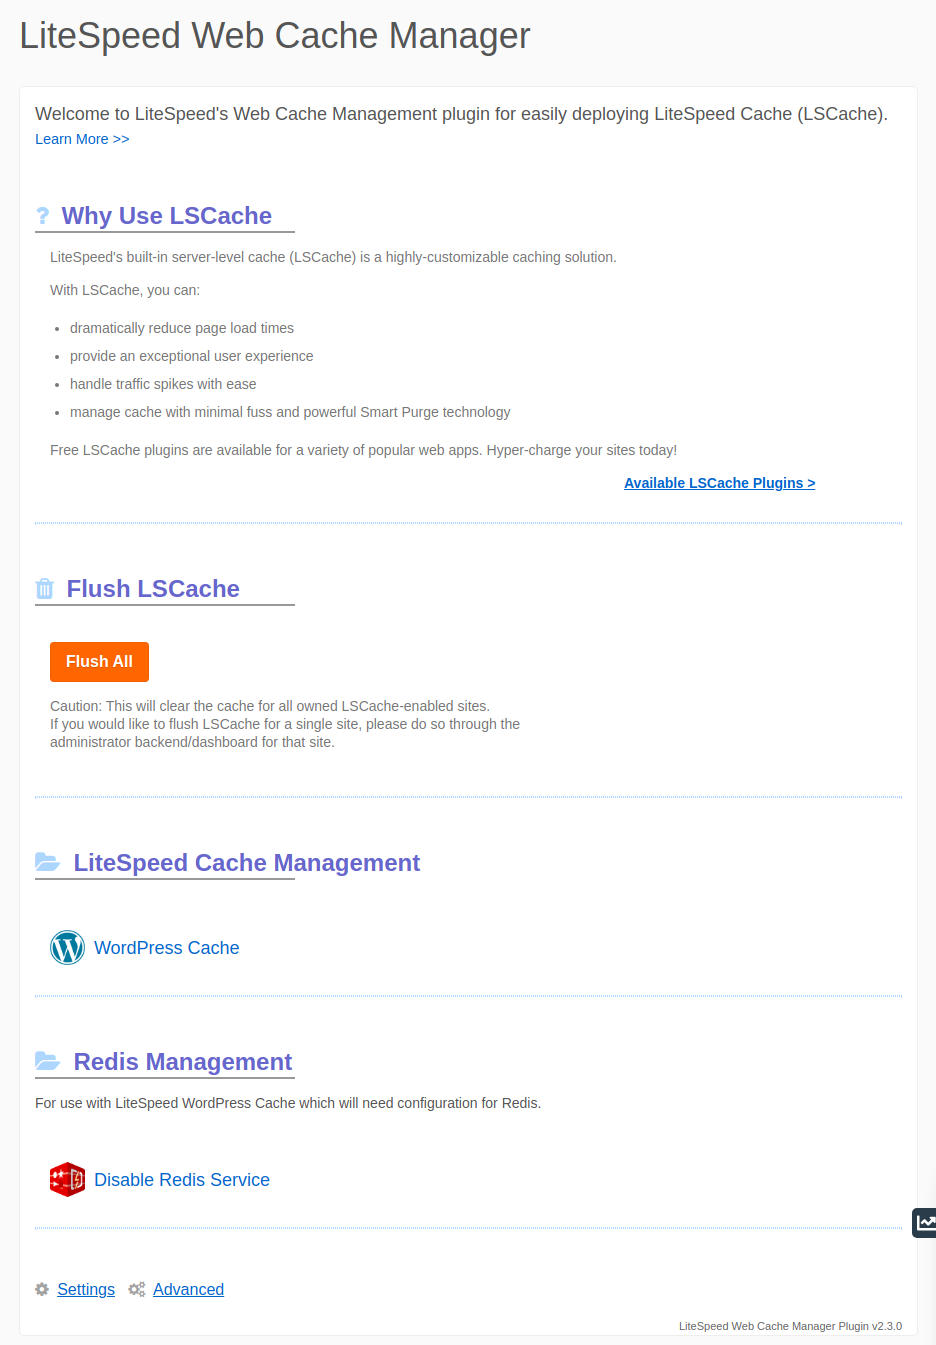
- Why Use LSCache? - This section offers valuable information regarding the benefits of LSCache and provides a link to explore the various available LSCache plugins, accessible via the Available LSCache Plugins page.
- Flush LSCache - Here, users will find a prominent button designed to flush the entire contents of their LSCache folder. Executing this action clears the cache for all owned sites that currently have LSCache enabled, ensuring fresh content delivery.
- LiteSpeed Cache Management - This section contains a convenient link directing users to the LiteSpeed Cache Management page. On this page, administrators can selectively enable and disable LSCWP (LiteSpeed Cache for WordPress) for individual WordPress installations on a per-site basis.
- EC Certificate Management - Provides a dedicated link to the "Manage EC Certificates" page. This interface allows for the generation or removal of EC SSL certificates for owned domains, offering enhanced security and performance.
- Settings - This link quickly navigates users to the main plugin settings page, where various configurable options can be adjusted to suit specific needs.
- Advanced - This link grants access to the advanced operations page, providing tools for more specialized tasks within the plugin.
The LiteSpeed Cache Management, EC Certificate Management, Settings, and Advanced Operations pages are explored in greater detail in the subsequent subsections.
LiteSpeed Cache Management - WordPress Cache
The LiteSpeed Cache Management view is where much of the dynamic control over your WordPress installations takes place. This interface allows you to efficiently manage LSCWP for multiple WordPress installations, either individually or in groups.
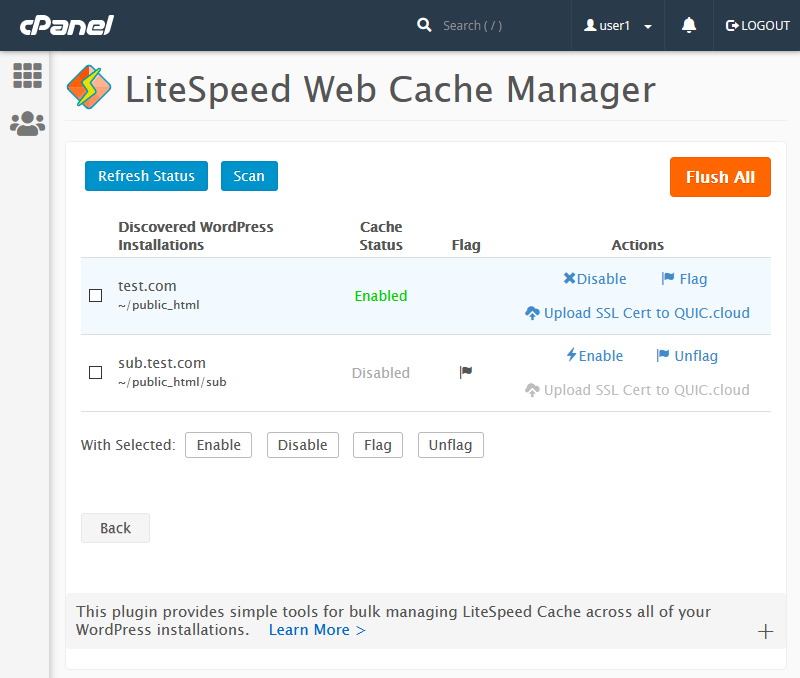
The table presented in this section includes the following critical fields:
- Discovered WordPress Installations: This field displays the complete file path for each WordPress installation that was identified during the most recent scan operation.
- Cache Status: Indicates the last known operational status of LSCWP for the corresponding WordPress installation listed.
- Flag: This field can either be blank or show a distinctive flag icon. When an installation is flagged (i.e., displaying the flag icon), it is specifically excluded from all subsequent Mass Enable/Disable LSCWP operations conducted through the WHM plugin, allowing for granular control.
- Actions: This field provides specific action buttons tailored for each WordPress installation. These actions enable users to individually Enable/Disable LSCWP, Flag/Unflag the installation, and Upload the SSL Certificate to QUIC.cloud for its associated domain.
At the top of the interface, you will find a row of control buttons:
- Refresh Status: This button updates the LSCWP Status for all listed WordPress installations to reflect their most current operational state, ensuring that the displayed information is always up-to-date.
- Scan/Re-scan: Initiates a discovery process to locate all WordPress installations under each cPanel user's defined document root. These newly discovered installations are then saved to a data file and promptly displayed on the manager screen. If this data file happens to be removed or becomes corrupted, simply performing another scan will repopulate the list.
- Flush All: Similar to the button found on the main page, this function clears the contents of your LSCache folder. This action effectively flushes the cache for every owned site that has LSCache enabled, ensuring immediate propagation of changes.
Moving to the bottom of the page, another row of buttons facilitates group operations. These buttons work in conjunction with the checkboxes located next to each discovered installation, allowing you to perform actions on a selected group of WordPress sites simultaneously:
- Enable Selected & Disable Selected: These buttons allow you to simultaneously enable or disable LSCWP for the WordPress installations that you have specifically selected using the checkboxes.
- Flag Selected & Unflag Selected: These buttons provide the ability to set or unset the flag field for your chosen WordPress installations. Remember, flagged installations are deliberately excluded from any Mass Enable/Disable LSCWP operations performed within the WHM plugin, offering precise management.
EC Certificate Management - Manage EC Certificates
The EC Certificate Management interface provides a streamlined way to oversee and control generated EC certificates for your owned domains. This page allows for individual or group management of these certificates, enhancing SSL performance and security.

The table presented on this page includes the following fields:
- Discovered Domains: This field lists the domain name and the corresponding path of each domain that was discovered during the last scan operation.
- EC Cert Exists: Displays whether an EC certificate has been successfully generated for the listed domain. This status is based on the outcome of the most recently performed EC certificate action and, if applicable, also shows the relevant generate or remove action button.
- Domains Covered By Cert: This field enumerates all domains that are currently secured by the generated EC certificate. It will appear blank if no EC certificate exists for the domain.
- Last Generation Message: Shows the most recent message returned after an EC certificate generation attempt for this specific domain, providing feedback on the process.
At the top of the interface, you will find a row of general control buttons:
- Update List: This action discovers all domains owned by the user. These discovered domains are then stored in a data file and subsequently displayed on the manager screen. Should this data file be accidentally removed or become corrupted, simply performing another update will repopulate the list.
- Generate All: This button attempts to generate an EC certificate for every single discovered domain listed, automating the process for multiple domains.
- Remove All: Selecting this option will remove all generated EC certificates across all domains managed through this interface, providing a quick way to clean up certificates.
Towards the bottom of the page, a row of buttons is dedicated to performing group operations. These buttons operate in conjunction with the checkboxes situated next to each discovered domain, enabling you to execute basic actions on a selected subset of domains:
- Generate Selected & Remove Selected: These buttons empower you to either generate new EC certificates or remove existing ones for the domains you have specifically selected using the provided checkboxes.
Settings
The Settings page within the plugin provides control over various plugin-related configurations. Currently, one key setting is available to manage the logging behavior of the plugin.
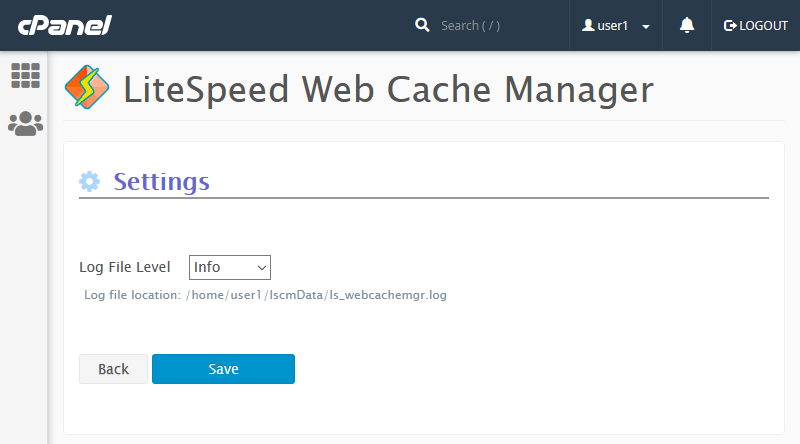
- Log File Level: This crucial setting determines the highest severity level of log messages that will be recorded in the log file, which is conveniently located at
/home/$user/lscmData/ls_webcachemgr.log. The default value for this setting is typically set toINFO, capturing informational messages alongside warnings and errors. Adjusting this level allows administrators to control the verbosity of the logs according to their monitoring needs.
Advanced
The Advanced Operations page provides access to specialized functions within the plugin. Currently, one significant advanced operation is available for managing PHP processes.
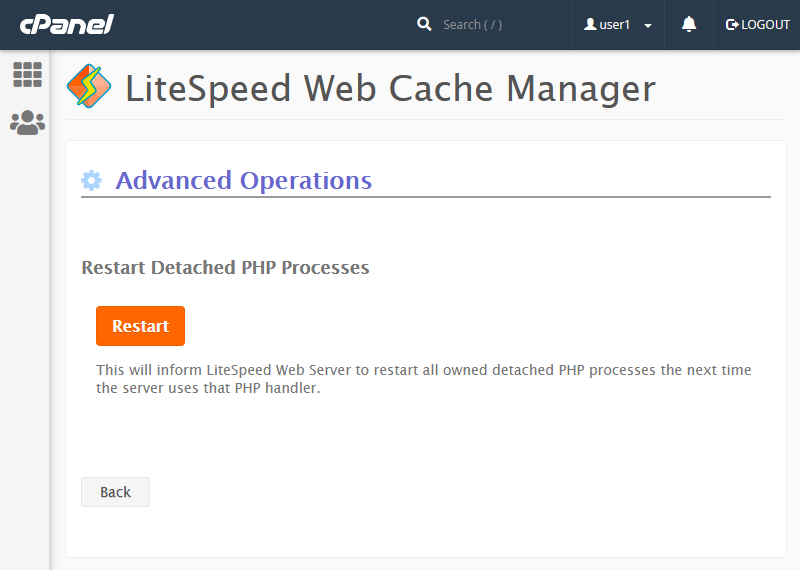
- Restart Detached PHP Processes - This function is utilized to signal LiteSpeed Web Server to restart all detached PHP processes associated with the current user. This restart will take effect the next time the server processes a request using that specific PHP handler, which can be useful for applying changes or resolving issues related to PHP execution.
Redis Management
For users operating on sandbox-capable systems such as CloudLinux or LiteSpeed Containers, the LiteSpeed Web Cache Manager offers robust Redis Management capabilities. This feature is accessible from the cPanel Advanced group, specifically under LiteSpeed Redis Cache Manager, and allows for seamless control over the Redis service.
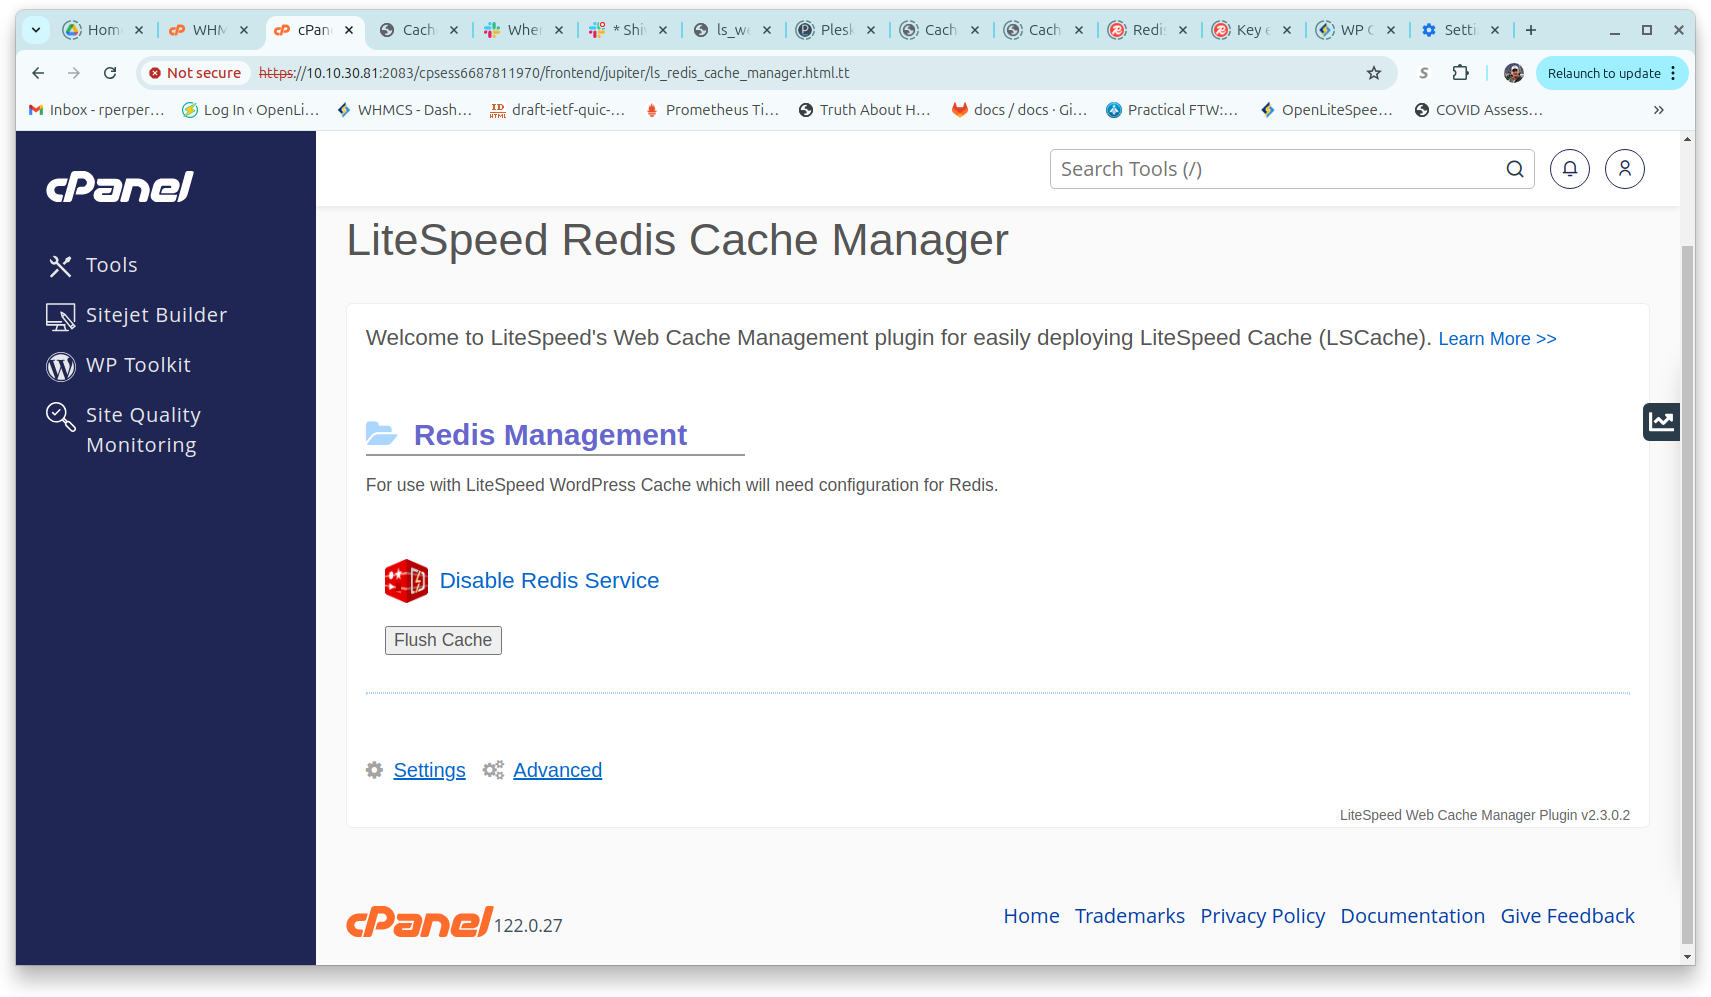
If the Redis service is configured or a default setup is present on your system, you will be presented with the option to Enable Redis Service. Selecting this option will initiate the creation and startup of the Redis service for your environment.
Conversely, if the Redis service is already active, you will see the option to Disable Redis Service. Choosing this will stop the running Redis service and disable it. Please note that both enabling and disabling actions require confirmation to proceed, ensuring intentional changes.
The Flush Cache button is available to clear the Redis Cache. This operation is typically performed after a software update or a data upgrade to invalidate all existing cache information, forcing the system to repopulate the cache with fresh data and ensure consistency.
Translations
As of the cPanel user-end plugin v1.2.2, a dedicated lang/ directory has been incorporated, facilitating custom translations for all plugin text. The language used for these translations dynamically adjusts based on the locale selected within the user's cPanel dashboard.
The lang/ directory will also house any translations officially submitted to LiteSpeed for inclusion in the plugin package. It is important to note that these official translations will be superseded if any custom translations for a particular locale are present within the lang/cust/ directory, giving precedence to user-defined language packs.
Detailed instructions for translating the plugin are provided in the README file located within the plugin's lang/cust/ directory. For your convenience, the key information from this README file is summarized below:
To provide your own custom translations for the LiteSpeed Web Cache Manager user-end cPanel plugin, based on the language selected in a user's cPanel dashboard, follow these steps:
- Choose a cPanel locale: Identify the specific cPanel locale you wish to provide translations for. A comprehensive list of available locales can be found in WHM under Home >> Locales >> View Available Locales.
- Create Directory Structure: Once a locale is chosen (e.g., 'fr' for French), create a directory for that locale under the plugin's
lang/cust/directory, using the exact same name as the locale (e.g.,lang/cust/fr/). Inside this locale directory, create anen_US/directory, and then anLC_MESSAGES/directory withinen_US/. The complete structure would resemble:lang/cust/fr/en_US/LC_MESSAGES/.Note: The
en_USdirectory serves as a workaround for Linux systems that might lack certain locales, asen_USis commonly installed. If you encounter issues with translations appearing, confirm that theen_US.utf8locale is installed on your system. Also, as long as thelang/cust/frdirectory exists, it will always be prioritized for translation files, regardless of whether any exist. To revert to using official translations, you must remove or rename the custom locale directory. - Generate or Copy
messages.po: Generate amessages.pofile for your desired language based on themessages.potfile provided in the mainlangdirectory. Alternatively, if an officialmessages.pofile already exists for your locale under thelangdirectory, you can copy it as a starting point. - Update
messages.po: Proceed to update the generatedmessages.pofile with your new translations. It is also important to update themessages.pofile header information if you haven't done so already. - Generate and Place
messages.mo: Based on your updatedmessages.pofile, generate a correspondingmessages.mofile. Both themessages.poandmessages.mofiles must then be placed into the customLC_MESSAGESdirectory that you created earlier. - Confirm Translations: Finally, visit the LiteSpeed user-end cPanel plugin through a cPanel dashboard where the target locale is selected, and confirm that your custom translations are now appearing correctly.
Caution: Any custom translation files you create will be permanently lost upon uninstalling the LiteSpeed Web Cache Manager user-end cPanel plugin. To prevent the loss of these valuable files, please maintain a separate backup copy of all your custom translation files in an external location.
These instructions should provide all the necessary guidance to begin using custom translations with the LiteSpeed user-end cPanel plugin. If you wish to contribute your custom translations for inclusion as official translations in future versions of the plugin, or if you have updates for existing official translations, please send an email, including the locale and both the messages.po and messages.mo files, to [email protected].
