


A domain name serves as a human-readable internet address that enables users to access websites and online services. The critical process of translating these human-readable names into machine-readable IP addresses is handled by the Domain Name System (DNS). Correct DNS configuration is paramount for the seamless operation of your online services; misconfigurations can lead to service disruptions, such as website unavailability or email delivery failures.
Plesk is capable of functioning as either a primary or a secondary name server for your domains. While DNS settings are typically configured automatically upon domain setup, the Plesk interface provides the flexibility to view and modify these settings as needed. Furthermore, if your domain's DNS service is entirely managed by third-party name servers, you have the option to disable the DNS service within Plesk, ensuring no conflicts.
Adding and Modifying DNS Records
Note: This section is specifically designed for advanced users. Incorrectly configuring DNS settings can significantly impair the accessibility of your website and mail services, potentially leading to downtime. We advise exercising extreme caution when making any changes.
For every new domain name established in Plesk, a corresponding DNS zone is automatically created. This creation adheres to the default settings provided by your service provider, ensuring your domain is operational from the outset. This automatic configuration is generally sufficient for proper domain operation. However, if you are utilizing the Plesk name server (NS server) and require custom modifications within the domain's DNS zone to meet specific operational requirements or integrate third-party services, you can easily perform these adjustments through your control panel.
Viewing Resource Records
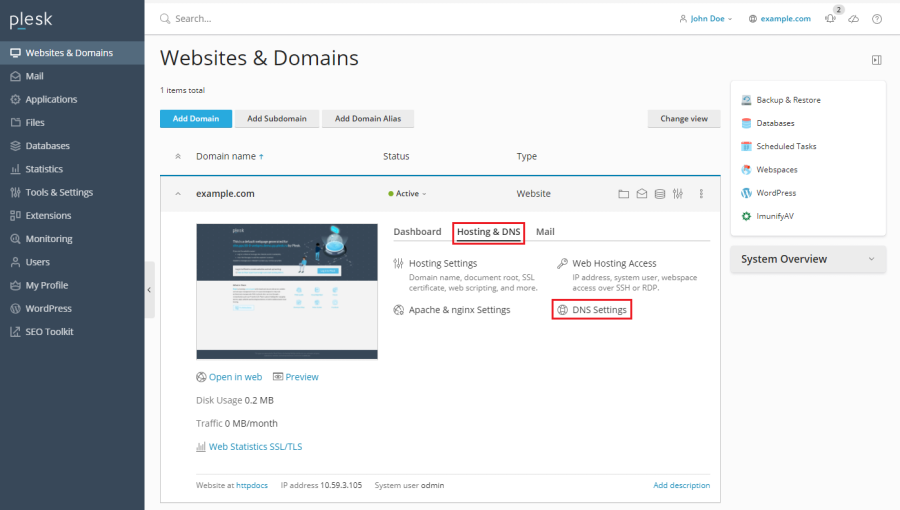
To inspect the existing resource records that define your domain's DNS zone, navigate to the Websites & Domains section in your Plesk panel, then select DNS Settings. This view provides a comprehensive list of all configured records.
Adding a New Resource Record
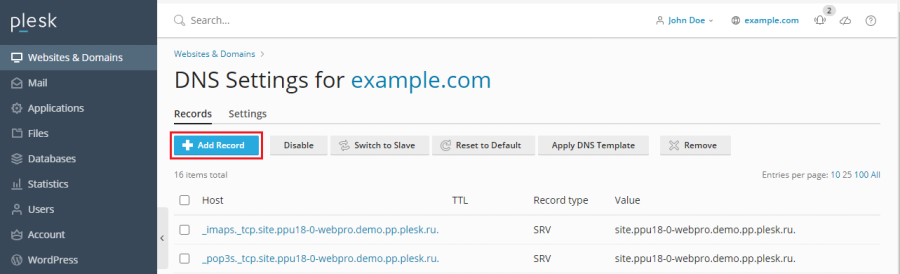
Should you need to introduce a new resource record—such as an A record, MX record, or CNAME record—to the DNS zone, proceed to Websites & Domains > DNS Settings, and then click the Add Record button. You will then be prompted to specify the record type and its corresponding values.
Modifying an Existing Resource Record
To adjust the properties of an already existing resource record, such as changing an IP address or mail server priority, go to Websites & Domains > DNS Settings and simply click on the specific record you wish to modify. This action will open an editing interface where you can update the record's details.
Beyond the standard resource records that direct traffic, each DNS zone includes a crucial Start of Authority (SOA) record. This record signifies that the particular DNS name server is authoritative for the domain's DNS zone, meaning it holds the master copy of the DNS information. The SOA record also encompasses vital settings that govern the propagation of information about the DNS zone throughout the broader Domain Name System, influencing how frequently other DNS servers query for updates and the expiry of cached records.
Using External DNS Servers
In scenarios where you host websites on your account but prefer not to designate Plesk as your primary DNS server, you have several flexible options available to manage your DNS. These options cater to different external DNS setups, ensuring you maintain full control over your domain's name resolution while leveraging Plesk for hosting.
Operating Plesk as a Secondary Name Server
If you have a dedicated standalone name server that acts as the primary name server for your websites, you can configure Plesk to function as a secondary name server. This setup provides redundancy and improved reliability for your DNS resolution, ensuring that if your primary server experiences issues, Plesk can still respond to queries.
To enable this configuration, navigate to Websites & Domains > DNS Settings and click Switch to Secondary.
Disabling DNS Service in Plesk
For situations where you utilize entirely external primary and secondary name servers that are authoritative for your websites, you can choose to completely disable the DNS service within Plesk. This prevents Plesk from attempting to manage DNS for your domain, deferring all name resolution responsibilities to your external providers.
To switch off Plesk’s DNS service for a site served by external name servers, navigate to Websites & Domains > DNS Settings and click Disable.
Reverting to Plesk as the Primary Name Server
Should you decide to restore Plesk as the primary name server for your domain after previously configuring it as a secondary server or disabling its service, the process is straightforward.
To revert the Plesk DNS server to its role as the primary name server, go to Websites & Domains > DNS Settings and click Switch to Primary. This action will re-enable Plesk's authoritative DNS service for your domain.
