
 Nederlands
This document explains how to connect to a File Transfer Protocol (FTP) server using either active or passive mode.
Important:
By default, the system enables passive ports
49152through65534for Pure-FTPd and ProFTPD servers. If you utilize the ConfigServer Security & Firewall (CSF) firewall plugin, the system also automatically adds these passive port ranges to your server’s firewall.However, if you are using
nftables,firewalld, oriptablesfor your firewall, you must manually configure the firewall settings for the passive ports. For more comprehensive information about firewall configurations, please refer to our How to Configure Your Firewall for cPanel & WHM Services documentation.
Understanding Active and Passive FTP Modes
FTP employs both a data port and a command port to facilitate information transfer between a client and a server. In a typical active mode session, port 21 is used for commands and port 20 for data. Conversely, in a passive mode session, the data port does not consistently use port 20.
Active Mode
In active mode, after establishing a connection, the FTP server attempts to initiate a separate data connection back to the FTP client from a different port. This server-initiated connection request is often blocked by Network Address Translation (NAT) configurations.
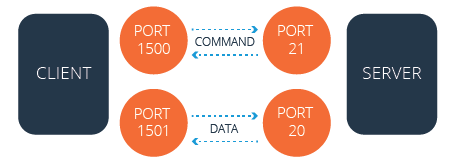
Firewalls commonly block the server’s attempt to establish this data connection with the client because it originates from a port different from the initial command connection.
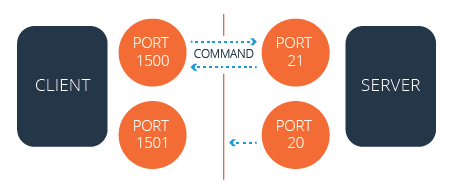
Passive Mode
In passive mode, the FTP client initiates both the command and data connection attempts. This approach typically ensures that NAT configurations do not block the connection requests, as the client is always the initiator.
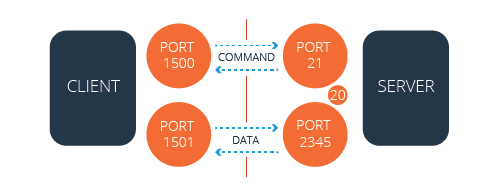
The firewall does not block the server’s communication attempt in passive mode, as both connection requests are initiated by the client.
Note:
If FTP users are located behind a NAT configuration on a private network, it is essential to enable FTP's passive mode and open the passive port range within your FTP server’s configuration file. You may also need to open this passive port range on your firewall.
Configuring FTP Servers for Passive Mode
The following sections detail how to modify the default configurations for Pure-FTPd and ProFTPD servers.
Note:
- A local configuration file allows you to define custom settings that override the default settings found in the main configuration file.
- Passive ports
49152through65534are enabled by default for both Pure-FTPd and ProFTPD servers.
Pure-FTPd Server Configuration
To modify the FTP configuration for a Pure-FTPd server, follow these steps:
- Log in to your server as the
rootuser via SSH. - Open the
/var/cpanel/conf/pureftpd/localfile using a text editor. If this file does not exist, create it. - Add your desired changes to the file. If your FTP server operates behind a NAT configuration, set the
ForcePassiveIPoption to your FTP server’s public IP address. For example:ForcePassiveIP: 203.0.113.0If your server is not in a NAT configuration, leave the
ForcePassiveIPoption undefined.Important:
Only one
ForcePassiveIPentry is permitted within a configuration file. - If you wish to change your server’s default passive port range, execute the following commands:
echo "PassivePortRange: 49152 65534" >> /var/cpanel/conf/pureftpd/local /usr/local/cpanel/scripts/setupftpserver pure-ftpd --force - Configure your server's firewall to permit the passive port range. Refer to the Firewall Configuration for Passive FTP section below for instructions.
- Restart the Pure-FTPd service using the following command:
/usr/local/cpanel/scripts/setupftpserver pure-ftpd --force
ProFTPD Server Configuration
To modify the FTP configuration for a ProFTPD server, follow these steps:
- Log in to your server as the
rootuser via SSH. - Open the
/var/cpanel/conf/proftpd/localfile using a text editor. If this file does not exist, create it. - Add your desired changes to the file. If your FTP server operates behind a NAT configuration, set the
MasqueradeAddressoption to your FTP server’s public IP address. For example:MasqueradeAddress: 203.0.113.0If your server is not in a NAT configuration, leave the
MasqueradeAddressoption undefined.Important:
Only one
MasqueradeAddressentry is permitted within a configuration file. - If you wish to change your server’s default passive port range, execute the following commands:
echo "PassivePorts: 49152 65534" >> /var/cpanel/conf/proftpd/local /usr/local/cpanel/scripts/setupftpserver proftpd --force - Configure your server's firewall to permit the passive port range. Refer to the Firewall Configuration for Passive FTP section below for instructions.
- Restart the ProFTPD service using the following command:
/usr/local/cpanel/scripts/setupftpserver proftpd --force
Firewall Configuration for Passive FTP
Note:
The system automatically enables passive ports
49152through65534for Pure-FTPd and ProFTPD servers by default.
However, you may still need to manually add your FTP server’s passive port range to your firewall, depending on your firewall solution.
Configuring ConfigServer Security & Firewall (CSF)
If you are using the CSF plugin to manage your server’s firewall, open the /etc/csf/csf.conf file and verify that the passive port range is included at the end of the TCP_IN line. The system typically adds your FTP server’s passive port range to the firewall by default. For more detailed information on installing and utilizing CSF, please visit the CSF website.
Warning:
CSF is incompatible with the
firewalldutility. If you choose to install CSF, you must remove thefirewalldutility by running theyum remove firewalldcommand.
Configuring nftables
For servers running AlmaLinux OS, CloudLinux™ 8 or higher, or Rocky Linux™ that use the nftables framework, execute the following commands to add the passive port range to your server’s firewall:
nft add rule filter INPUT tcp dport 49152-65534 accept
nft -s list ruleset | tee /etc/sysconfig/nftables.conf # to save the ruleset post reboot
The nftables ruleset for your server can be found in the /etc/sysconfig/nftables.conf file.
Configuring firewalld
If you are using the firewalld application on a CentOS 7, CloudLinux 7, or Red Hat® Enterprise Linux® (RHEL) 7 server, run the following commands to add the passive port range to your server’s firewall:
firewall-cmd --permanent --zone=public --add-service=ftp
firewall-cmd --permanent --add-port=49152-65534/tcp
firewall-cmd --reload
Configuring iptables
For FTP servers utilizing the iptables application for firewall management, follow these steps to add the passive port range:
- Install the
iptables-servicespackage if it is not already present on your server. This package provides theiptablesandip6tablesservices, which are not included with the coreiptablesapplication. To install, execute:yum install iptables-services - Run the following commands to add the rules to the firewall and save the configuration:
iptables -I INPUT -p tcp --dport 49152:65534 -j ACCEPT
service iptables save
Troubleshooting with SolusVM and Xen
Users who employ SolusVM and Xen® on a CloudLinux server may encounter issues with Passive FTP. These problems might manifest as firewall or other connection-related errors, even in the absence of an active firewall.
To resolve these issues, perform the following steps:
- Replace the line
IPTABLES_MODULES=ip_conntrack_netbios_nsin the/etc/sysconfig/iptables-configfile on the VPS node with the following entry:IPTABLES_MODULES=ipt_REJECT ipt_tos ipt_TOS ipt_LOG ip_conntrack ipt_limit ipt_multiport iptable_filter iptable_mangle ipt_TCPMSS ipt_tcpmss ipt_ttl ipt_length ipt_state iptable_nat ip_nat_ftp ipt_owner ipt_REDIRECT - Restart the
iptablesservice by running theservice iptables restartcommand.
Advanced Troubleshooting for FTP Passive Mode
If your NAT-configured server is unable to establish Passive FTP connections to other IP addresses on the same server, you can set the ForcePassiveIP option with a tilde (~) character. The system interprets this character as an undefined directive, which prevents automatic modifications to the /etc/pure-ftpd.conf or /etc/proftpd.conf files.
